

In this guide, we will explain how to use email aliases to send campaigns through Snov.io.
Snov.io allows you to use aliases of your primary mailbox or aliases from a different domain/email provider, but you need to set them up correctly before connecting to Snov.io.
To send emails using an alternate address, you can configure an alias in your email account settings, whether it’s Google Workspace, Outlook, or any other provider.
TL:DR; Here is a brief summary of how to use Gmail aliases with Snov.io. Continue reading for step-by-step guidance.
- Add new email account.
- Enter alias as a “From email” address.
- Click on the Use different account name checkbox.
- Enter your primary Gmail address to the Username field that appeared.
- Enter the app password created for the primary Gmail account to the App password field.

Worth noting: Aliases are not automatically signed with DKIM keys. Configuring DKIM keys for your aliases will improve your deliverability.
Use case #1: Using internal Google Workspace aliases
- Step 1: Add email alias in Gmail
- Step 2: Generate your app password
- Step 3: Connect alias to Snov.io as “From email”
Use case #2: Using aliases from a different domain/email provider
- Step 1: Add an alias to your primary email
- Step 2: Confirm access in your alias email account
- Step 3: Configure forwarding from alias to primary email address
- Step 4: Connect alias to Snov.io as a sender via SMTP
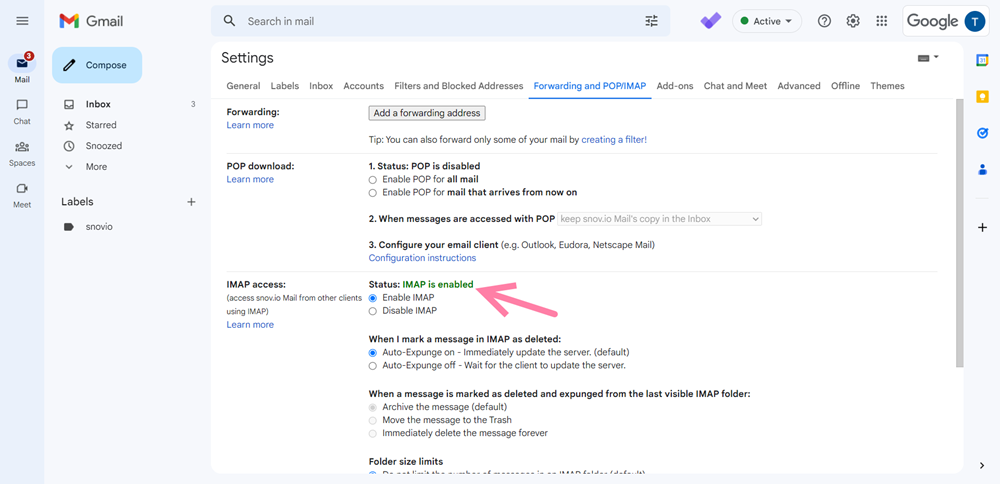
Before you begin with Use case #1 or Use case #2, make sure to check your mail settings and ensure that IMAP access is enabled. For example, here’s how to do that in Gmail.
- Open your Gmail account.
- Click on the gear icon in the top-right corner.
- Select See all settings.
- On the Settings page, open the Forwarding and POP/IMAP tab.
- Scroll down to the IMAP Access section.
- Ensure that Enable IMAP is selected.

Use case #1: Using internal Google Workspace* aliases
For this use case, you will learn how to use internal Google Workspace aliases in your sender email account settings.* The use case is applicable only to aliases created by the admin for a Google Workspace user.
Using aliases added to your primary Workspace account helps you manage incoming emails more effectively:
For example, you can create suitable aliases for work-related or personal communication.
If you have multiple roles, you can manage emails associated with each role separately, while still receiving all incoming emails and responses in your primary inbox.
Important:
Google Workspace aliases are like “nicknames” for your main email. Instead, they use the same mailbox and account details as your main account.
It’s not possible to warm up email aliases or use them as separate email sender accounts in Snov.io.
Remember, aliases count towards your daily sending limit on your main email account. To stay within the limit, calculate the total limit for all aliases in your Google Workspace.
To create aliases, you will need Workspace admin access. If you don’t already have an alias, you can ask the administrator in charge of your corporate Workspace to add one to your primary email.
If you already have an alias, follow the steps below to add it to your primary email and use it in Snov.io:
Step 1. Add email alias in Gmail
First, you need to add an alias address in your primary Gmail settings.
Here’s how to do it:
- Open your primary Gmail inbox.
- Click on the gear icon at the top right corner and select See all settings.
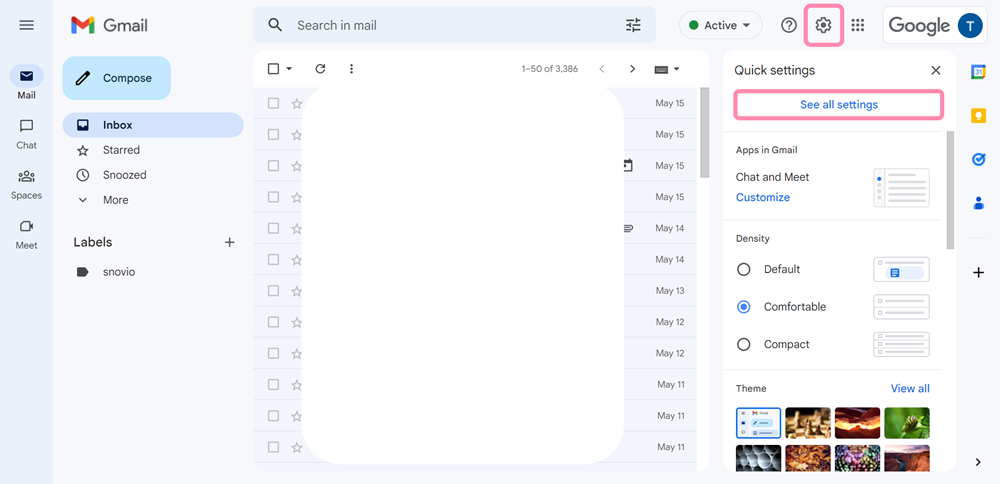
- On the Settings page, open the Accounts tab.
- In the Send mail as section, click on Add another email address (1).
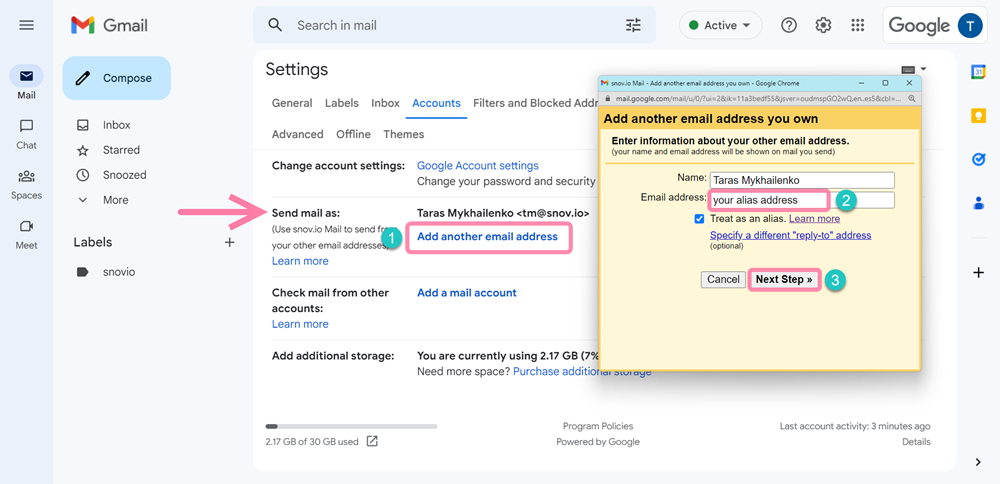
- A pop-up window will appear where you need to enter the alias address created for your Google Workspace user by the admin (2).
- Remember to keep the Treat as an alias checkbox selected.
- Click on the Next step button (3).
Step 2. Generate your app password
The next step is to generate an app password for your Gmail account with the alias set up.
An app password lets you connect your primary Gmail account to Snov.io via SMTP. You can find instructions on how to create an app password here.
Here’s a quick recap of how to create an app password:
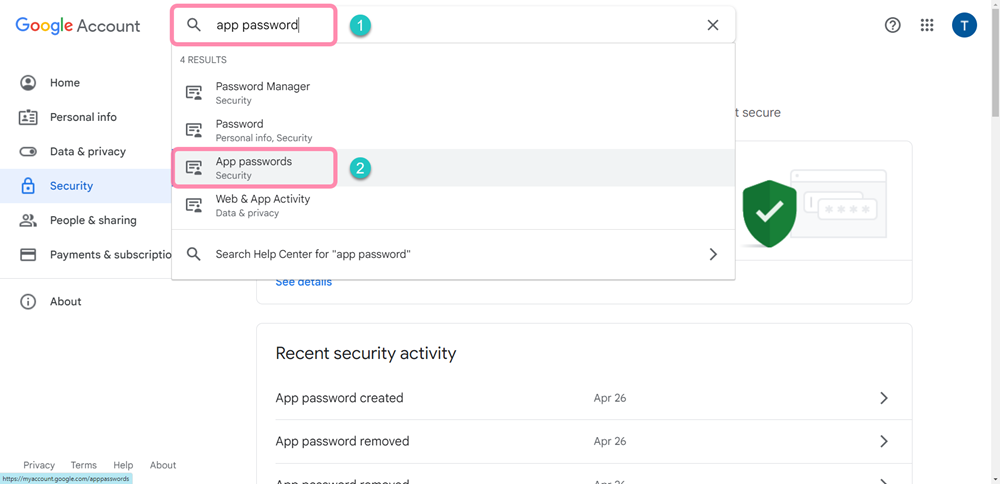
- In your Google Account settings, type “app password” into the search bar (1) and select “App passwords” under the Security menu (2).
- Follow the on-screen instructions to proceed.
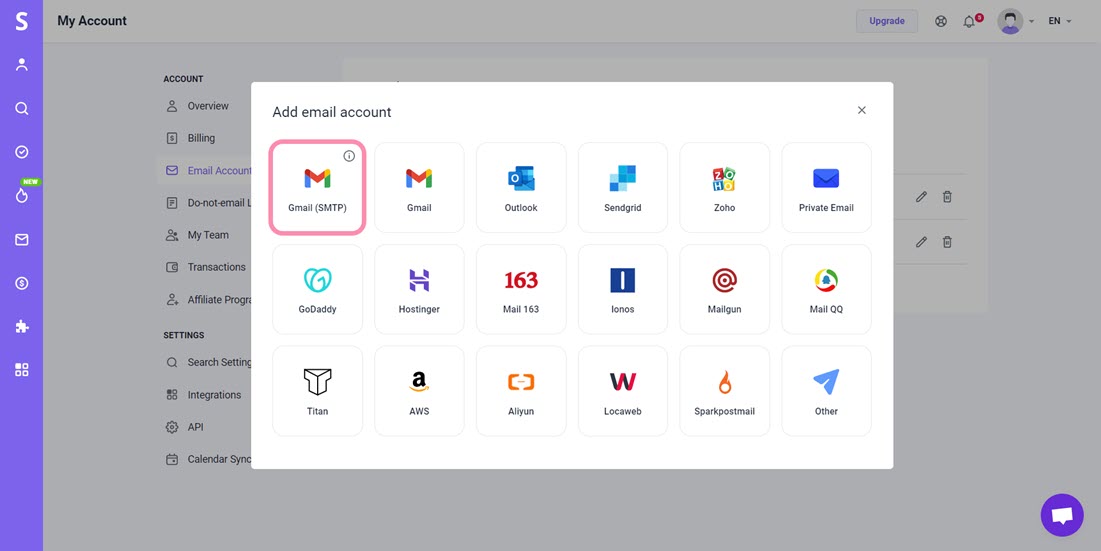
Step 3. Create new email account in Snov.io
- Go to the Email Accounts page.
- Click the Add email account button to start adding a new account.
- From the list of email service providers, select Gmail (SMTP).

Step 4. Connect your primary Gmail
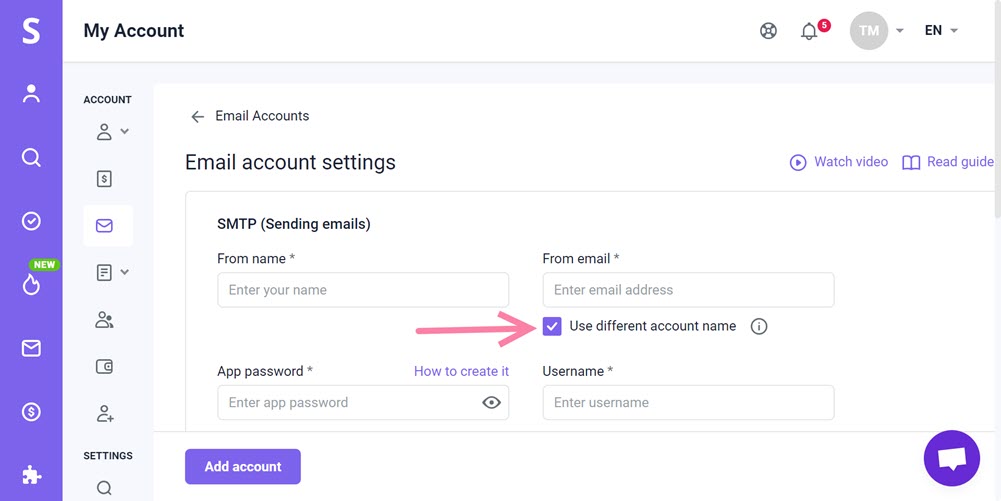
Next, connect your primary Gmail account as the SMTP username.
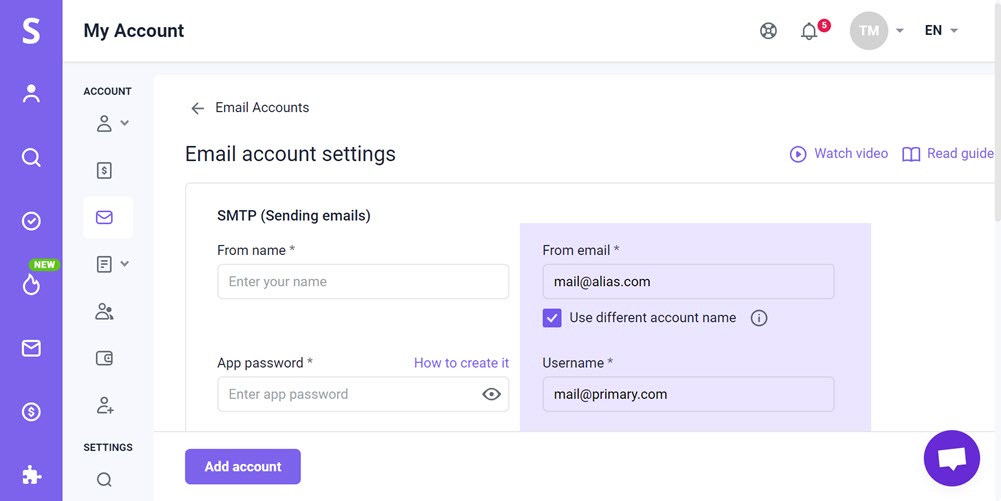
- Click on the Use different account name checkbox.
- Enter your primary Gmail address to the Username field that appeared.
- Enter the app password created for the primary Gmail account in Step 2.
Step 5. Add your alias as “From” email
Finally, add your alias address into the From email field.
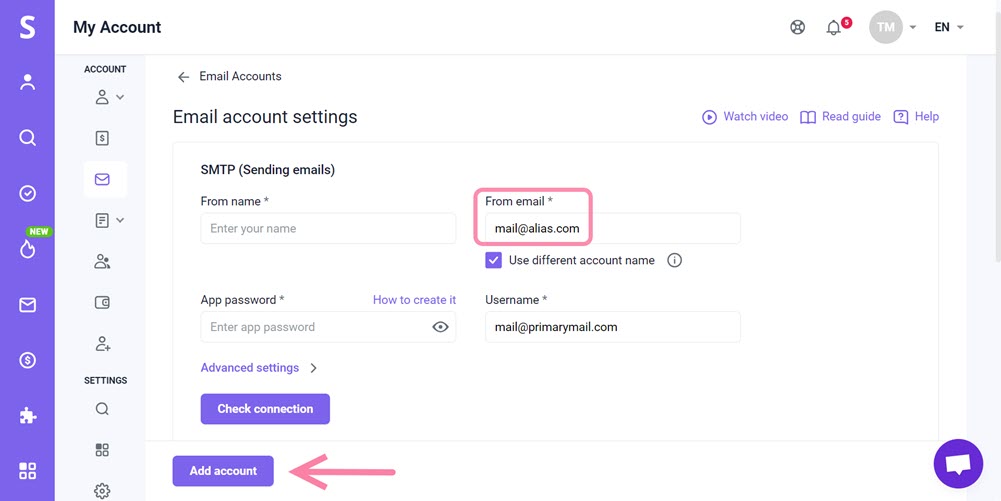
Click Check connection to test the connectivity.
After confirming a successful connection, click Add account.
Once you have completed the email setup, you can start sending email campaigns with your alias as “From email”.
Here’s a quick summary of how it works:
- In the campaign builder, on Step 3 (Sending options), choose your alias as the sender account.
- When your recipients receive the email, it will appear as if it’s coming from your alias address.
- Any replies you receive to the email alias will appear in your primary mailbox.
- You can continue the conversation with the recipient using either your primary email or the alias email directly in your email client.
- While composing your email, click on the From field.
- Select the email address you want to send the email from (either your primary or alias address).
Use case #2 Using an alias from a different domain/email provider
For this use case, we will explain using an alias from a different domain/email provider for your primary Google Workspace (as an example) account.
In Snov.io, you have the option to connect and send emails from an alias address that is added to your primary email account on any provider.
An alias address allows you to receive emails from different email addresses into your primary inbox, making it convenient to manage communications from multiple email accounts in one place.
For example, let’s say you send emails from both email1@domain.com and email2@domain.com, but you want to have all email threads in a single inbox, primary@mail.com.
In such a case, you should add email1 and email2 as aliases to your primary@mail.com.
Step 1: Add an alias address in your primary Gmail*
*We’ll show how to do this in Gmail, but please note that the steps may vary slightly depending on your email provider.
Begin by adding your alias email address in your primary Gmail’s settings.
- Sign in to your primary Gmail inbox.
- Click on the gear icon in the top-right corner → select See all settings.
- In the Settings menu, open the Accounts tab.
- Under the Send mail as section (1), click on the Add another email address option.
A new window will pop up, asking you to enter the new email address you want to add as an alias. Type in the email address associated with your alias email account (2).
Click on the Next Step button (3).
In the next window, you will be asked to configure the SMTP server for the alias email address. Enter SMTP server address and your SMTP email credentials.
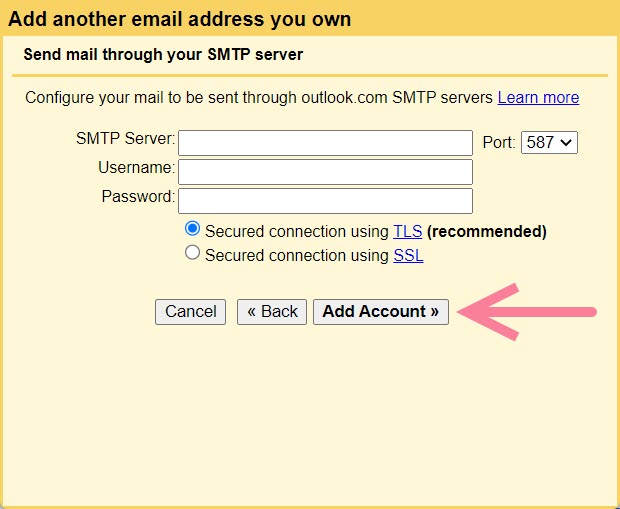

Click Add account when completed.
Step 2. Confirm access in your alias email account
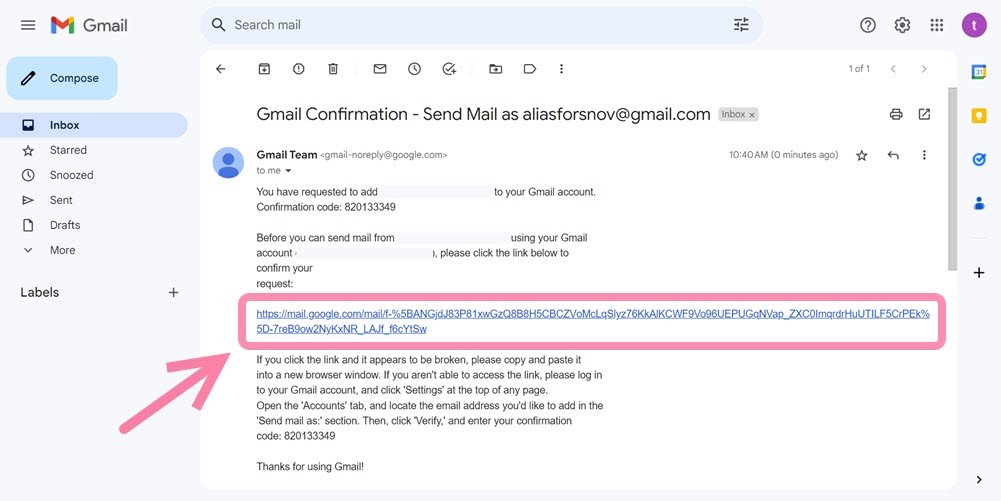
Gmail will send a verification email to the alias address you provided.
Open your alias email client and find the verification email from Gmail. If you can’t find it, check the spam or junk folder.
Click on the verification link inside the email. This confirms that you own the alias address.
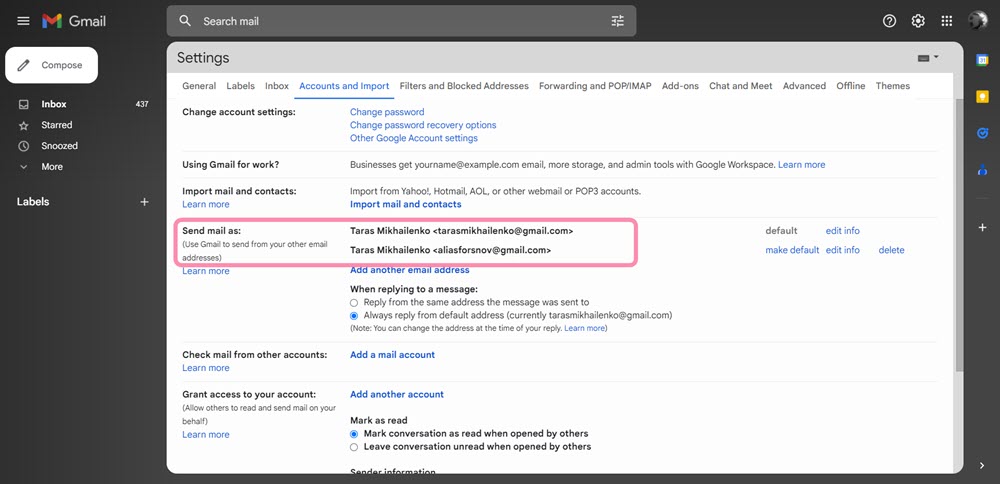
Once the alias address is verified, return to your Gmail account. Refresh the Gmail settings page and go back to the Accounts tab.
Under the Send mail as section, you should see the newly added alias address listed.
Save your changes by scrolling down and clicking on the Save Changes button.
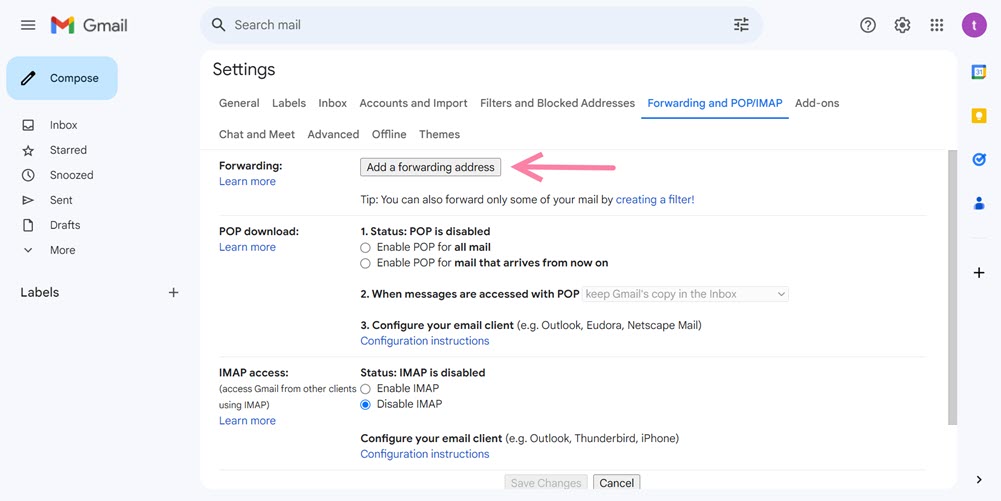
Step 3. Configure forwarding from alias to primary email address
To set up email forwarding for your alias address and redirect copies of incoming emails to your primary mailbox, follow these steps:
- In your alias email client settings, find the Forwarding section. Add your primary Gmail address as the forwarding address.
- Now, switch to your primary Gmail inbox. Find an email from your alias address asking for confirmation of the forwarding request.
- Open the email and click on the confirmation link provided. This step verifies that you authorize the forwarding of emails from your alias to your primary mailbox.
After confirming the forwarding request, return to your alias email settings.
In the settings, find the forwarding options again and select your primary Gmail address as the forwarding address.
Step 4. Connect alias to Snov.io via SMTP
Once you have set up the alias in your primary email account, you can now connect it to Snov.io via SMTP connection.
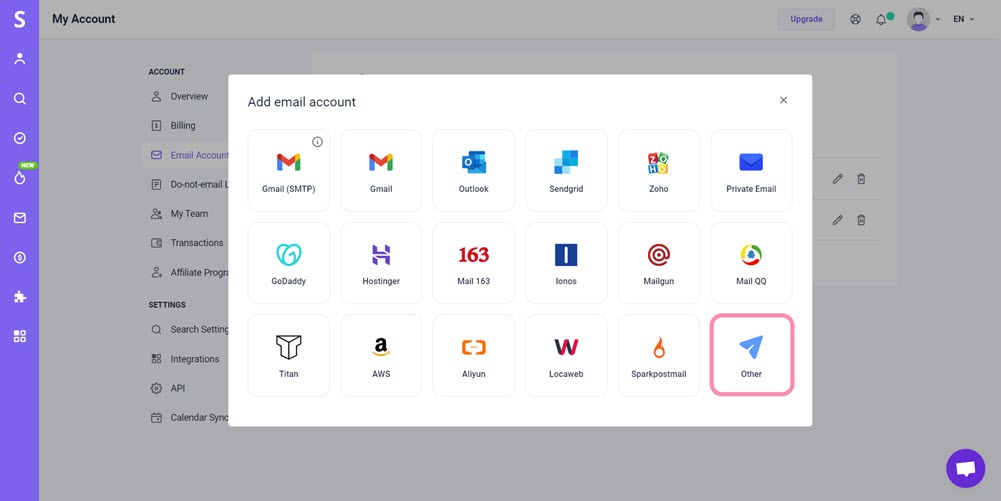
- Go to the Email Accounts page.
- Click the Add email account button to start adding a new account.
- From the list of email service providers, select Other.
- Now, you need to configure the settings for both the SMTP and IMAP sections.
Under SMTP section, enter the following:
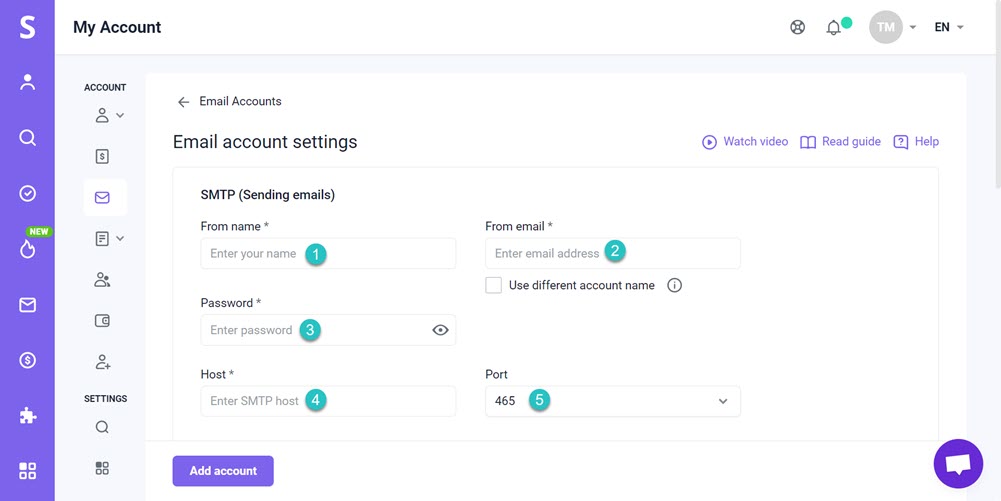
| Field | Explainer |
|---|---|
| From name (1) | Enter your sender name. |
| From email (2) | Enter the username (login) for your alias here. Usually the same as your alias email address. |
| Password (3) | Enter the password to your alias email account. |
| Port (4) | Select the SMTP port that matches your alias email account’s default settings.
Gmail: 587 |
| Host (5) | Enter the SMTP host that matches your alias email account’s default settings.
For Gmail: smtp.gmail.com |
Under IMAP section, enter the following:
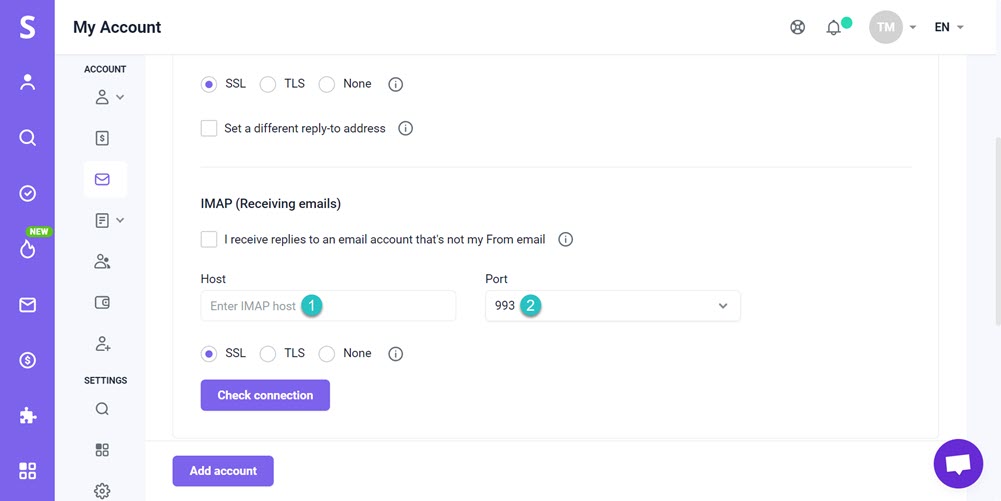
| Field | Explainer |
| Host (1) | Enter the IMAP host that matches your alias email account’s default settings.
Gmail imap.gmail.com Outlook outlook.office365.com SendGrid imap.sendgrid.net Zoho imap.zoho.com GoDaddy imap.secureserver.net ProtonMail mail.protonmail.ch Ukr.net imap.ukr.net |
| Port (2) | Select the IMAP port that matches your alias email account’s default settings.
Use port 993. This port number is widely used and supported across various ESPs. |
After you have entered all the necessary details, click on Check connection to test the connection.
If the connection is successful, click on Add account to finalize the process.
Your alias email is now connected, and you can begin sending email campaigns using it.
To ensure that everything is working correctly, we suggest sending a test campaign before you start with a real one.
Here’s a quick summary of how it works:
In the campaign builder, on Step 3 (Sending options), choose your alias as the sender account.
When your recipients receive the email, it will appear as if it’s coming from your alias address.
Any responses from the recipient will be forwarded to your primary mailbox.
You can continue the conversation with the recipient using either your primary email or the alias email directly in your email client.
While composing your email, click on the From field.
Select the email address you want to send the email from (either your primary or alias address).
If you find that this article does not cover your specific use case or if you encounter difficulties while setting it up, please reach out to our support team directly. We would greatly appreciate your feedback.