Need to email multiple recipients without everyone seeing each other’s addresses? Or want to personalize messages without spending hours on each one? You’re not alone — whether it’s for sales, marketing, or recruitment, we all face this challenge.
This guide will show you exactly how to send an email to multiple recipients individually in Gmail. Plus, the best tools and tips to make your cold email campaigns actually work.
Outline:
- TL;DR: How to send emails to multiple recipients individually in Gmail
- How to choose the best way to email recipients individually
- How to send an email to multiple recipients individually in Gmail
- How to send emails to multiple recipients with Snov.io
- How to write emails that actually get opened
- Best practices for email deliverability
- Key takeaways
TL;DR: How to send emails to multiple recipients individually in Gmail
If you’re wondering how to send an email to multiple recipients individually in Gmail, here’s a quick breakdown of the three main methods and when to use each.
| Method | Personalization | Tracking | Best use case |
|---|---|---|---|
| BCC in Gmail | ❌ None | ❌ No tracking at all | One-off personal emails |
| Gmail Mail Merge | Basic only | ❌ No tracking | Small personalized outreach |
| Snov.io | ✅ Full customization (name, company, job title, etc.) | ✅ Full analytics | Serious email campaigns, lead gen, sales outreach |
Now, let’s review these methods in detail.
How to choose the best way to email recipients individually
Choosing the best way to email recipients individually depends on several factors. These include the purpose of your cold email campaign, the level of personalization you need, whether you want to track engagement, and how much automation you require.
To help you decide, consider the following:
- Personalization level: Do you need to include names, companies, or job titles?
- Purpose of the campaign: Is it for lead generation, sales outreach, or one-time communication?
- Email tracking: Do you want insights on opens, clicks, and replies?
- Automation: Are you looking to schedule follow-ups or build full sequences?
- Scalability and reply management: Can the method handle larger lists and organize responses clearly?
In the table below, we compare BCC, Mail Merge, and Snov.io to help you decide which approach fits your needs:
| Feature | BCC in Gmail | Gmail Mail Merge | Snov.io email campaigns |
|---|---|---|---|
| Personalization | ❌ None | Basic only (first name, etc.) | ✅ Full customization (name, company, job title, etc.) |
| Privacy (Recipients hidden) | ✅ Yes | ✅ Yes | ✅ Yes |
| Engagement tracking | ❌ No tracking at all | ❌ No tracking | ✅ Full analytics |
| Automation | ❌ Manual only | ❌ Manual only | ✅ Automated sequences + smart follow-ups |
| Cost | ✅ Free | Google Workspace only | ✅ Free & paid plans available |
| Reply management | ❌ All replies in one thread | ✅ Separate threads | ✅ Tracked per recipient, organized |
| Best use case | One-off personal emails | Small personalized outreach | Serious email campaigns, lead gen, sales outreach |
When to use each method?
Use BCC when you’re emailing a small group of people and don’t need any personalization. It’s quick and easy, but not ideal for professional or large-scale outreach.
For moderately sized email lists that require a personal touch, Gmail Mail Merge works well. It’s an improvement over BCC, but it’s still limited, particularly when trying to track results or send more complex messages.
As an AI outreach tool, Snov.io is ideal for sending personalized emails at scale. It’s built for serious outreach, letting you automate follow-ups, customize every message, and see exactly how your campaigns are performing.
And LeadsNavi will help you craft messages that truly connect with recipients, tailor content based on deeper insights, and create a more meaningful outreach experience by taking personalization a step further.
How to send an email to multiple recipients individually in Gmail
Sending emails to multiple recipients individually in Gmail can be done in a few different ways. This section will guide you through each option.
Understanding To, CC, and BCC in Gmail
When you send emails in Gmail, you have three options for adding recipients:
- Direct multiple addressing: This involves adding all the email addresses in the To field.
- CC (Carbon Copy): This is typically used when you want to include recipients for informational purposes, where a response isn’t necessarily expected.
- BCC (Blind Carbon Copy): This feature is for sending emails where each recipient’s address is hidden from all other BCC recipients.
We recommend focusing on BCC (blind carbon copy) for your group messages. This way, you can ensure each person gets your message without seeing who else received it.
Let us walk you through this step by step:
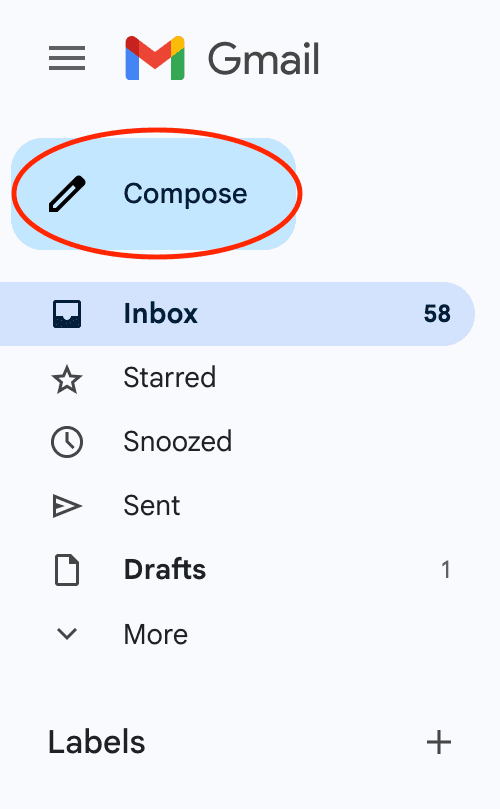
First, open Gmail and click the Compose button to start your new email.
Then, look for the CC option near the top of your email draft. Right next to it, you’ll see BCC — click on that.

Now you’ll see a new BCC field has appeared. Add every recipient’s email address you want to reach; just put a comma between each address.
Finally, write your message like you normally would and click Send when you’re ready.
BCC is effective for sending private group emails, but it has significant drawbacks that make it unsuitable for many situations, especially business communications.
- Impersonal appearance
The most noticeable issue is that recipients can see they’ve been BCC’d rather than directly addressed. This immediately signals that your message is part of a mass send, making it feel impersonal and potentially spammy.
- No personalization
BCC also offers zero personalization options. Everyone receives the exact same message with no way to include names, company details, or any customized content. This generic approach reduces engagement and makes your communication feel less professional.
- No performance tracking
More importantly for businesses, BCC emails lack tracking capabilities, making it impossible to measure engagement metrics essential for evaluating campaign performance.
So, while using the BCC field in Gmail is a solid move, it might not be the best way to send emails to multiple recipients individually. It could have negative effects on your relationships and results.
Understanding Gmail Mail Merge
Unlike BCC, Gmail’s Mail Merge feature allows you to easily add several personal touches. To be more specific, you can include each person’s first name, last name, or full email address anywhere in your message. So, instead of starting with “Hi everyone,” you can write “Hi @firstname” and people will see their actual names.
Just like with the BCC method, recipients who get your mail merge message can’t see who else received it. It’s completely private from their perspective.
Plus, when people reply to your email, each response comes back in its own separate conversation thread. This keeps everything organized and prevents those messy group reply situations.
Getting started with this feature is simple; here’s how:
Start by opening Gmail and clicking Compose like you normally would.
Now, in the Gmail compose window, click Mail Merge and add individual recipients in the To field.
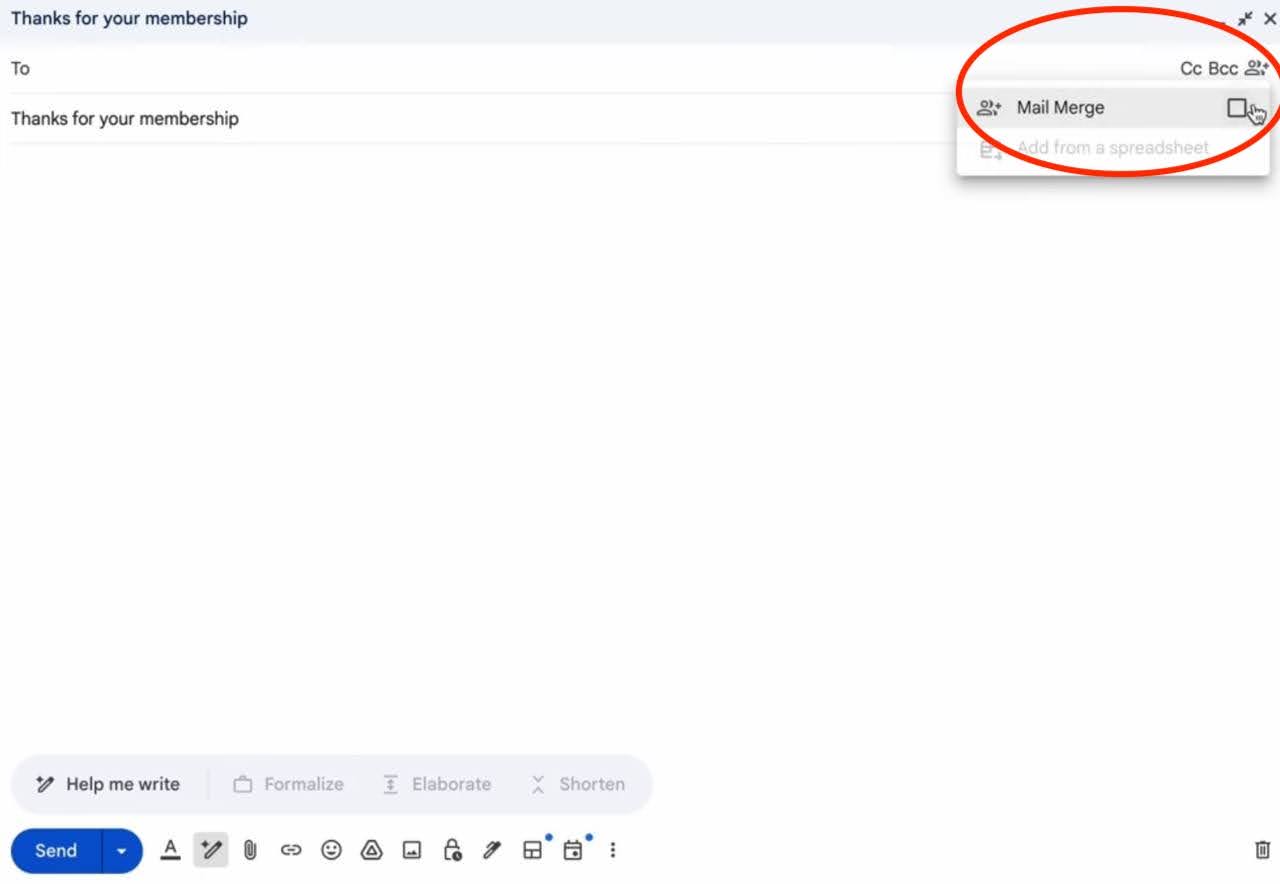
Next, write your message as usual, but here’s where it gets cool: whenever you want to add someone’s name or email address, just type the @ symbol. Gmail will show you options like @firstname, @lastname, or @email.
Finally, send your email when you’re ready, and Gmail automatically creates personalized versions for each recipient.
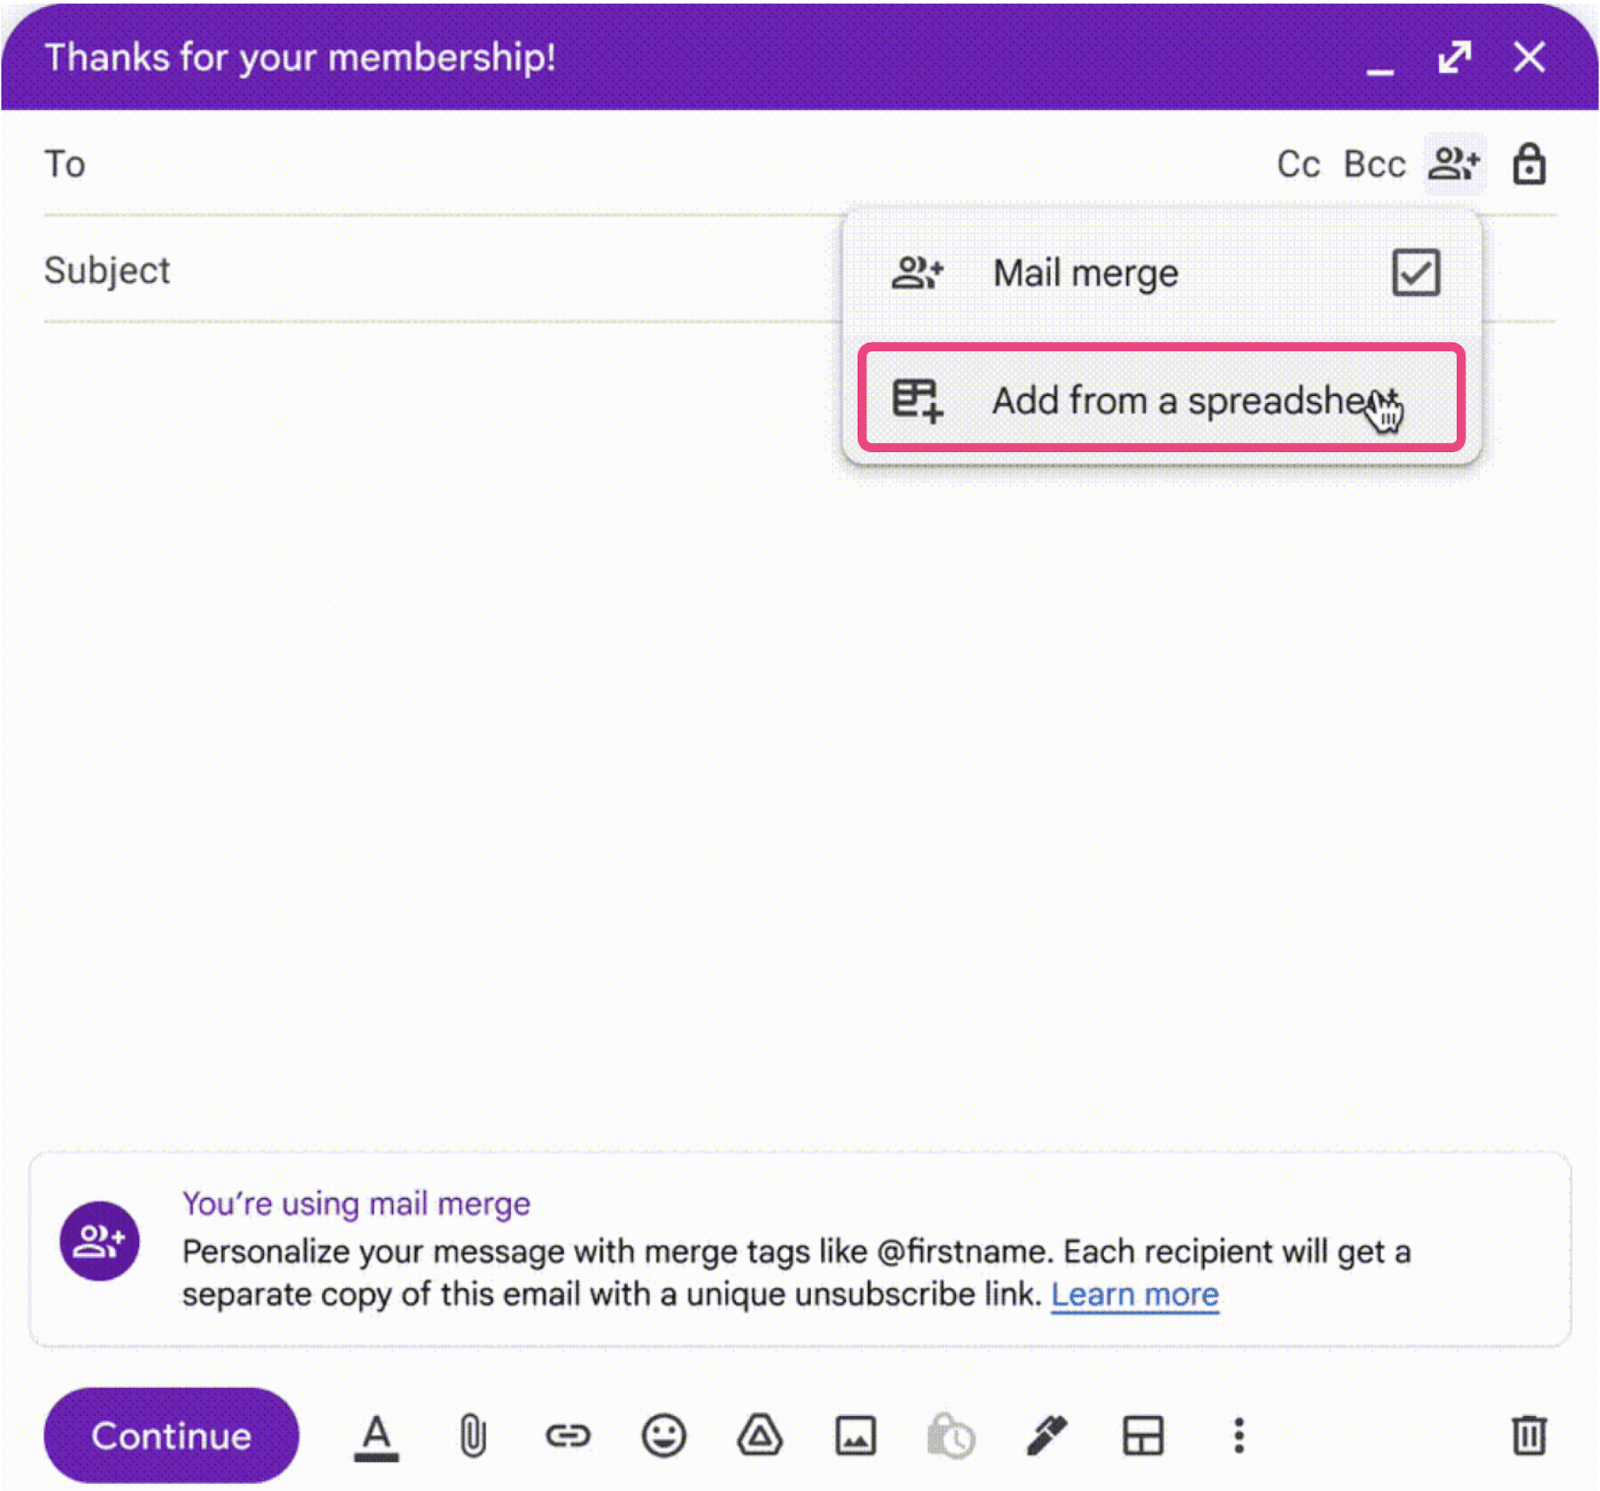
Note: For larger or more personalized groups, click Add from spreadsheet and link a Google Sheet.
Gmail’s mail merge improves on basic BCC by adding personalization, but it still remains quite limited and falls short for serious email campaigns.
- Limited personalization fields
The personalization options are extremely limited. You can only use basic merge fields like first name, last name, and email address; you can’t add custom fields for things like company names, job titles, or industry-specific details.
- Paid access required
Mail merge also requires a paid Google Workspace subscription. This creates a barrier that many individuals and small businesses can’t justify for basic email needs.
- No analytics or tracking
Like BCC, mail merge provides no analytics or tracking capabilities. You can’t see who opened your emails, clicked on links, or engaged with your content – data that’s essential for understanding campaign effectiveness.
How to send emails to multiple recipients with Snov.io
If you’re tired of Gmail’s limitations and want to send personalized emails to multiple recipients without them knowing about each other, Snov.io is your answer. This guide will walk you through everything you need to know to get started.
Before we dive in, here’s what makes Snov.io special:
- Complete privacy: Recipients never see each other’s email addresses
- Smart automation: Set up follow-ups that trigger based on what people do
- Real insights: See who actually engages with your messages (not just fake opens)
- Personalization at scale: Make every email feel like it was written just for that person
- All-in-one inbox: Manage all your conversations from one place
Sending emails to multiple recipients with Snov.io is not difficult. Just take a look at these practical guidelines telling how to build cold outreach campaigns from A to Z:
Here’s a more detailed breakdown of the process of creating bulk campaigns in Snov.io:
Step 1: Set up your first campaign
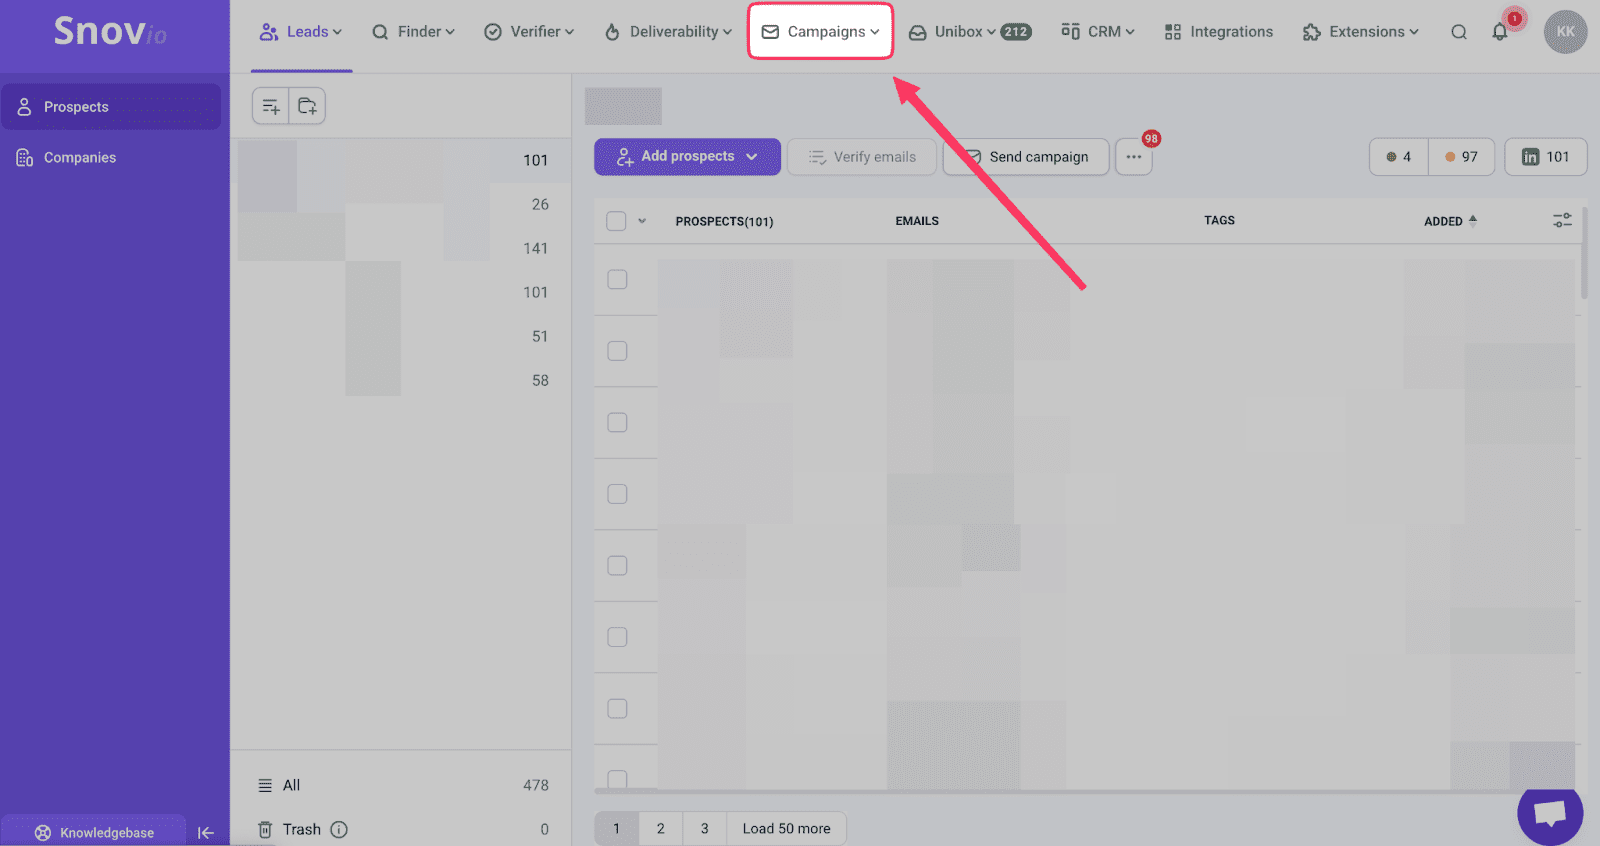
Getting started is refreshingly simple. Once you’re logged into Snov.io, head to the Campaigns section on your dashboard and click Create campaign.
You’ll see a clean, drag-and-drop interface that feels intuitive from the start; no complicated menus or confusing settings.
Step 2: Craft your email sequence
Here’s where Snov.io really shines:
Make it personal
Add personalization variables like {{first_name}} or {{company}} to make each email feel tailored. But Snov.io goes deeper — you can use Dynamic content that changes based on the recipient’s industry, location, or previous interactions.

Set smart conditions
Create follow-up rules that actually make sense. For example:
- If someone opens your email but doesn’t reply, send a gentle follow-up in 3 days
- If someone clicks a link, send them more detailed information
- If someone doesn’t engage, try a different approach after a week
Add natural timing
Space out your emails with realistic delays. Nobody sends follow-ups at exactly 9 AM every day, so add some variation to feel more human.
Choose your content style
Use your own templates to maintain brand consistency, or let Snov.io’s AI email builder generate fresh content based on your ideal customer profile.
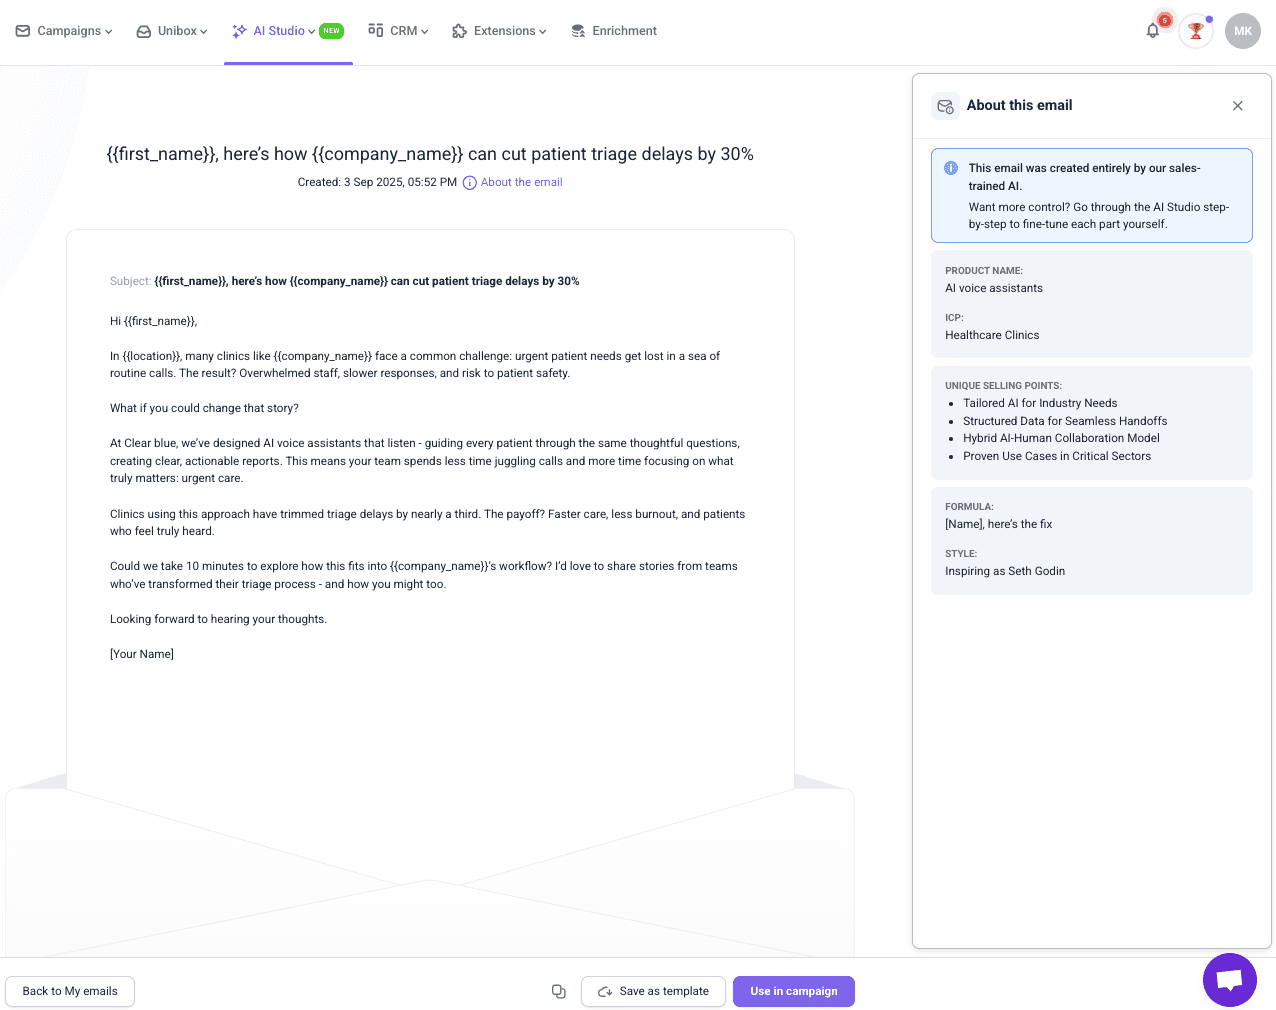
You can change the tone of voice and style of your email to ensure it suits your recipients.
Step 3: Manage your contacts and sending
Upload your prospect list.
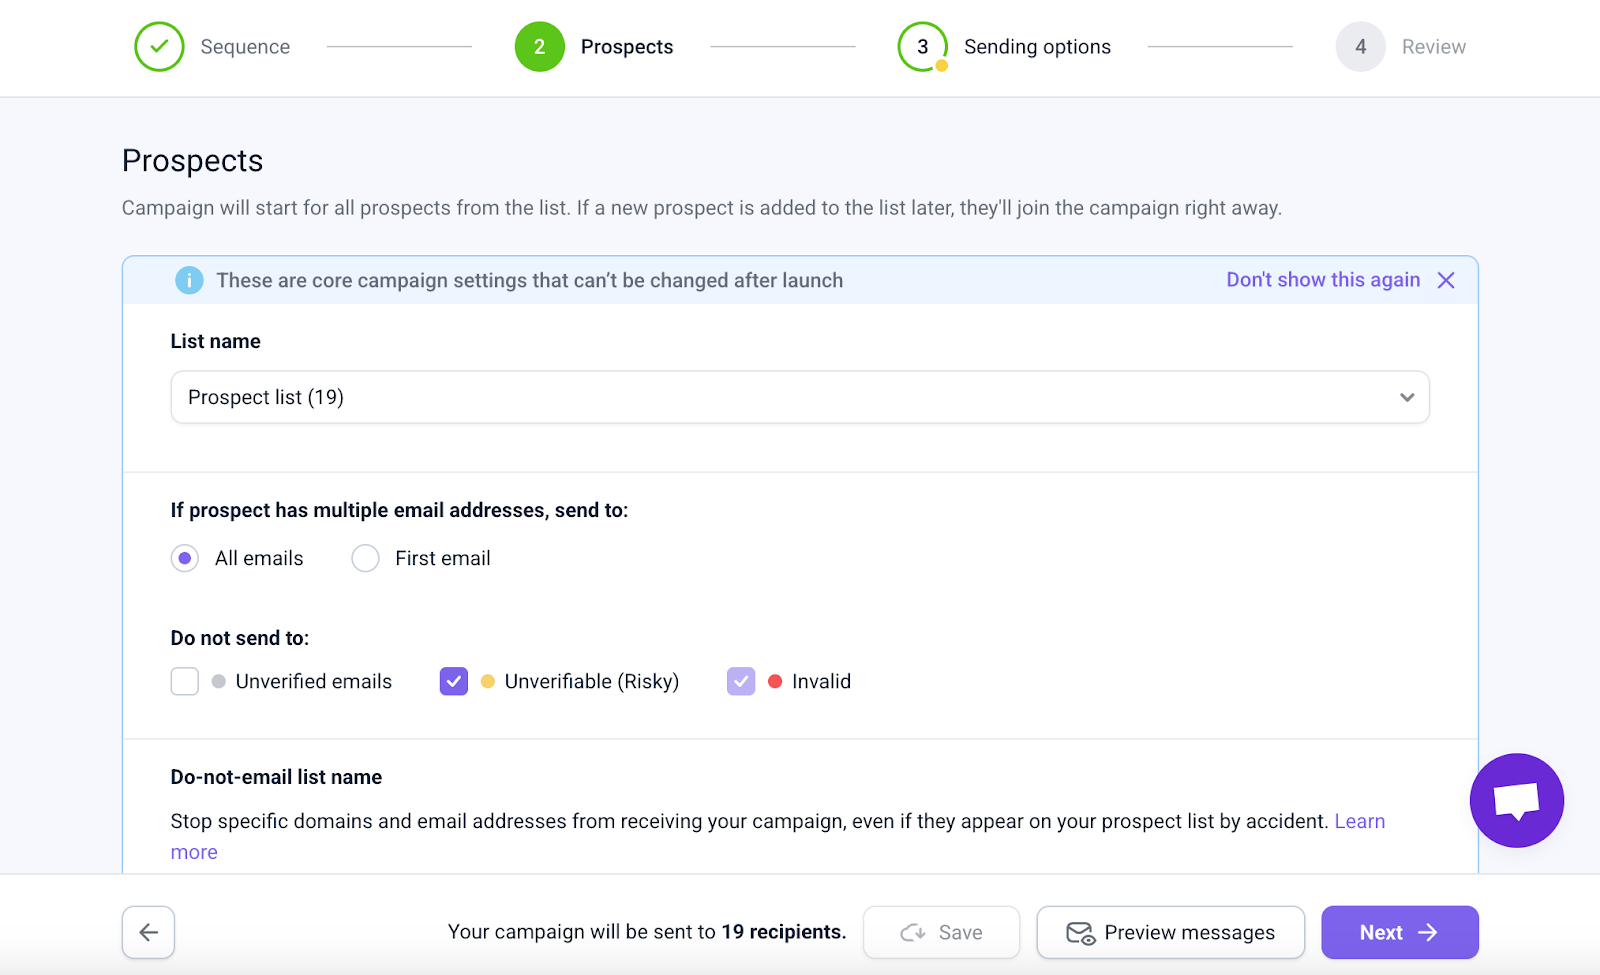
Finally, complete the setup by selecting the email account you’ll use to send from, defining your sending schedule, and enabling tracking features.
💡 Expert tip
Here’s something important: we don’t recommend enabling open rate tracking.
Our data indicates that you can receive up to 2x more replies when open tracking is disabled. Here’s why:
- Email providers are getting smarter at detecting tracking pixels
- Tracking can trigger spam filters
- It hurts your deliverability rates
- Open rates are often misleading anyway (email scanners create fake opens)
We suggest focusing on reply rates instead; they show real human engagement, not just automated email scanning.
Step 4: Launch and monitor
Now, hit send, and Snov.io takes over. Emails are sent one by one, following your timing, and appear as personal messages rather than bulk emails.
Step 5: Track what actually matters
Skip the vanity metrics. In your Reports tab, focus on:
- Reply rates — the only metric that shows genuine interest
- Deliverability rates — are your emails actually reaching inboxes?
- Engagement funnel — how people move through your sequence
The Unibox feature keeps all responses organized in one place, so you never miss a reply or lose track of a conversation.
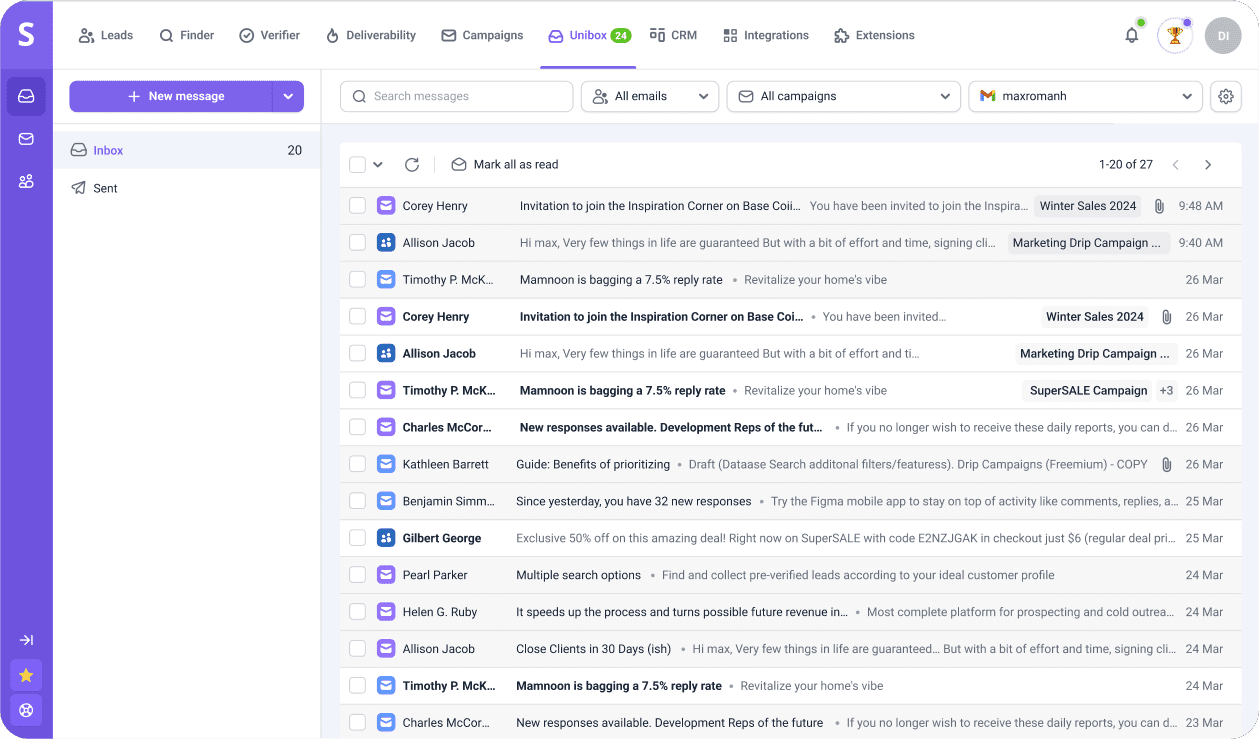
This way, you can manage all your mailboxes in a single, intuitive, easy-to-use space.
How to write emails that actually get opened
After you’ve settled on your sending approach, the real work begins: writing messages recipients actually want to read.
Just a quick reality check: the average person receives dozens of emails daily, and most get deleted or ignored within seconds. So what separates those that get opened from the ones that don’t? It’s simple: messages that feel like they were written specifically for that person.
Genuine personalization goes way beyond inserting someone’s first name at the top. It’s about showing you’ve researched their company, their role, and their current challenges.
Here are some important tactics:
- Reference recent company news
Mention funding rounds, product launches, new hires, or industry recognition. This shows you’re paying attention to their business.
- Connect to their role
A message to a marketing director should focus on different challenges than one to an operations manager. Tailor your language and examples accordingly.
- Address timing
“As you’re heading into busy season…” or “Now that Q4 planning is underway…” shows awareness of their business cycle.
- Use social proof wisely
Instead of generic testimonials, mention specific results you’ve achieved for companies in their industry or situation.
- Ask relevant questions
End with something that requires thought rather than a simple yes/no. “What’s been your biggest challenge with…” invites engagement.
💡 Expert tip
Here’s a quick quality check. Before hitting send, ask yourself these questions:
- Would I want to receive this email?
- Does it sound like it was written for this specific person?
- Is the value clear within the first two sentences?
- Would a busy executive understand it in under 30 seconds?
Remember, the goal isn’t to close deals through email; it’s to start meaningful conversations with the right people. Focus on being helpful, relevant, and human – the responses will follow.
Best practices for email deliverability
Getting your emails to actually reach people’s inboxes takes more than just clicking “send.” There are essential steps happening in the background that can make or break your delivery rates. Think of it like tending a garden: with the right care and attention, your email campaigns will flourish.
Start slow and build trust
Picture this: you wouldn’t walk up to a stranger and immediately ask them to marry you, right? The same principle applies to email sending. When you’re working with a new email account or domain, you need to build a relationship with email providers gradually.
This process, called warming up, is like introducing yourself properly. It’s necessary because it helps build trust with email providers and ensures your messages land in inboxes instead of spam folders.
Keep your email list fresh and clean
Your email list needs regular tidying up so it remains useful. Over time, some contact data becomes outdated, people change jobs, or simply lose interest in what you’re sharing.
Make it a habit to review your list regularly. Weed out contacts who’ve gone radio silent for months, and definitely remove anyone who’s opted out. It might feel counterintuitive, but quality always beats quantity when it comes to email marketing.
💡Bonus tip
Use email verification tools to check if addresses are still active before sending campaigns.
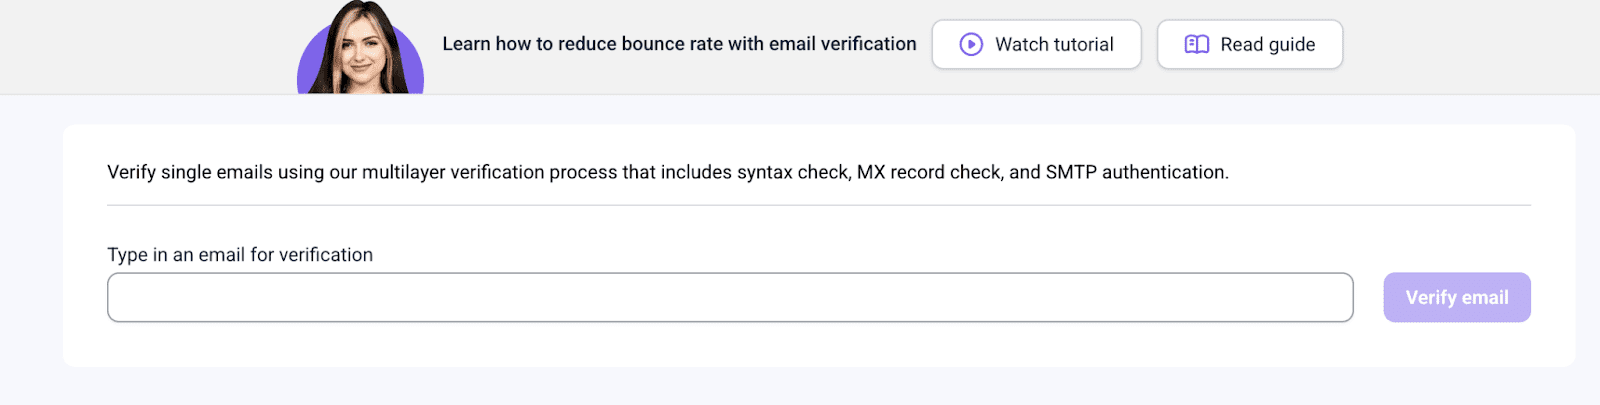
This simple housekeeping prevents your messages from bouncing and protects your sender reputation.
Test before you launch
Even the most compelling content won’t deliver results if it never reaches its destination. That’s why regular deliverability testing is crucial. Think of it as a health check for your campaigns.

These tests give you valuable insights into how email providers view your messages. You’ll discover whether your emails are landing in inboxes, getting caught in spam filters, or facing delivery issues altogether.
💡Expert tip
When checking your deliverability, we recommend aiming for these healthy benchmarks:
- Domain health score of 75% or higher
- Spam rate below 2%
- Inbox placement rate of 90% or better
If your results fall short of these targets, it’s a signal that something needs attention before you launch your next campaign.
Segment your audience thoughtfully
Not everyone on your list has the same interests or needs, so why send them all the same message? Smart segmentation means grouping your contacts based on their preferences, behavior, or characteristics, then tailoring your content accordingly.
Make unsubscribing easy
It might seem backward, but making it simple for people to unsubscribe actually helps your email reputation. When someone no longer wants to receive your messages, they should be able to opt out with just a click or two.
If unsubscribing is difficult or confusing, frustrated recipients are more likely to mark your emails as spam instead. This hurts your sender reputation and makes it harder for your future emails to reach engaged subscribers who actually want to hear from you.
Follow these steps to safely send emails to multiple recipients individually in Gmail:
- Choose your sending method wisely.
- Understand Gmail’s limits.
- Write emails that feel human.
- Focus on real engagement.
- Track your email deliverability.
- Segment your audience.
By following these practices consistently, you’ll build a strong foundation for successful campaigns that reach the right recipients at the right time.
Key takeaways
Whether you’re using Gmail’s built-in features or professional marketing tools, the ability to send emails to a crowd is still a big deal today, and it’s crucial to use it both effectively and ethically. Keep your messages on point, respectful, and a little protective of your recipients’ privacy – in other words, send wisely.
Here’s a short checklist for you:
- Choose your sending method wisely.
- Understand Gmail’s limits.
- Write emails that feel human.
- Focus on real engagement, not vanity metrics.
- Track your email deliverability.
- Segment your audience.
Want to go beyond Gmail’s limits and personalize your emails at scale? Try Snov.io — it brings together everything Gmail lacks in one powerful platform.