In this article, you’ll learn how to set up Google Postmaster to monitor email sending metrics.
Snov.io already tracks key metrics to help you monitor engagement and campaign results. For deeper insights, tools from email providers like Google can offer additional data for analysis.
Postmaster is Google's email analytics tool made to help senders understand the quality of their cold email campaigns and follow Google's guidelines.
What Postmaster does and why use it:
It tracks the emails you send to personal Gmail mailboxes and provides data on important metrics such as spam rate, sender reputation, email authentication, and delivery errors. Monitoring this data helps you identify aspects of your campaigns that need improvement.
Before you begin, here's what you need to know to decide if it's right for you:
- Google Postmaster provides data only for emails sent to personal Gmail accounts (that end in @gmail.com or @googlemail.com). It doesn’t include data for emails sent to corporate mailboxes and prospects’ business emails on Google Workspace. Keep this in mind if you mainly reach your target audience through business emails.
- Your domain must send enough emails daily to collect data from, at least 50-100 emails per day to Gmail users. Even if the rest of your recipients use different mailboxes, Postmaster data can help improve your email score with other providers as well.
- You don't need to use Google as your email provider to access Postmaster, but you need to have a Google account.
How to set up Postmaster for Gmail accounts
Step 1: Add your sender domain to Postmaster
To start setting up Postmaster, log in to https://postmaster.google.com →
Add the domain you use for sending emails by clicking the Add (+) icon in the bottom right. In the pop-up window, enter your domain address.
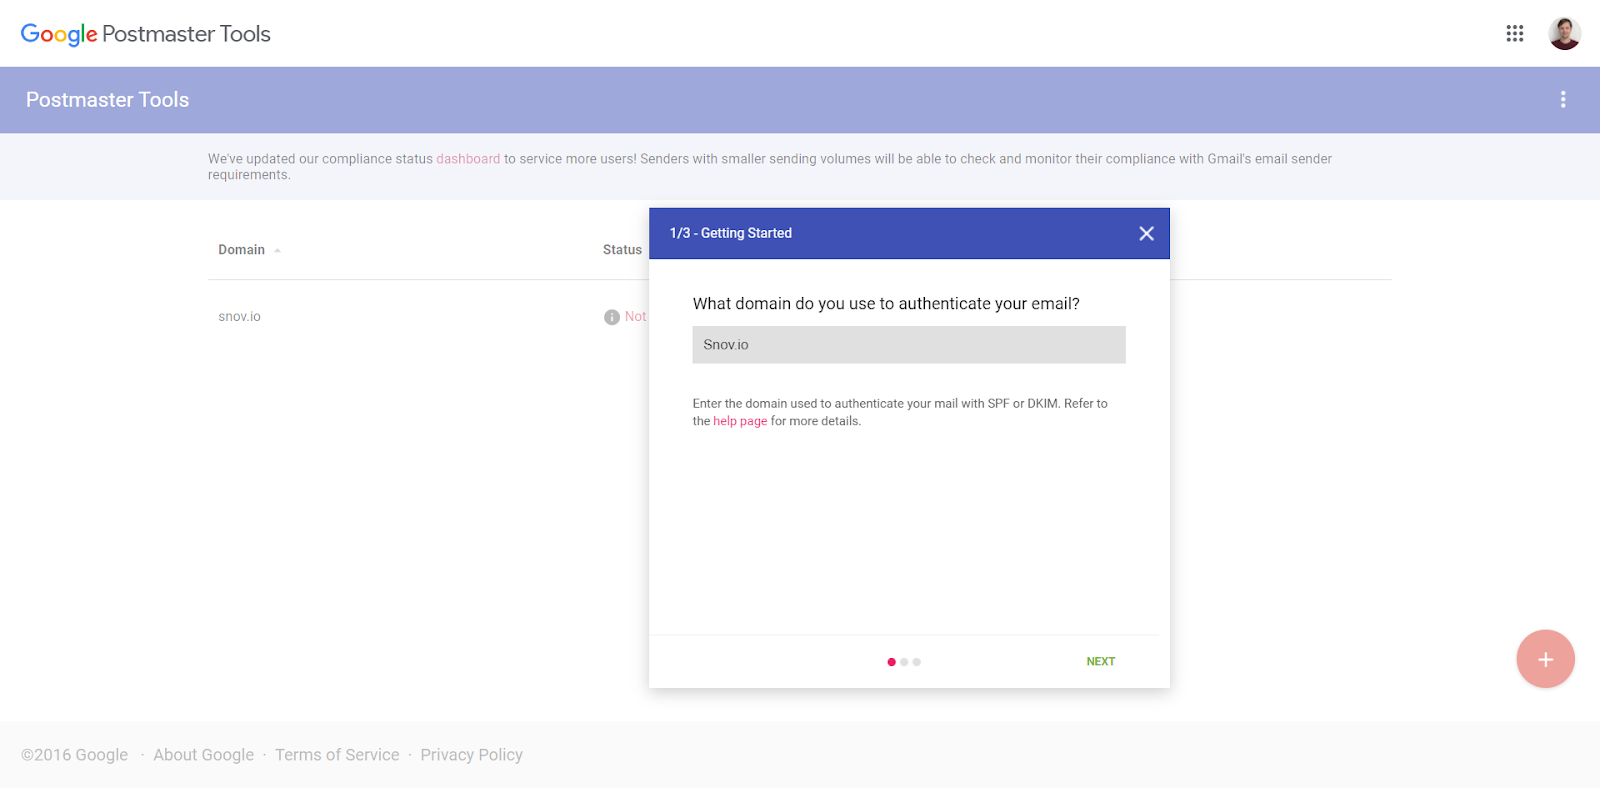
Your domain is the part after the @ symbol in your email address, which is the same as your company's website address.
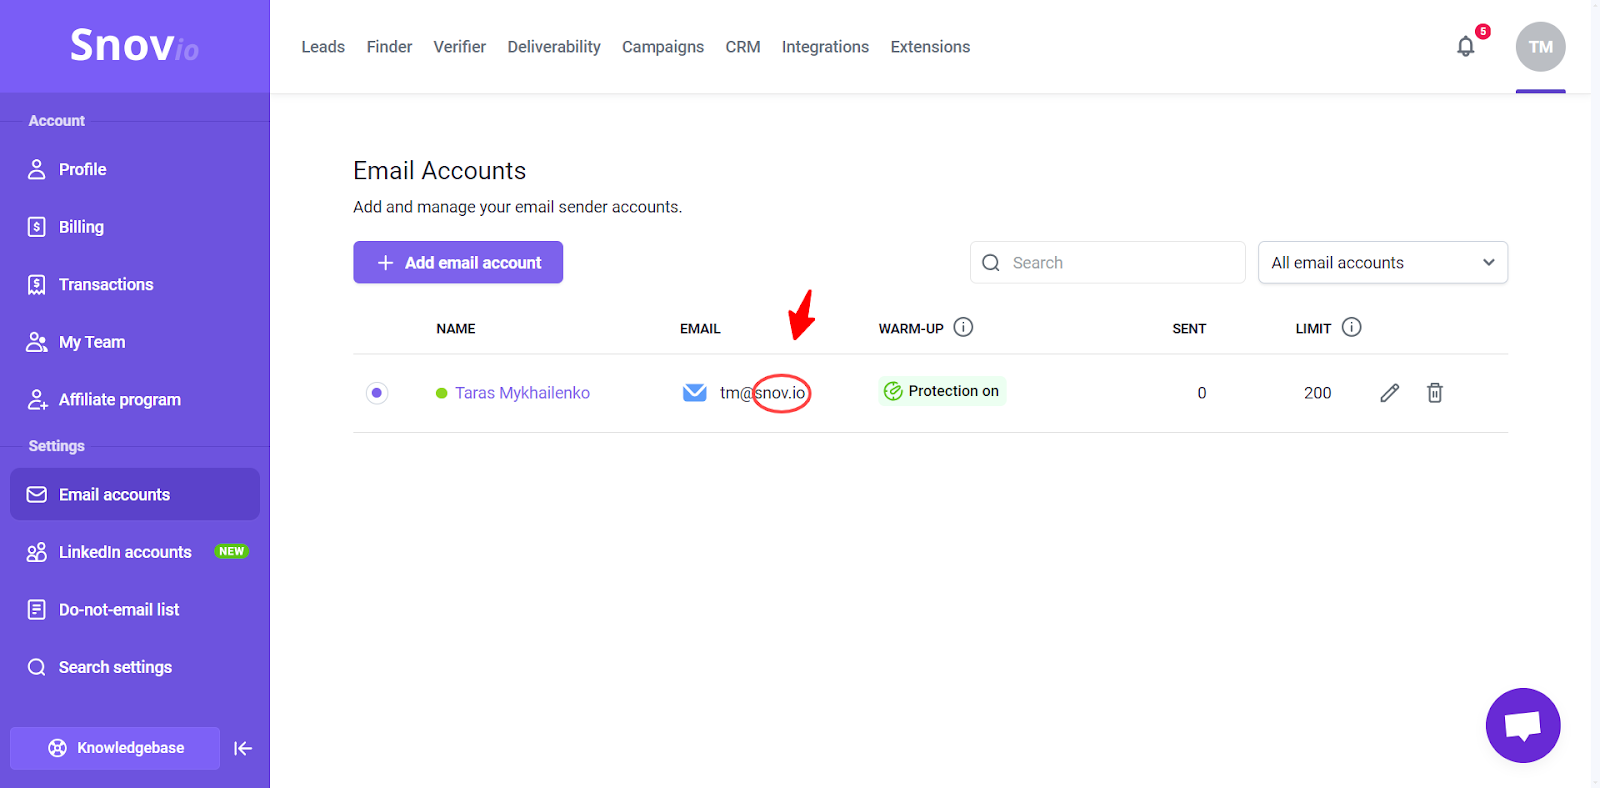
View your email accounts connected to Snov.io →
Step 2: Verify domain ownership
You can add a domain from any provider, but if your domain is from Google (purchased through Google Workspace), verification isn't needed.
To add your domain to Postmaster, you need to verify ownership through your domain's DNS settings. This is done by adding a new TXT record to the DNS settings. This step happens at your domain registrar.
Log in to your domain’s admin account (on your registrar’s website) and find the DNS settings. This is where you add and update DNS records.
How to identify your domain registrar:
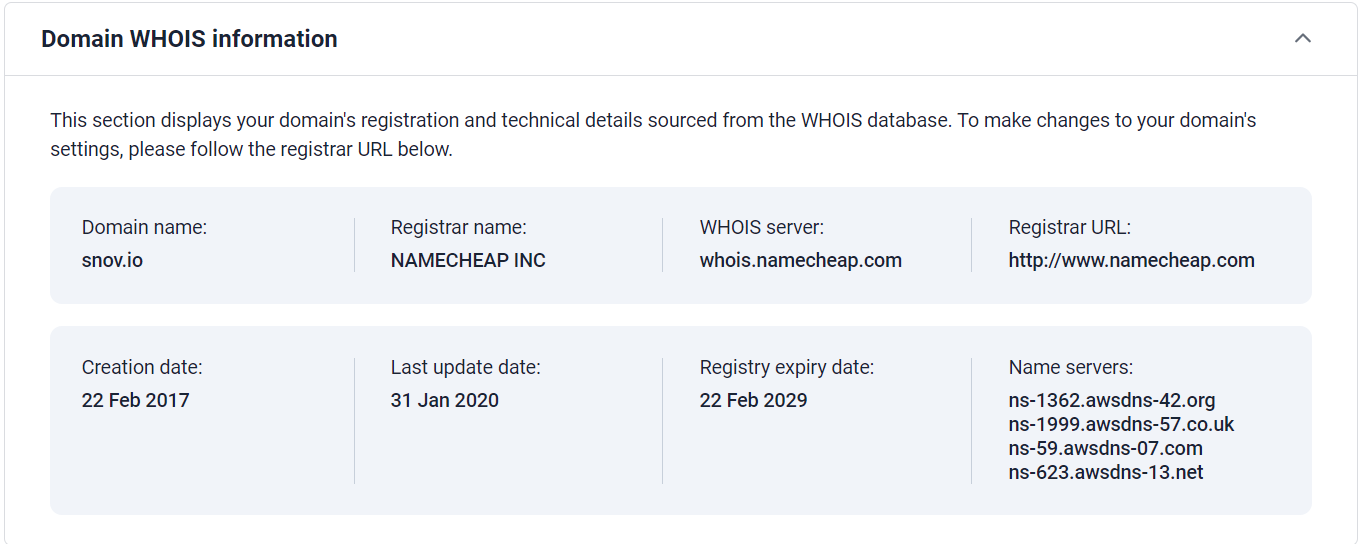
If you're unsure of your domain registrar, you can find this information in the deliverability test results. Follow these steps:
Start a new test or open the details of a previous test. In the results section, open the Domain Health tab and select Domain WHOIS Information.
Here, you'll see your domain's details, including the registrar's name and its website (Registrar URL).
In the Postmaster settings, copy the "TXT record" value provided by Google. This value is unique to your account.
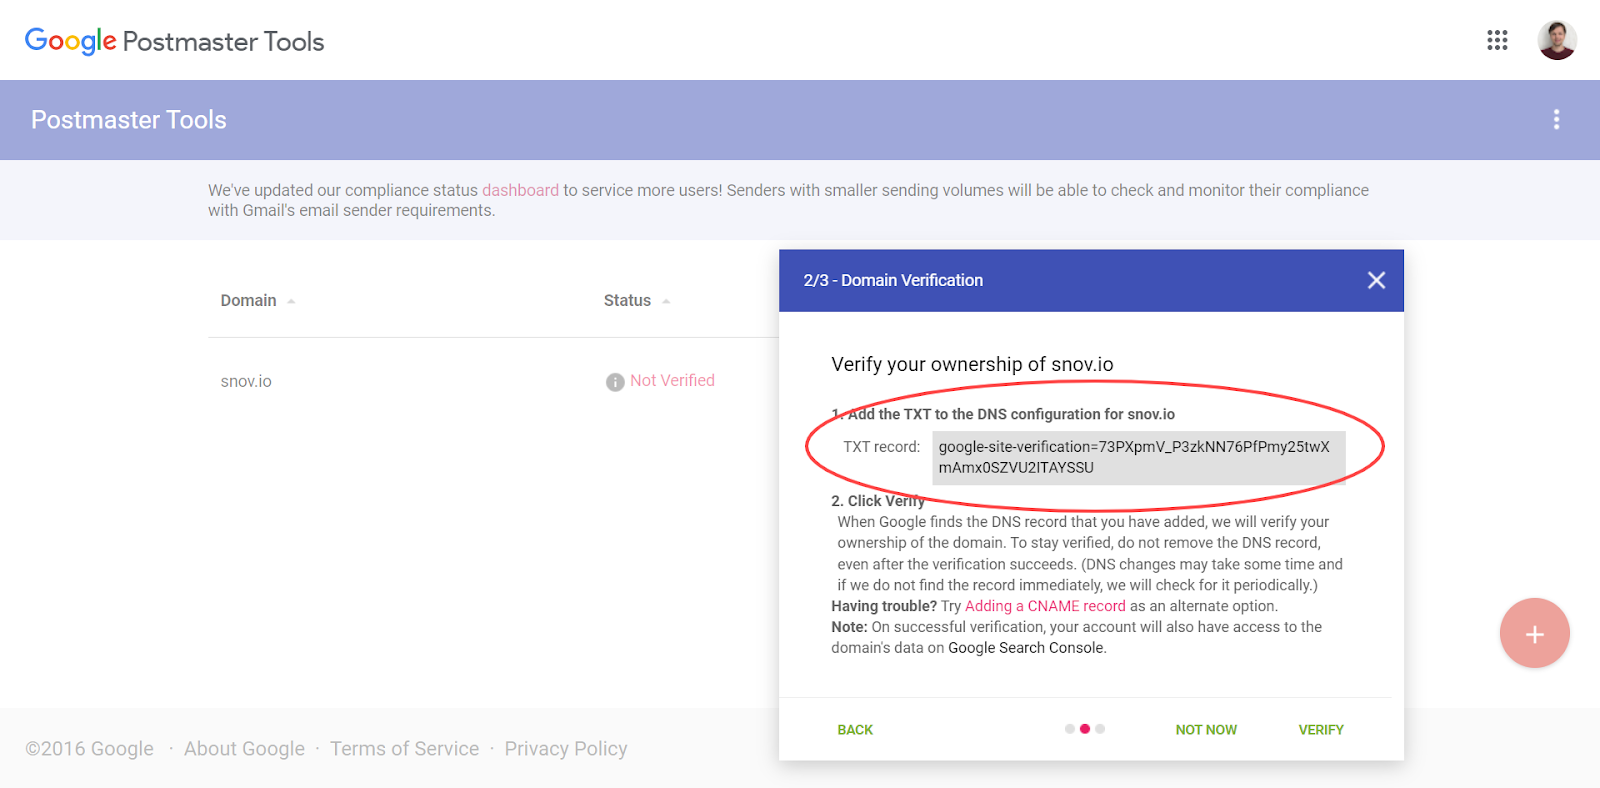
Next, return to your registrar, add a new DNS record, and select the TXT type. Paste the copied value and save the record.
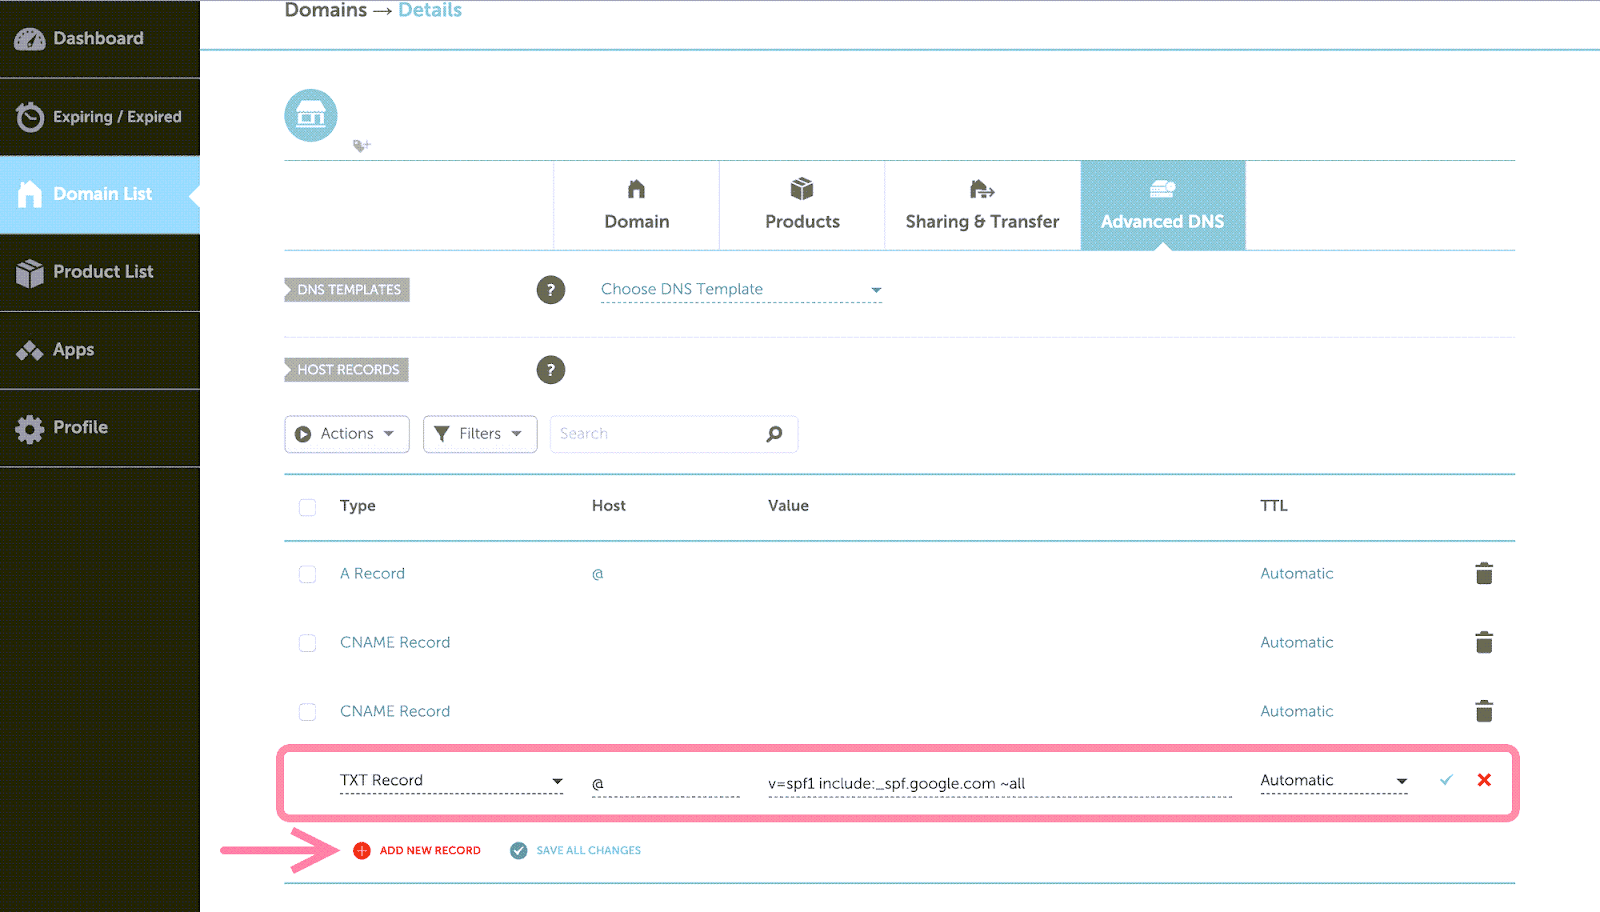
For example, if your domain provider is Namecheap, do the following:
Log in to your Namecheap account. Choose the Domain List in the left menu. Click Manage next to the domain you want to add to Postmaster. Switch to the Advanced DNS tab.
Click Add new record and choose the TXT type. Put @ (or your domain name) in the Host field. Put the TXT record from Postmaster in the Value field.
After updating the DNS, return to Postmaster and click Verify. If you see an error or the TXT record isn’t found, ensure it's added correctly and wait, as domain settings may take time to update.
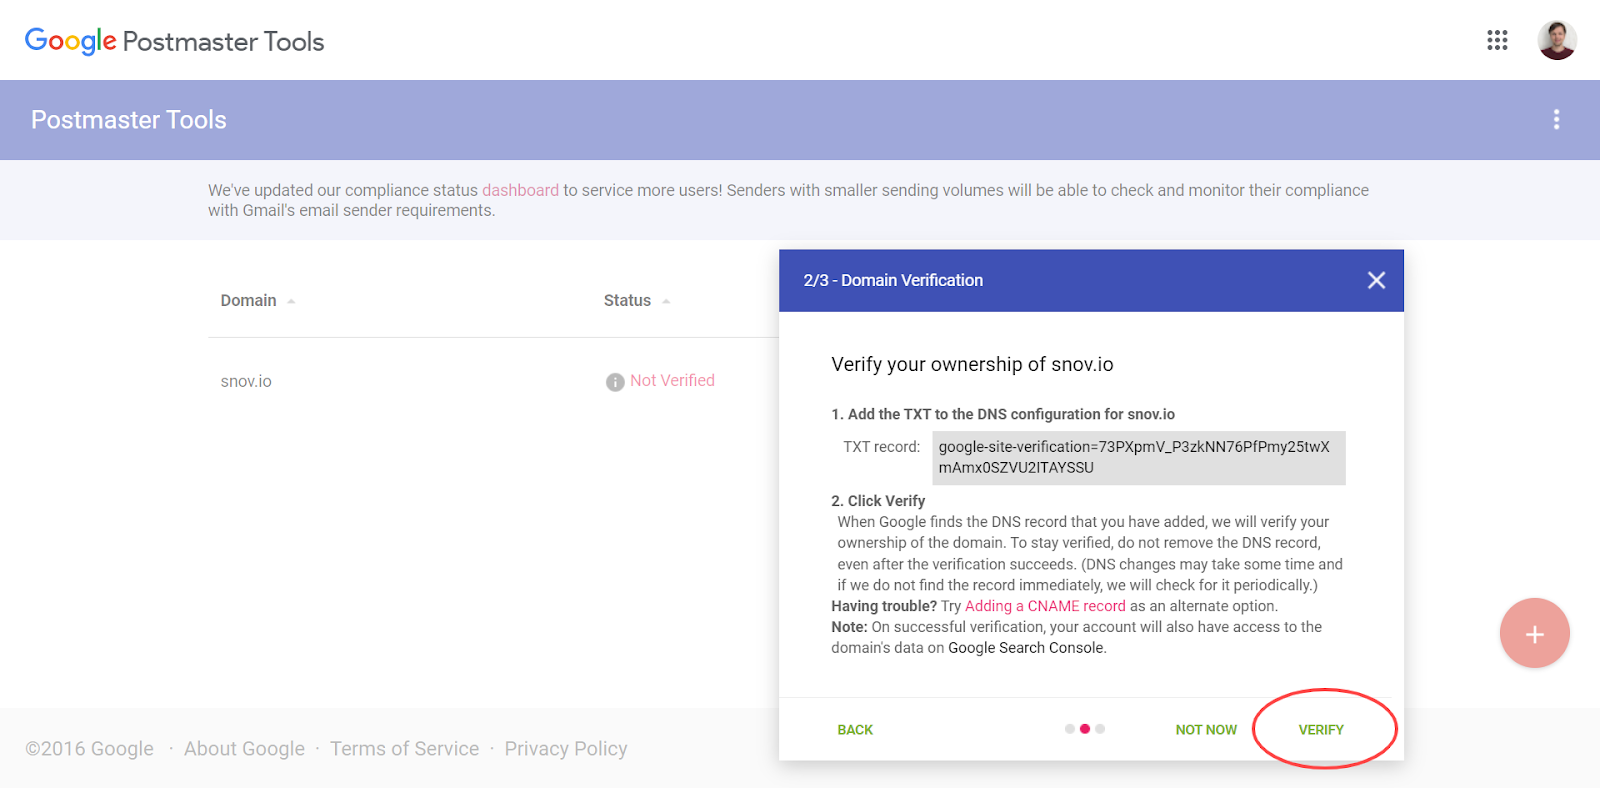
Once the domain status shows as Verified, the process is complete.
Step 3: Review email metrics in Postmaster
After completing the previous step, you can start monitoring email data for the added domain.
Keep this in mind before reviewing the metrics:
- Metrics only include emails sent to personal Gmail accounts. But, this data can still give useful insights into how your emails perform on other mailboxes.
- To see relevant metrics, you should send more than 50-100 emails daily to Gmail users.
Which metrics to monitor in Postmaster:
To view the dashboards, select your domain and the desired dashboard. You can also choose a time period, ranging from the last 7 days to the last 120 days.

Knowing which metrics are underperforming will help you improve your campaigns. In Postmaster, you'll find dashboards for several metrics, including:
- IP reputation
- Domain reputation
- Authentication
- Spam rate
- Delivery errors
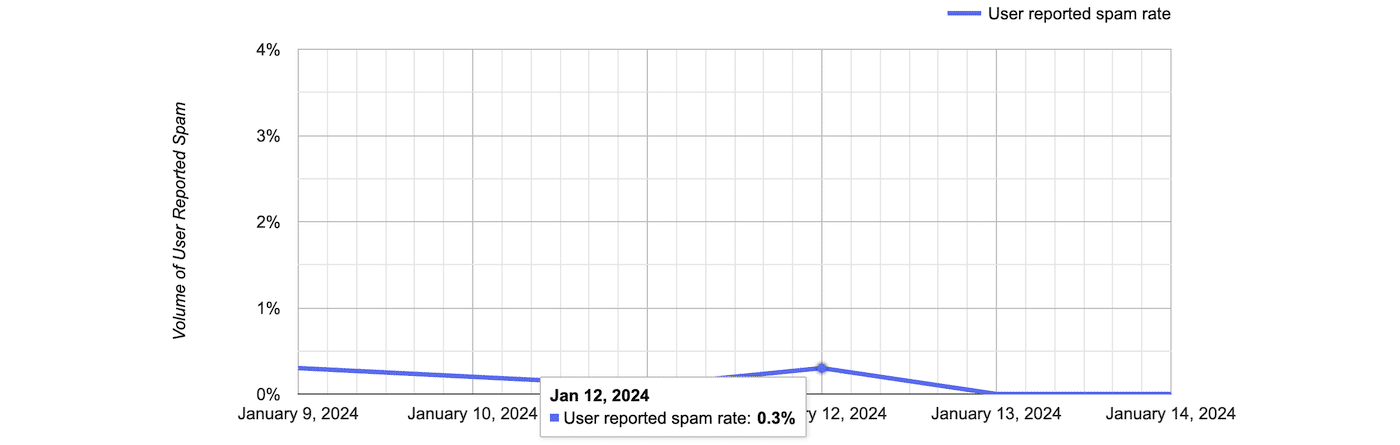
The key metric to monitor in Postmaster is the Spam rate (User reported spam).
Spam Rate dashboard
Spam rate means the percentage of emails delivered to the inbox that recipients manually mark as spam. Emails marked as spam by a spam filter automatically are not included in this metric.
Why it's important to monitor spam rate:
Spam rate is one of the best indicators of your campaign’s success. It shows if your email content is engaging and relevant, and whether you’re targeting the right leads.
Recipients might mark emails as spam because the offer has no value for them or the timing is wrong – you can adjust your email content and campaign settings accordingly.
According to Google’s sender guidelines, a spam rate should not exceed 0.3%. Rates above 0.3% are considered high and may indicate issues with your campaigns. A spam rate around 0.1% is considered good.
How spam rate affects your deliverability:
High spam rates can harm your sender reputation which directly affects email placement (spam or inbox).
High spam rate → lower reputation → lower deliverability (less emails go to inbox).
How-to fix high spam rate:
There’s no quick fix for reducing spam rate; it requires following best practices in your campaigns. But, taking immediate action can make a positive difference.
Step 1. Warm up your email for 2 weeks to restore its reputation. During this time, pause your campaigns if possible. If pausing isn't an option, lower your sending volume to the minimum necessary.
Once the dedicated warm-up period is over, you can return to sending campaigns at your usual limits. Keep the warm-up active alongside your campaigns, but reduce its daily limit to 10-20 emails. This helps maintain your sender reputation.
Read more tips for effective warm-up →
Step 2. Target recipients who are most likely to be interested in your offer. Research your ideal customer profile → before collecting prospects for campaigns.
Step 3. Ask questions to motivate recipients to reply. Give them an option to reply with something even if they're not interested.
Also, regularly review your recipient list and remove those prospects who don’t show any engagement even after follow-ups.
Step 4. Include an easy unsubscribe option in all your emails. It's better for your email reputation if prospects unsubscribe rather than mark your emails as spam.
Other reasons recipients might mark emails as spam include:
- Receiving too many emails from you: review your email frequency and add longer delays between emails.
- The subject line doesn’t convey the email’s value very well: test different versions of the subject line.
- The email is not personalized: use variables to personalize your emails in bulk.
- The email includes too many images: follow best practices for using images in cold campaigns.
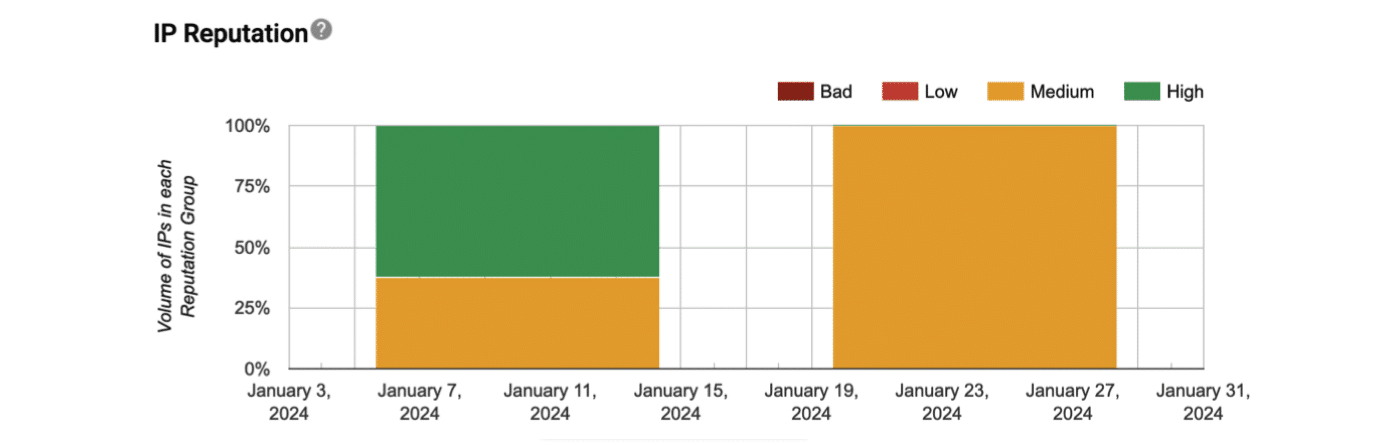
IP reputation dashboard
Another metric featured in Postmaster is IP reputation.It indicates the rating of the IP address (same as the email server address) you’re sending emails from.
A higher IP reputation improves the deliverability of emails sent from this IP. If you notice poor results in this section, it may be because you use a shared IP address assigned by the email provider by default.
Using shared IPs with bad ratings can affect your own metrics, regardless of your sending practices. Dedicated IPs offer better control over your email reputation but are more suited for bulk senders.
If you use other email providers, such as Microsoft Outlook, they often provide their own tools for monitoring email metrics.
To access email metrics, do the following:
If you have an Outlook for Business/Enterprise, go to the Reports section in the Microsoft 365 admin center. There, you can find email activity reports showing details like send and receive rates, read rates, and more.
If you have a question that we haven't covered, feel free to reach out to our Customer Care team. You can contact us at Snovio Help or through live chat. We're here to assist you!

Sorry about that 😢
How can we improve it?