Log in to your Snov.io account to get started — most of the steps in this guide will be done there.
You can follow this guide on a free plan and find up to 50 test leads. Pro and Ultra plans unlock bulk prospecting and list verification features.
Choose the plan that fits the number of leads you need to collect, verify, and contact each month. For example, the Pro S plan lets you collect up to 5,000 verified prospects using the tools in this guide.
Step 1: Define your ICPs and buyer personas
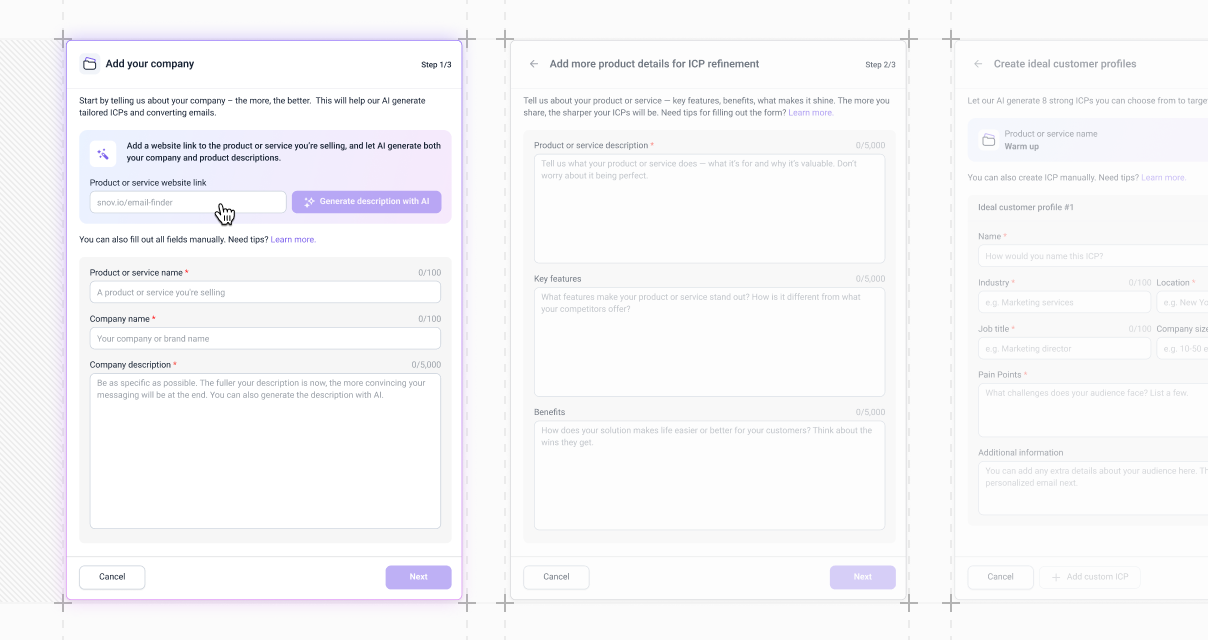
To succeed with outreach, start by defining your Ideal Customer Profile (ICP). Do this before collecting prospects or writing offers. It’s the only way to target prospects who need your product and are likely to convert.
What is an ICP:
An ICP is a detailed profile of the prospects or companies that will benefit most from what you offer and are most likely to buy your product.
Once your ICP is ready, you can use it to:
- Find leads based on it using Finder tools (Database Search or Bulk Domain Search)
-
Create personalized emails based on ICP using Snovio's Persona-driven Email Builder

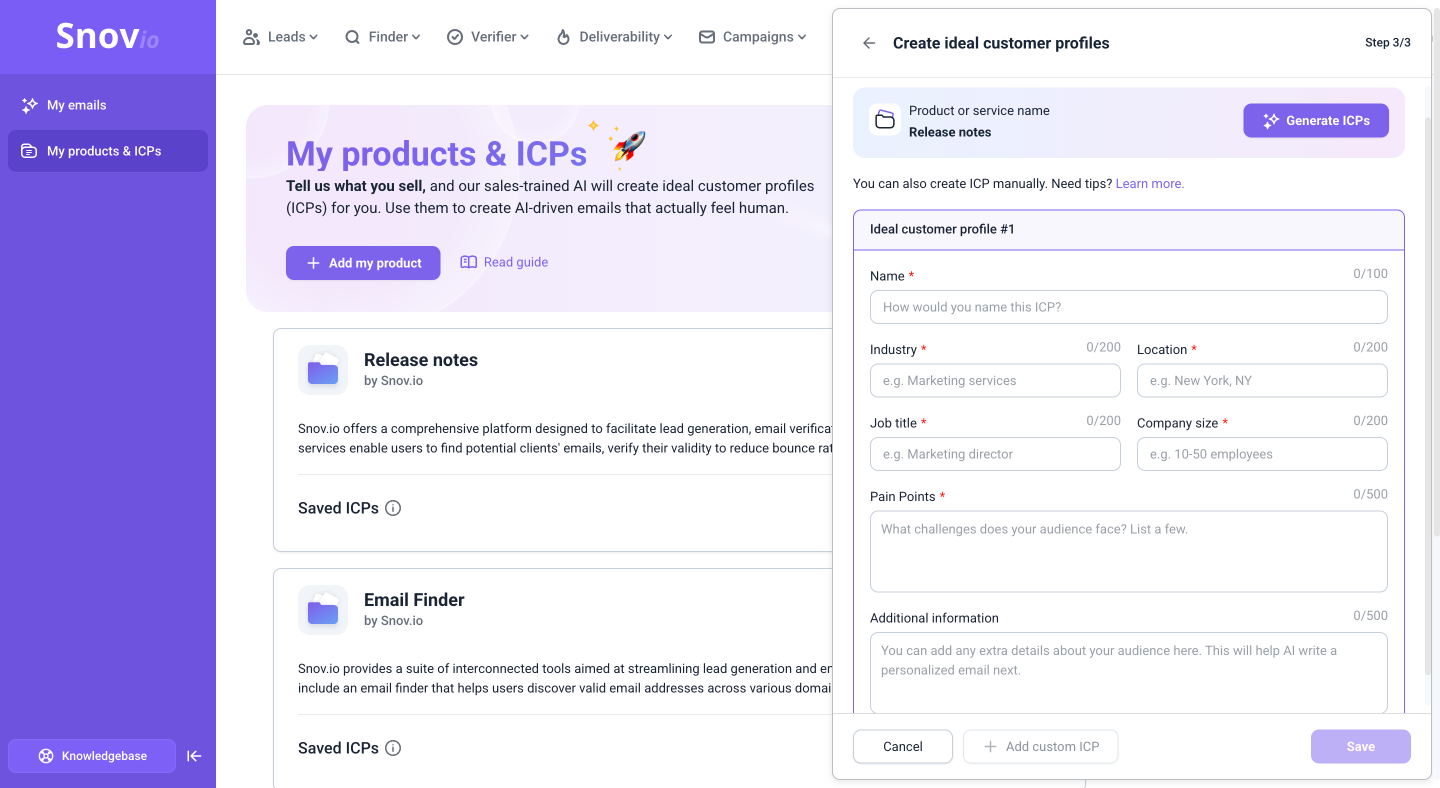
ICP template: Default fields for manual creation
An ICP includes data points such as industry, job title, company size, and common pain points.
Define these key characteristics in a question-and-answer format.
Proceed to Step 3 of the ICP Generator on the Products & ICPs page and fill in the fields manually.
After completing the template below, you’ll have a detailed profile like this:
Data Analyst Joe/ United States / Computer Software / 10–50 employees / uses Salesforce / struggling with data accuracy and reporting speed
| What to define/Question | ICP field | Tip |
|---|---|---|
|
How would you name this ICP? |
Name | Give each ICP a defining and relatable character.
It helps step into their shoes and see them as real people/companies with specific pain points/goals. For example: Busy Drew, Startup Sam, Retention Riley, Scaling SaaS |
| What countries or cities should you target?
What countries and cities have purchasing potential? |
Location | Analyze areas where you already get conversions. Prioritize the countries where your revenue comes from today.
Then explore new regions with strong buying potential. Consider local factors like purchasing power, regulations, and economic conditions to fine-tune your targeting. |
| In what industries is your product most relevant to use?
Define markets where your product delivers the most value (SaaS, Computer Software, Finance?) |
Industry |
|
| What size of companies need your product and will benefit most?
Define employee count (10-50, 50–200 employees) |
Company size | Adjust your pitch for startups/small companies, mid-sized businesses, and enterprises.
Emphasize scalability for growing companies and efficiency for larger ones. Consider how your pricing fits with their budget. Align your offer with the processes typical of that company size. |
| Who in the company is responsible for solving the problem?
Who in the company faces the problem your product solves? Define your target roles and decision-making level (Marketing Manager, CTO, Head of Sales) |
Job title | Outline possible roles who influence or make the buying decision.
In smaller companies, you may need to reach both the CEO and the end user. In larger companies, managers and department leads are often more responsive than C-level but still have strong influence. |
| What’s frustrating your prospects enough that they’ll pay you to fix it?
What’s stopping them from reaching their goals or improving results — and how can you solve it? Define common needs and challenges. |
Pain points | Knowing pain points will help you segment and personalize campaigns by position. Different roles in the company have different goals, pains, and ways of achieving them.
Make your offers stronger by matching your selling points to their pain points. |
When you’re done with the basic filters, add more specific characteristics to enrich your ICP.
Specialty or niche:
What is the company’s specialization? Can your solution address the unique needs of their niche? Define the segment where your product creates the most value.
Tech stack (software or tools in use):
If possible, check what tools or platforms your prospect already uses (Salesforce, HubSpot, AWS). Look for your chance there — are they unhappy with any part of their stack? Show how your product can fit in, replace, or improve what they have.
Highlight easy integrations and smooth migration to reduce objections and speed up adoption.
Goals/KPIs:
Don’t just focus on pain points — define your lead’s goals too. Ask: What results do they want to improve in their daily work?
What long-term objectives are they aiming for? To make your solution more compelling and show clear, measurable value, align your pitch with their KPIs.
Revenue:
Consider whether a company is fast-growing, established, or in decline. Fast-growing businesses often need scalable solutions quickly, while established ones look for stability and efficiency. Adjust your offer to fit their stage and show how your product supports their current priorities.
Create ICP from existing customers
Another approach is to build an ICP based on real customer data. This ensures your targeting is tied to past success but may limit new potential sales opportunities.
Additional tips to define ICP
In addition to the standard approach, there are alternative strategies to define your ICP that can reveal new opportunities and refine your targeting.
Step 2: Create lists and folders for prospect organization
Manage lists and prospects from the Leads page in your account.
Snov.io offers unlimited lead storage. If you have your own lead base, import your lists via CSV or sync directly from your CRM (Pipedrive or HubSpot) with our native integrations.

Step 3: Find prospects based on ICP
Now for the practical part—collect prospects that match your ICP.
Snov.io’s Finder tools let you run targeted searches for people or companies, find prospects in bulk, or enrich lead data from spreadsheets.
Our prospect data is sourced from LinkedIn, ensuring accuracy and up-to-date information. We enrich prospects with the key data points you need for basic personalization at scale.
The best way to prospect is with tools that allow filtered searches. Snov.io’s Finder tools do exactly that.
Database Search: use ICP details as search filters
Snov.io's Prospect Database Search is the easiest way to find leads according to your ICP.
There are a few customizable filters for precise results—you can apply them in various combinations to get the desired results.
How to use it:
You enter key details like job position, location, industry, and skills—we provide prospects that match the profile. All prospects from the database have pre-verified emails.
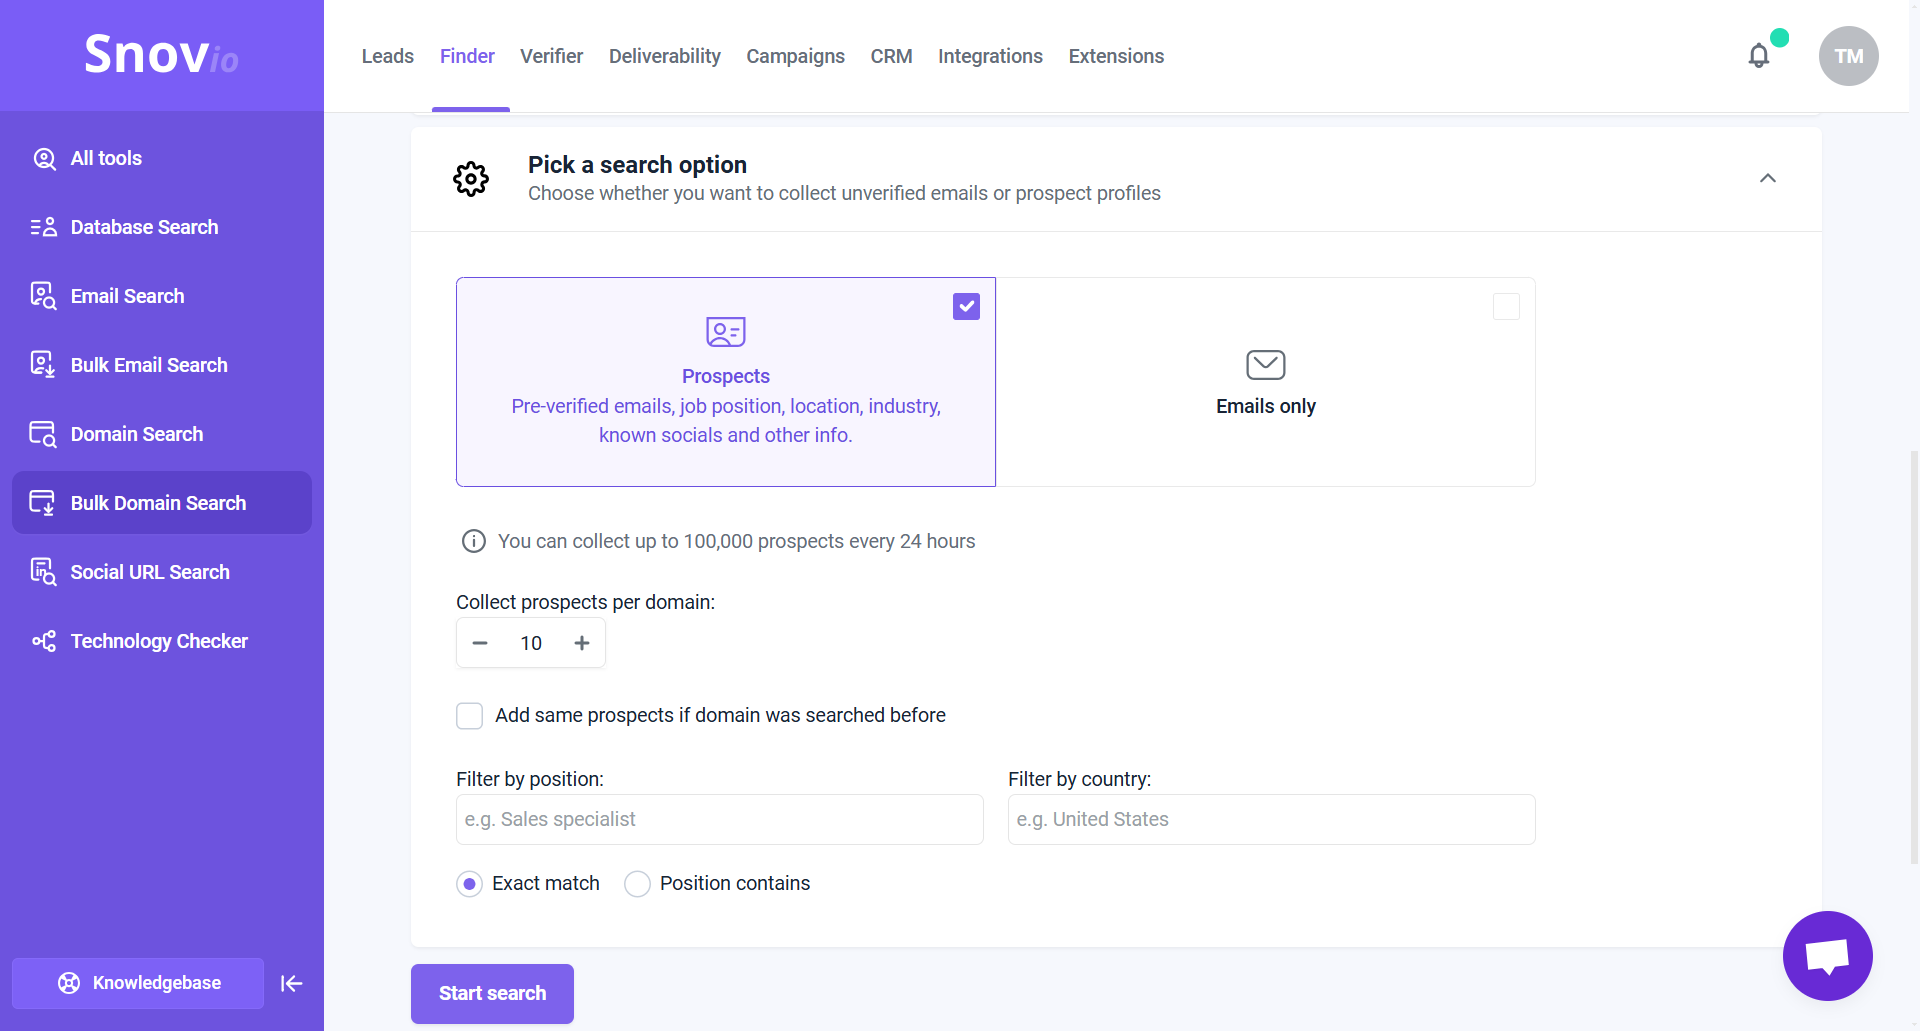
Bulk Domain Search: get emails from domains
Using this tool, you can find prospects or email addresses on company domains in bulk.
How to use it:
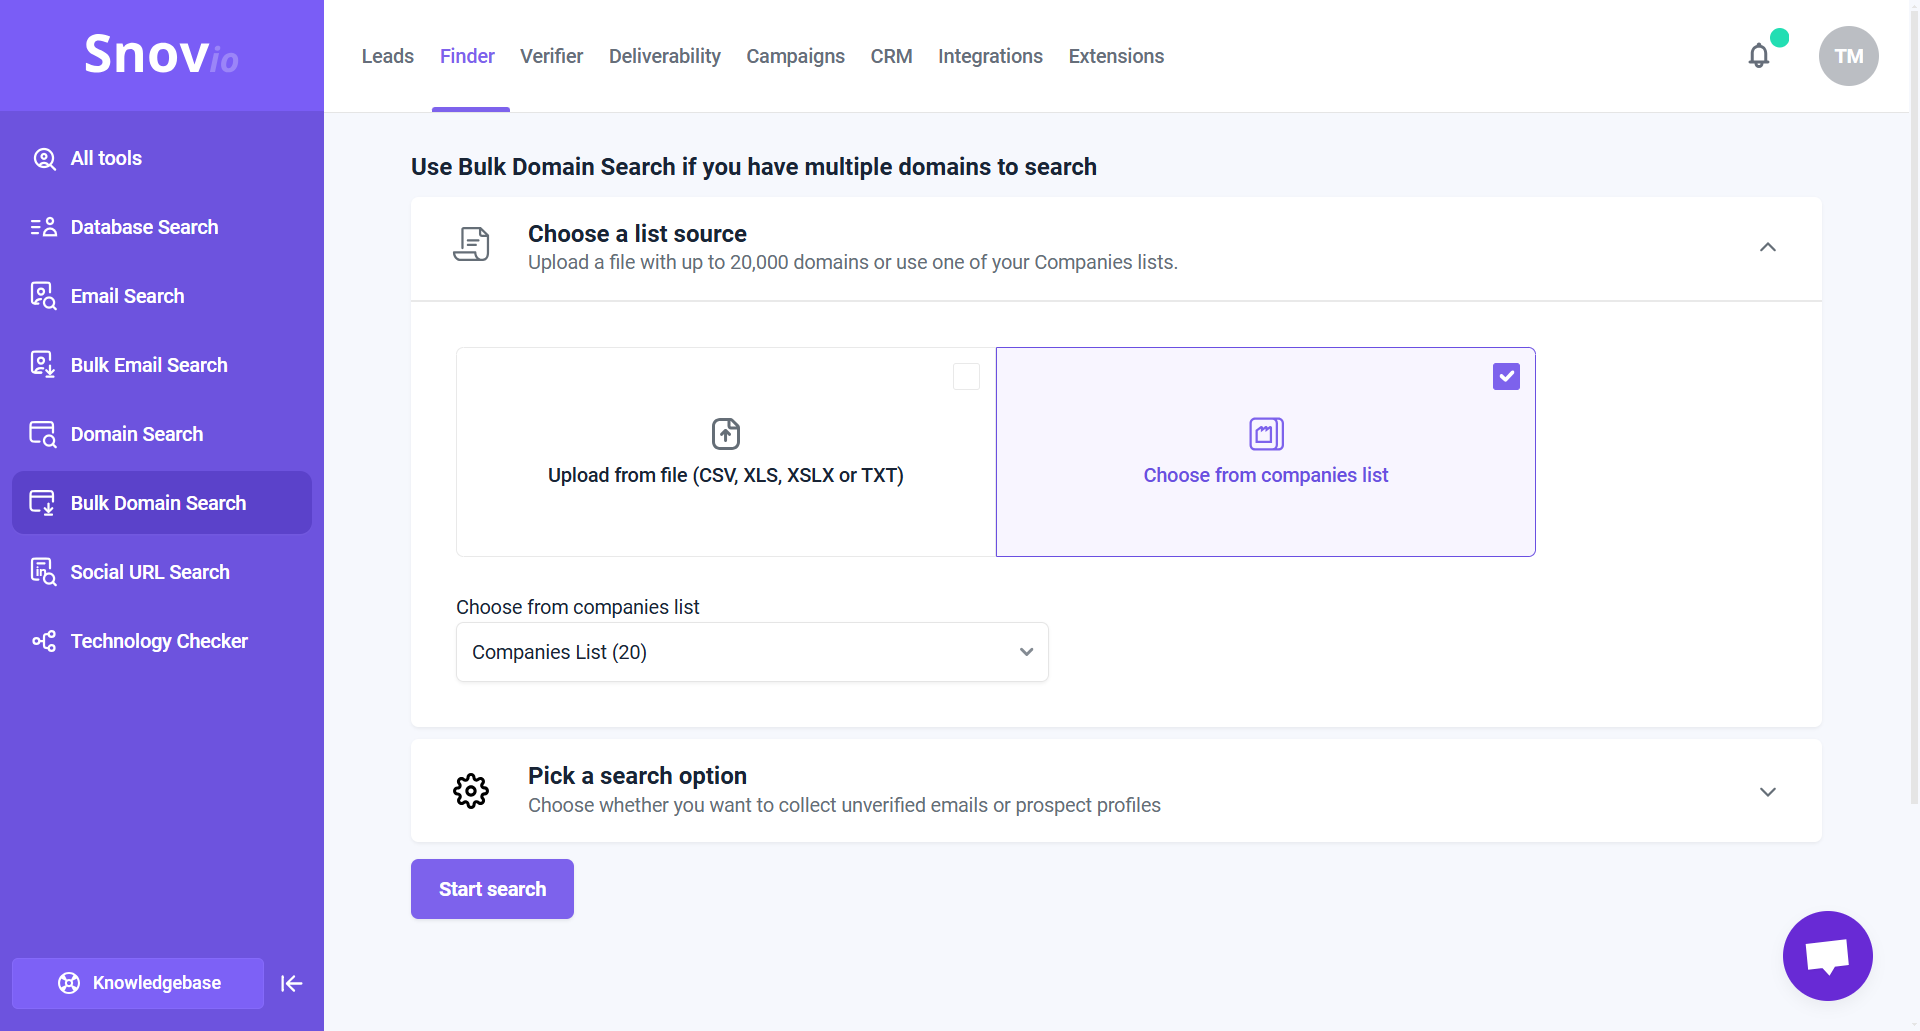
On the Finder Tools page, select Bulk Domain Search.
Upload a CSV file with domains. You can search up to 20,000 domains per search. To get prospects that match your ICP, add keywords to the job position and location filters.
Remember: when we mention Prospects, we're referring to enriched profiles with pre-verified emails. In tools like Domain Search and Bulk Domain Search, you also have the option to find Emails Only. These emails still require verification.
Don't have domains to upload? We have a solution:
Use Company Database Search to find a list of companies filtered by industry, company size, and location.
In the Bulk Domain Search, select the saved list of companies to find prospects from.
LinkedIn Prospect Finder extension: collect leads from LinkedIn
Our LinkedIn prospecting extension is the most efficient way to collect leads from LinkedIn.
You can try it even with a free LinkedIn account. Paid accounts (LinkedIn Premium or Sales Navigator) have extended search filters.

How to use it:
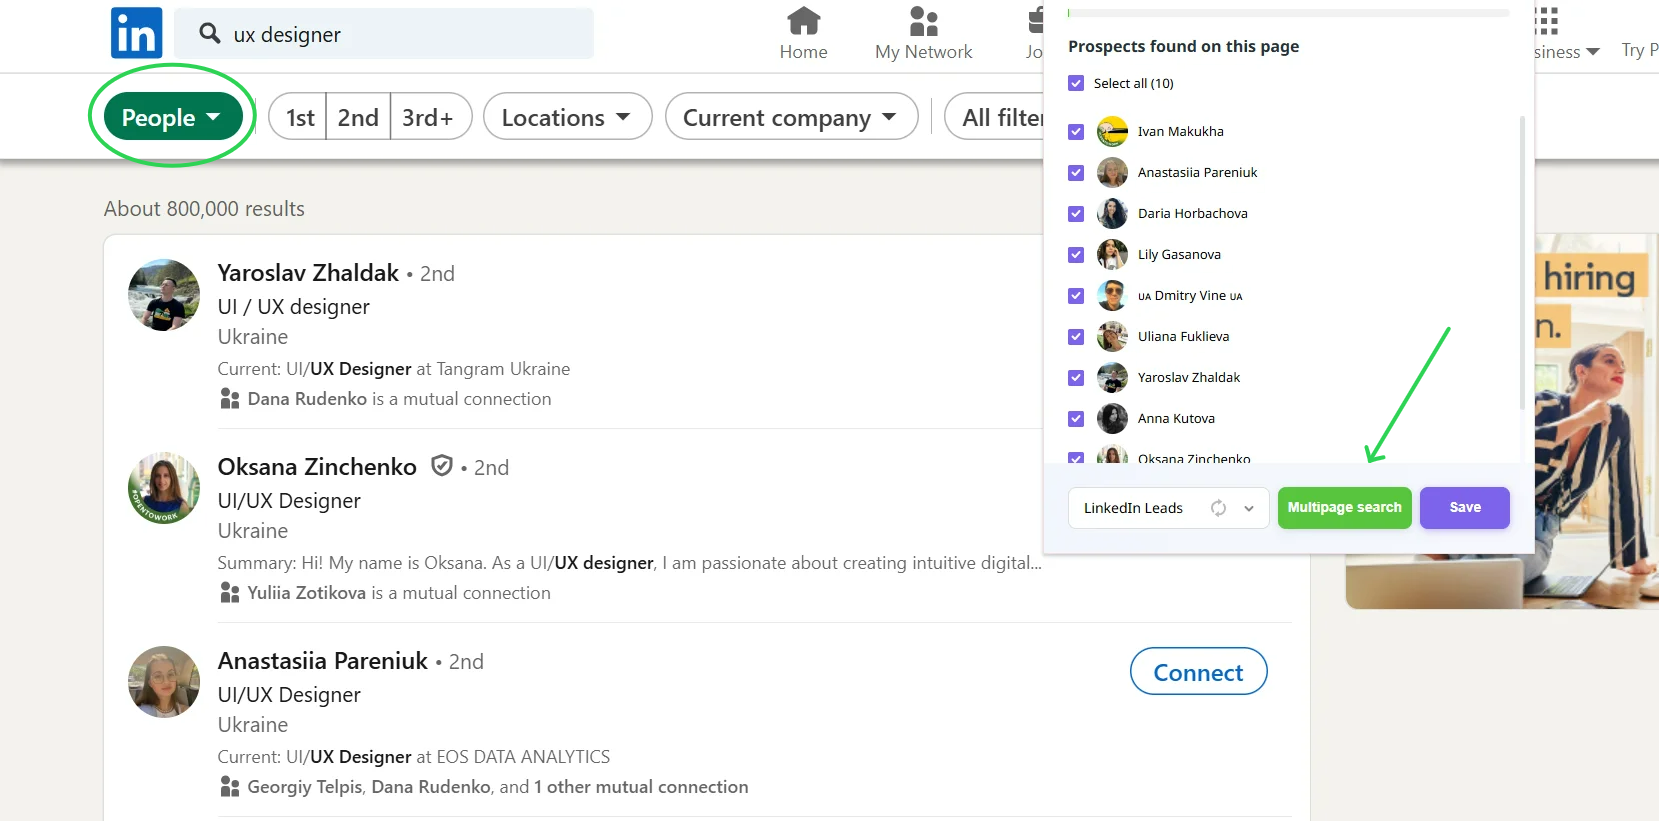
Install the LIPF extension from Chrome Store → Go to LinkedIn.
Enter the prospect's job position you're looking for in the search bar, and select the People filter.
Click the extension icon in the top-right corner. It can automatically search multiple pages of results—you set the search limit based on how many prospects you need. To save prospects in bulk, select the Multipage search option.
Read about more ways to collect leads on different LinkedIn pages.
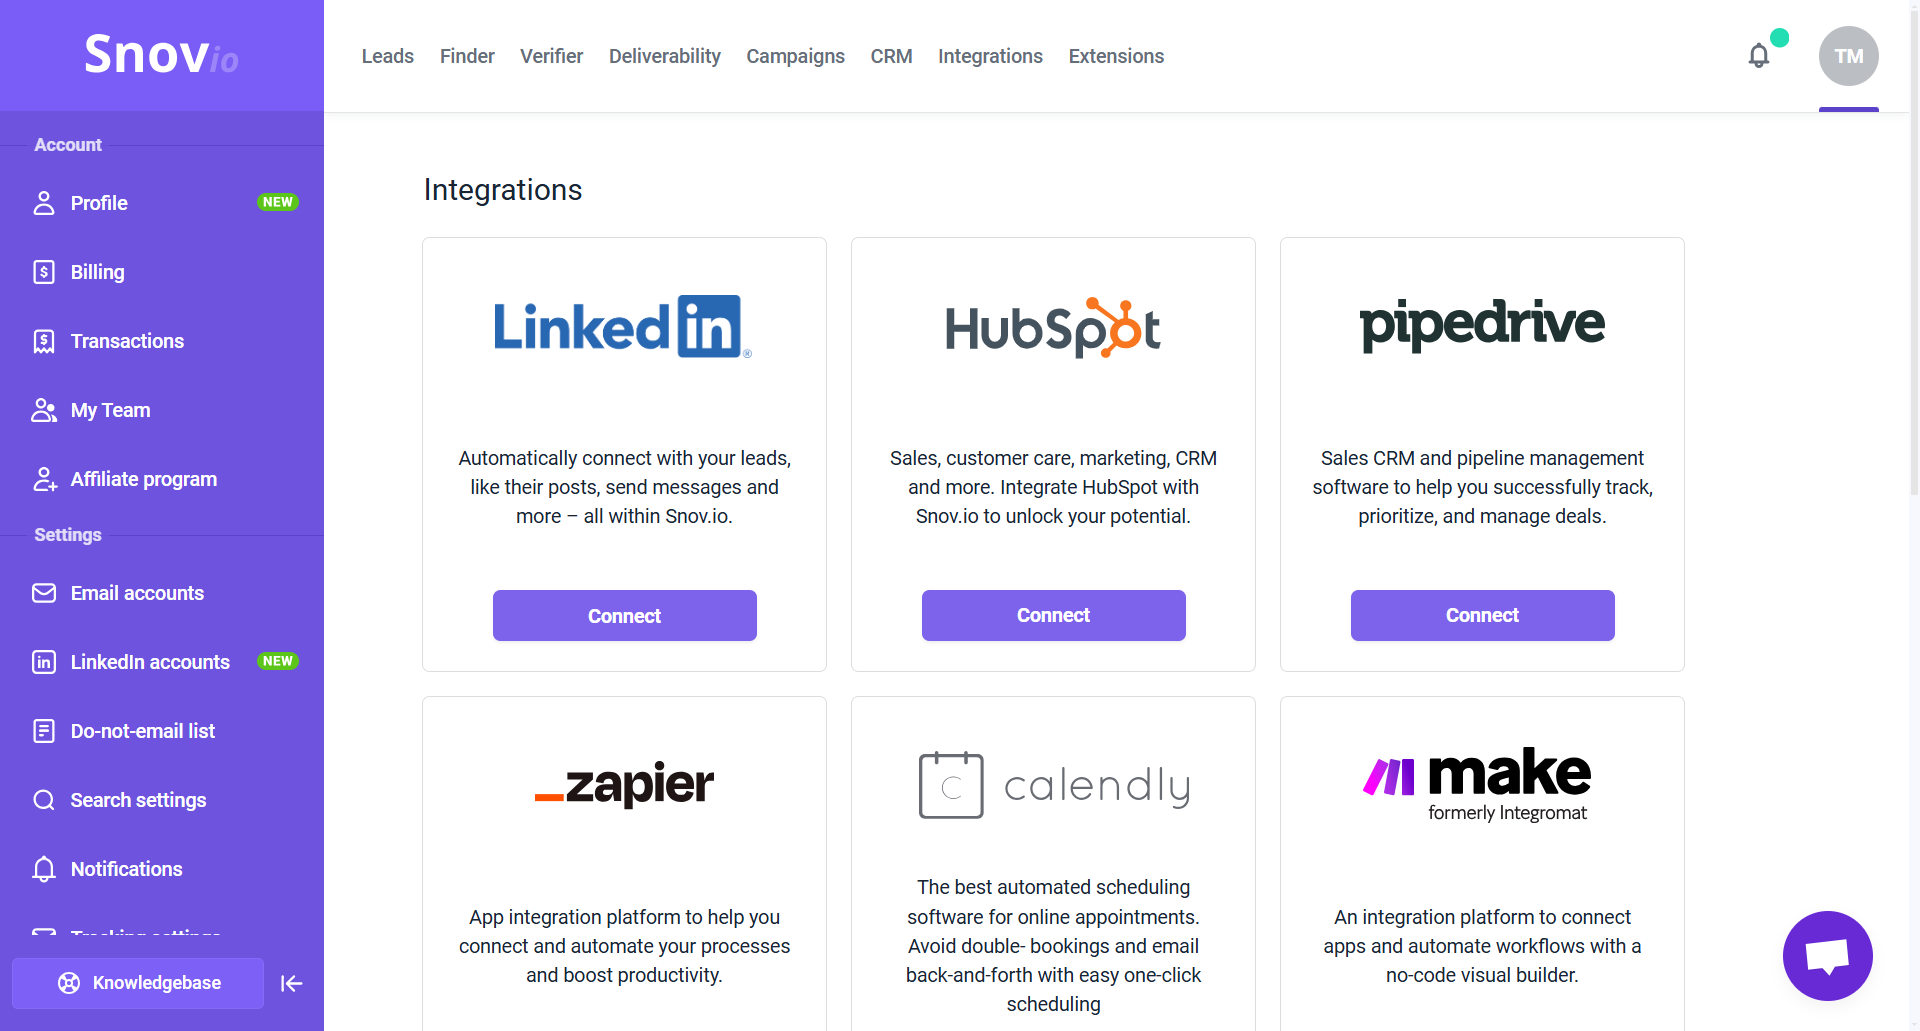
Native integrations: Transfer leads from or to your CRM
Snov.io's native integrations allow you to enable two-way data synchronization between your CRM and prospect lists in Snov.io.
You can transfer your lead databases from the CRM to Snov.io or set up an automatic transfer of newly created leads in both directions—from CRM to Snov.io and from Snov.io to CRM.
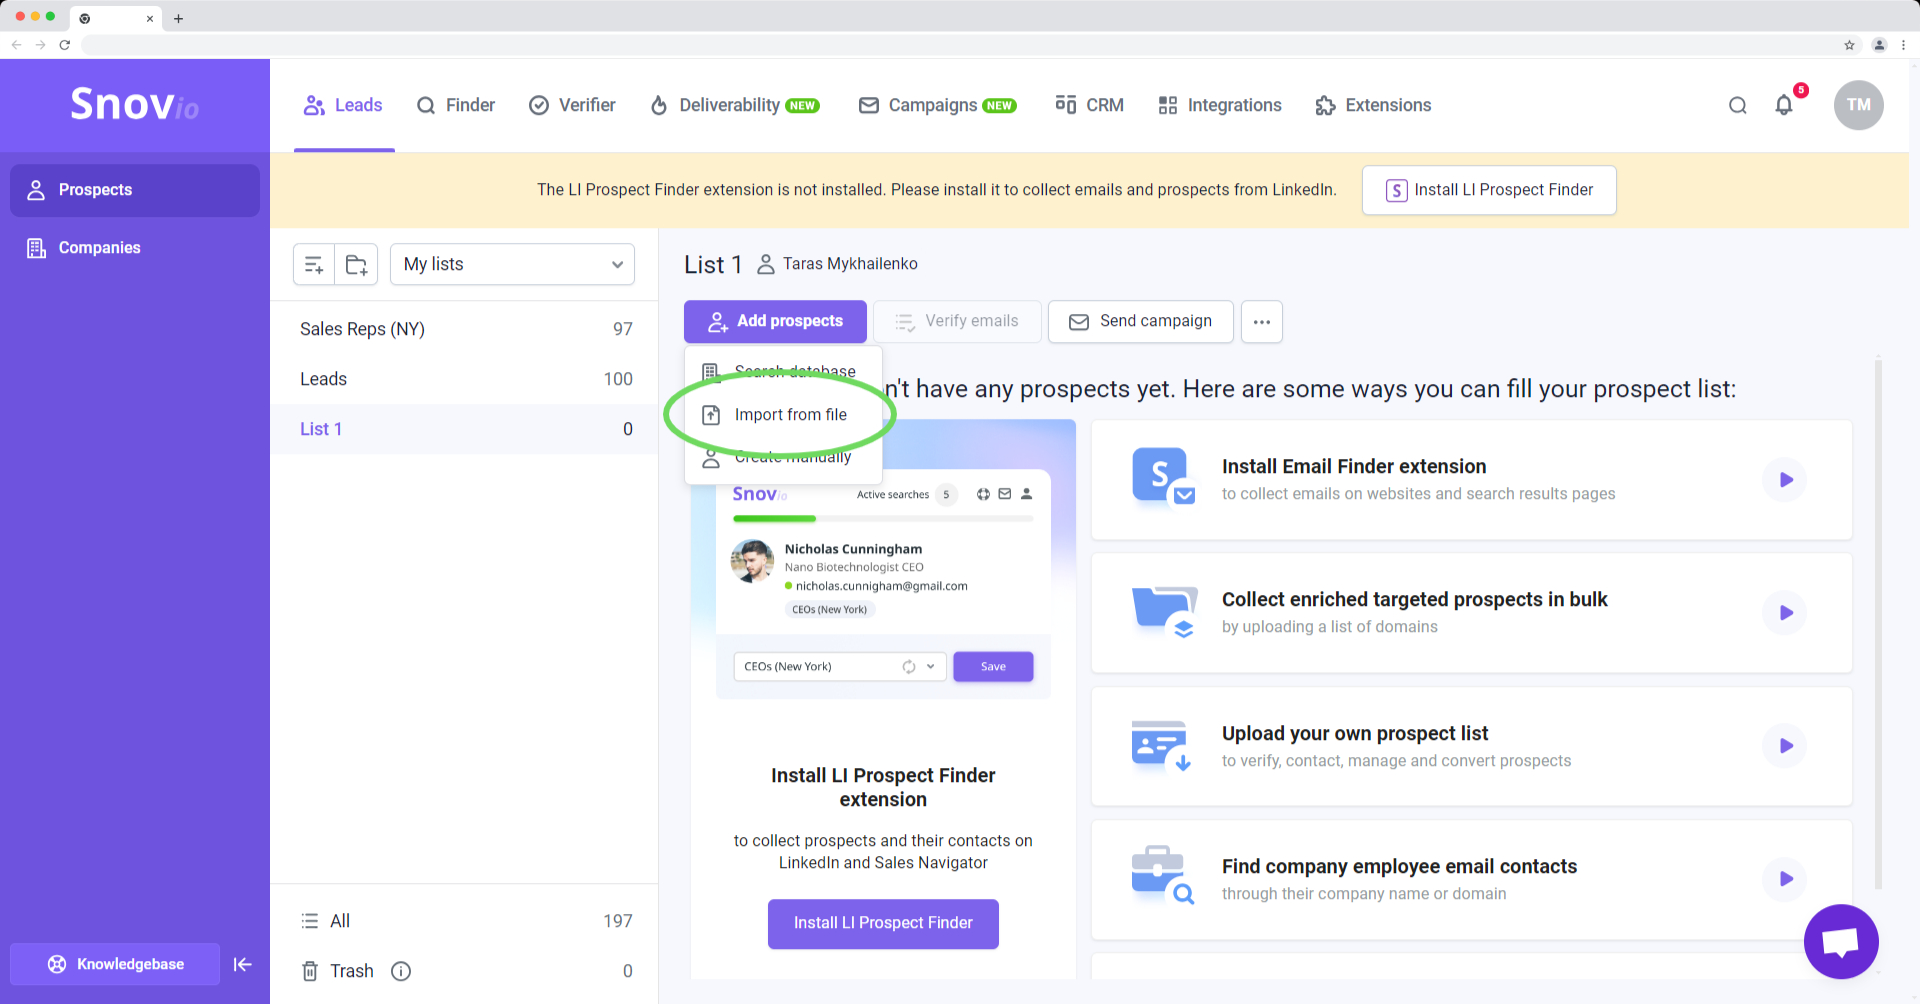
Import from file: Add your own prospects
You can also upload lead lists or emails you already have.
We offer unlimited data storage at no extra cost – you can create as many lists and upload as many prospects as required. The Import option in Snov.io supports .csv or .xls files with up to 100,000 rows of data.
Create custom fields for personalization
If you have any relevant information about your leads, you can use it to personalize your Snov.io campaigns.
Add this information to a separate column in your CSV file. Each prospect in the file should have their own row with the custom data in that column.
Using the file import, you can add this data in bulk to all prospects in your Snov.io list.
Go to your Prospects page and choose Import from file option.
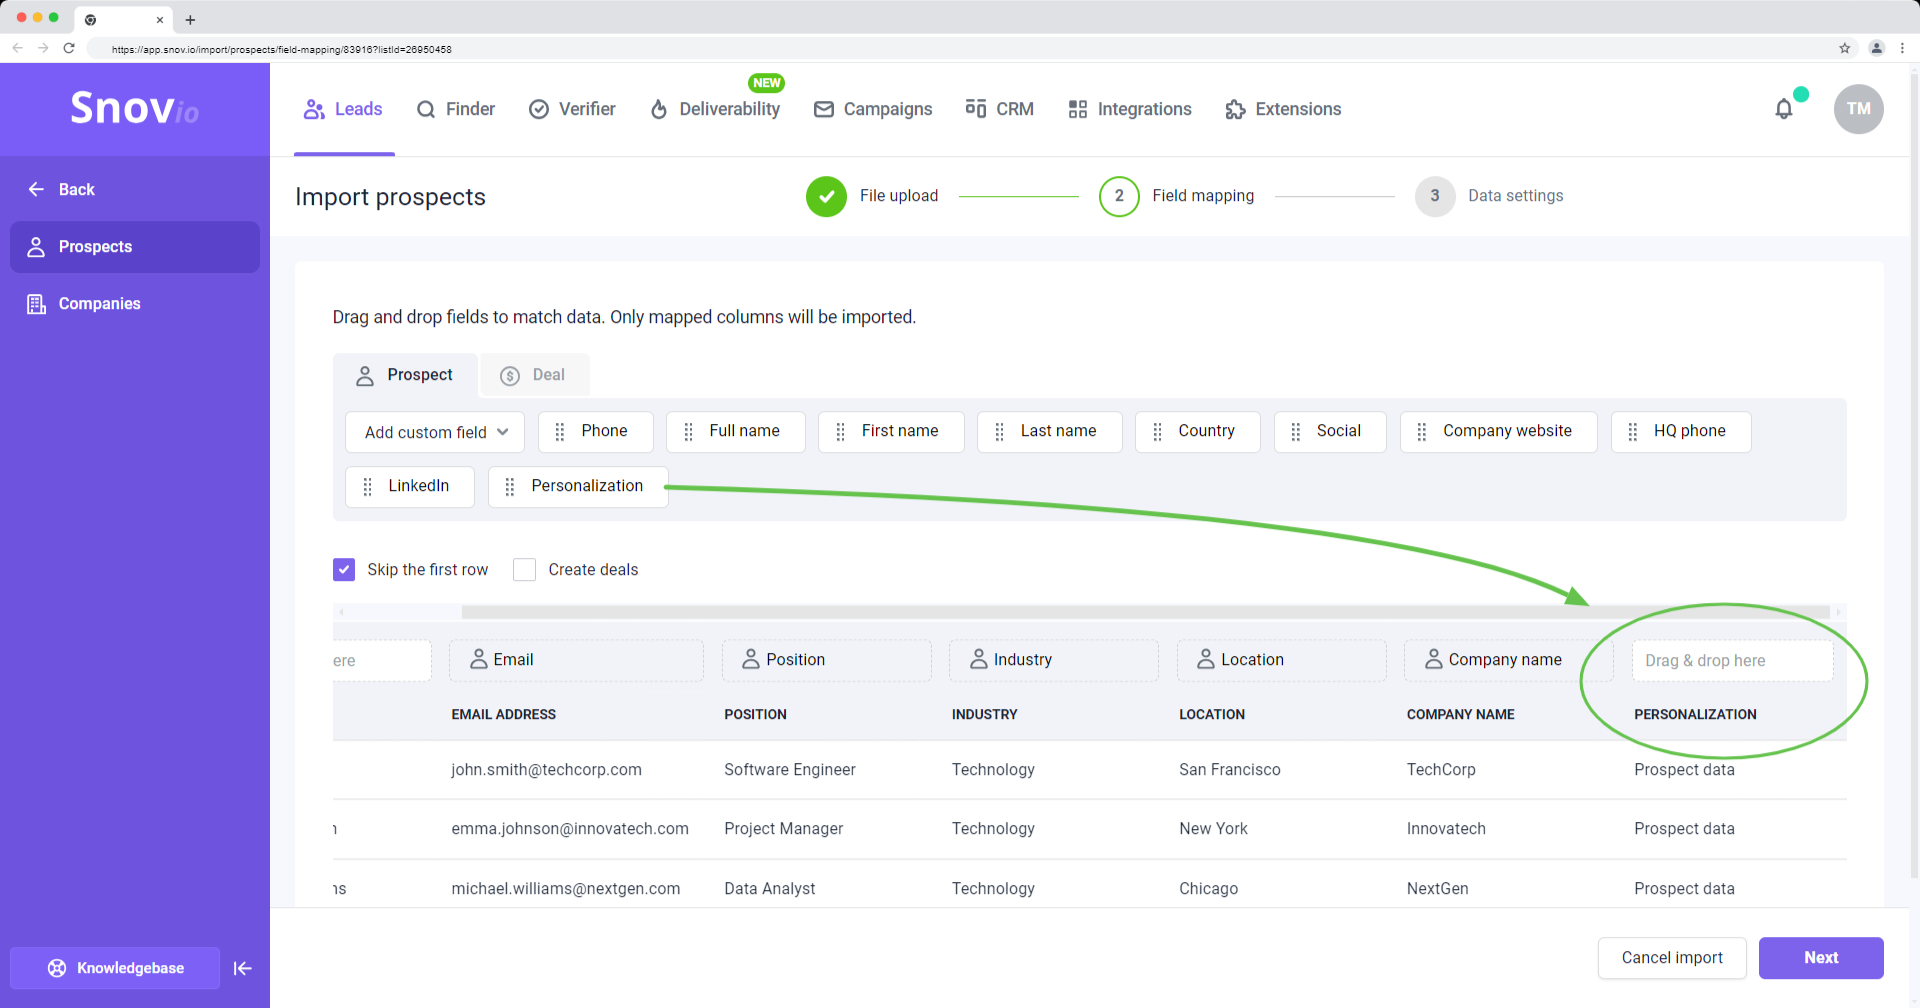
During the import, create new custom fields in Snov.io for the data from your file. Click on Add custom field and select the Prospect type.
To upload data correctly, map the custom fields to the corresponding columns from your file. You can do this by dragging the fields to the appropriate headers in the import settings.
Field mapping ensures that data from that columns in your file will be uploaded to the appropriate fields in the prospect profiles.
You can create up to 30 custom fields. For each custom field, Snov.io will generate variables (placeholders). If the field name is "Personalization", Snov.io will automatically create a variable {{personalization}}. This variable can be inserted into your emails and LinkedIn messages to automatically add data from that field to the content.
A few examples of custom fields you can create are:
- {{leads_pain_point}}
- {{leads_goal}}
- {{ice_breaker}}
- {{unique_intro}}
Step 4: Verify lists
When you add prospects using our tools, email verification is included. If you upload email lists from other sources and are unsure about their quality, you can use the built-in Verifier.
Snov.io uses a 7-step validation process -- expect up to 98% email verification accuracy.
After verification, you'll see the prospects sorted by email status in the top right corner. Later, when creating campaigns, you'll decide which email statuses to add to your final recipient list.

What’s next:
Congratulations! You’re one step closer to launching a successful outreach campaign. Let's move on to the next guide in this series: writing personalized emails that convey your offer's value effectively.
How to write a killer email copy.
If you feel like this article doesn't address something you can’t figure out, email us at help@snov.io. Your feedback is very important to us!

Sorry about that 😢
How can we improve it?