In this article, you will learn how to integrate your Snov.io and HubSpot accounts to synchronize prospect data between the two systems.
How to set up the integration:
Step 1. Connect integration -->
Step 2. Choose a sync direction -->
Step 3. Set data sync settings -->
Step 4. Add constant fields -->
Step 5. Sync existing data -->
Step 6. Manage data conflicts -->
Before you begin, make sure you meet the criteria to create the integration: you should either be a super admin or have App Marketplace permissions in your HubSpot account.
With Snov.io x HubSpot integration, you can easily share prospect data and keep your lists synced in real-time, ensuring that your databases are always up to date.
Transfer prospects from Snov.io to your HubSpot lists for further management, or refill your Snov.io lists with contacts from HubSpot to boost your email campaigns.
Here's what you get by connecting the integration:
- Two-way sync keeps prospect lists constantly updated in real-time.
- Automatic data sharing without manual export/import.
- Field mappings already set up with an option to add your custom mappings.
- Data sync settings are available to help you organize the flow of prospects.
- Retroactive sync to transfer pre-existing records created before you’ve set up the integration.
How the integration works and what data sync means
Data is exchanged between the apps through field matching or mapping. This means that each default field in one app corresponds to a matching field in the other app.
By mapping the fields, the two apps can share relevant data between their systems.
Anytime you add, update, or delete a prospect record in one application, those changes will automatically be updated in the other application.
When selecting the sync type, you can choose to share data from one app to the other only, or have it synchronized in both directions (default option).
Once the integration is connected, new data will be synced between apps in real-time. You can also transfer data created in either app before setting up the integration using manual sync.
How to set up the integration
Now that we know the basics, it's time to start setting up the integration.
Step 1. Connect the integration
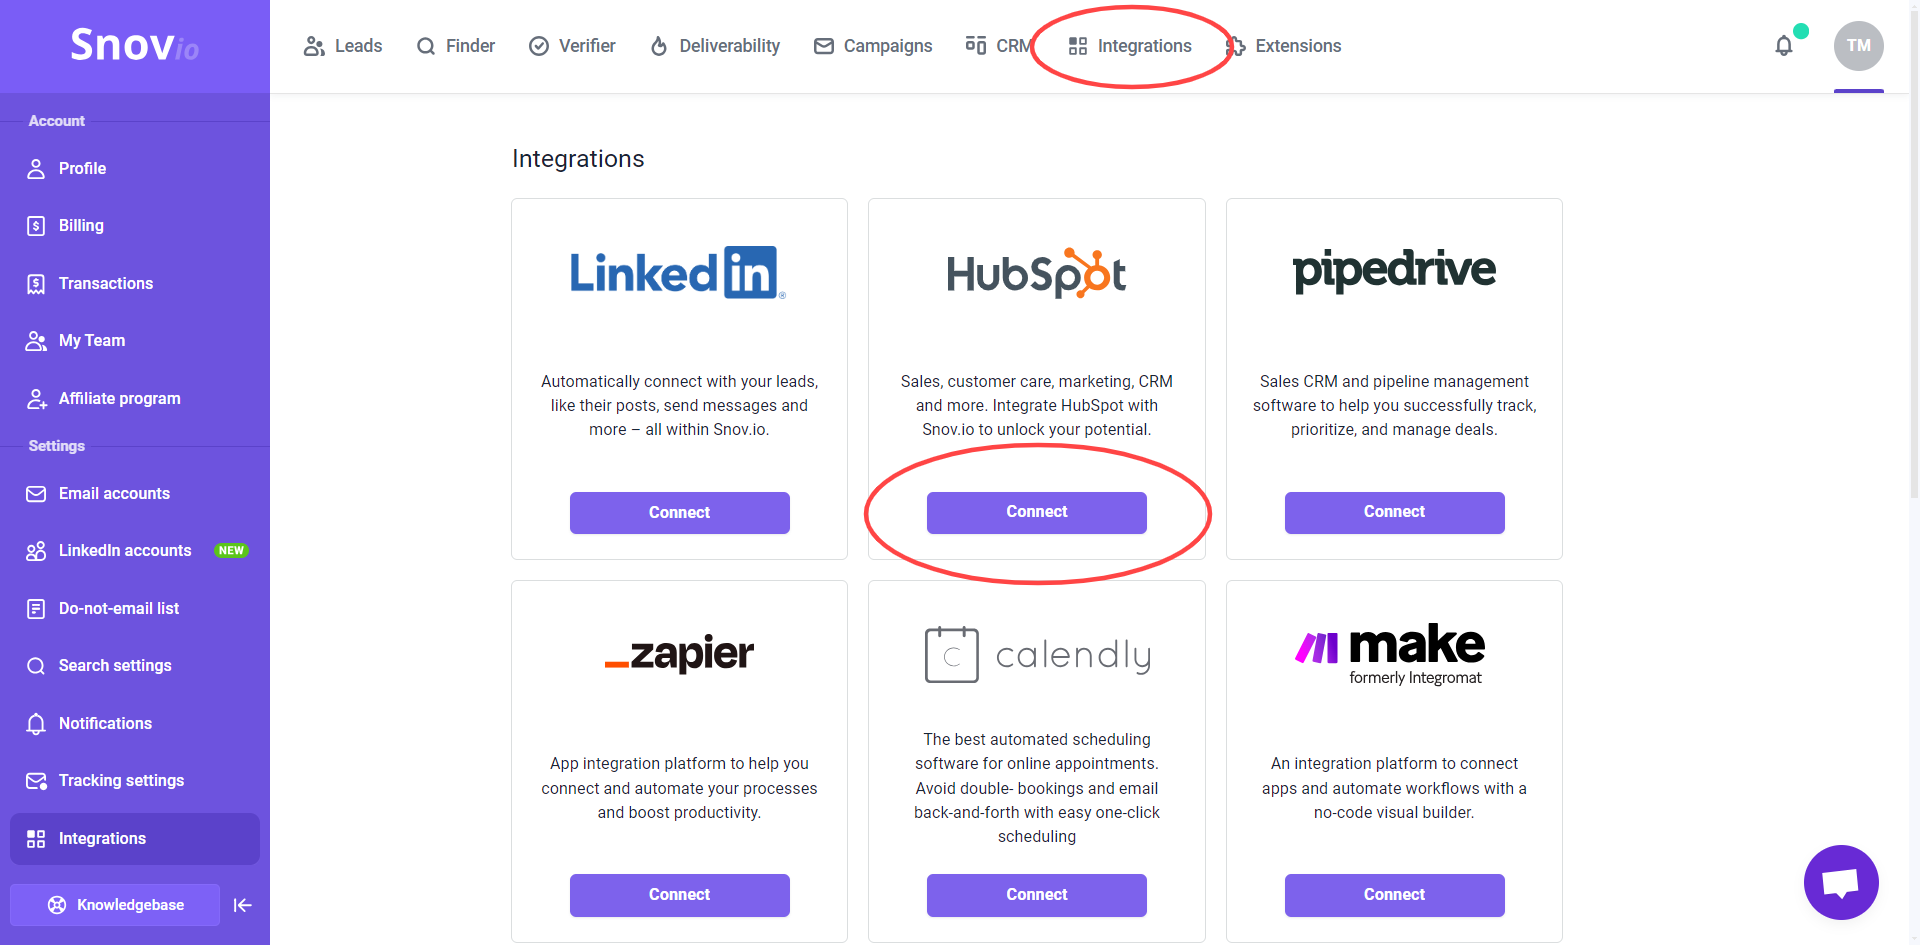
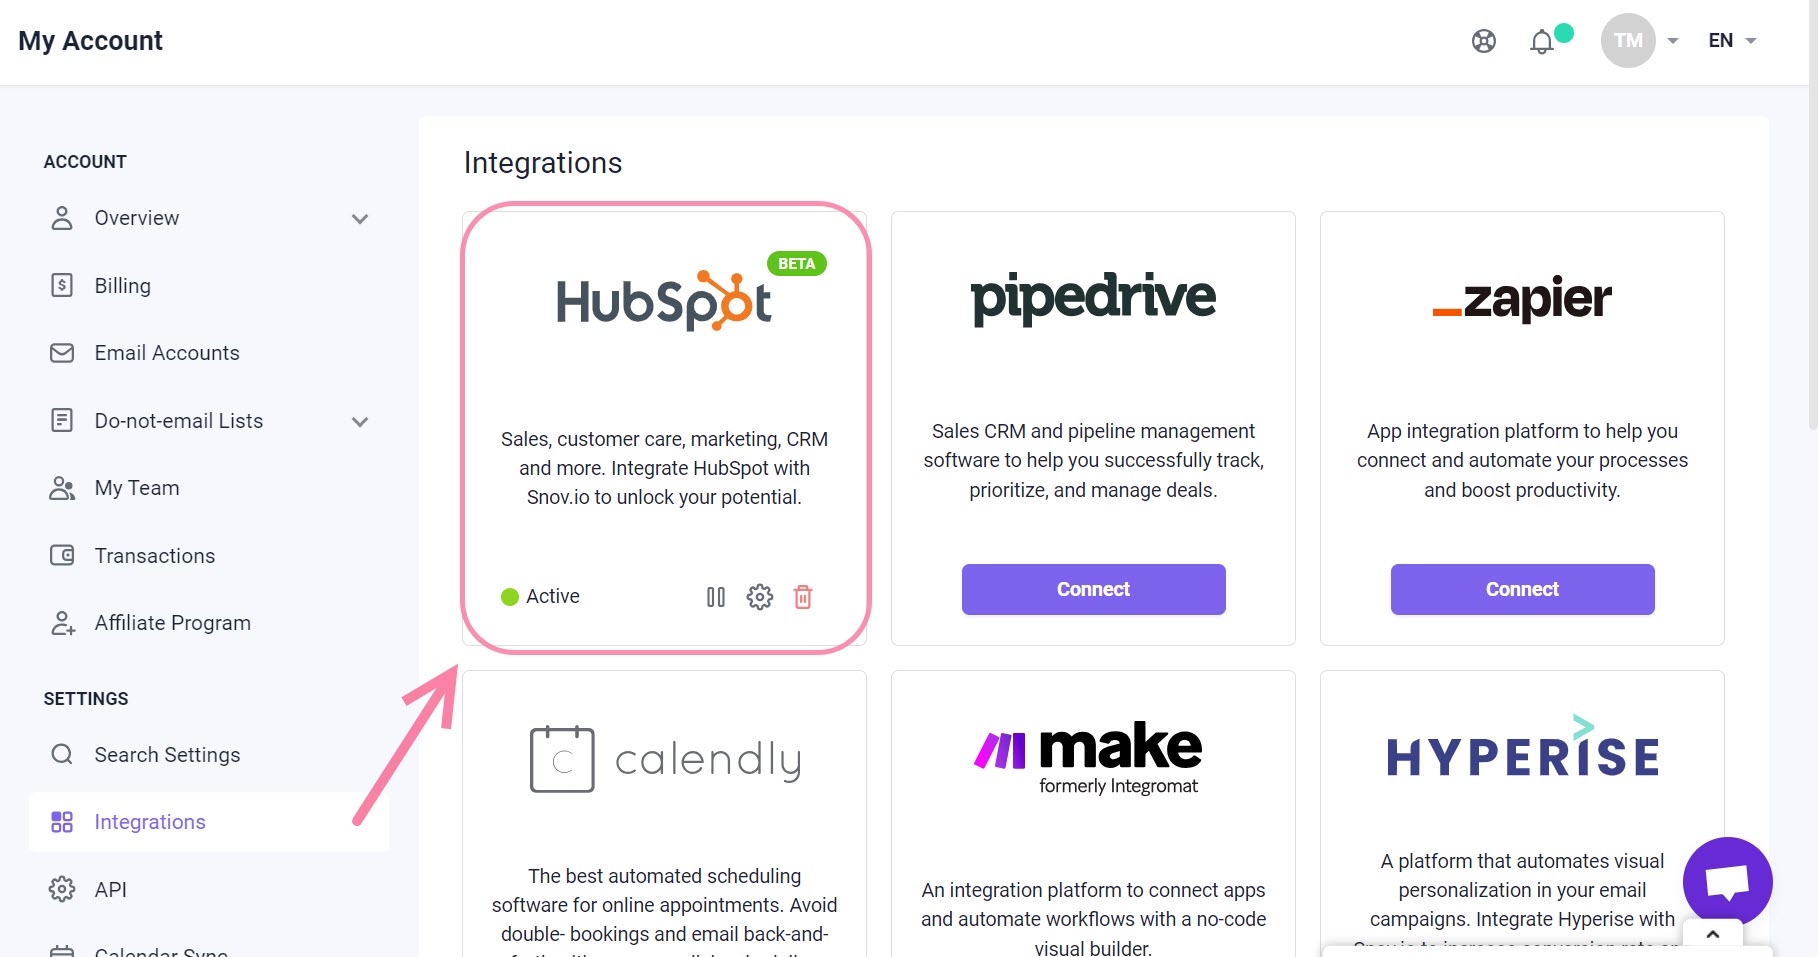
To begin connecting the integration, go to the Integrations --> page in your account settings.
Click on Connect for the HubSpot integration.
You’ll be redirected to a page where you can choose a HubSpot account to integrate with Snov.io.
Once you have chosen the HubSpot account, review the app permissions and then click on Connect app to continue.
This will take you to the integration settings page within your Snov.io account.
Step 2. Choose a sync direction
Under the Synchronization type section, choose a sync type to determine the direction your data will be shared.
This parameter allows you to share data from one application to the other or synchronize information between both applications.
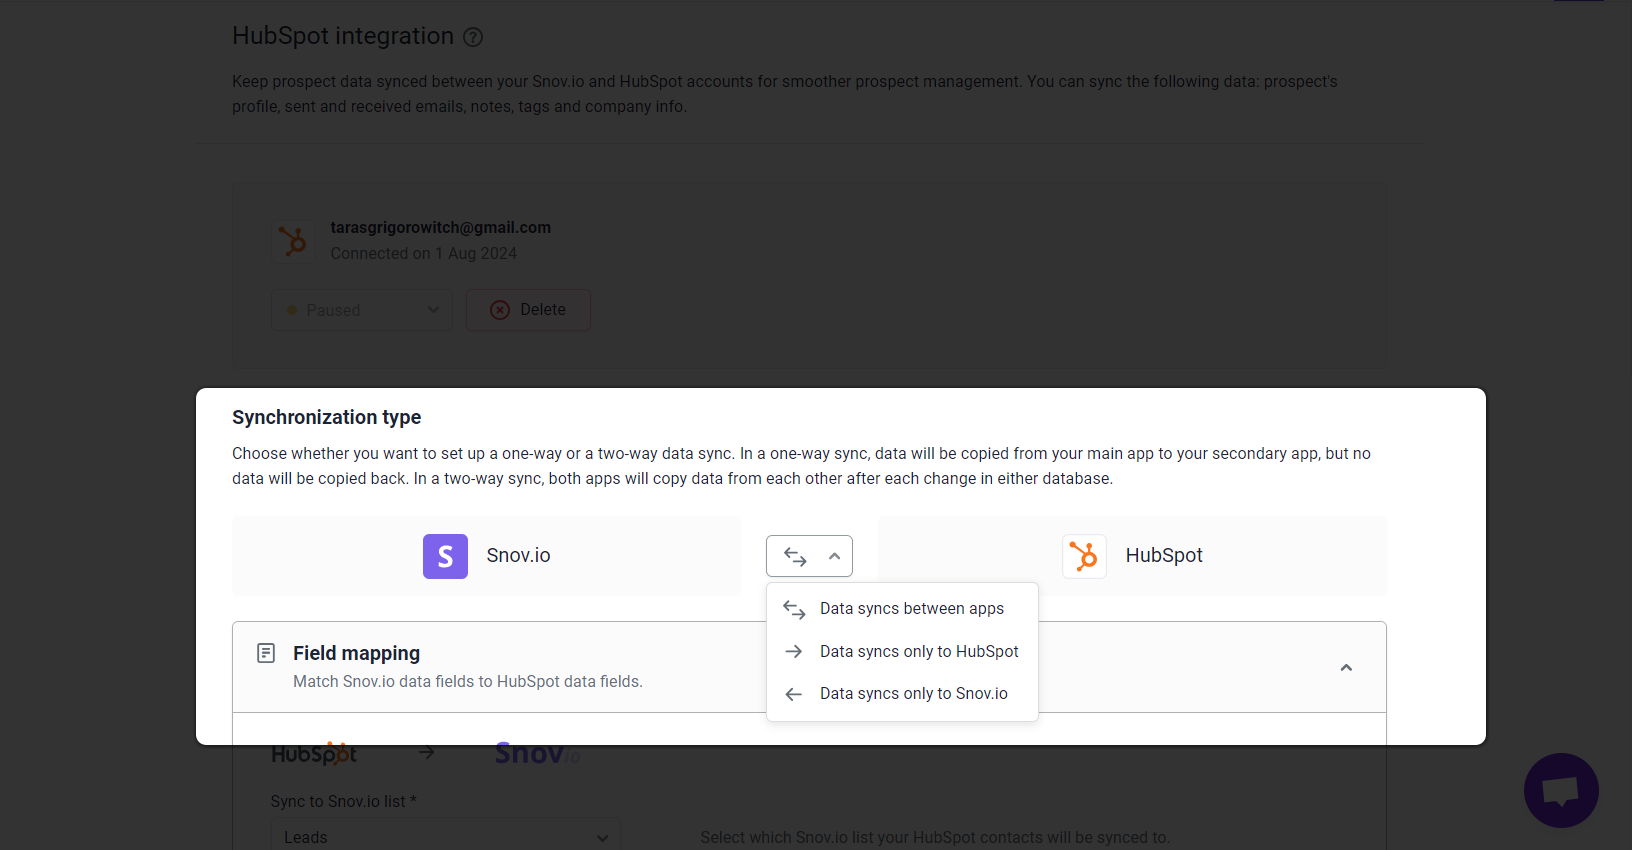
There are three options:
1) Two-way sync (default type):
Data sync runs both ways. Any new prospects created or existing prospects updated in one application will be copied and reflected in the other application as well.
2) Data syncs only to HubSpot:
Any new, updated, or deleted data in your Snov.io account will be synchronized with your HubSpot account.
If you select this integration type, Prospects from Snov.io will be synced to Contacts in HubSpot.
Changes made to your data in HubSpot will not be reflected in Snov.io.
3) Data syncs only to Snov.io:
Any new, updated, or deleted data in your HubSpot account will be synchronized with your Snov.io account.
If you select this integration type, Contacts from HubSpot will be synced to Prospects in Snov.io. Any changes made to your data in Snov.io will not be reflected in your HubSpot account.
Step 3. Set data sync settings
In this step, configure how the data will be shared between Snov.io and HubSpot.
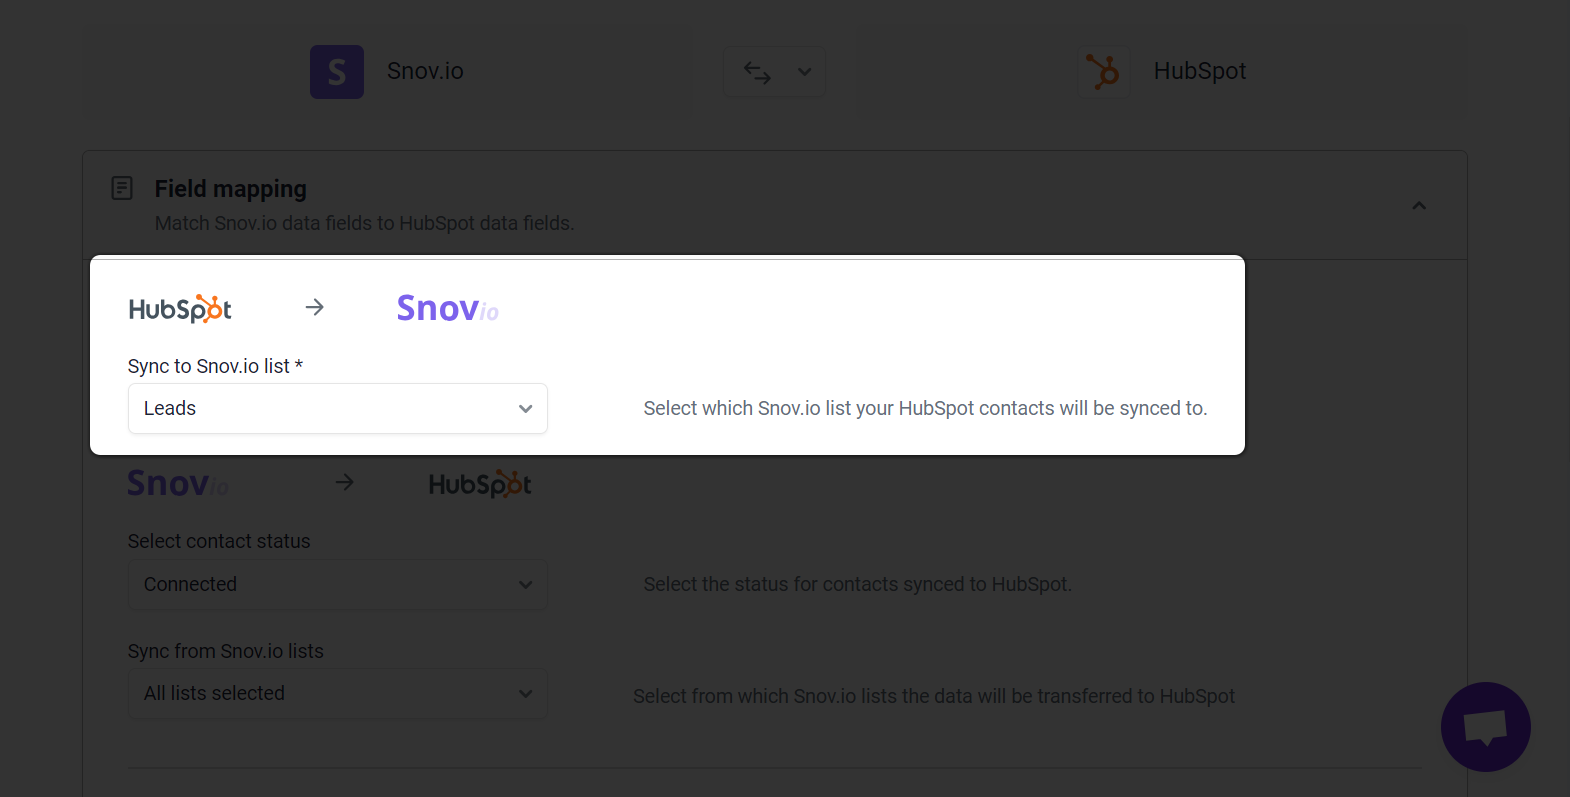
Select Snov.io list for HubSpot contacts
Use the drop-down menu to choose the Snov.io list where you want to store the contacts synced from HubSpot.
Select Snov.io lists for integration
Use the drop-down menu to pick the specific prospect lists from which you want to transfer the data to HubSpot.
If you want to transfer data from all your Snov.io lists, select the "All lists selected" option.
Choose the specific lists you use for collecting or importing prospects. If you move prospects from other lists to the lists selected in the integration settings, data syncing will not be possible.
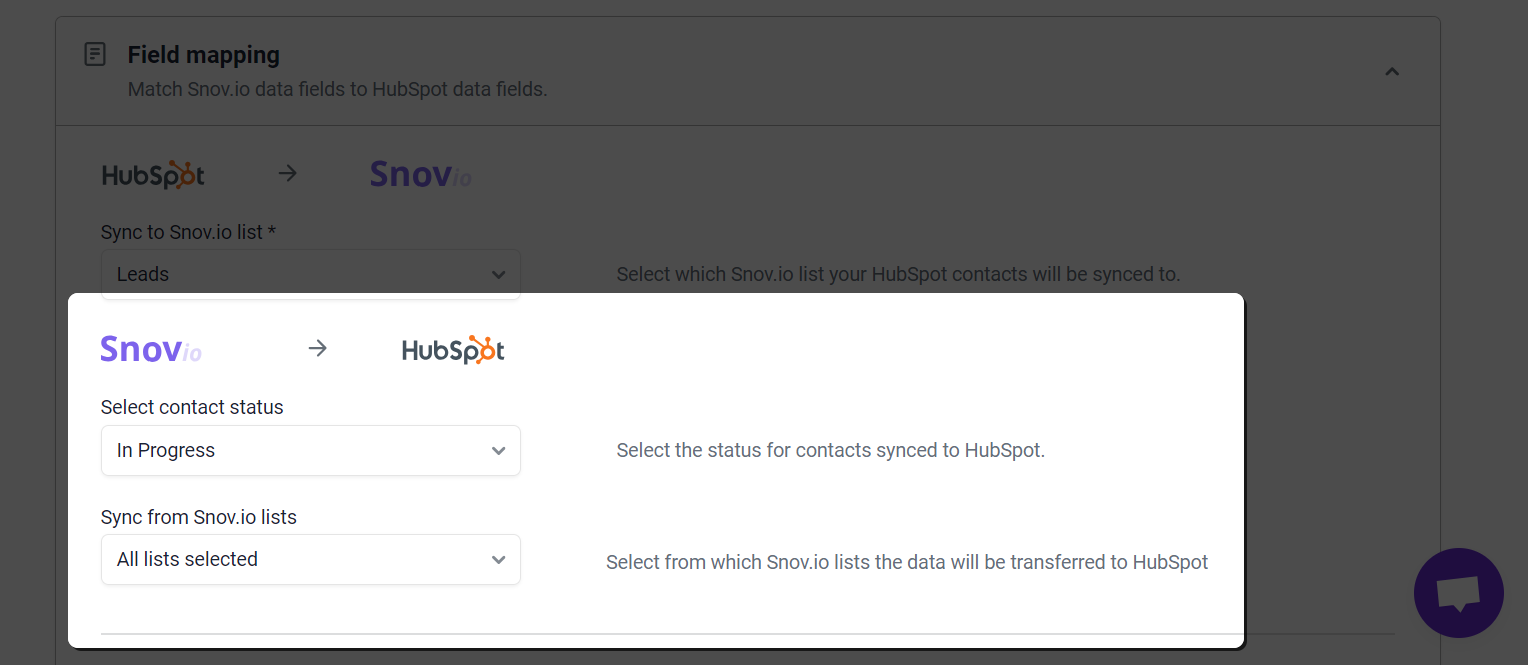
Select contact status in Hubspot
Choose the status that contacts will have in HubSpot after being transferred from Snov.io. By default, contacts will be set to "Connected" in HubSpot.
Map fields
Field mapping determines how data is shared between the two apps. You can adjust default fields or add custom mappings to match corresponding data fields that you have in both apps.
First name, Last name, and Email field mappings cannot be deleted or modified. If a prospect contains multiple emails, only the primary email will be synced.
The following data fields from the prospect's profile will be mapped by default. Synced data will also include sent/received emails and prospect notes.
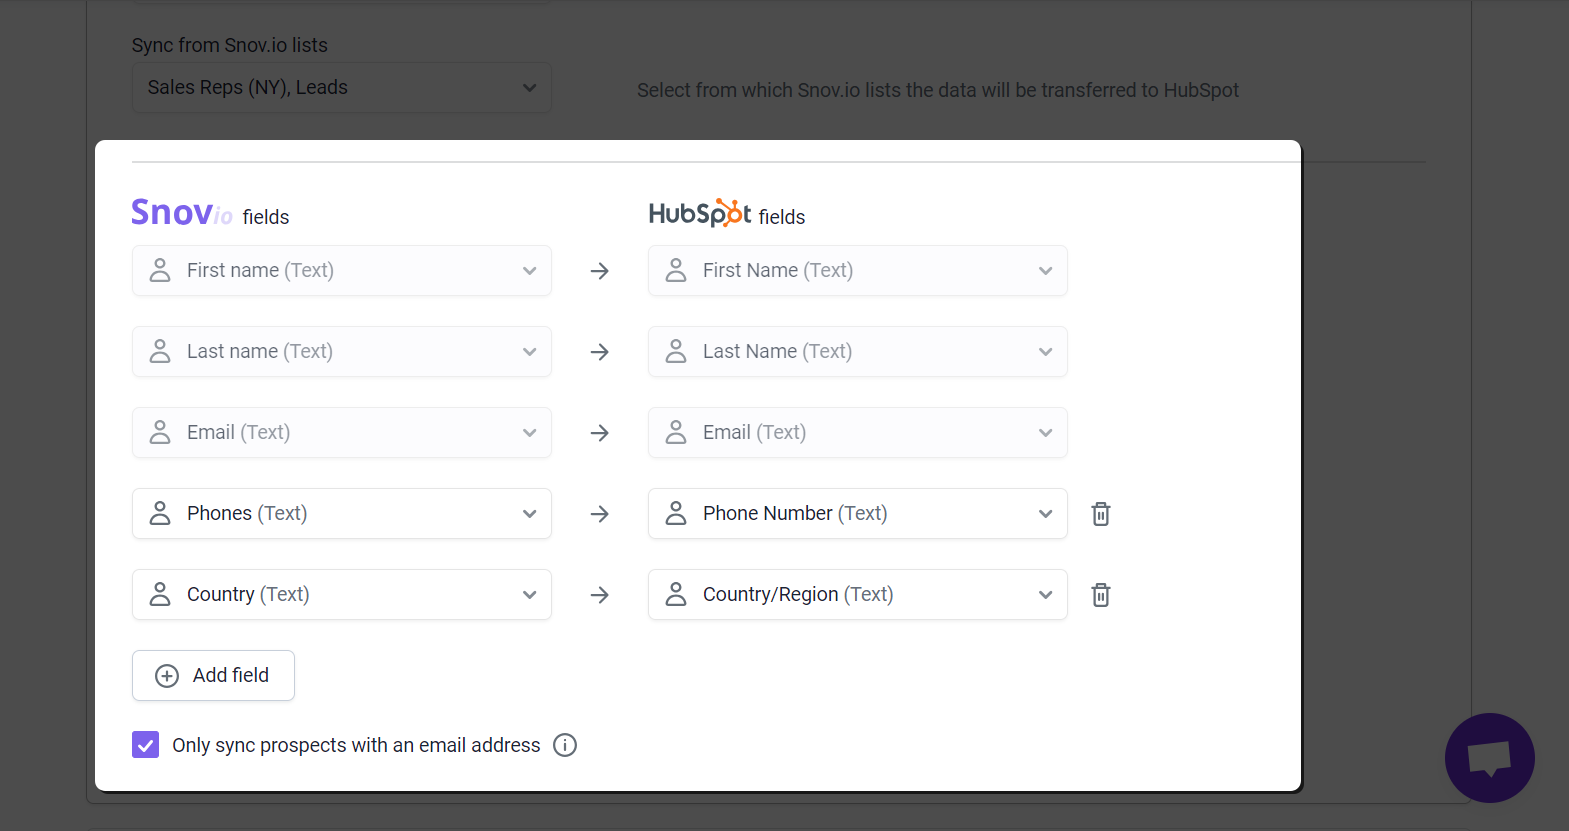
To add a field mapping, both fields must have the same data type. For example, you can only match a Text type field from Snov.io, with a Text type field from HubSpot.
- Click Add a field
- Choose a Snov.io field from the drop-down list → select a matching HubSpot field.
The drop-down list includes all the fields available for mapping.
You can create a custom Snov.io field to match your custom fields in HubSpot. Scroll down the drop-down list and click +Create custom field.
To remove a mapping, click on the trash icon located next to the row of the mapped fields. Deleting the mapping will not delete the custom field itself.
You can only map each field (default or custom) once. If you create new custom fields in HubSpot after setting up the integration, you will need to reconnect it in order to update your field mapping options.
Step 4. Add constant fields
During this step, you'll add constant (fixed) fields to keep track of prospects from Snov.io in HubSpot and contacts from HubSpot in Snov.io. This makes it easier to filter and organize the data that's synchronized during the integration process.
Constants are optional, so you can continue without them.
Click on Constant fields section to open the settings.
For integration from Snov.io to HubSpot:
- Toggle the Add a constant field switch to the enabled position.
- Click on Constant field and select a custom HubSpot field from the drop-down list.
- In the Constant value field, enter your constant. For example, "from Snov.io".
The list of HubSpot fields includes all fields created before connecting the integration. If you want to create a new field for a constant value in Hubspot, please reconnect the integration after doing so to update the available fields.
Once you add a constant field, all prospects that are synced from Snov.io will have a fixed constant value added to them in HubSpot.
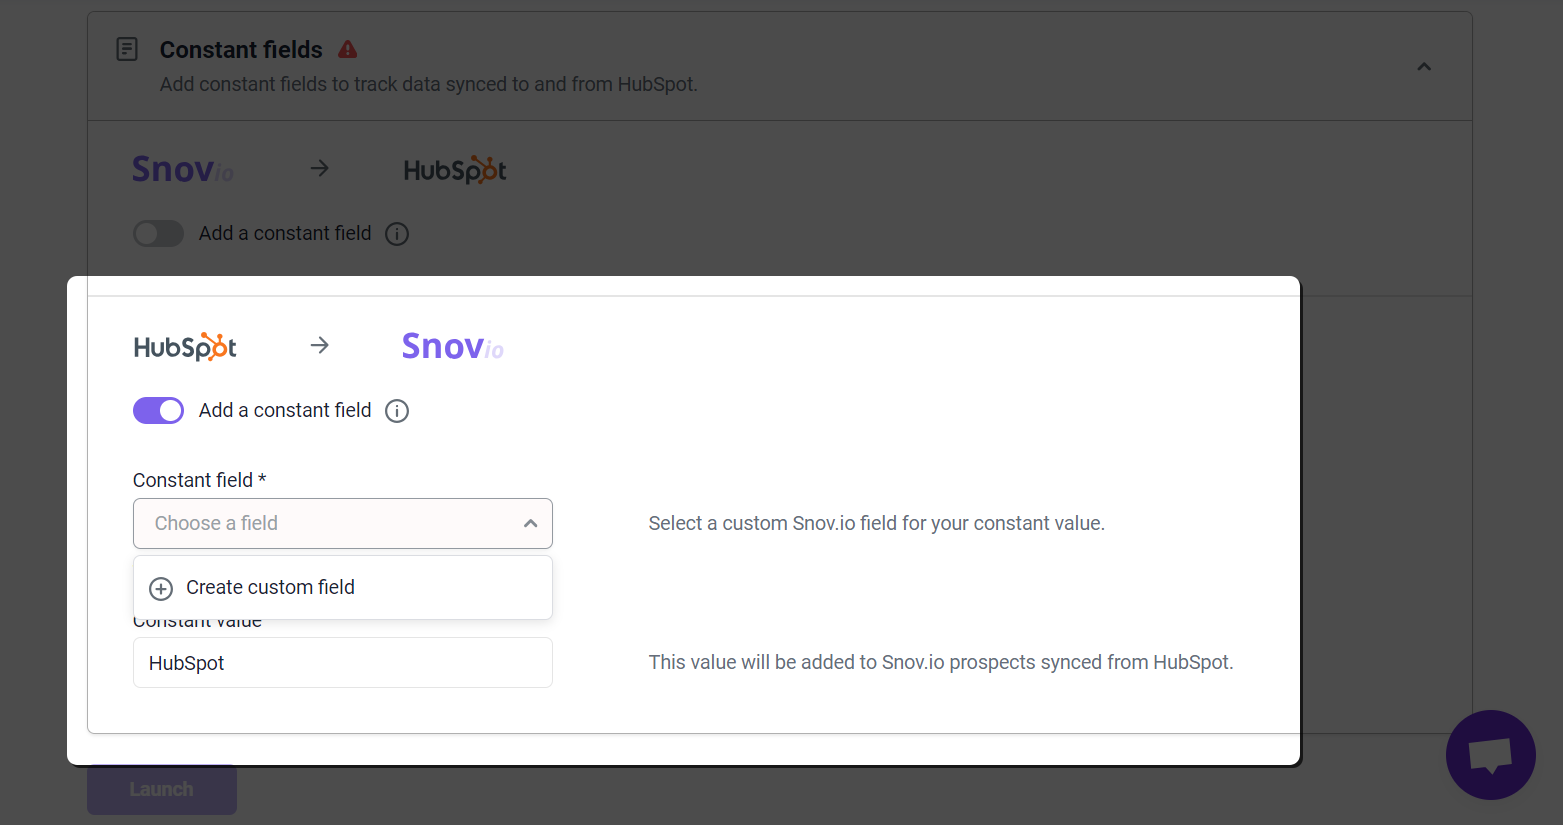
For integration from HubSpot to Snov.io:
- Toggle Add a constant field switch to the enabled position.
- Click on Constant field and choose a custom Snov.io field or scroll down the list to create a new field for your constant.
- In the Constant value field, enter your constant. For example, "from HubSpot".
Create a prospect field with “Text” type in Snov.io to store a constant value.
Once you add a constant field, all prospects that are synced from HubSpot will have a fixed constant value added to them in Snov.io.
Launch the integration
The integration is nearly ready to go—fantastic work!
Take a moment to review the settings, and when you're ready, click Launch at the bottom of the page.
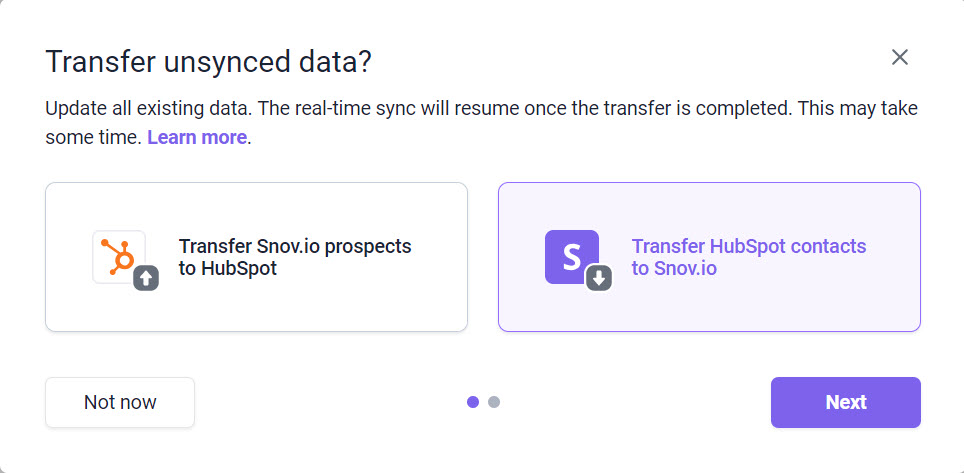
Upon the initial launch, we'll suggest transferring unsynced data.
Continue reading to understand more about this process.
Step 5: Transfer unsynced data (manual sync)
This process is optional. If you wish to skip it for now, click Not now.
You can use manual sync to move the data you collected before setting up the integration.
Why this might help you: Besides syncing data in real-time, you can enrich your database by transferring existing prospects/contacts from one app to another.
To proceed, select the direction for the data transfer:
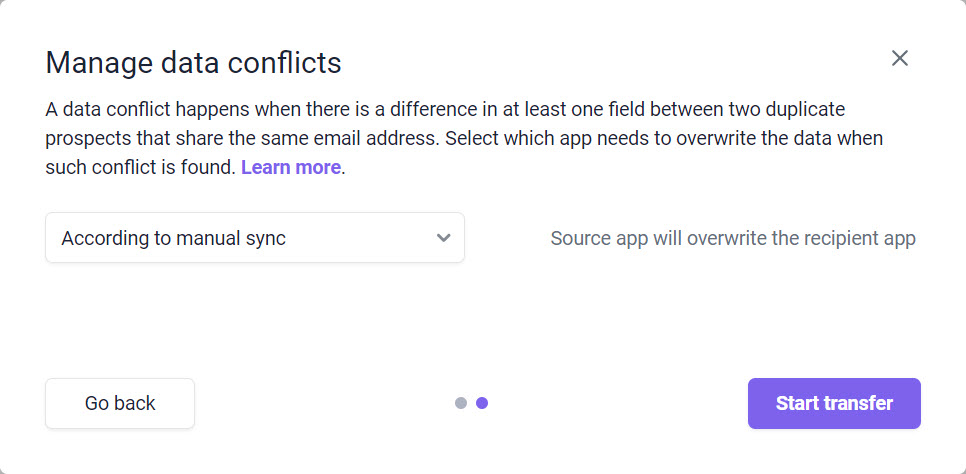
Step 6. Manage data conflicts

FAQs
1. Can I use the integration for free?
Absolutely! You can connect the integration free of charge on all plans, including the Trial plan.
2. Is the data synchronization done retroactively?
Once the integration is connected, prospect data syncs between apps in real time. You can also copy previously created data from one app to another by using the Manual sync option.
3. What are the default field mappings?
The table below shows the fields that are automatically set up when you start integrating. Field mappings marked with an asterisk (*) cannot be changed or removed.
| From Snov.io Prospects → | → To HubSpot Contacts |
| First name* | →First name* |
| Last name* | →Last name* |
| Email*
(If a prospect contains multiple emails, only the primary email will be shared.) |
→Email*
(If a prospect contains multiple emails, only the primary email will be shared.) |
| Phones | Phone Number |
| Country | Country/Region |
| Industry | Industry |
4. What happens if I delete a contact list before it is synchronized?
If you try to delete a synchronized list, you'll receive an alert recommending you not to delete it until the synchronization is complete.
5. What will happen if I delete a custom field that is used in the mapping?
Data synchronization for the mapping with this field will stop.
If you want to change or delete custom fields used in the mapping settings, make sure to replace them with newly created fields in the mapping settings to ensure data synchronization can continue smoothly.
6. Do I need to keep track of whether manual synchronization has been performed or not?
You don't have to keep your Snov.io page open once manual sync starts. It will run in the background and finish when all the available data is transferred based on the integration settings.

Sorry about that 😢
How can we improve it?