Your first email campaign should get your message to the inbox and drive engagement.
You'll learn a safer workflow that includes preparing domains and accounts for reliable delivery, building email sequences that drive engagement, personalizing messages at scale, and tracking what works.
Step 1. Set up domains and sender accounts
Connect the email accounts you'll use for sending campaigns. Go to Email Accounts → Click Add email account.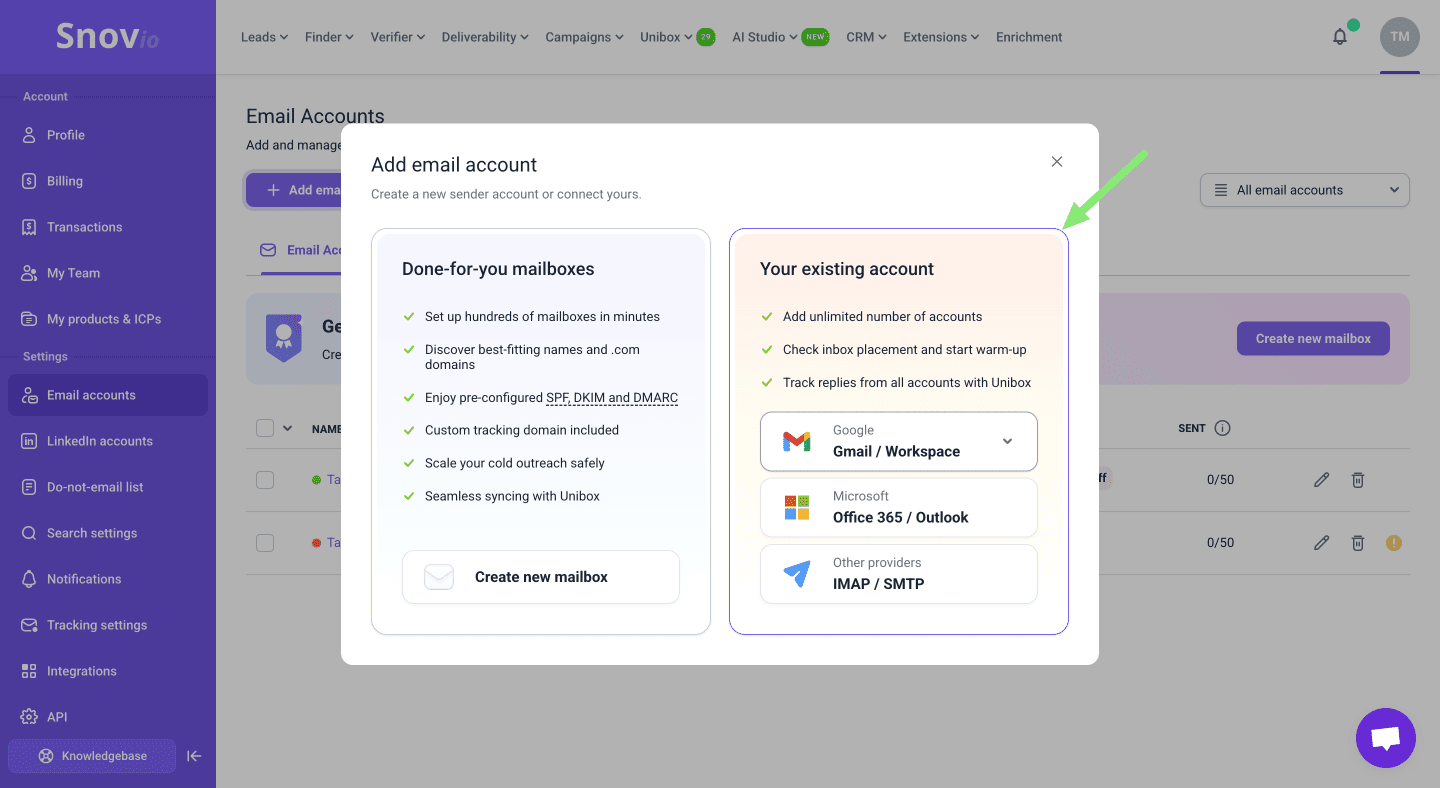 Choose your provider:
- Gmail or Microsoft: Connect with direct sign-in (API connection)
- Other providers: Use SMTP/IMAP settings
If you have multiple accounts ready, you can import them from a CSV file.
For best results, it's recommended to use dedicated sender accounts.
Here's why that matters:
Using accounts separate from your daily inbox gives you better control over volume, reputation, and troubleshooting. If something goes wrong with a campaign account, your personal email stays unaffected.
For marketing teams:
If you're sending to 500+ prospects, connect 2-3 sender accounts now. You'll use Mailbox rotation later to spread volume across them. Each account has its own daily limit, so more accounts = more capacity without pushing any single sender too hard.
Step 2. Check domain health
A campaign should not start until the domain health check is clean. Before sending, make sure your domain is properly configured. Missing or broken DNS records hurt inbox placement badly.
Go to Email Accounts → Click the sender account → Open Domain health in Optional settings.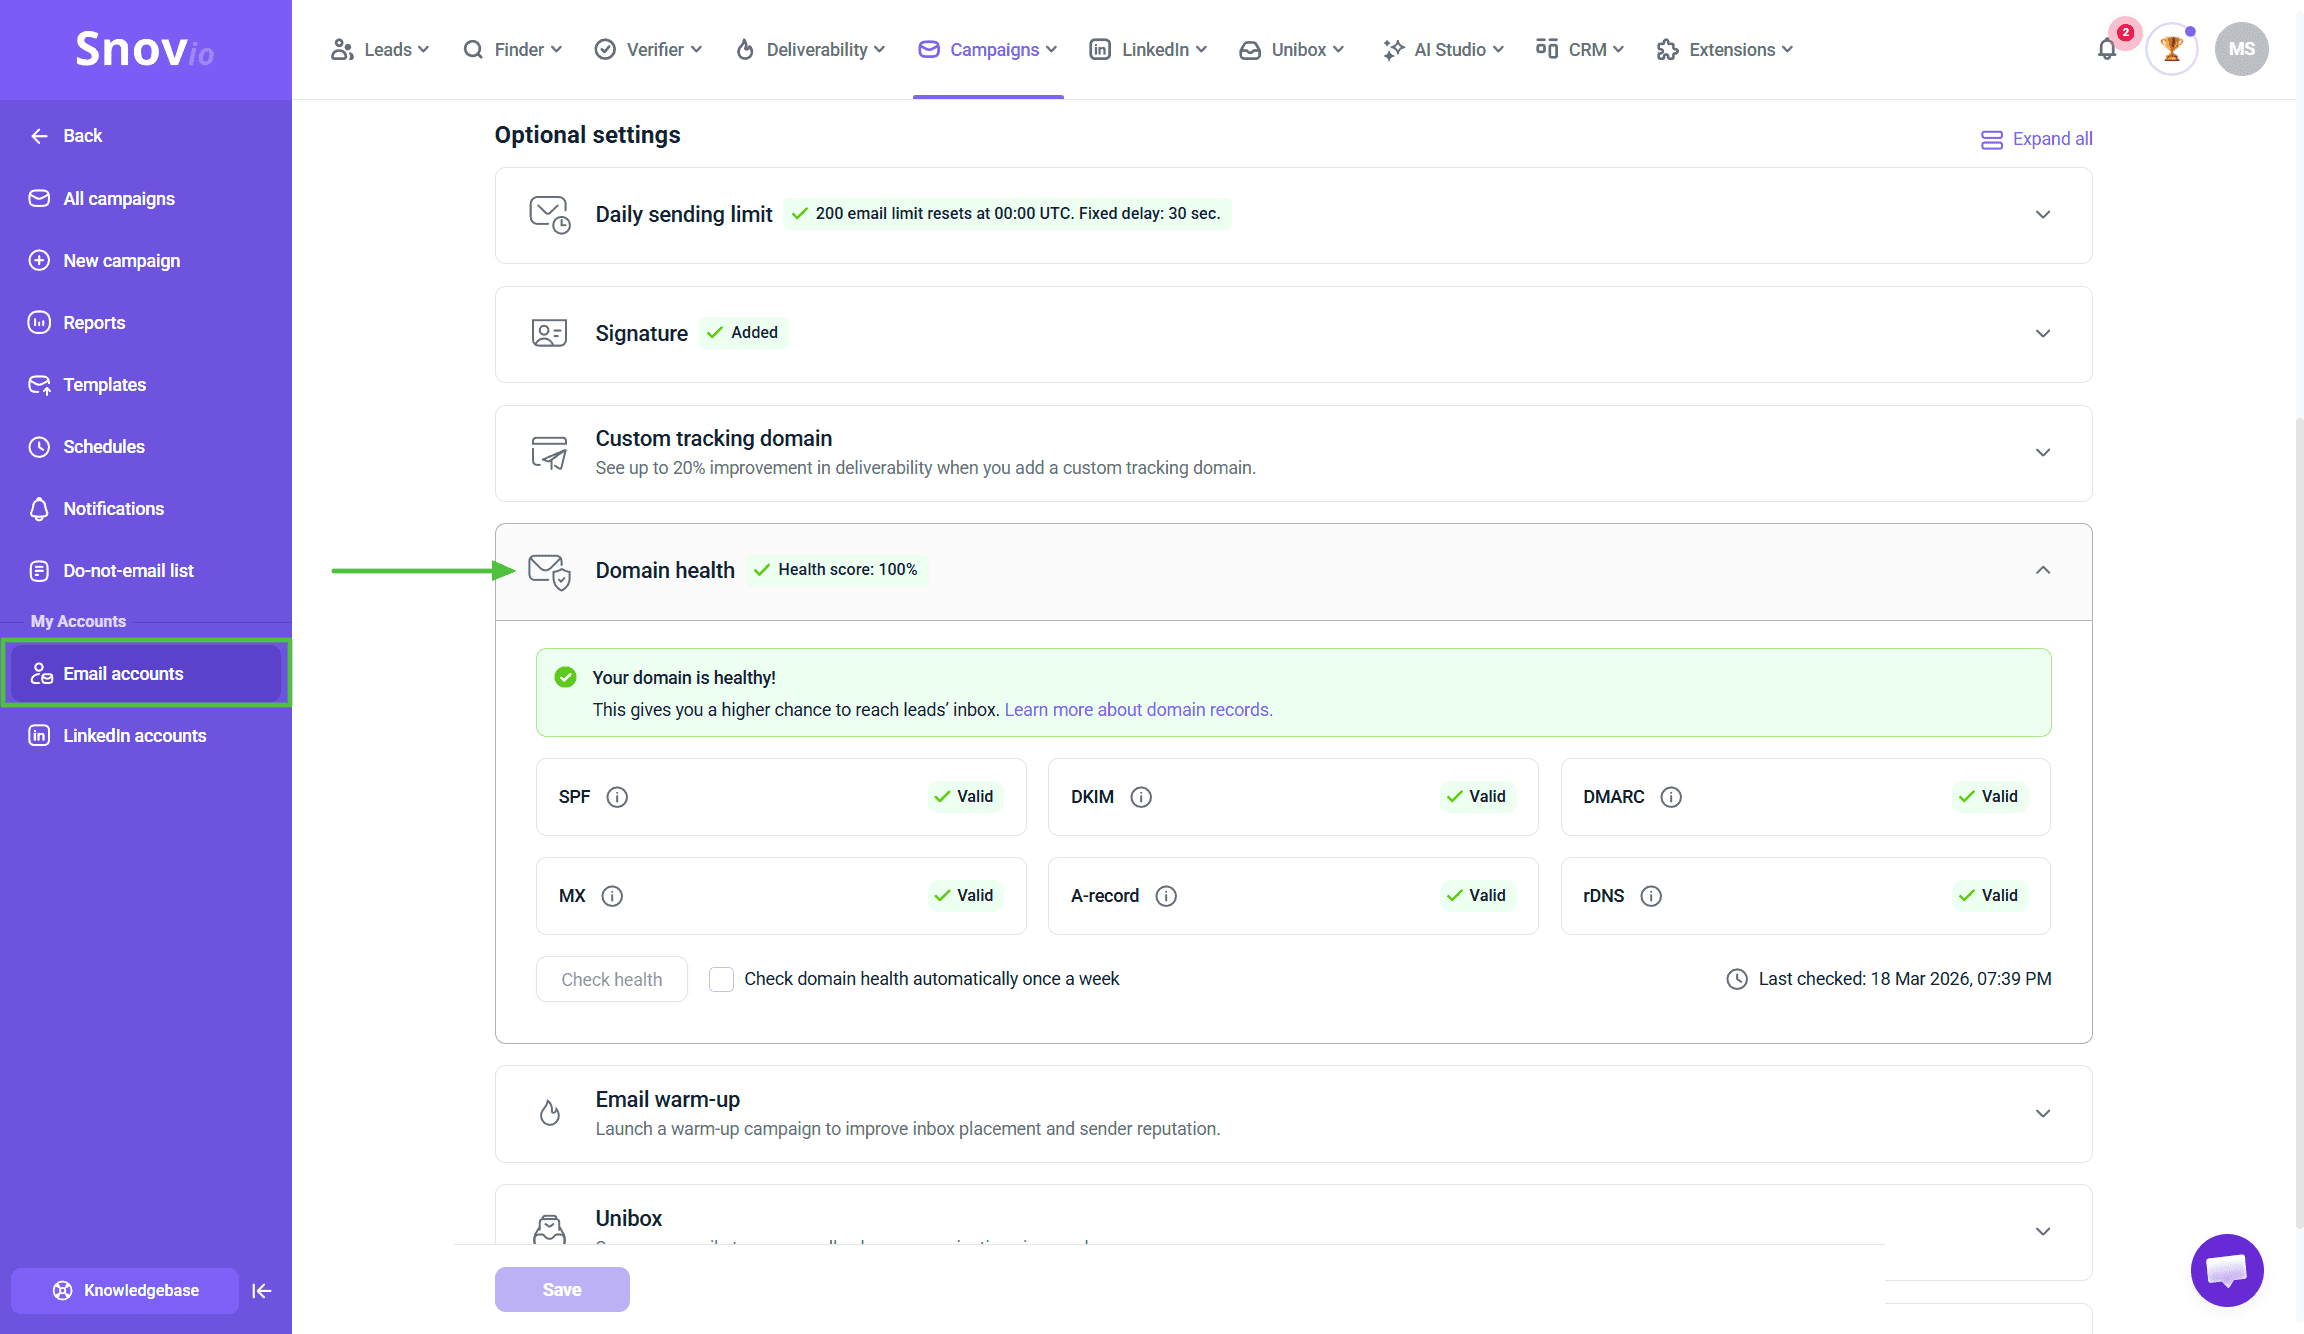 You'll see a check for:
- SPF - Verifies your domain is allowed to send emails
- DKIM - Adds a digital signature to authenticate your emails
- DMARC - Tells receiving servers how to handle failed authentication
- MX - Routes incoming email correctly
Fix any issues before moving forward. Snov.io shows you exactly what to do for each record.
Why this matters:
Gmail and Outlook check these records before deciding inbox or spam. A clean health check means your emails have the best shot at reaching your audience. Think of DNS records like proper ID - without them, you're not getting through the door.
After fixing DNS records, go to Deliverability Check and run a test.
This simulates sending emails to real inboxes across Gmail, Outlook, and other providers. You'll see:
- Where emails landed (inbox vs spam)
- Inbox placement rate by provider
- Any remaining technical issues
Domain health confirms your setup is correct. Deliverability check confirms your emails reach inboxes. Both matter before you launch.
Add a custom tracking domain (optional but recommended):
If you plan to track opens or clicks, set up a custom tracking domain now in the sender settings. Using your own domain instead of Snov.io's shared domain improves deliverability. Takes a few minutes, worth it for any campaign where you need performance data.
Step 3. Warm up
Email providers watch new accounts closely. If a brand-new account suddenly sends 100 emails a day, it looks like spam. Warming up builds sending activity and trust gradually.
Go to Email Warm-up → Add mailbox → Select your accounts → Choose a warm-up strategy.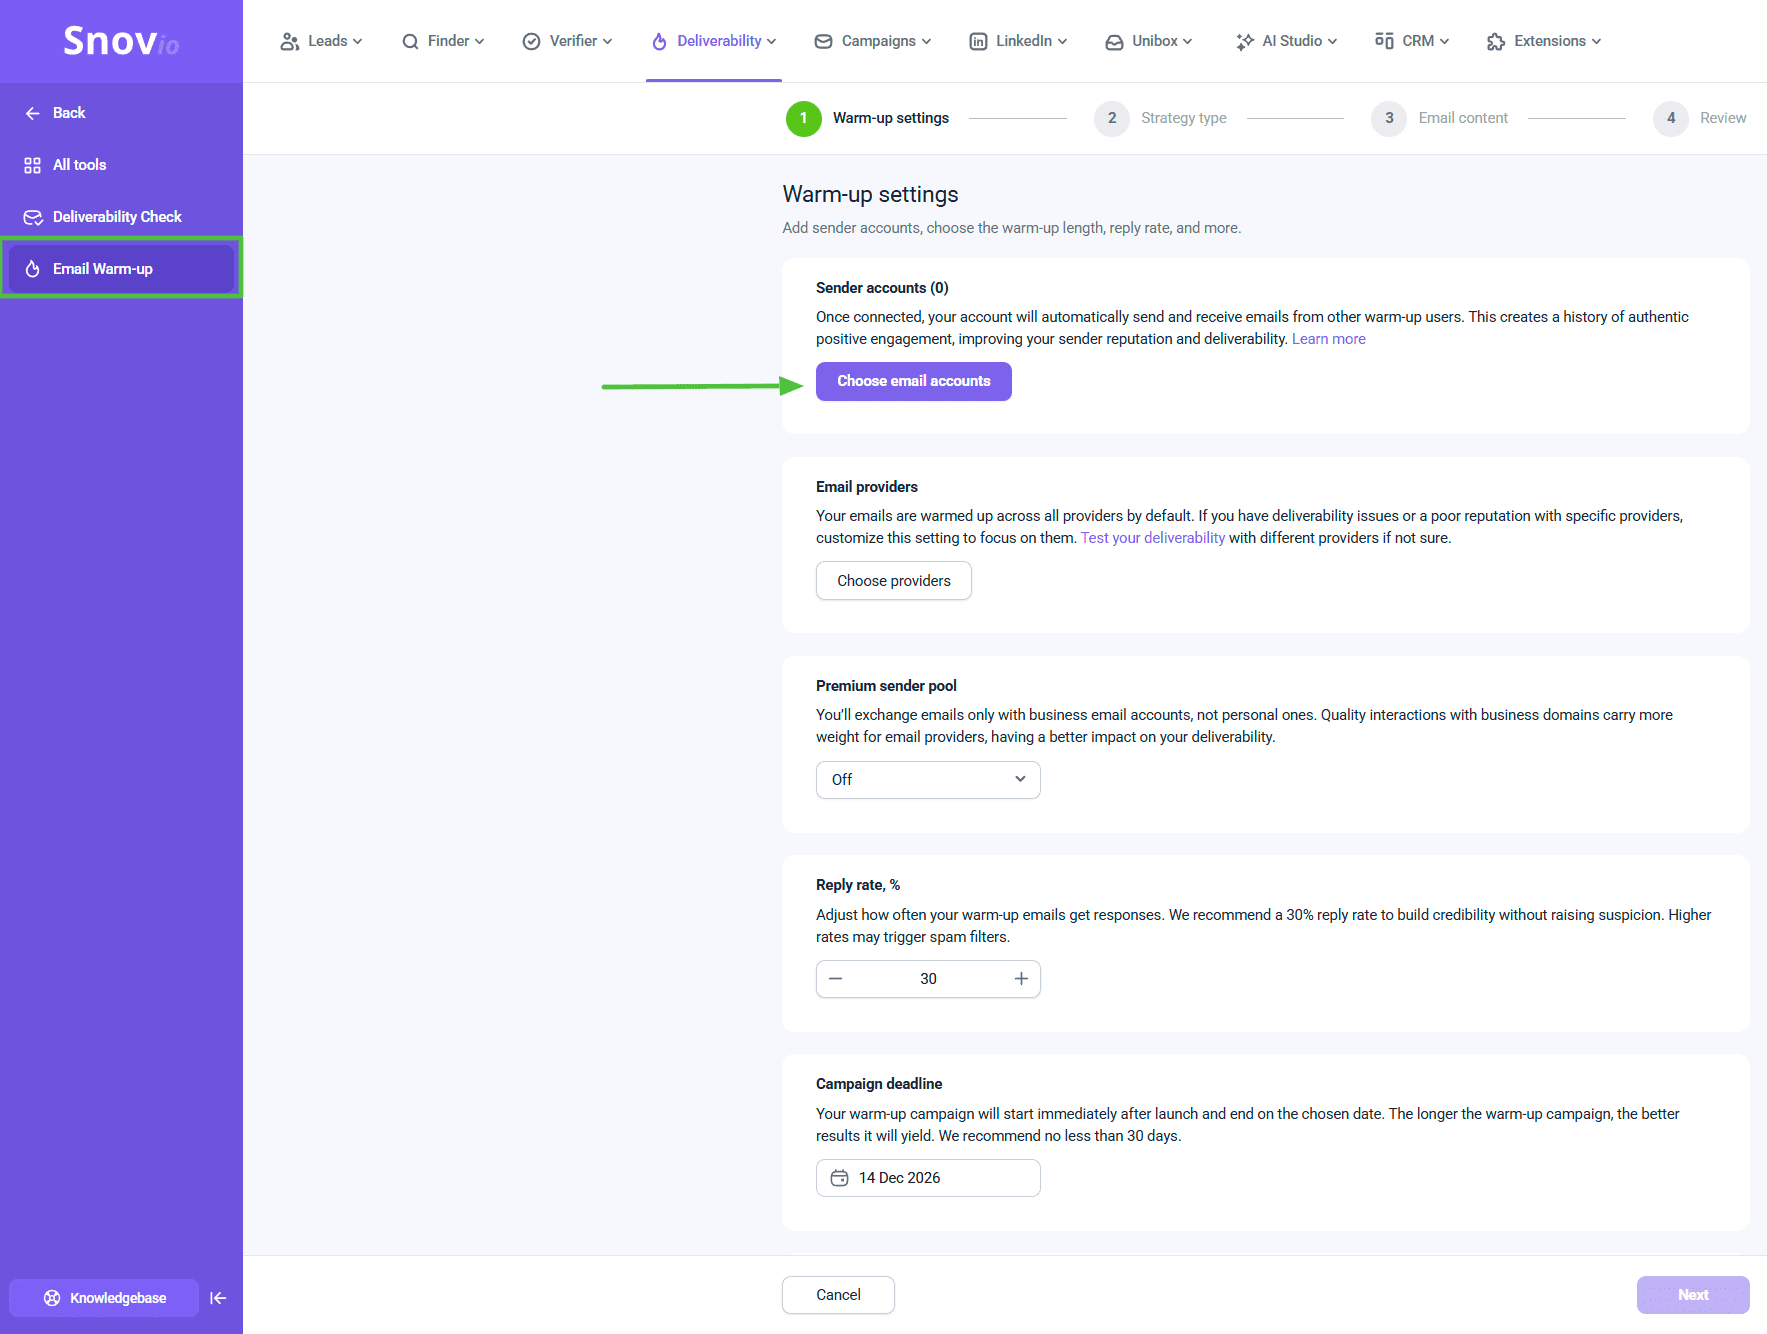 For new accounts:
- Use gradual warm-up
- Run for 2-4 weeks before launching campaigns
- Start with 5-10 emails/day, let it increase gradually
For existing accounts:
- Run warm-up for 1-2 weeks to strengthen reputation
- Especially important if the account was inactive for a while
Why you can't skip this:
Launching too early hurts both immediate deliverability and long-term ROI. You might get low open rates not because your subject line is weak, but because emails landed in spam. Warm-up prevents this by building positive history before real prospects see your message.
Keep it running:
After campaigns start, keep warm-up active at lower volume (10-20 emails/day). This maintains reputation between sends.
Tip: Use the same schedule for warm-up that you'll use for campaigns. If campaigns send Monday-Friday 9-5, set warm-up the same way. Consistent patterns look natural.
Step 4. Pick optimal daily sending limits
Control how many emails each account can send per day.
Go to Email Accounts → Click the needed account → Daily sending limit in Optional settings.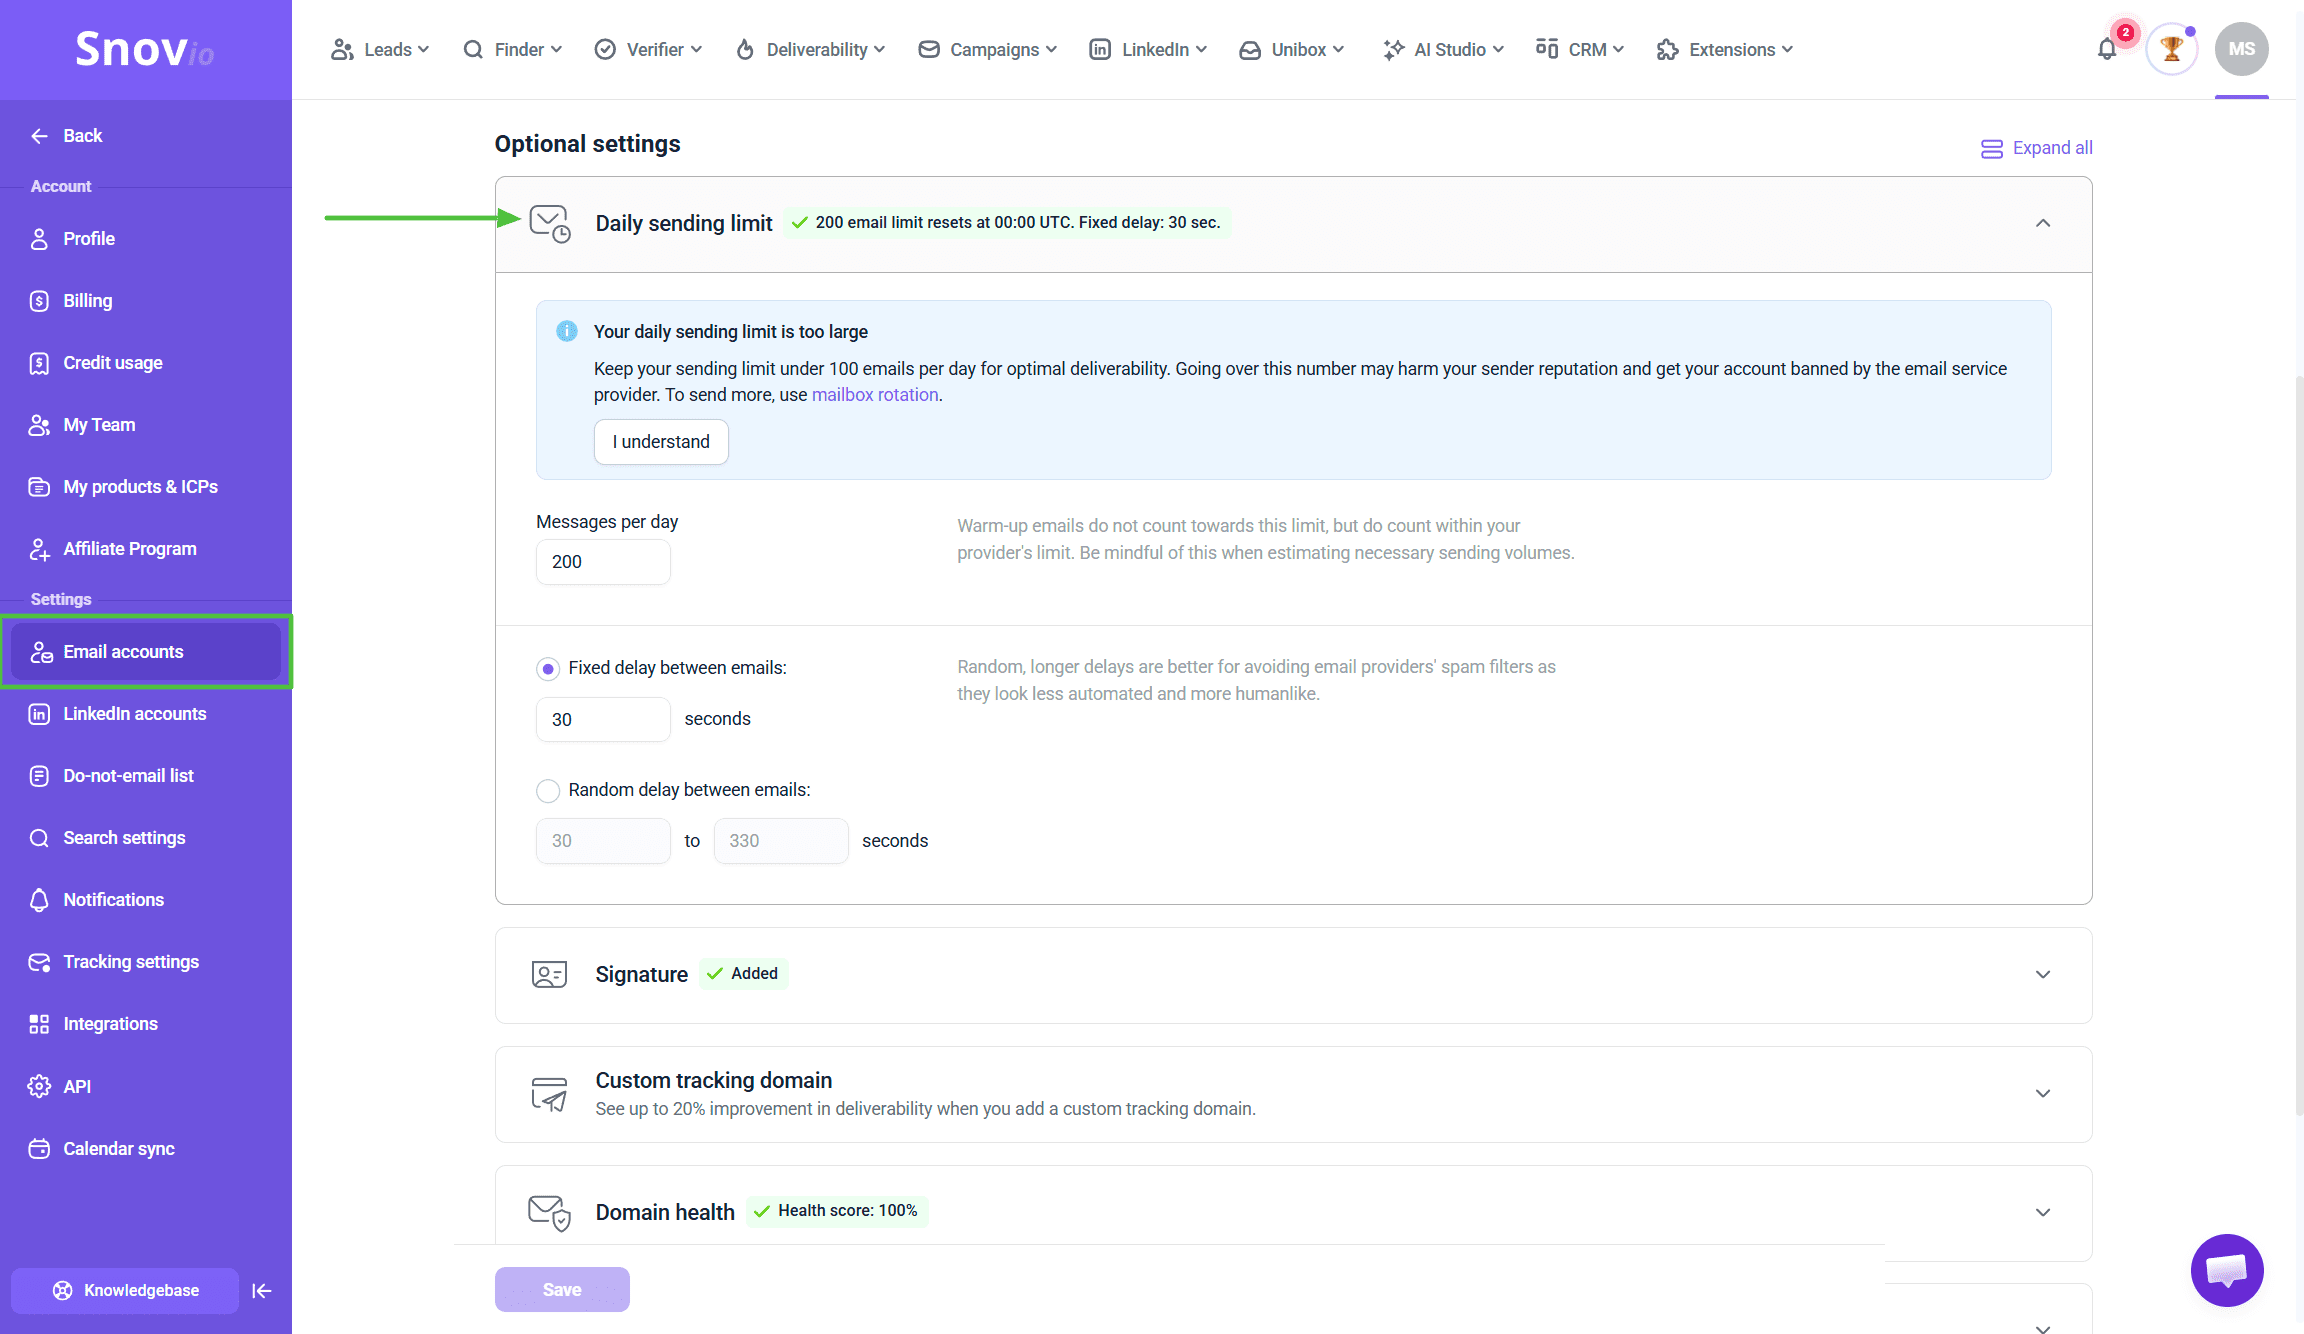 Starting limits:
- New accounts (under 1 year): 20-30 emails/day
- Accounts with history: 40-50 emails/day
- Mature accounts: Up to 75 emails/day (but start lower)
Why limits protect you:
These aren't arbitrary restrictions. Email providers have internal limits too. Send too much too fast, they flag you as spam. Starting conservatively and increasing gradually is safer than starting high and dealing with deliverability problems later.
For marketing teams:
If your campaign needs to reach 500 people and you have one sender at 30/day, that's 17 days total. Feels slow, but it's better than burning your account with 500 emails in one day.
Scale by adding more accounts (Step 5), not by pushing one account harder.
Campaign-level limits (optional):
When setting up your campaign, you can also add a campaign-level daily limit in Sending options → Advanced settings. Useful for controlling pace of specific campaigns without changing mailbox limits.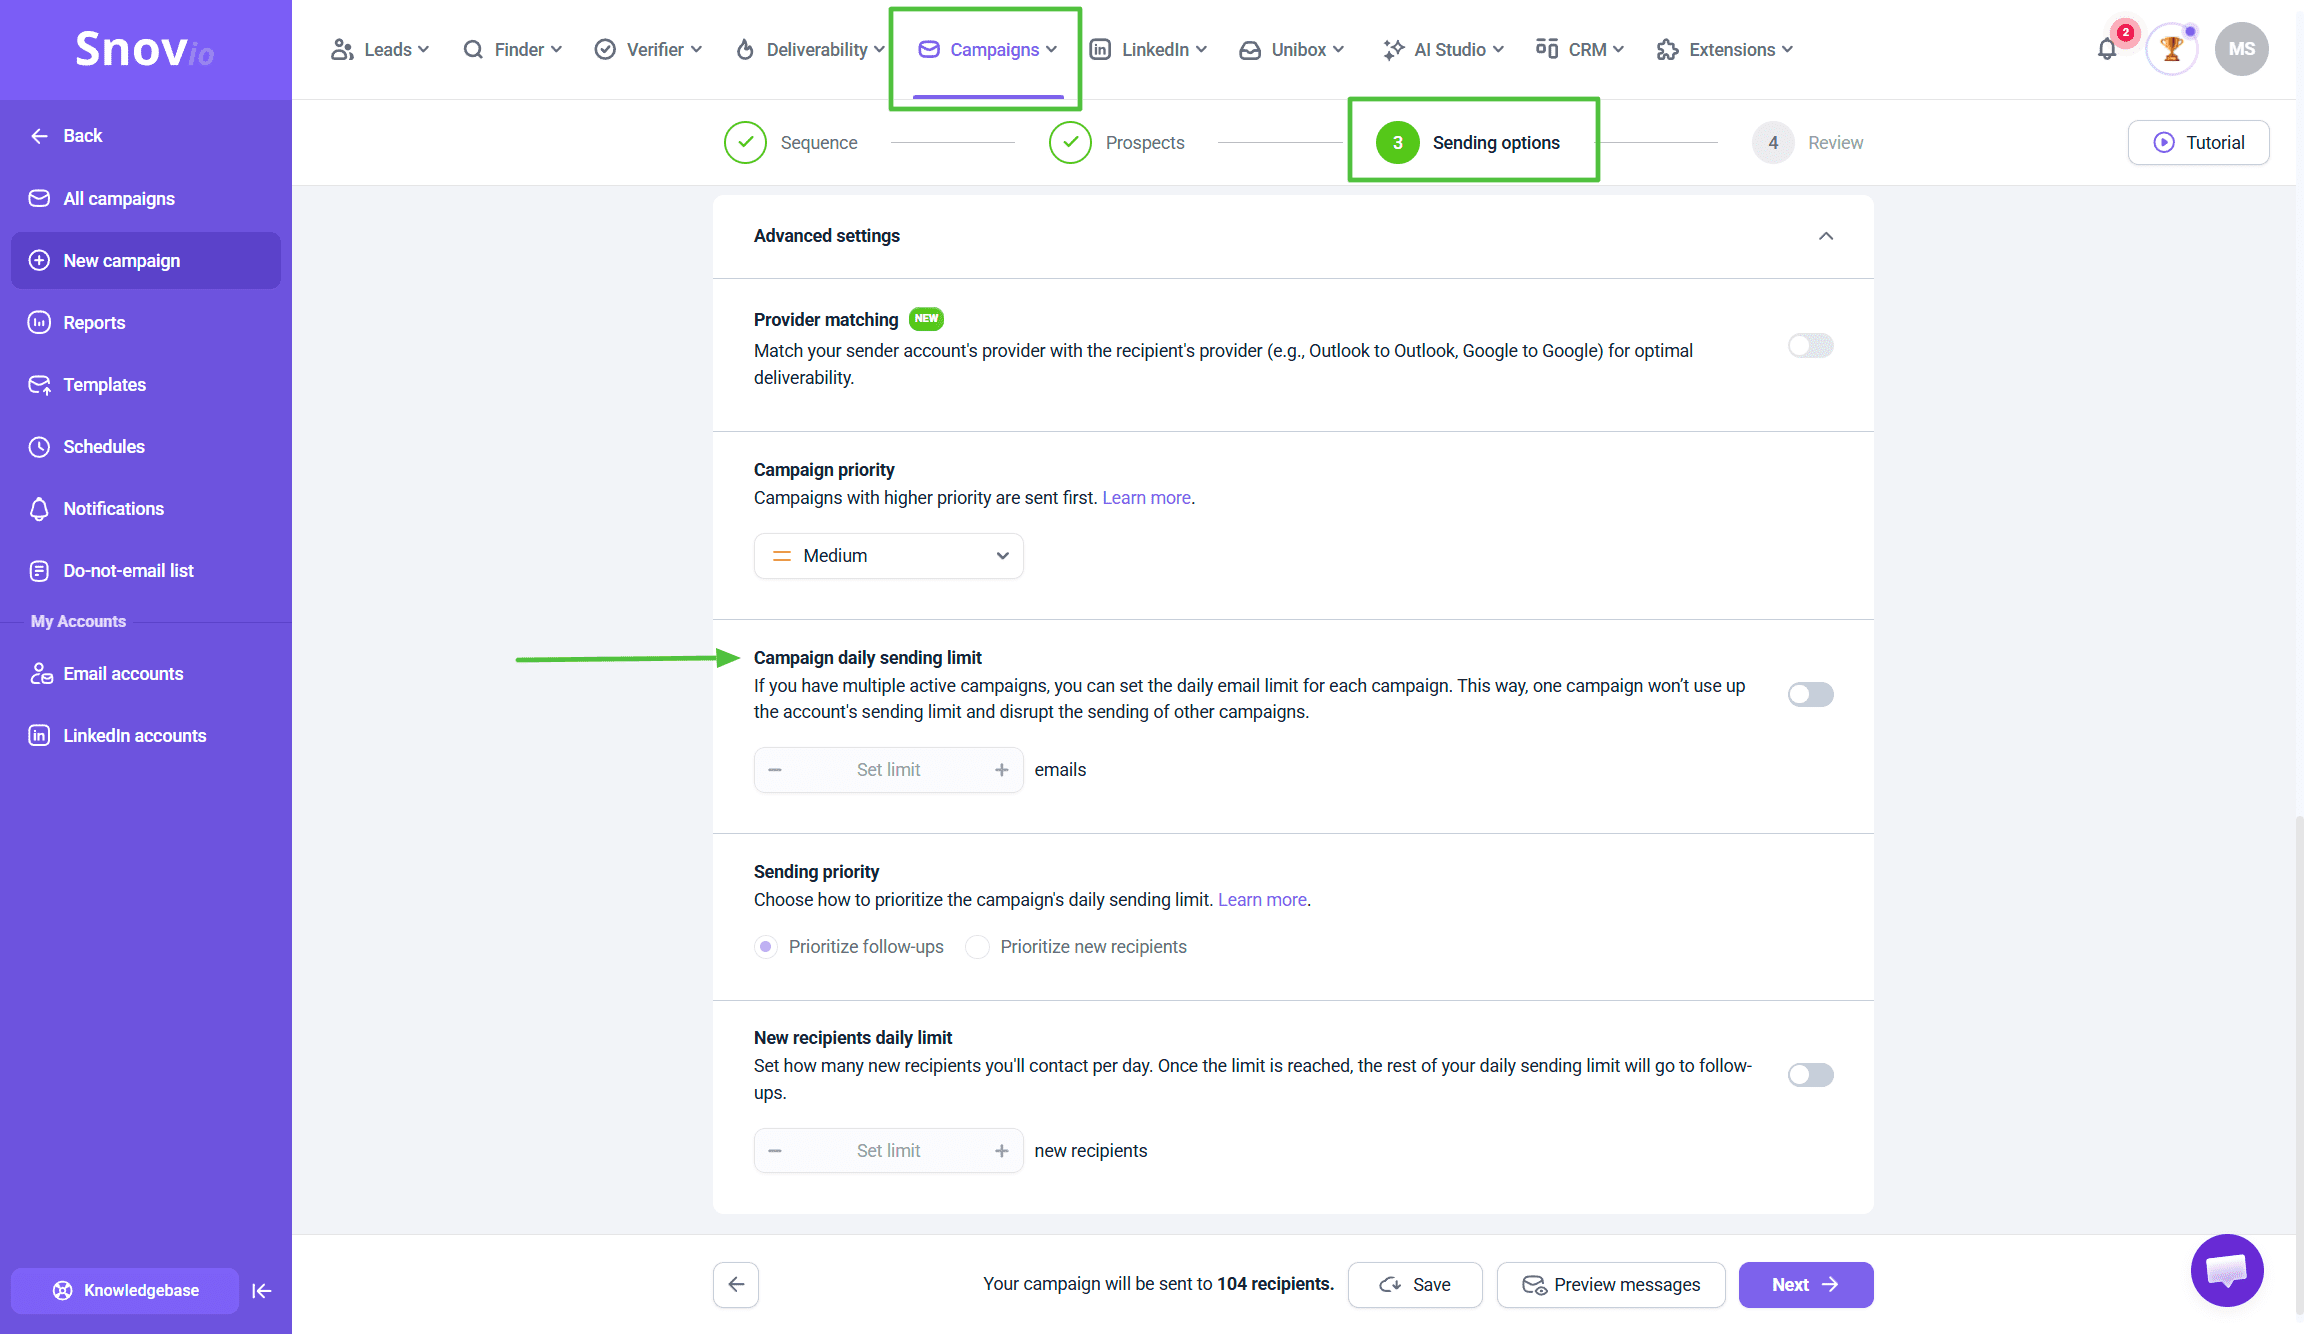
Step 5. Use mailbox rotation to scale volume
Need to reach more people faster? Add more sender accounts and distribute volume across them.
How it works:
Mailbox rotation spreads sends evenly. If you have 3 accounts at 30 emails/day each, your total capacity is 90 emails/day.
Go to campaign Sending options → Add multiple senders → Enable Mailbox rotation.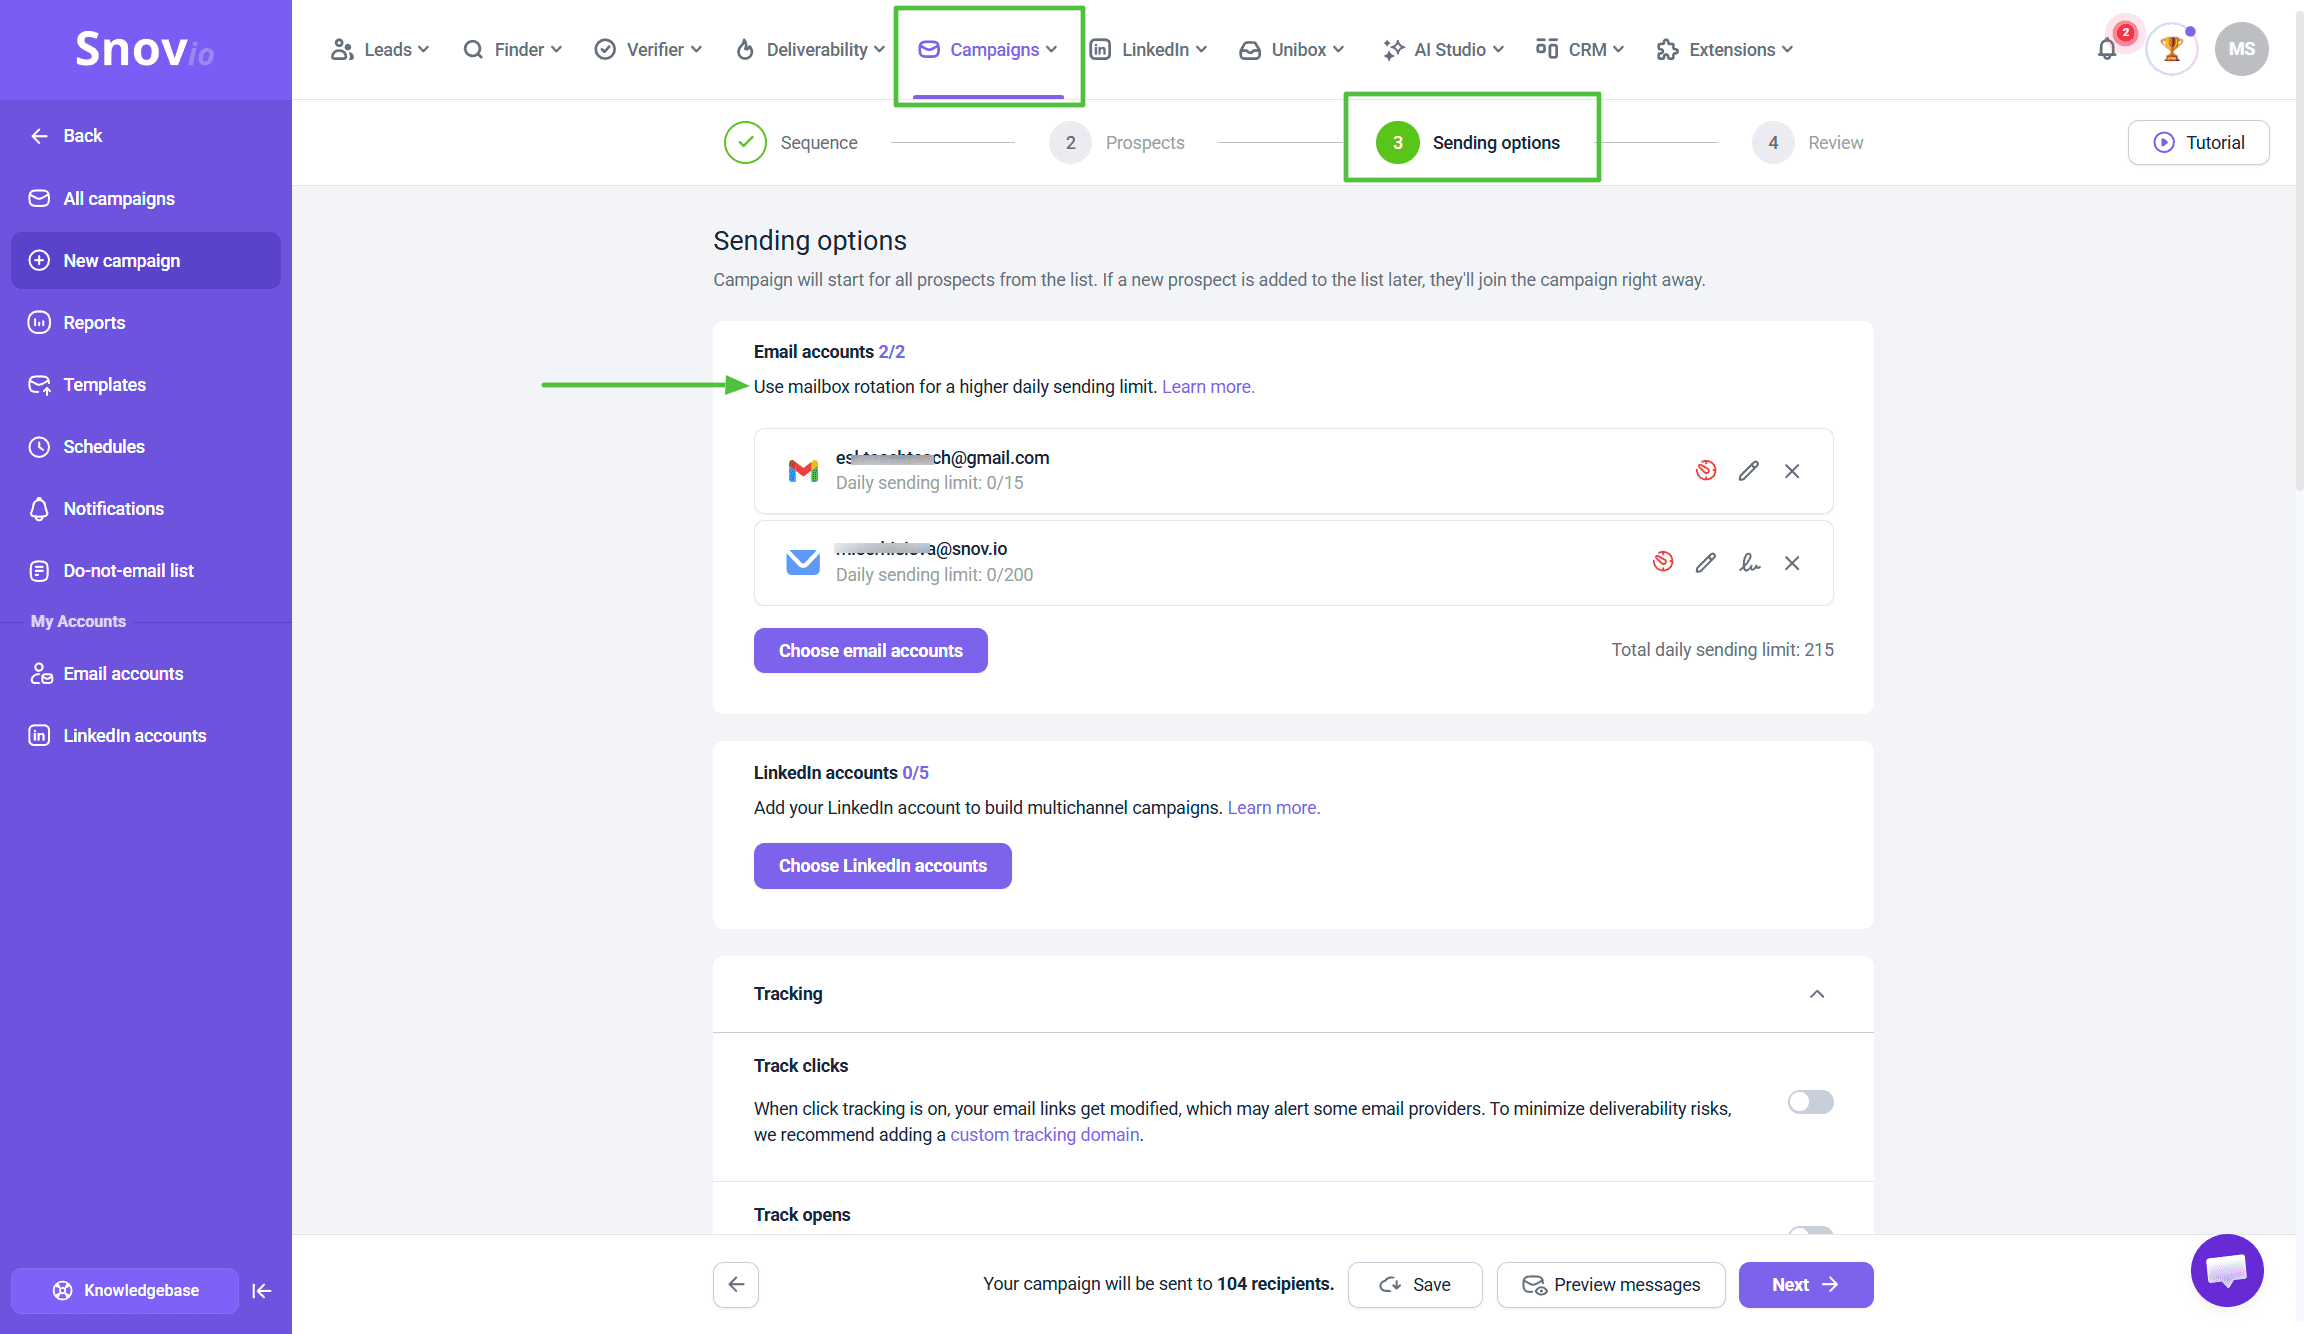 Snov.io distributes sends automatically so no single account hits its limit while others sit idle.
Why this is safer:
Scaling with more accounts beats pushing individual accounts to maximum. You also get redundancy - if one account has issues, the campaign continues through others.
Keep it balanced:
Aim for 3-5 mailboxes per domain. Need more volume? Add accounts on additional domains rather than loading 10+ onto one domain.
Don't have more accounts?
You can purchase pre-configured domains and mailboxes through Snov.io's DFY (Done-for-you mailboxes) service. They come with DNS records already set up and are ready for warm-up.
Open the Email Accounts section. Click Add email account and choose the Done-for-you mailboxes option.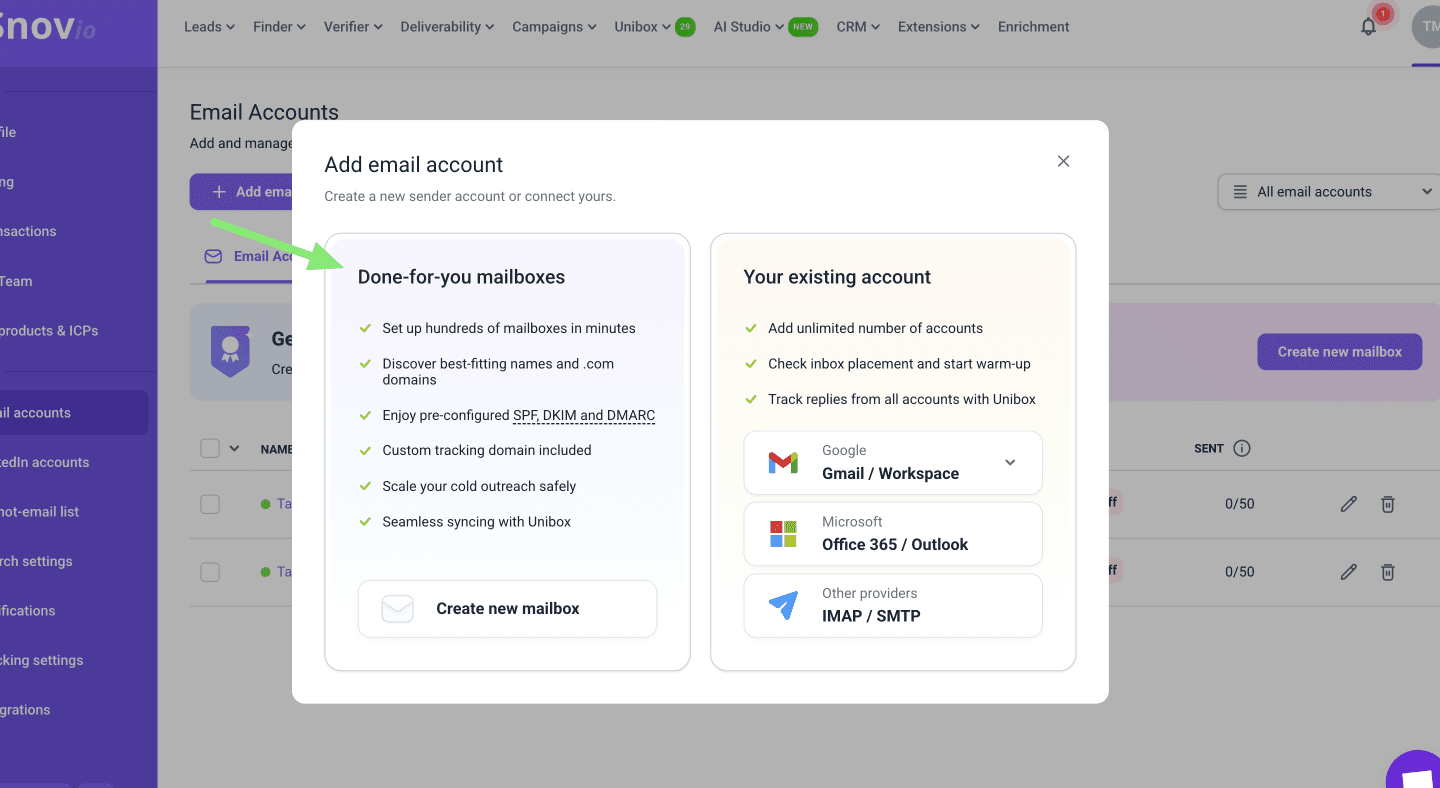
Step 6. Build a simple automated sequence
Start simple: one main email plus 1-2 follow-ups.
Go to Campaigns → + New campaign → Add your first Email step.
Add a Delay (waiting period before next step).
Add your follow-up email.
Repeat if you want a second follow-up: Email → Delay → Email.
Delay timing:
- First follow-up: 2-3 days after initial email
- Second follow-up: 3-4 days after first
This gives prospects time to see and respond without feeling bombarded.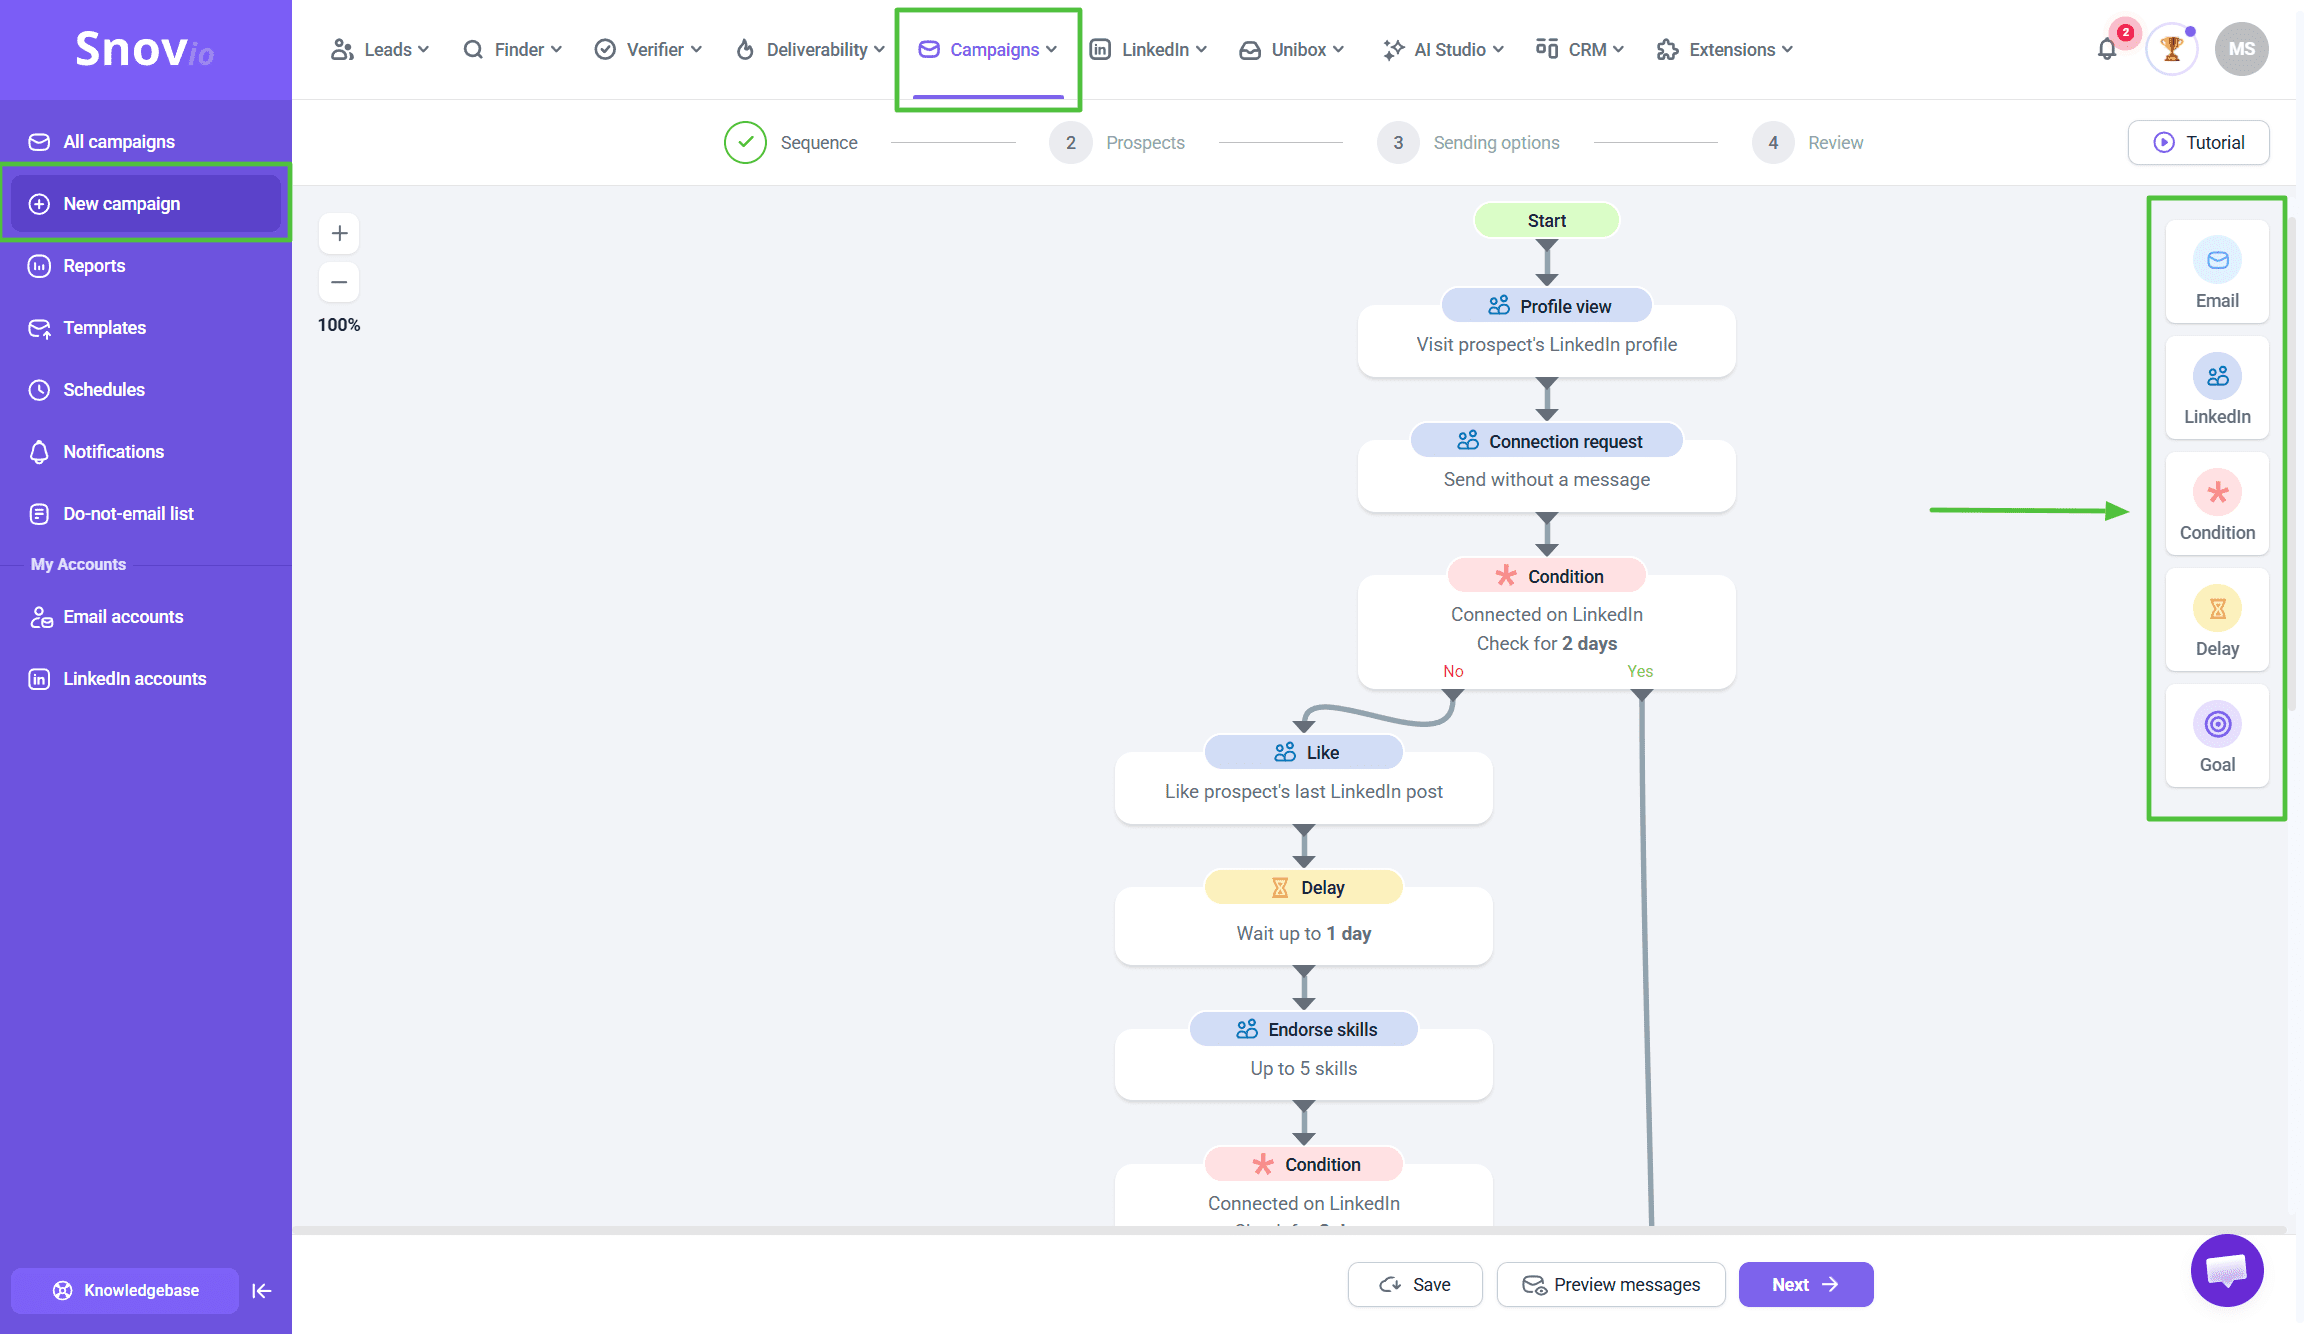
Sequence stops automatically on reply:
By default, when a prospect replies, Snov.io automatically stops sending them follow-ups. You don't need to do anything - the system removes them from the sequence as soon as they respond.
This prevents the awkward situation where someone replies to your first email but still receives your follow-ups.
You can change this setting in campaign Sending options → Campaign duration → Stop for those who reply if you want follow-ups to continue even after replies (not recommended for most cases).
Why follow-ups matter:
Follow-ups significantly increase response rates. Many people miss the first email, are busy when they see it, or need a reminder. A second or third touchpoint often gets the reply the first didn't.
But more isn't always better for first campaigns. Start with 2-3 emails total, see how your audience responds, adjust for next time.
Keep one clear goal:
One campaign should push one action:
- Click to a landing page or resource
- Register for an event or webinar
- Download a guide or whitepaper
- Schedule a demo or call
- Learn about a product launch
Single goal = easier to measure and improve.
Marketing use cases:
- Product launches
- Feature announcements
- Event/webinar invitations
- Content distribution (ebooks, guides, case studies)
- Seasonal campaigns
Step 7. Add a sending schedule and sending hours
Control when emails are sent. Timing affects engagement and consistency.
Go to Schedules → Create schedule → Choose recipient timezone.
Select active days and hours:
- Days: Usually Monday-Friday for B2B
- Hours: 9 AM - 5 PM in recipient's timezone
Save, then apply this schedule in campaign Sending options (step 3).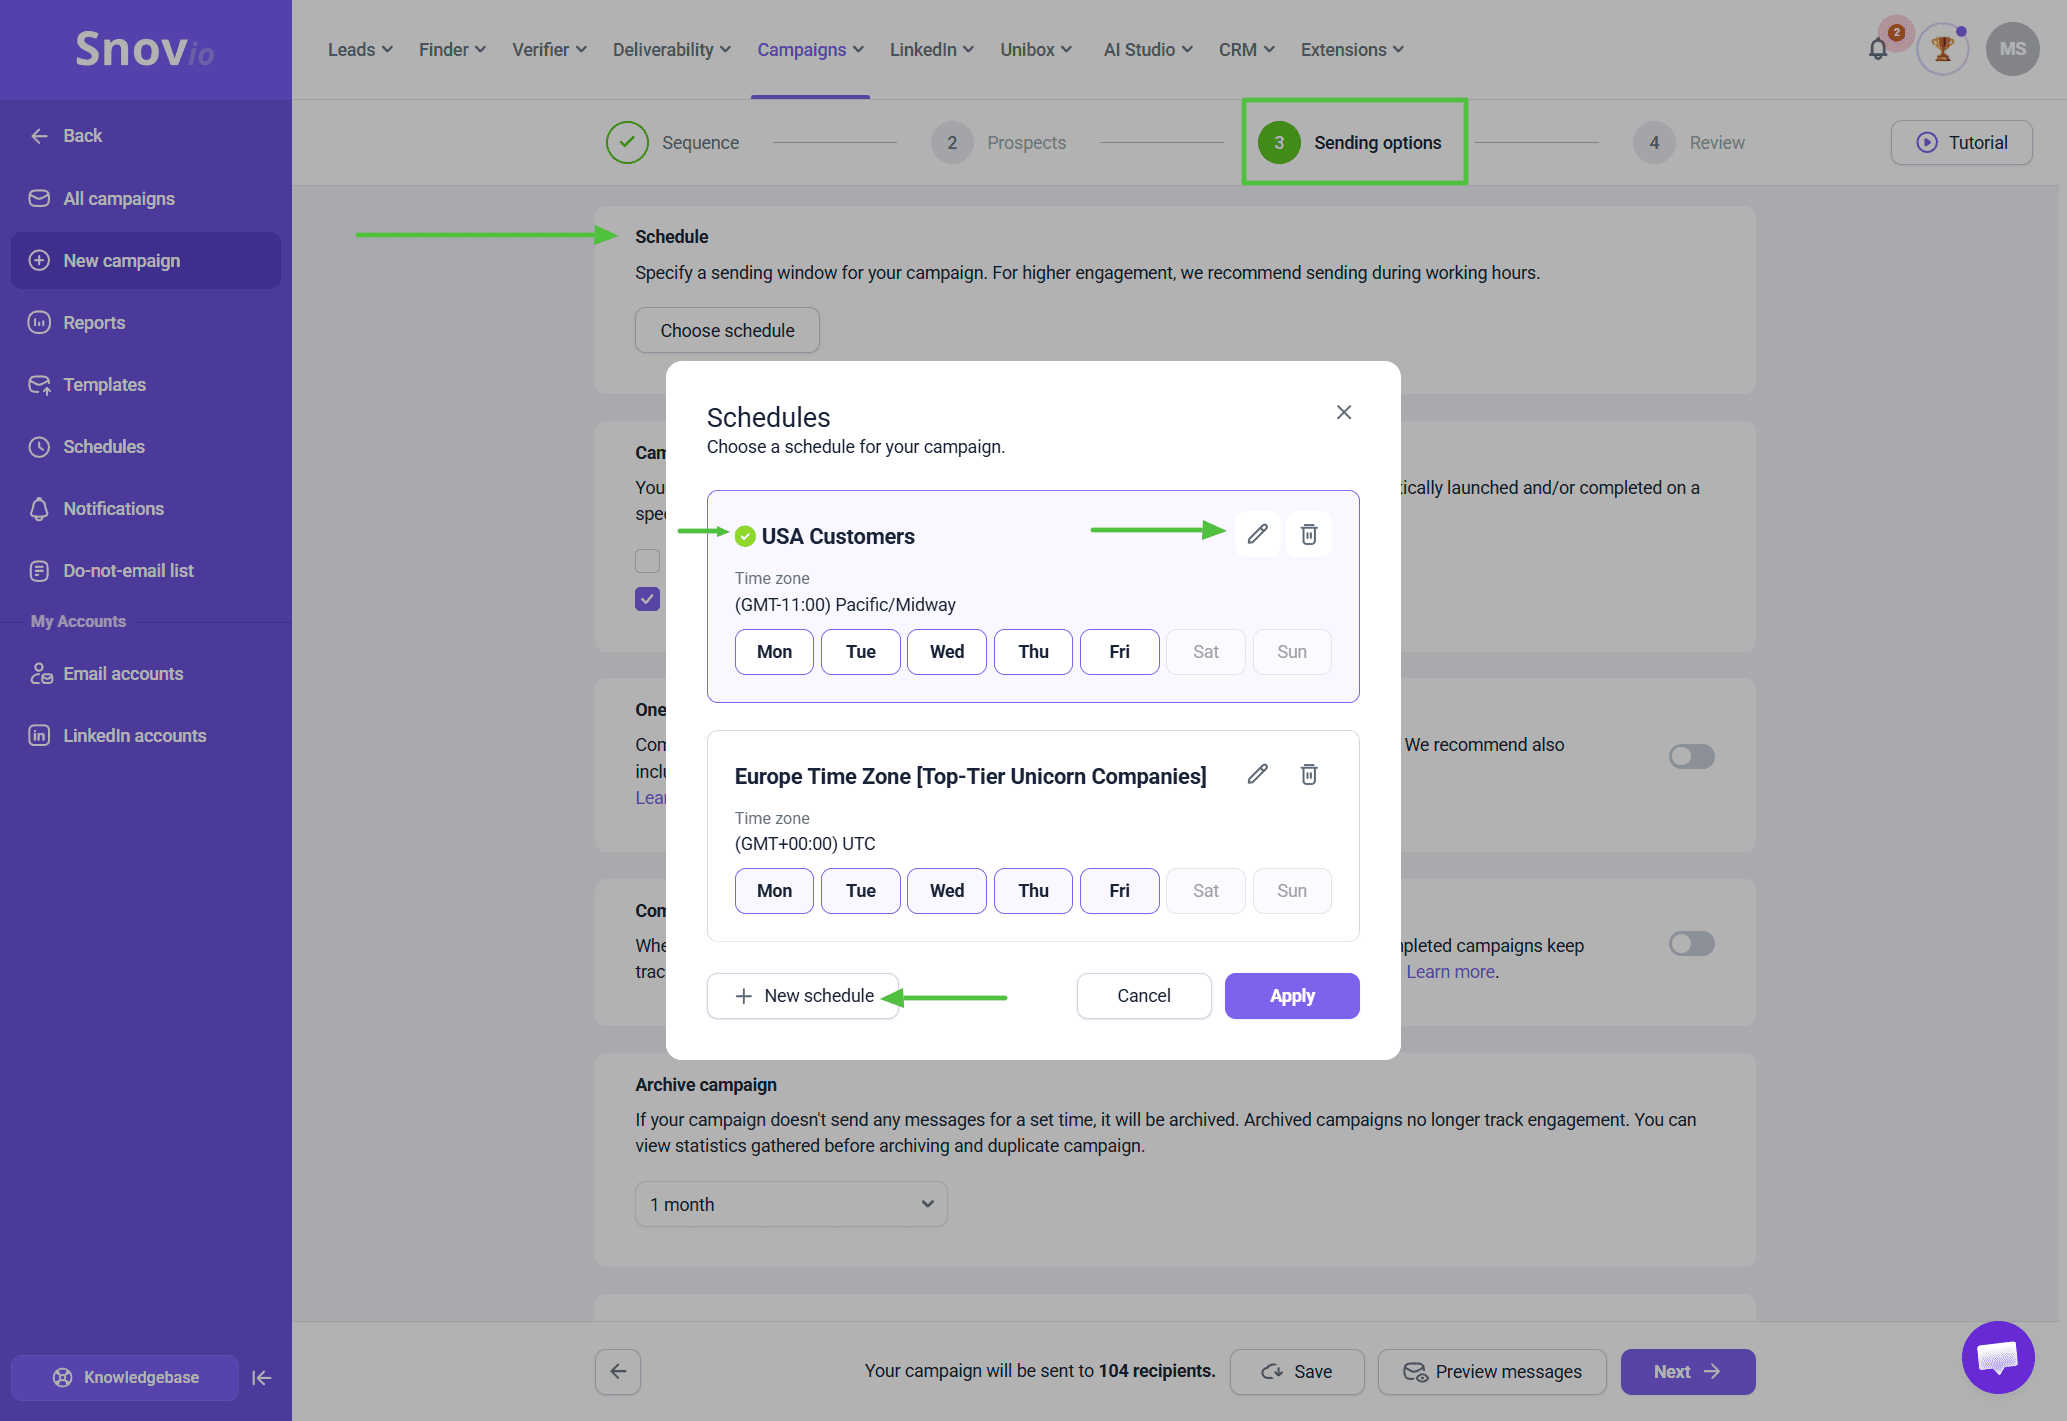
Why timing matters:
Emails at 2 AM Saturday get buried. Emails at 10 AM Tuesday get seen and opened. Schedules also make your sending pattern look natural and human, which helps deliverability.
Reuse schedules:
Once created, reuse across multiple campaigns. Saves time, keeps patterns consistent.
Step 8. Personalize with variables and placeholders
Basic personalization makes emails perform better. You don't need complex customization to see results.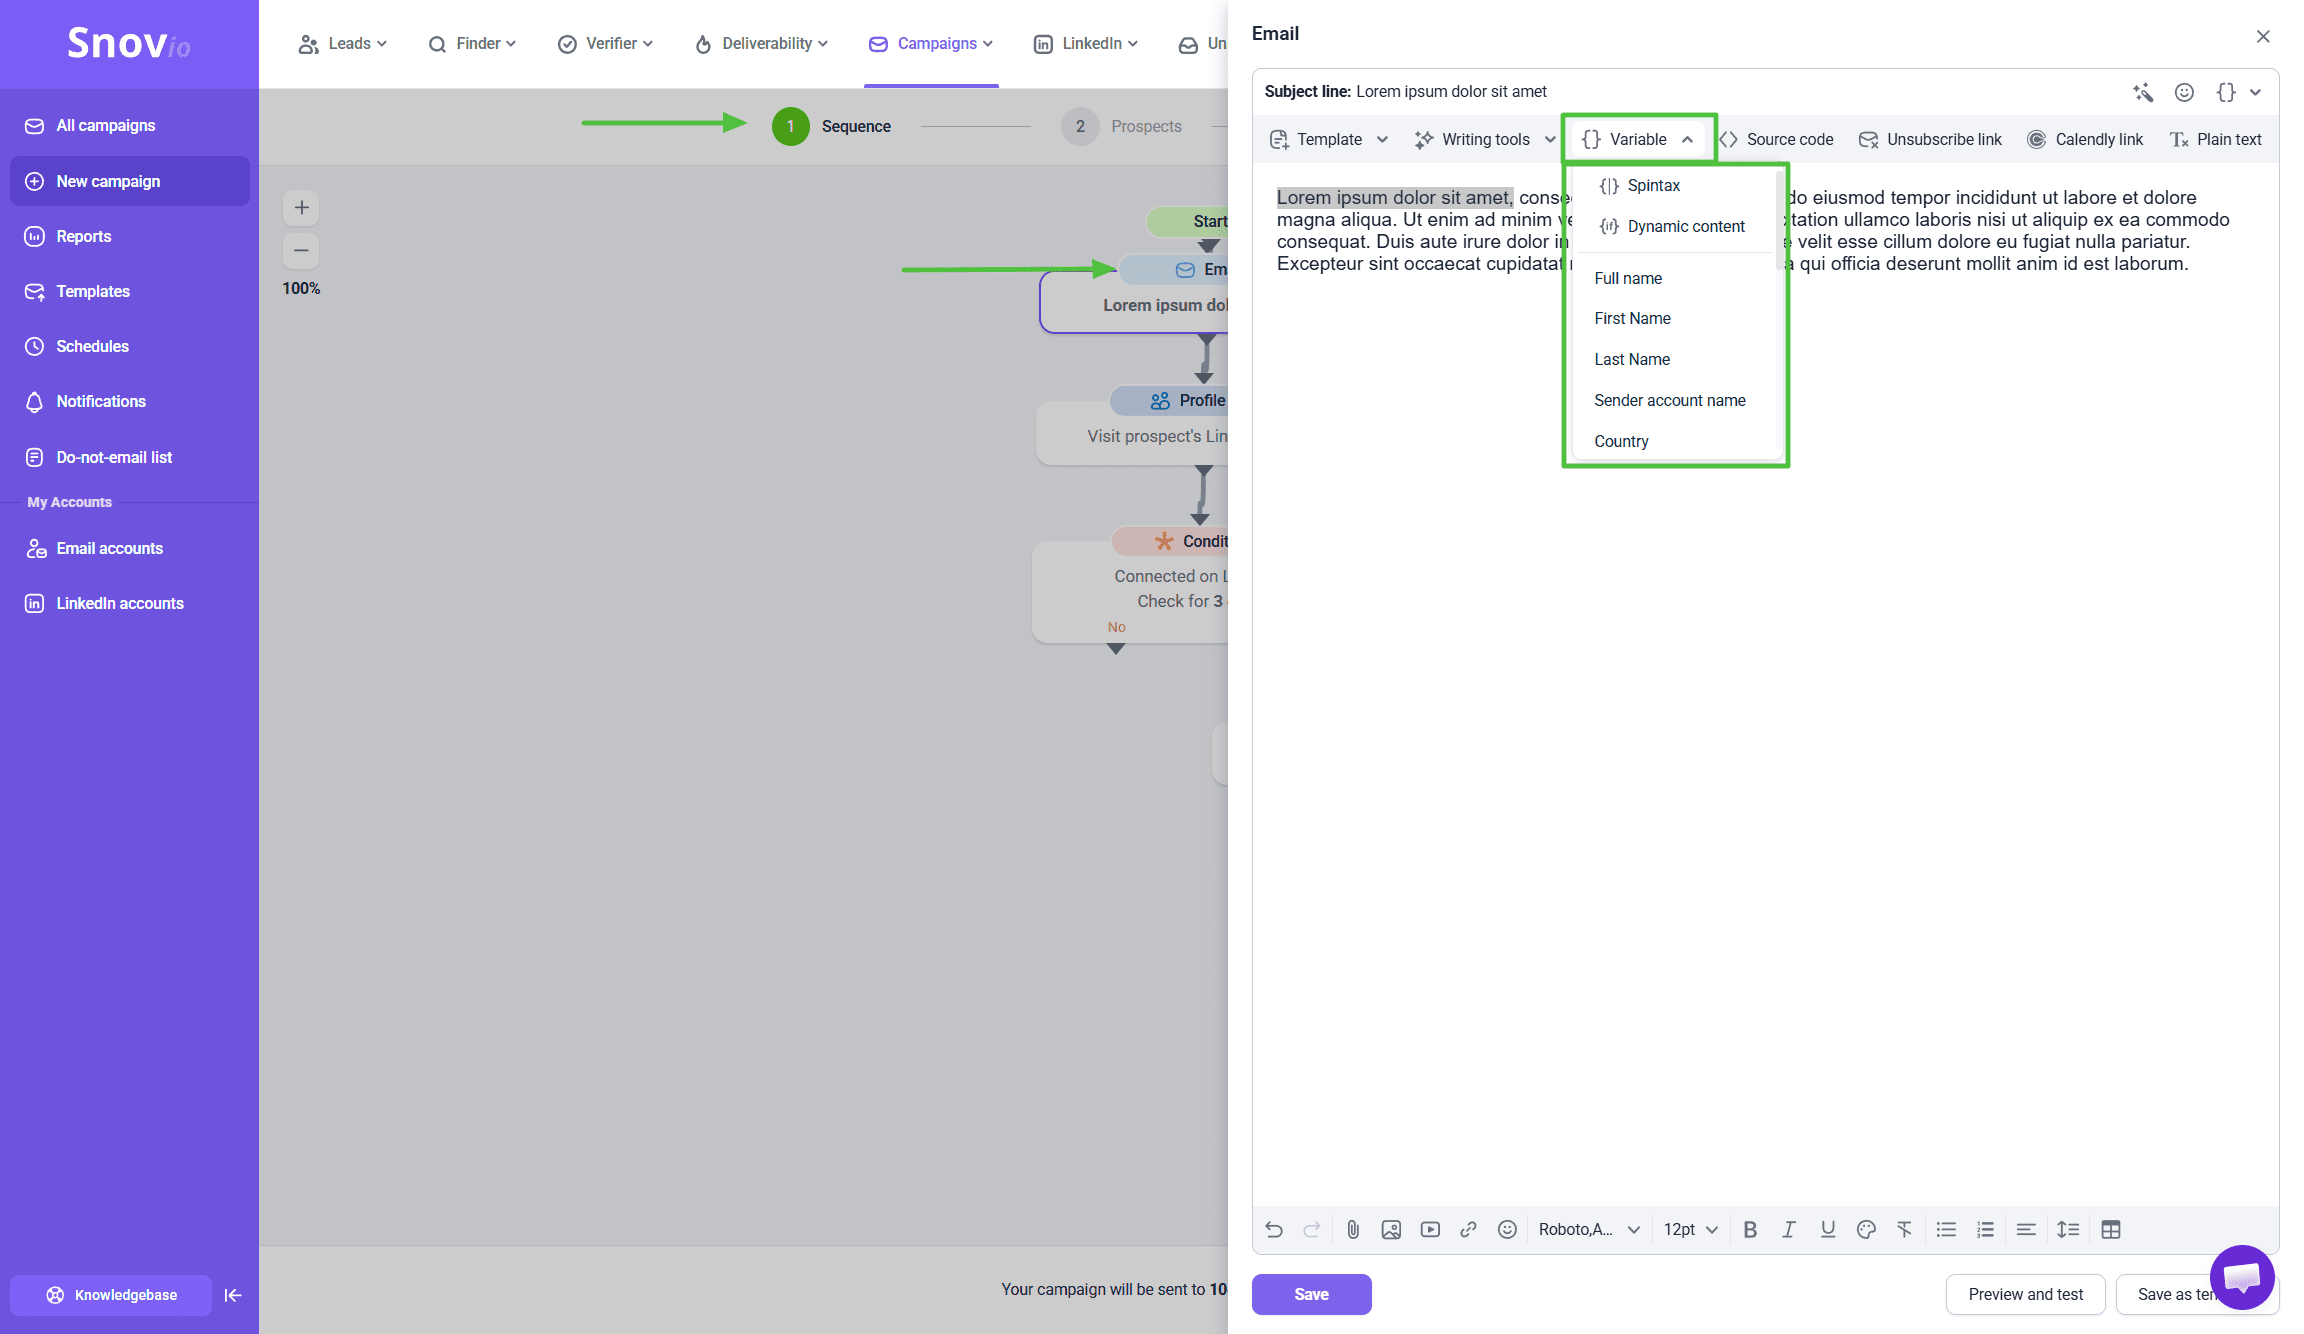
In the email editor, click Variable → Choose which field to insert:
- First name
- Last name
- Company name
- Job title
- Custom fields
Tip: Custom fields let you store any additional data beyond default fields. Use them to create up to 30 custom fields for personalization:
- Opener sentences tailored to each prospect's situation
- Intent signals like recent funding, hiring activity, or product launches
- Industry-specific stats or metrics relevant to their role
- Use cases matching their company size or vertical
- Pain points identified during research
- Custom greetings or qualifying questions
Variables appear as placeholders like {{First Name}}. When sending, Snov.io replaces them with actual data.
Example:
Instead of: "Hi there,"
Use: "Hi {{First Name}},"
Instead of: "I wanted to share this with your team."
Use: "I wanted to share this with the team at {{Company}}."
Set fallback behavior:
In campaign settings, choose what happens when data is missing:
- Use default text ("Hi there" instead of "Hi {{First Name}}")
- Skip the prospect entirely
This prevents awkward "Hi {{First Name}}," emails.
Why it works:
People respond better to emails that feel relevant. Personalization signals you've done research, not just blasting everyone the same message.
For marketing campaigns:
First name and company name are usually enough for launches, events, and announcements. More complex personalization (specific pain points, recent activity, custom fields) makes sense for nurture campaigns or highly-targeted segments.
Step 9. Draft the email in AI Studio, then simplify it for performance
Focus on clarity, relevance, and action.
You can use Snov.io's AI Studio to generate drafts. Choose your product, audience, and value points - it generates versions to customize.
Subject line:
Determines whether emails get opened.
Keep it short: 5-8 words ideal.
Make it specific and relevant. Avoid generic "Checking in" or "Following up."
Good examples:
- "New feature: [Feature Name] is live"
- "You're invited: [Event Name] on [Date]"
Email body:
Start with why this matters to the recipient. Don't start with who you are - start with the benefit.
Structure:
- Opening (1-2 sentences): Why this is relevant to them
- Body (2-3 short paragraphs): What you're offering, how it helps
- Call-to-action (1-2 sentences): What you want them to do, with clear link/button
- Closing: Simple signature
Keep paragraphs short - 2-3 sentences. Use line breaks for scannability.
One clear CTA:
Don't give five options. Pick one action:
- "Register for the webinar"
- "Download the guide"
- "Book a 15-minute call"
- "See the new feature"
Make it obvious and easy to find.
Why simple works better:
Your prospects are busy, scanning inboxes quickly. If they can't immediately tell what you want or why it matters, they move on.
Once you have a draft, simplify it. Best-performing marketing emails:
- Get to the point faster
- Use shorter sentences
- Have fewer distractions
- Make the CTA impossible to miss
Step 10. Optimize the email for deliverability
Marketing emails often get too heavy - too much HTML, too many images. This hurts deliverability.
Snov.io’s email content guides point to a few simple limits that keep the first campaign safer.
Minimal HTML:
- Keep formatting simple (bold, italics, headers)
- Avoid complex layouts with multiple columns
- No background images or heavy CSS
Limit images:
- 1-2 images maximum
- Compress to 50-100 KB each
- Message should make sense if images don't load
- Avoid image-only emails with no text
Watch total size:
- Keep entire email under 102 KB
- Large emails get clipped by Gmail ("View entire message"), hurting engagement
- One uncompressed image can push you over
Tracking (use strategically):
Turn on Track opens and Track clicks in Sending options only when you really need data:
- Testing subject lines or content
- Triggering actions based on engagement
- Building reports for stakeholders
Tracking adds elements that can lower deliverability. If you don't need the data, leave it off.![]() If you use tracking, pair it with a custom tracking domain (Step 2). This reduces deliverability impact significantly.
If you use tracking, pair it with a custom tracking domain (Step 2). This reduces deliverability impact significantly.
Plain text option:
For maximum deliverability, send plain text with no formatting. Plain text emails look simpler but often have best inbox placement.
Note: Plain text disables images, clickable links, and all tracking.
Why light emails win:
Heavy emails look like marketing spam to providers. Light emails look more like personal communication, improving inbox placement.
For first campaigns, go simple. You can add design elements later once you've established good deliverability.
Step 11. Launch the campaign and monitor performance
Once the campaign is active, track the metrics below to understand what's working.
Go to your campaign → Statistics tab. Key metrics:
Sent: Total emails delivered. Should increase daily according to limits and schedule.
Open rate: Percentage who opened tells you if the subject line works.
- 30-50% = Strong
- 20-30% = Average, room to improve
- Under 20% = Check deliverability and subject
Click rate: Percentage who clicked a link tells you if message and CTA are compelling.
Reply rate: Percentage who replied. Most valuable for marketing - shows real engagement.
Bounce rate: Percentage that couldn't deliver. Keep under 5%.
- Over 10% = poor list quality or weak sender reputation
Campaign Overview:
Shows:
- Prospects at each sequence stage
- Total emails sent across all stages
- Send distribution across sender accounts
Use this to confirm volume distributes evenly and sequence progresses as expected.
Reports dashboard:
For broader view, go to Reports to see:
- Performance trends across campaigns
- Comparison between senders
- Overall account health
Why metrics matter:
They tell you what needs improvement. Low opens = subject line issue. Low clicks = offer or CTA unclear. Low replies = wrong audience targeting.
For marketing teams:
Don't judge success in the first 24 hours. Give it 3-5 days minimum to see patterns, especially with multi-day delays.
Your first campaign gives you a baseline. The goal isn't perfect numbers immediately - it's learning what works for your audience to improve the next campaign.
Step 12. Run deliverability checks regularly
Deliverability isn't one-and-done, so make it part of your ongoing workflow.
Go to Deliverability Check → Run a test.
The test simulates sending to multiple providers and shows:
- Where emails landed (inbox vs spam)
- Inbox placement rate by provider
- Technical issues affecting delivery
When to test:
- Before first campaign launch
- After design or content changes
- After increasing volume or limits
- After adding/removing tracking
- If you see sudden drop in opens
- At least monthly for active campaigns
Why this matters:
You might have a placement problem, not a messaging problem. If the open rate is 15%, you could spend hours rewriting subject lines when the real issue is 60% of emails landing in spam.
Check deliverability first, fix placement, then optimize messaging.
For marketing teams:
Marketing campaigns get judged by opens and clicks. But those numbers only matter if emails reached inboxes first.
Low inbox placement = low engagement, no matter how good your copy is.
Regular checks catch problems early, before they hurt multiple campaigns.
Common mistakes to avoid
| Mistake | Why it’s wrong | How to fix |
|---|---|---|
| Skipping warm-up | Launching with new accounts and no history. Sudden activity looks like spam and hurts reputation. | Warm up for 2–4 weeks first. |
| Starting with too much volume | Sending 50–100/day or blasting a large list on day one. New senders get blocked or flagged. | Start with 20–30/day. Scale with more accounts, not higher limits. |
| Using heavy email designs | Large images, complex HTML and fancy layouts trigger filters and reduce deliverability. | Keep it simple. Minimal HTML, 1–2 small images max. |
| Ignoring domain health | Skipping DNS checks leads to poor inbox placement, even with good content. | Check domain health before every launch. |
| No sending schedule | Random send times look unnatural and lower engagement. | Send during recipient work hours. |
| Not testing first | Launching without a test leads to broken links or errors at scale. | Send a test to yourself and check everything. |
What to do after your first campaign
Your first campaign is a learning experience. Use it to improve the next one.
After 3-5 days:
Review statistics:
- Which emails got the most opens?
- Which got the most clicks?
- Where did most people drop off?
- What time saw the highest engagement?
Read replies:
Even negative replies give information. Look for patterns:
- Not interested? (targeting issue)
- Confused about the offer? (clarity issue)
- Asking for more info? (message too vague)
- Interested but timing wrong? (nurture opportunity)
Check deliverability:
If opens are low (under 20%), run the deliverability check. Make sure emails reach inboxes before changing anything else.
Compare senders:
If using rotation, check Reports to see if some senders performed better. Underperformers might need more warm-up or have reputation issues.
Once you understand baseline, test one thing at a time:
Subject lines: Try different styles with A/B testing. Curiosity vs direct, short vs longer, question vs statement.
Send timing: Different days or times to see when the audience is most responsive.
Sequence length: If 3-email had drop-off after email 1, try 2 emails. If people are engaged through all 3, try adding fourth.
Personalization depth: If basic work, add more relevant details (job title, company size, industry pain points).
Offer or CTA: Test different actions (download vs demo, webinar vs consultation) to see what audience prefers.
A simple first-campaign workflow
Use this as your first practical setup:
- Connect sender accounts in Email Accounts
- Check Domain health and fix DNS issues
- Add a custom tracking domain if the campaign needs open or click tracking
- Warm up sender accounts
- Set mailbox-level sending limits
- Create a short email sequence with delays
- Add personalization with variables
- Draft the copy in AI Studio
- Simplify the design and keep the email light
- Apply a schedule
- Add more sender accounts if you need mailbox rotation
- Launch and monitor sent volume, opens, and clicks
- Run deliverability checks as you optimize
If you have a question that we haven't covered, feel free to reach out to our Customer Care team. You can contact us at help@snov.io or through live chat. We're here to assist you!

Sorry about that 😢
How can we improve it?