This guide shows you how to add conditions to your campaigns. You'll learn to create smart multichannel outreach flows that adapt to prospect actions throughout the sequence.
Step 1. Add the condition step
Step 2. Choose a condition type
--> Opened email
--> Clicked on link
--> Connection degree on LinkedIn
Example flows with LinkedIn conditions
--> Booked meeting on Calendly
Why use conditions in your sequence?
- Personalize next steps based on each prospect’s engagement
- Use a different flow with cold or unresponsive leads
- Switch channels when one channel doesn't get a response
In Snov.io Campaigns, you can personalize not just your emails and LinkedIn messages, but the entire sequence.
With conditions, you can route each prospect through the right flow based on their actions (or inactions) during your outreach. This helps you focus on engaged leads and follow up smarter with everyone else.
Let's see how to set up conditions in your multichannel outreach.
Step 1. Add the Condition step
In the sequence editor, drag and drop or click on Condition from the right side to add it to your sequence.
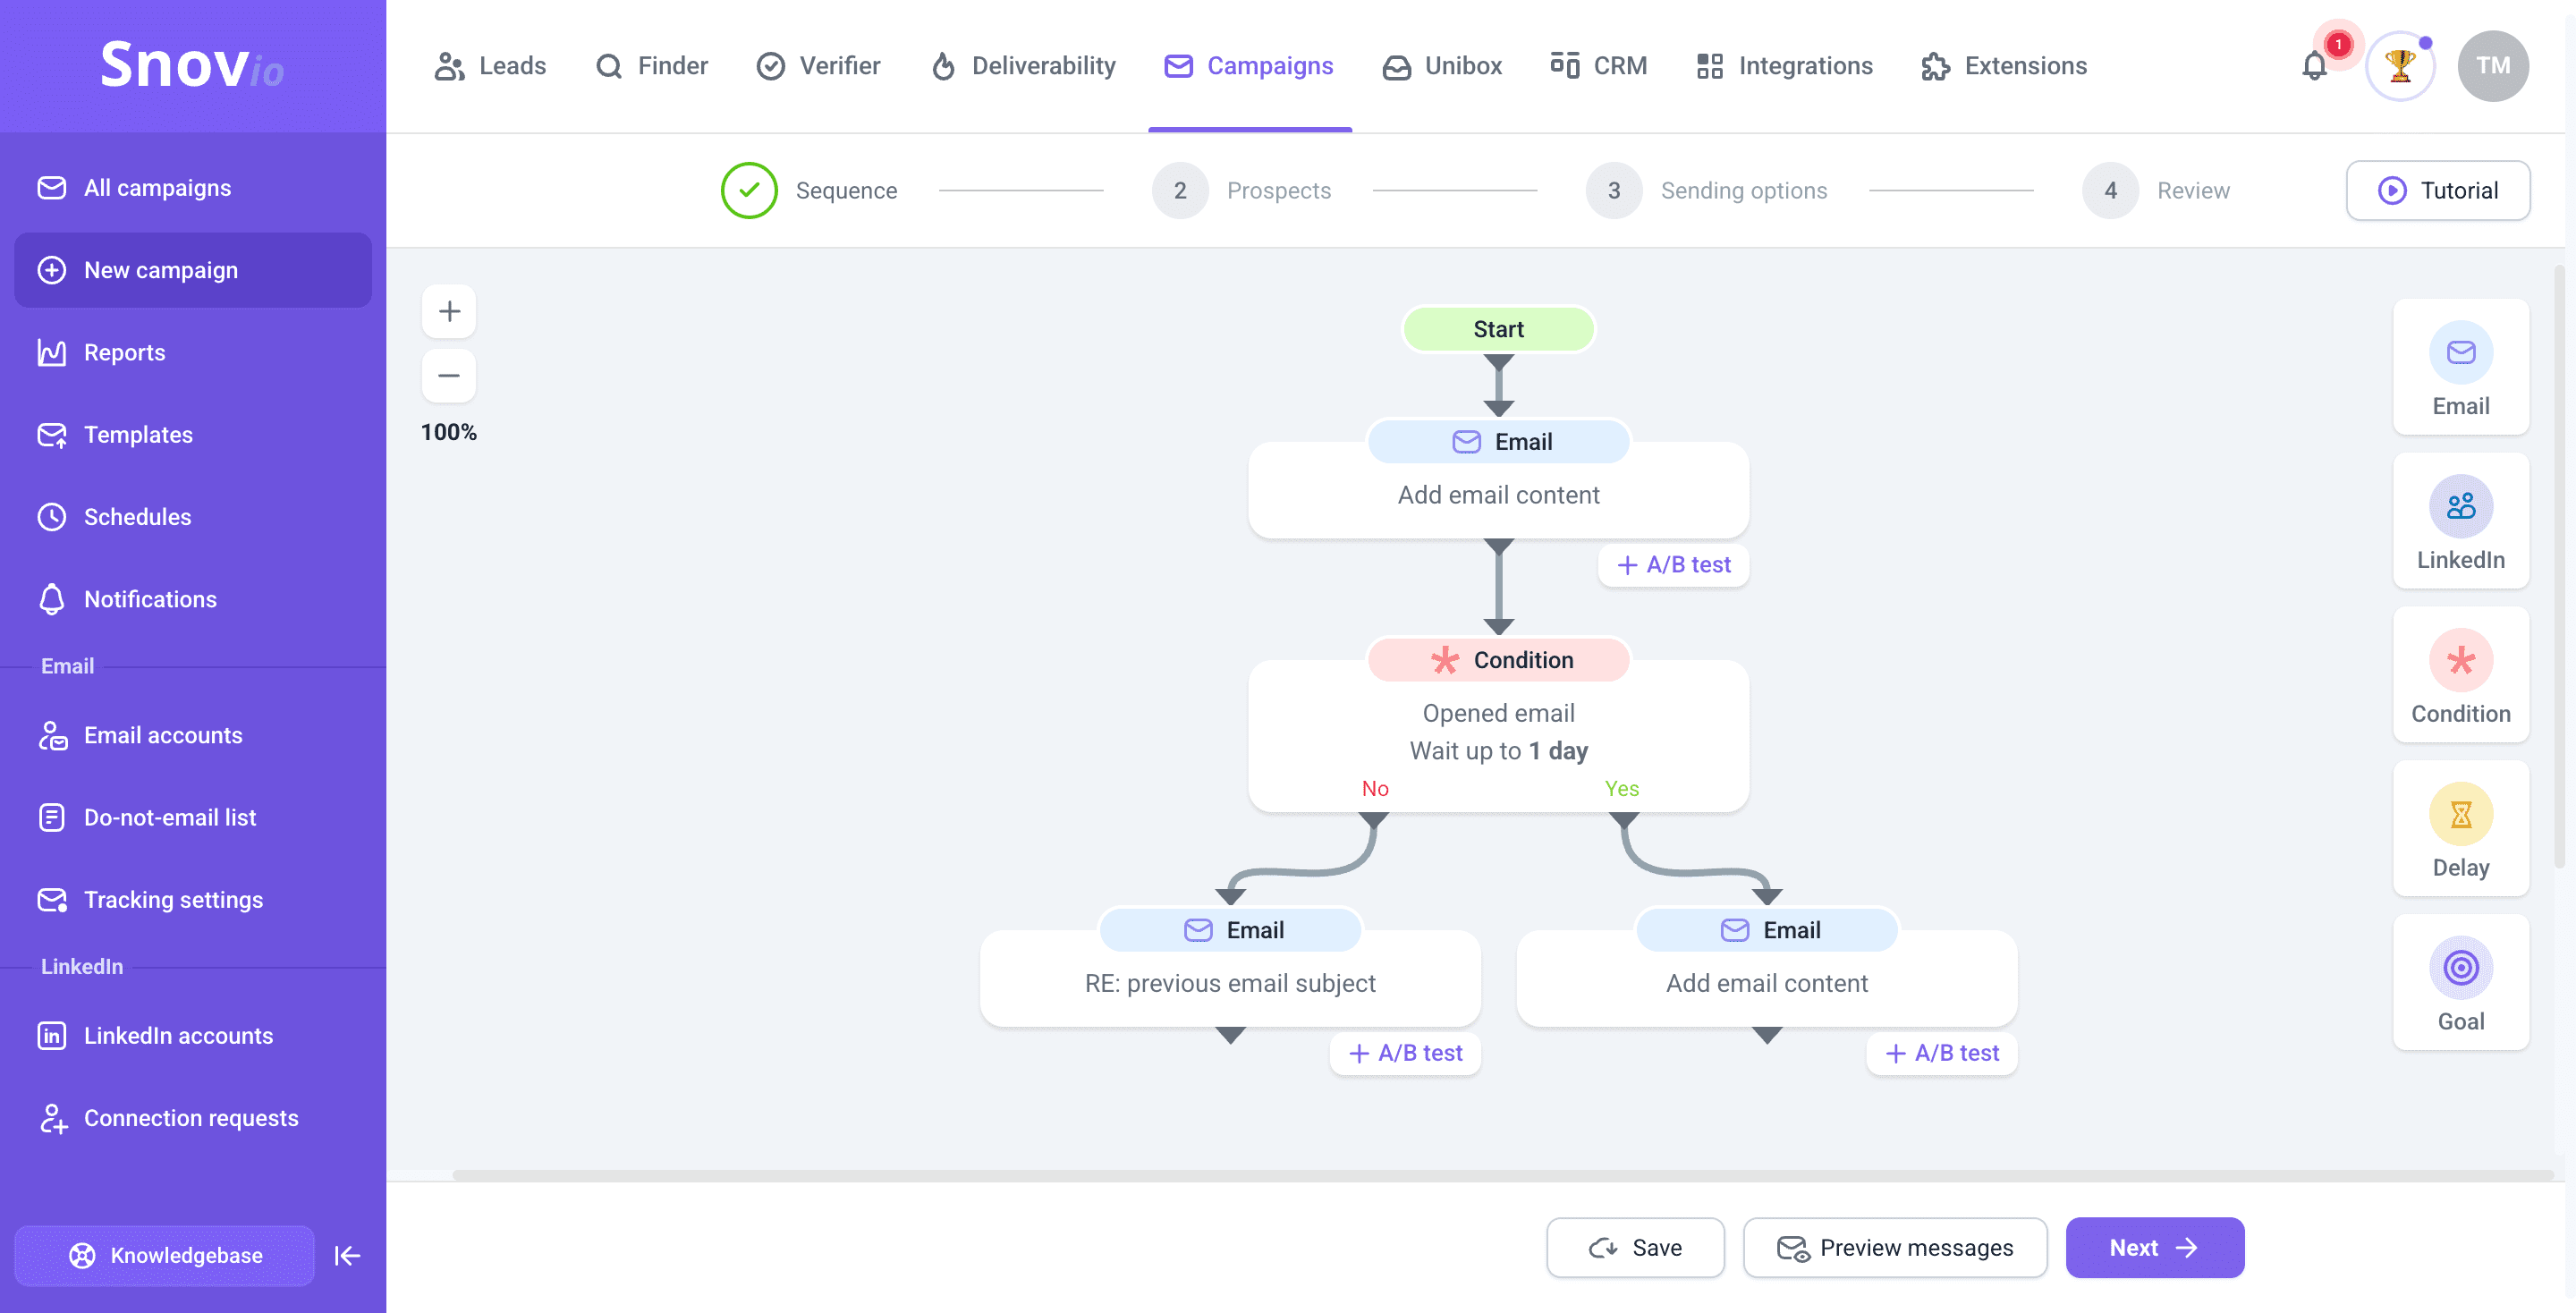
Add a condition step at any point in your sequence. For example, if you want to check whether prospects opened your previous email, add a condition step right after the Email step.
The sequence splits into two separate flows: Yes (if the condition is met) or No (if the condition is not met). We'll check the condition and distribute your recipients accordingly.
One step in your sequence can contain one condition. However, your full sequence can include multiple conditions at different points.

Step 2. Choose a condition type
There are different condition types available for each outreach channel — Email, LinkedIn, and Calendly.
When adding a condition to your sequence, choose the action or status you expect the prospect to have taken by the time they reach that step.
--> Email conditions let you track opens and clicks on links in your emails.
--> LinkedIn conditions improve your outreach based on each prospect’s relationship with you on LinkedIn.
In sequences with LinkedIn actions, set conditions to check the connection status and the connection level. To use LinkedIn conditions, add the LinkedIn Automation add-on to your account.
--> The Calendly condition helps you continue your sequence based on the meeting status (whether the meeting is booked or not).
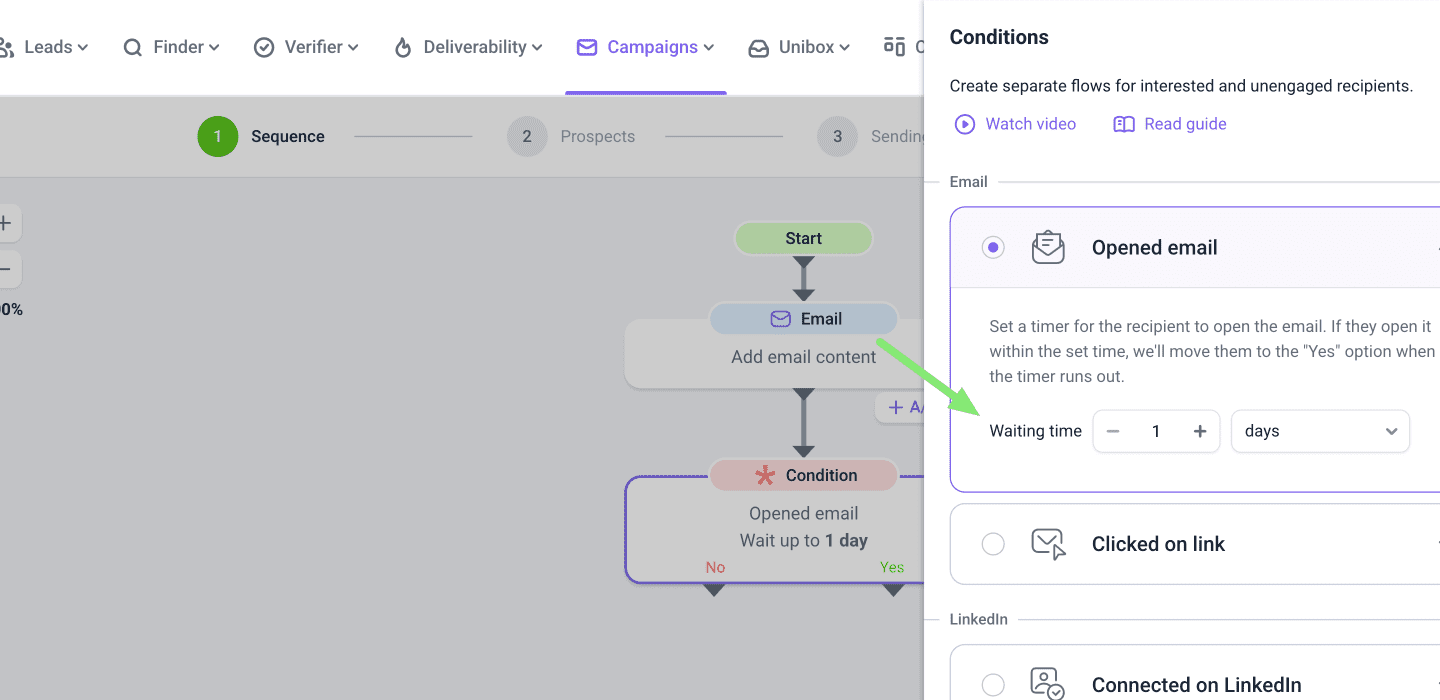
Opened email
This condition allows you to check if a recipient viewed the previous email in the sequence at least once.
Add after the Email step. You can send a follow-up assuming the prospect has read your previous email.
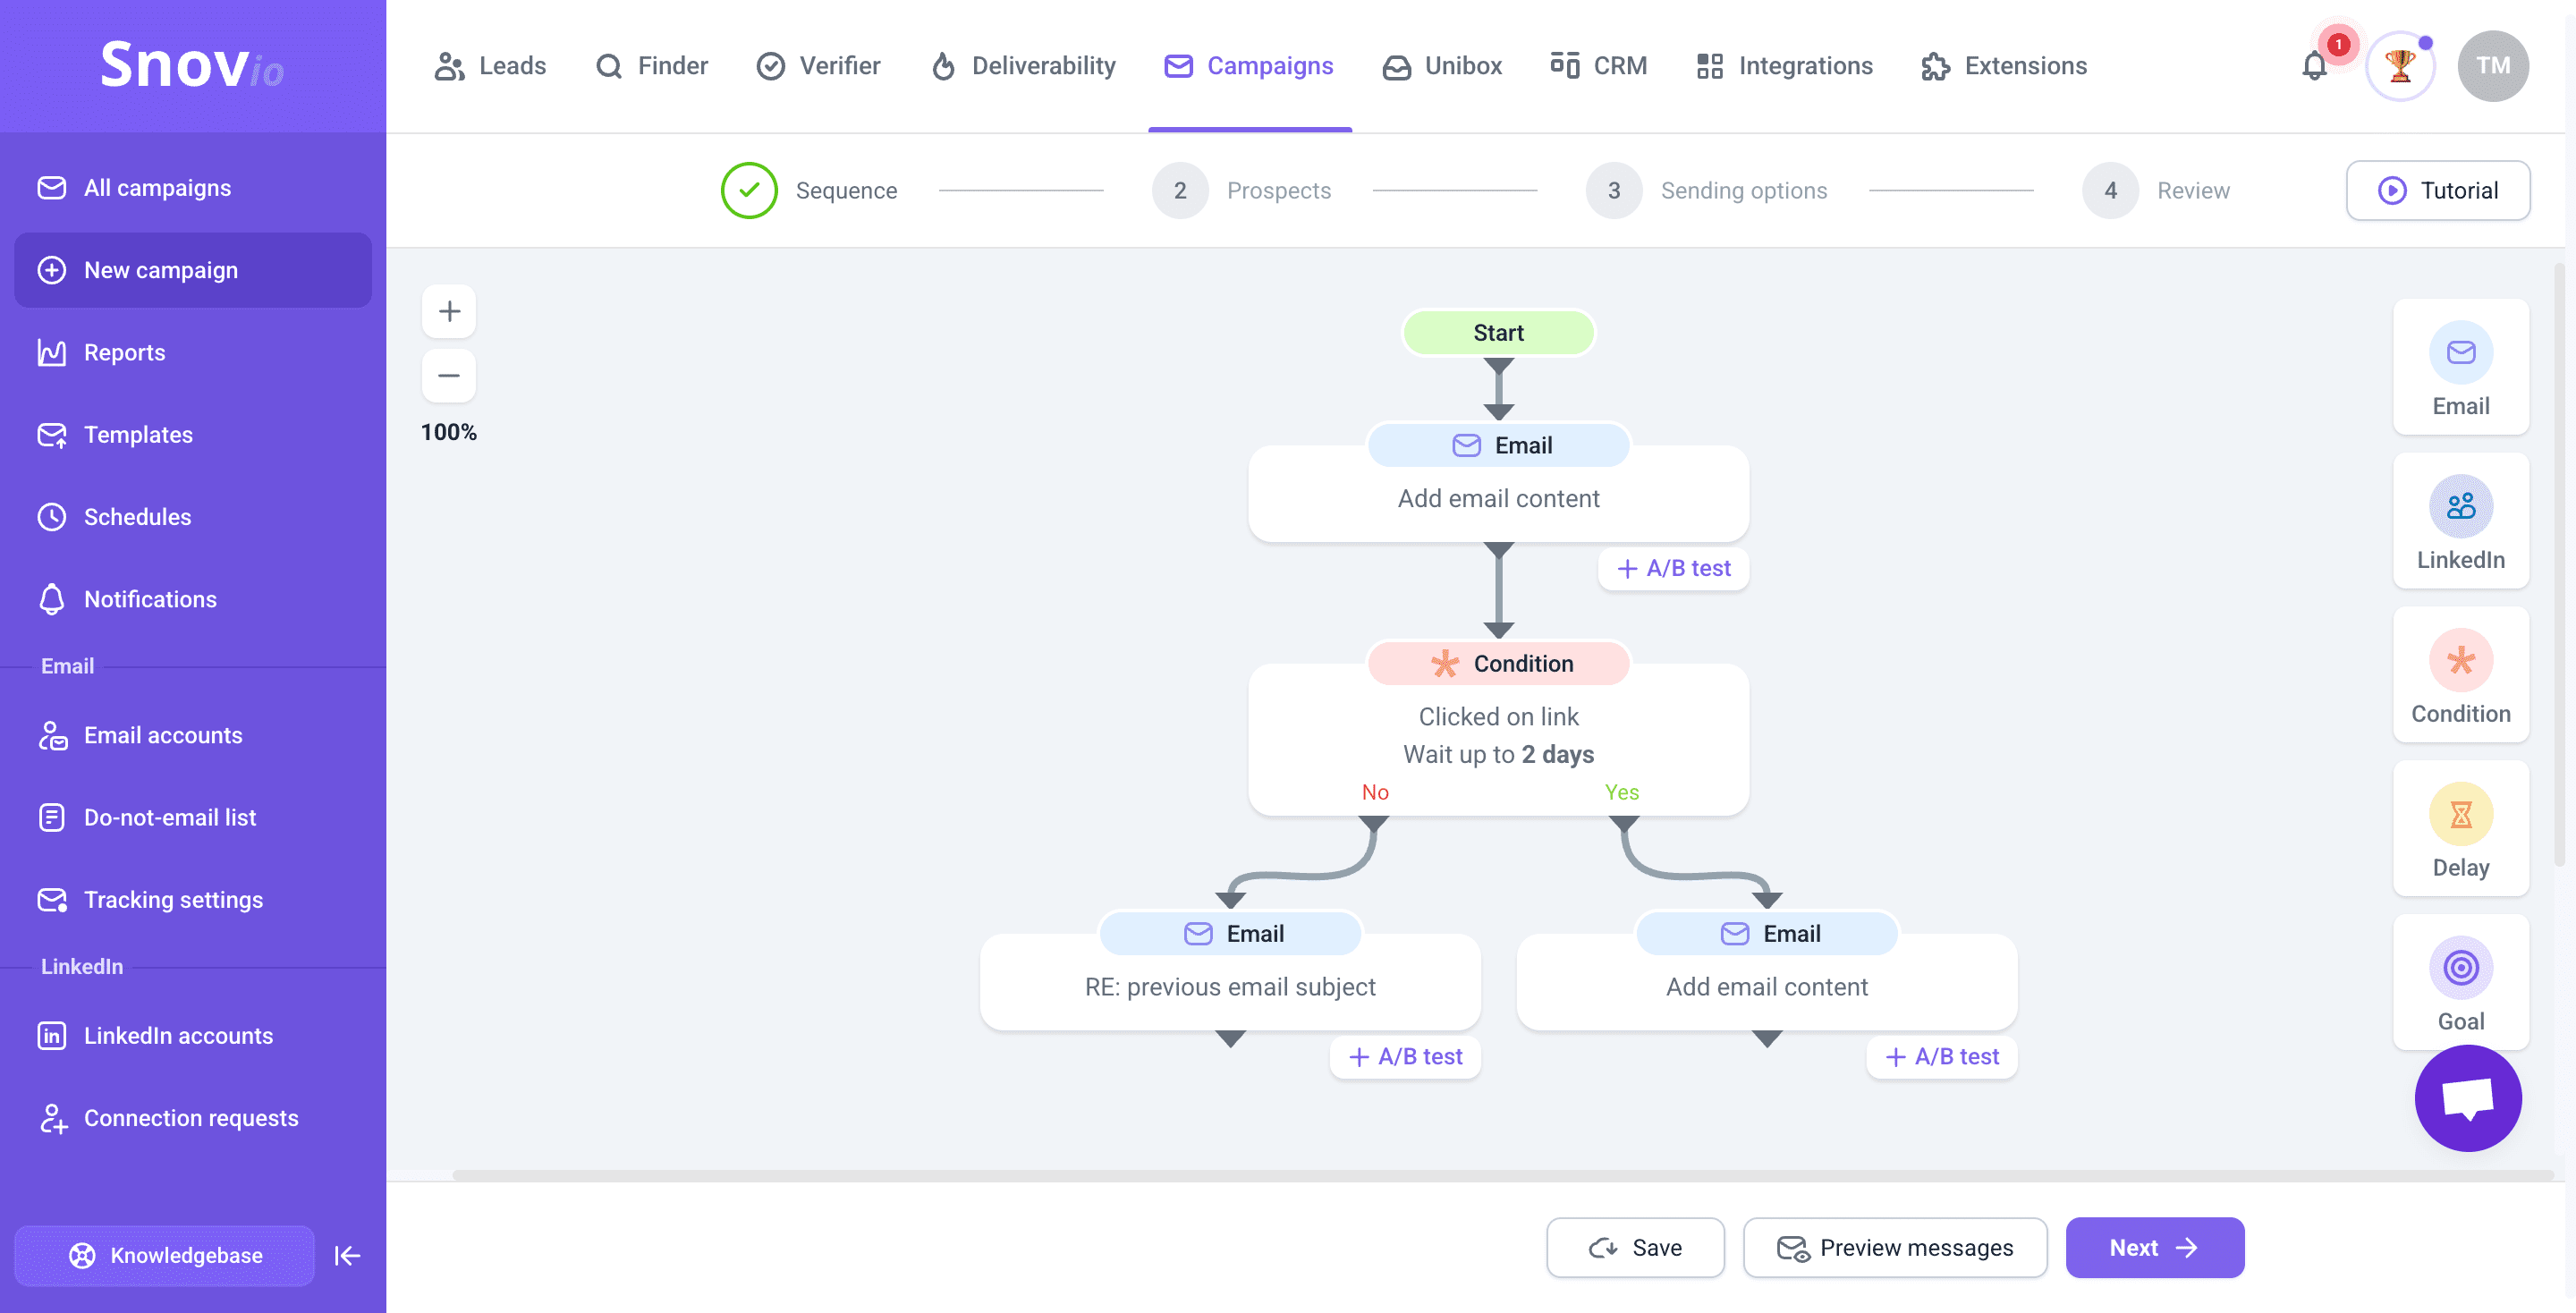
Clicked on link (Email)
Check if a recipient clicked any links from the previous email in the sequence. This doesn't include links in your email signature, only in the email body.
Add after the Email step, where you included links. Create a separate flow for prospects who visit your website. Send more targeted follow-ups or special offers with that in mind.
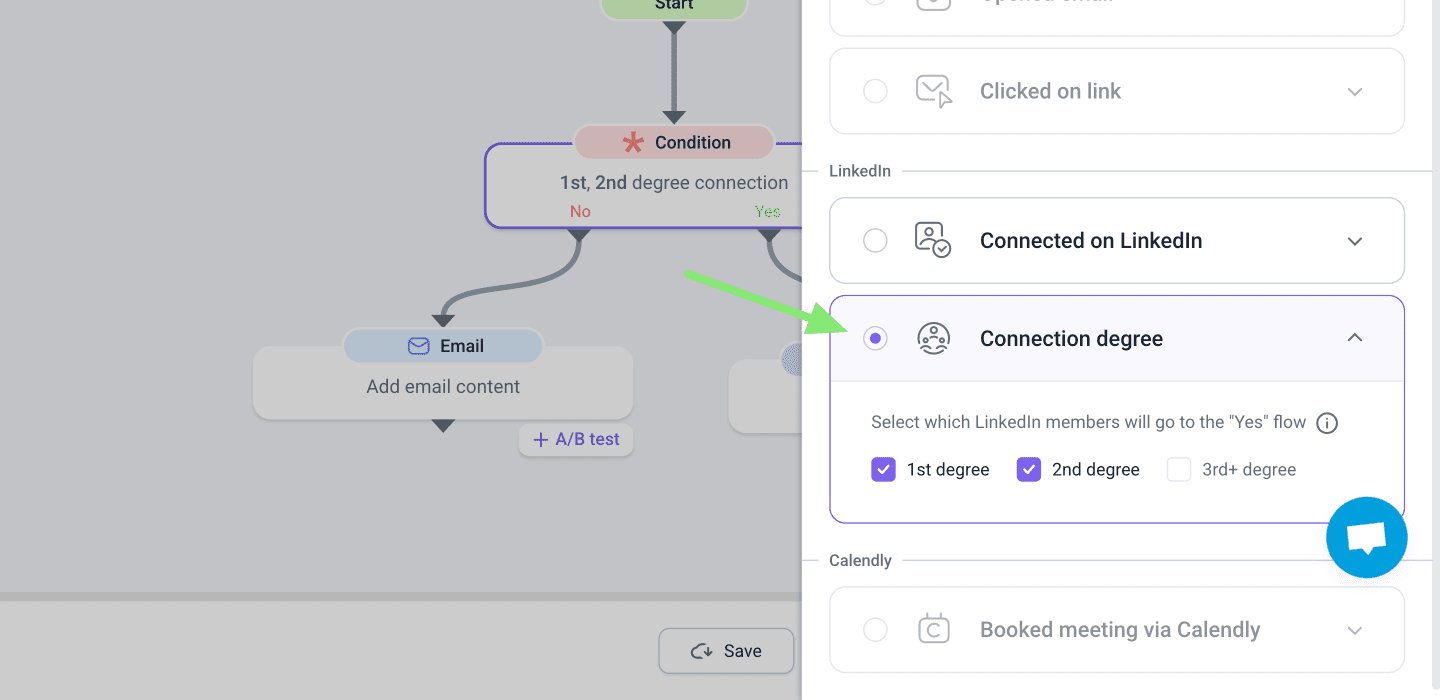
Connection degree (LinkedIn)
This condition checks each prospect’s connection level (1st, 2nd, or 3rd degree) and automatically filters them before continuing the sequence.
Why use this condition in LinkedIn outreach?
--> Plan the next actions based on the connection level
--> Send personalized flows for each degree
--> Make your outreach safer by removing 3rd-degree prospects
How to use the "Connection degree" condition:
Insert the Condition step anywhere in your sequence (even right after the Start step).
Select one or two connection degrees in the condition settings. If a prospect’s connection level matches any of the selected degrees, the sequence will continue in the Yes flow. If it doesn’t match, the sequence will follow the No flow instead.
For example, if you select 1st and 2nd degree, the next step in the main sequence will run only for prospects with those connection levels. Prospects with a 3rd degree connection will go through the No flow.
What are connection degrees on LinkedIn?
1st-degree: These are prospects you’re already connected with on LinkedIn. They’re more likely to respond, and you can message them directly without sending a connection request.
2nd-degree: These are prospects who are not yet part of your LinkedIn network, but you share at least one mutual connection—making them warmer leads. Leverage that mutual connection or a shared professional background to personalize your connection requests.
3rd-degree: These are prospects with whom you don’t share any mutual connections. Sending connection requests to 3rd-degree profiles can be risky, as LinkedIn may flag this as suspicious activity. To protect your account from potential restrictions, it’s best to remove them from your campaign.
If you still want to reach out, consider warming them up first with engagement actions like viewing their profile or liking a post. Alternatively, you can send an InMail with a soft, value-driven introduction.
Connected on LinkedIn
This condition checks whether a prospect has accepted your LinkedIn connection request.
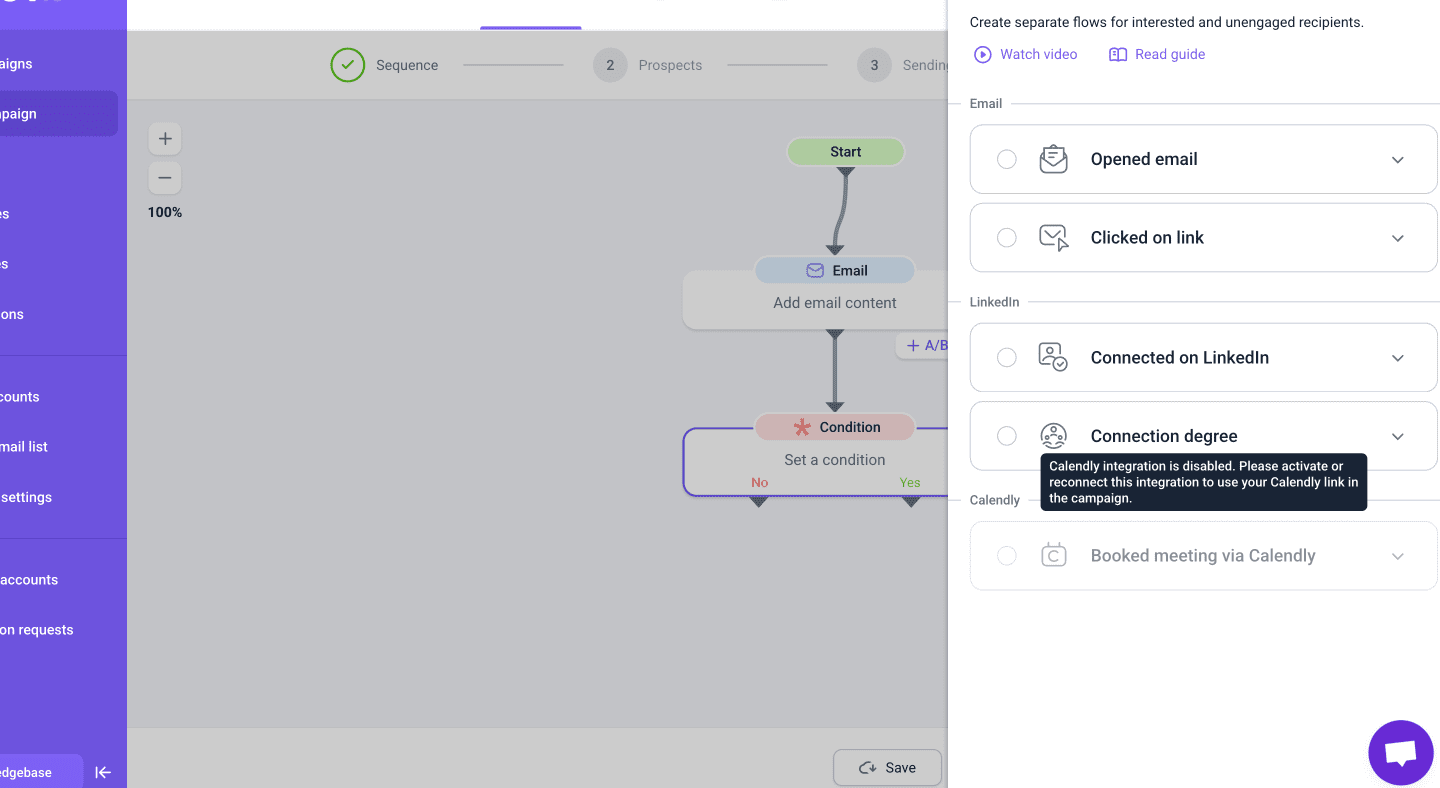
Booked meeting via Calendly (Email)
You need an active Calendly integration to use this condition.
This condition checks whether a prospect has used a booking link from a previous email.
In your sequence, it lets you create separate flows — for example, one for prospects who already booked a meeting and another to send reminders to those who haven’t booked yet.
How to use it:
The Calendly condition can only be used after an email that includes your Calendly link added via the integration. Directly pasting the link into the email won’t trigger the condition.
Step 3. Set a waiting time
To give your prospects time to respond before continuing, some conditions include a waiting period.
By default, the waiting time is set to 1 day for all condition types that support it. You can adjust this time according to your strategy.
During the waiting time, the sequence pauses to check whether the prospect takes the expected action.
Once the waiting time ends, any new actions taken after that point will not count — the condition will be considered not met.
Conditions checked once:
- Opened email
- Clicked on link
- Booked meeting
These conditions are evaluated only once, at the end of the waiting time. Prospects remain paused for the full duration, even if they take action earlier. The result of their action or inaction during the wait will determine whether they go to the Yes or No flow.
To pause your sequence after the "Connection degree" condition, add a Delay step with a waiting time.
Example:
You set a waiting period of 3 days. Prospect opens your email on day 1.
The sequence still waits for the full 3 days. On day 3, the condition is checked, and the prospect moves to the Yes or No flow based on their actions during that time.
Condition checked continuously:
- Connected on LinkedIn
Snov.io monitors it regularly throughout the waiting period (from 1 to 7 days).
If a prospect accepts your connection request during the waiting period, they’ll immediately move to the Yes flow.
Prospects who haven’t accepted will remain paused. Once the waiting time ends, they’ll automatically continue in the No flow.
Example:
You add a 5-day waiting time in the “Connected on LinkedIn” condition.
Prospect accepts on day 2 --> they go to the Yes flow immediately.
Prospects don’t accept by day 5 --> they move to the No flow.
Examples of sequences with LinkedIn conditions
LinkedIn conditions help you personalize outreach based on each prospect’s connection status or connection degree. Below are practical ways to use them.
Use case 1: Segment prospects by connection status
Condition to use: Connected on LinkedIn
This condition checks whether a prospect has already accepted your connection request (in this campaign or earlier).
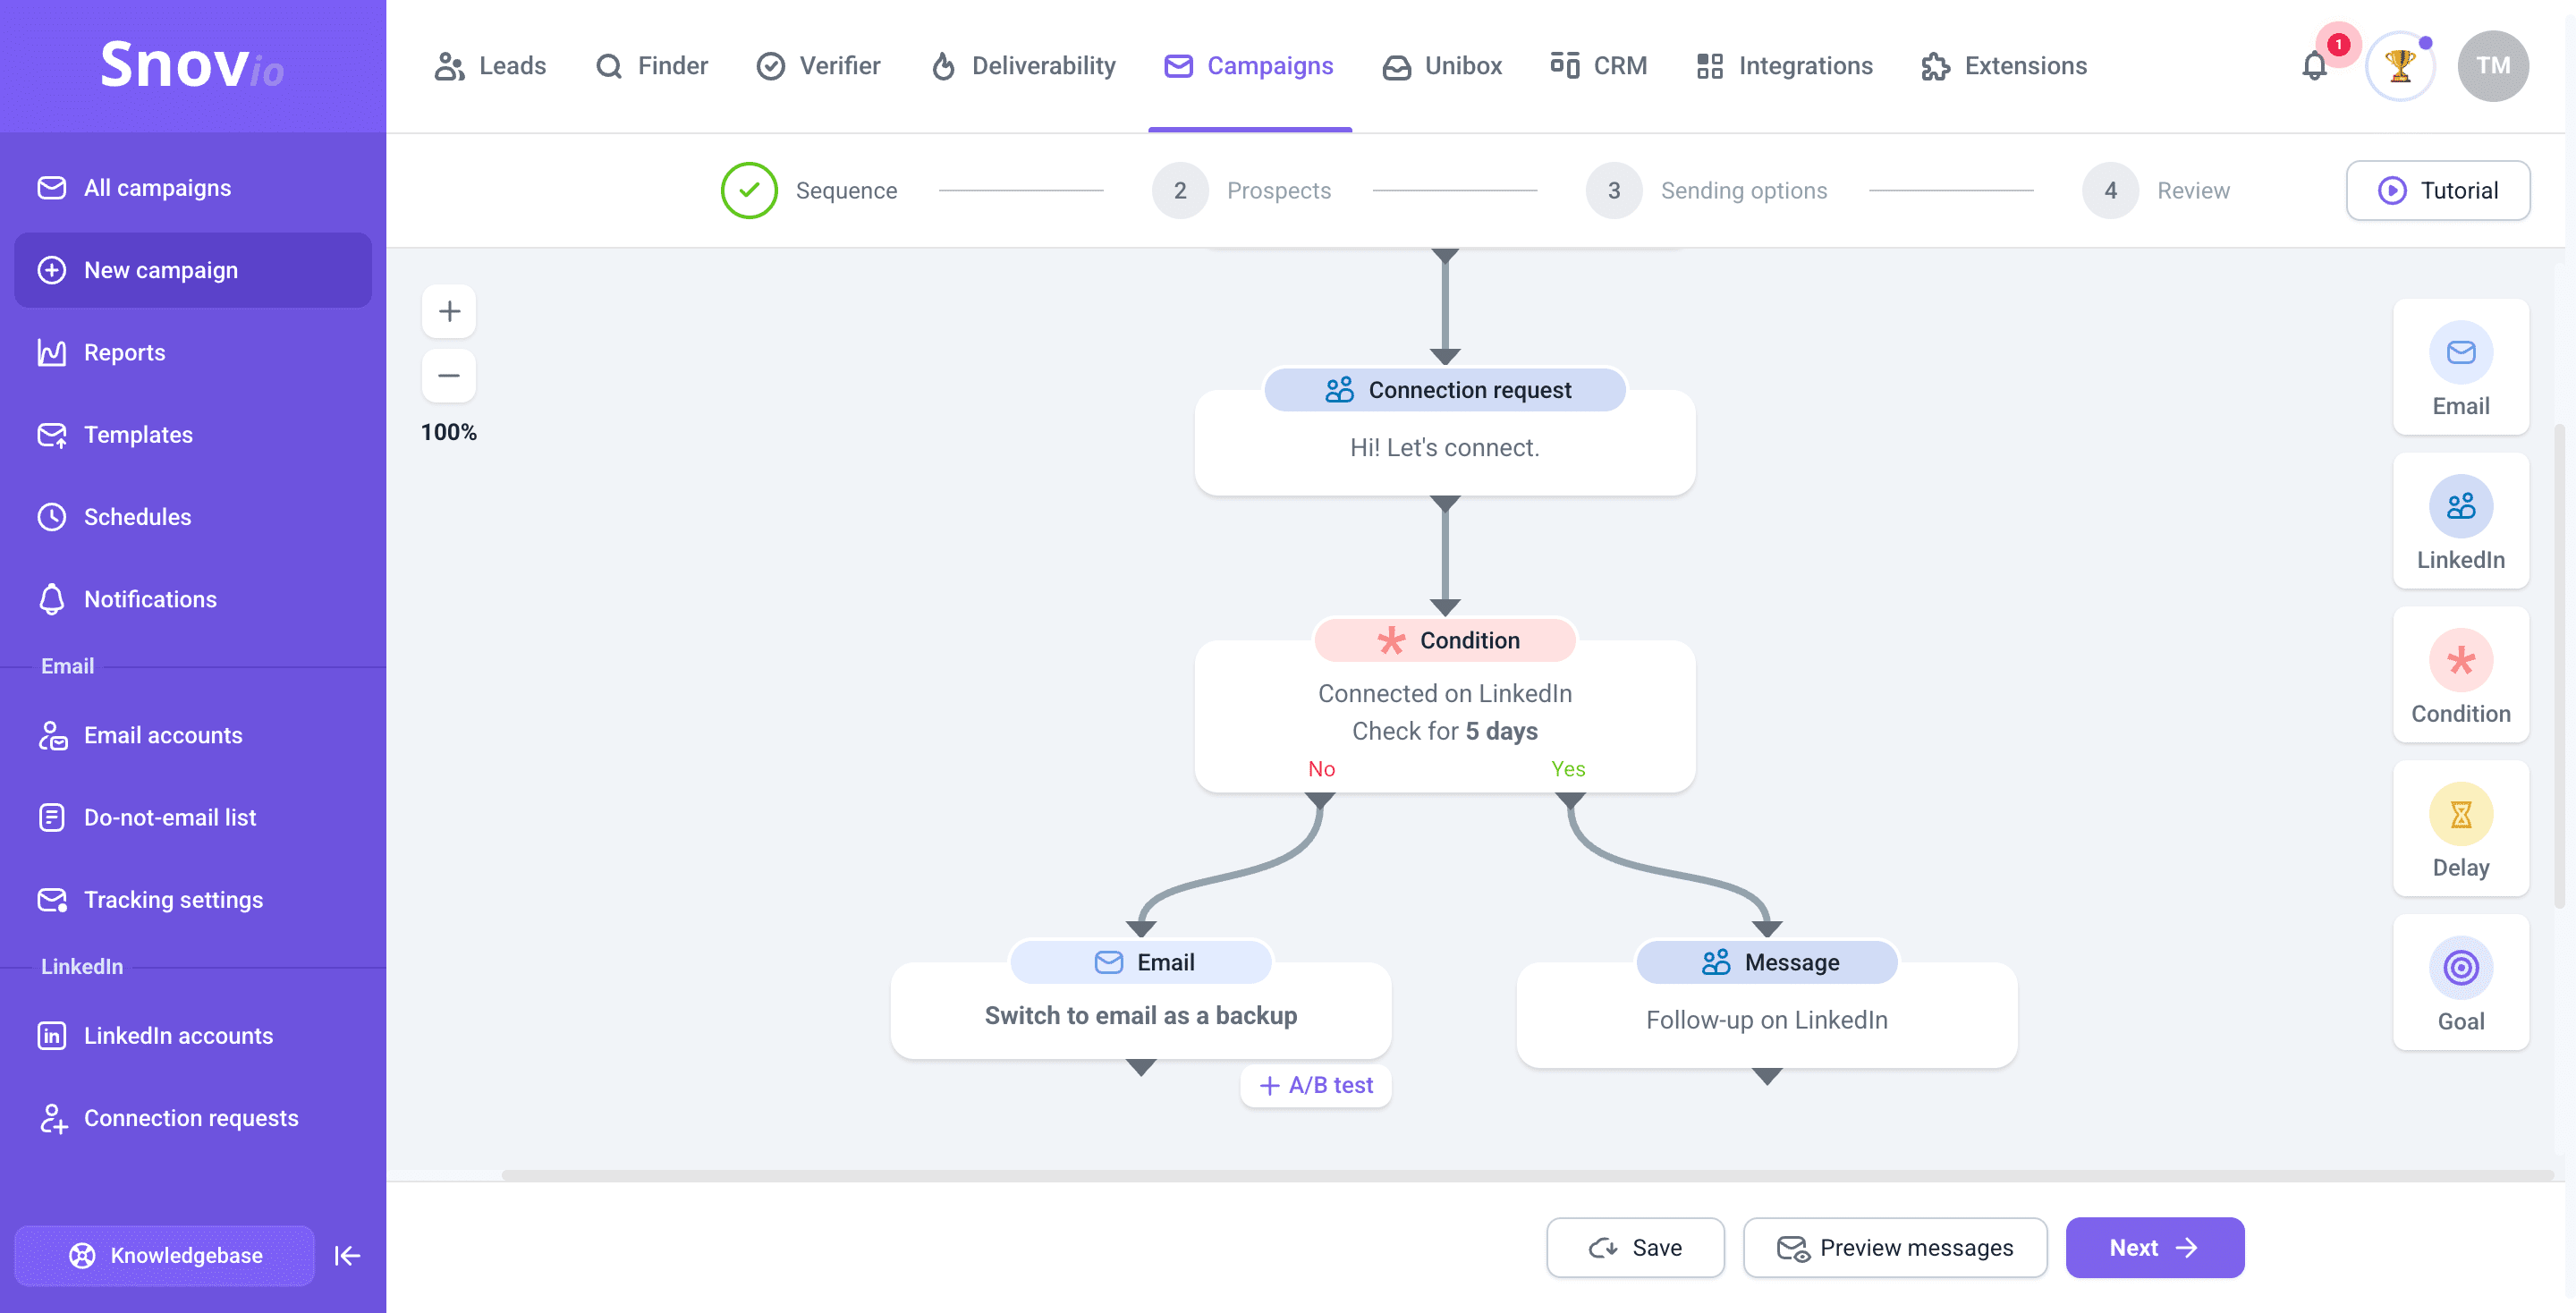
Example A: Check connection status after sending the request
Goal: Use email as a fallback for prospects who didn’t accept your request.
Flow:
Condition: Connected on LinkedIn (after a "Connection request" step).
-
Yes flow (accepted): For those who have accepted your request, the next step is to send a LinkedIn message.
-
No flow (not accepted): For prospects who haven’t accepted your request yet, the next step is to send an email.
Example B: Filter prospects before outreach
Goal: Treat existing connections differently from new prospects.
Flow: Add a "Connected on LinkedIn" condition as the first step after the sequence "Start".
Condition (first step): Connected on LinkedIn
Before the sequence begins, we'll automatically check if any prospect is already in your LinkedIn connections.
- Yes (existing connections): Send a LinkedIn message right away or exclude them from the sequence
- No (not connected): Continue only for new prospects: warm-up actions (visit profile, like post) → send connection request
 Use case 2: Filter prospects by connection degree
Requires: LinkedIn Automation add-on
Condition to use: Connection degree (1st-, 2nd-, 3rd-degree)
Goal: Keep only prospects with specific degrees in the main flow; create an alternative flow for other prospects.
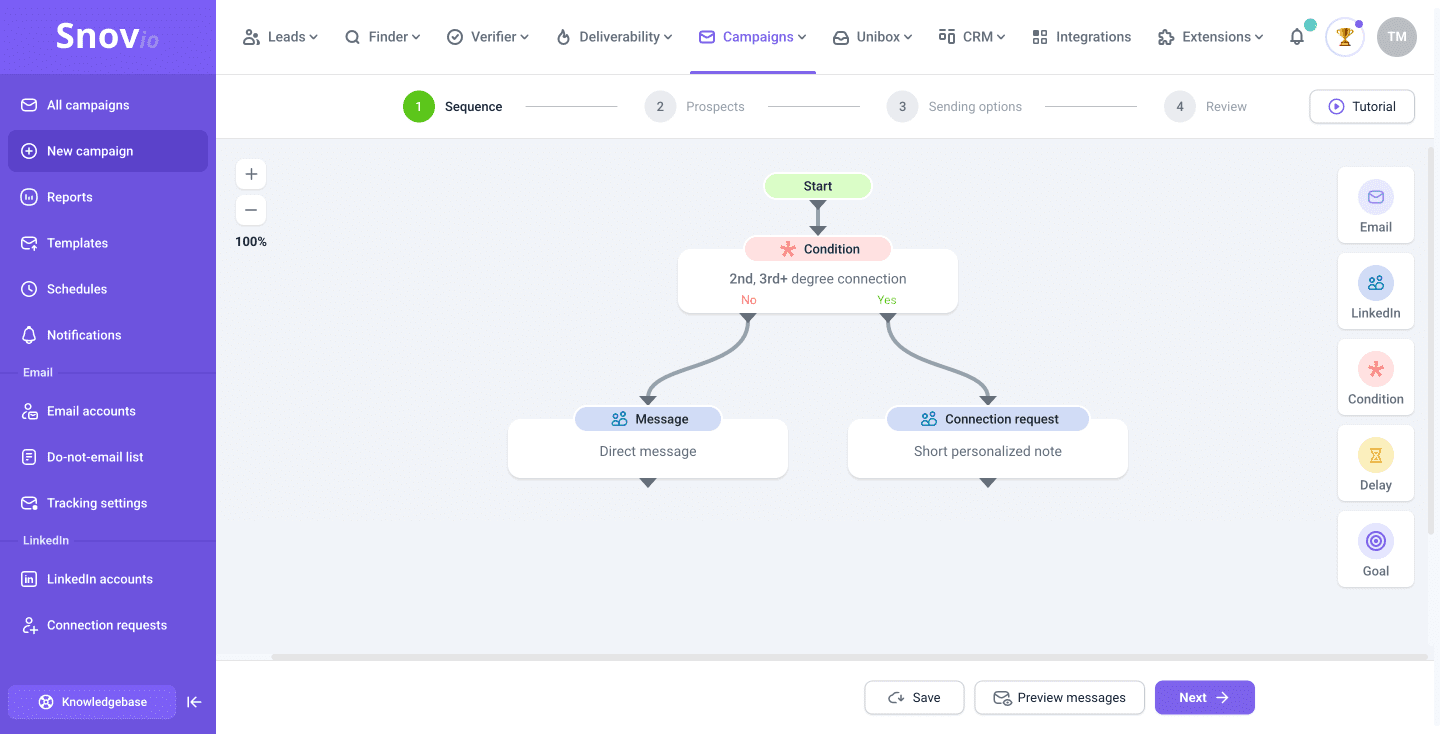
Example A: Send a message to prospects already in the network; send a request to others
Flow: Add the condition after the Start or any point in the sequence.
Condition: 2nd, 3rd+ degree connection
- Yes: Connection request
- No (for the 1st degree): Send LinkedIn Message
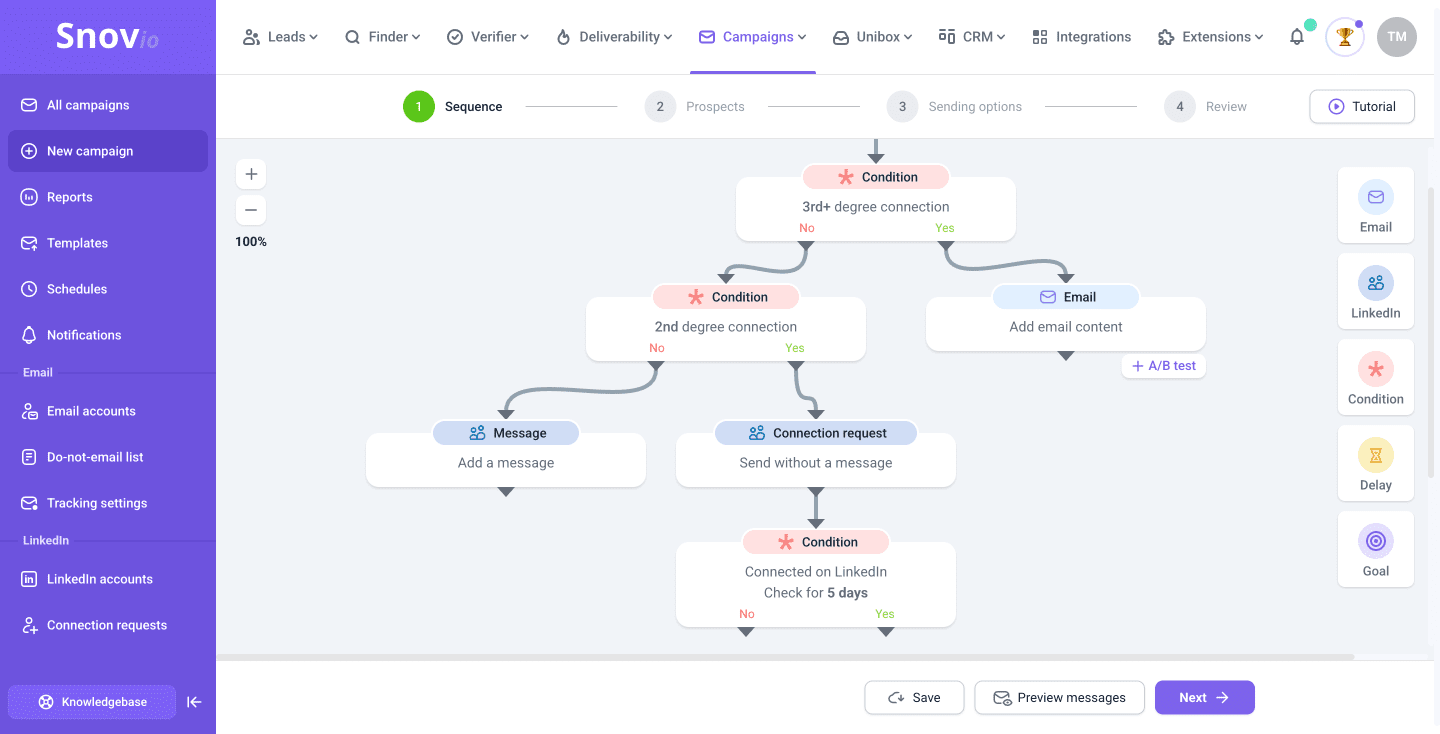
Example B: Exclude 3rd-degree on LinkedIn, contact via email
Goal: Avoid risky LinkedIn actions with 3rd-degree prospects but continue outreach via email.
Flow:
Condition #1: 3rd+ degree connection
- Yes flow: Stop LinkedIn sequence → Send email
- No flow: Add the second Condition
Condition #2: 2nd degree connection
- Yes: Send connection request → Condition: Connected on LinkedIn (Check for 5 days) → Send LinkedIn Message if accepted
- No (for the 1st-degree): Send a LinkedIn Message
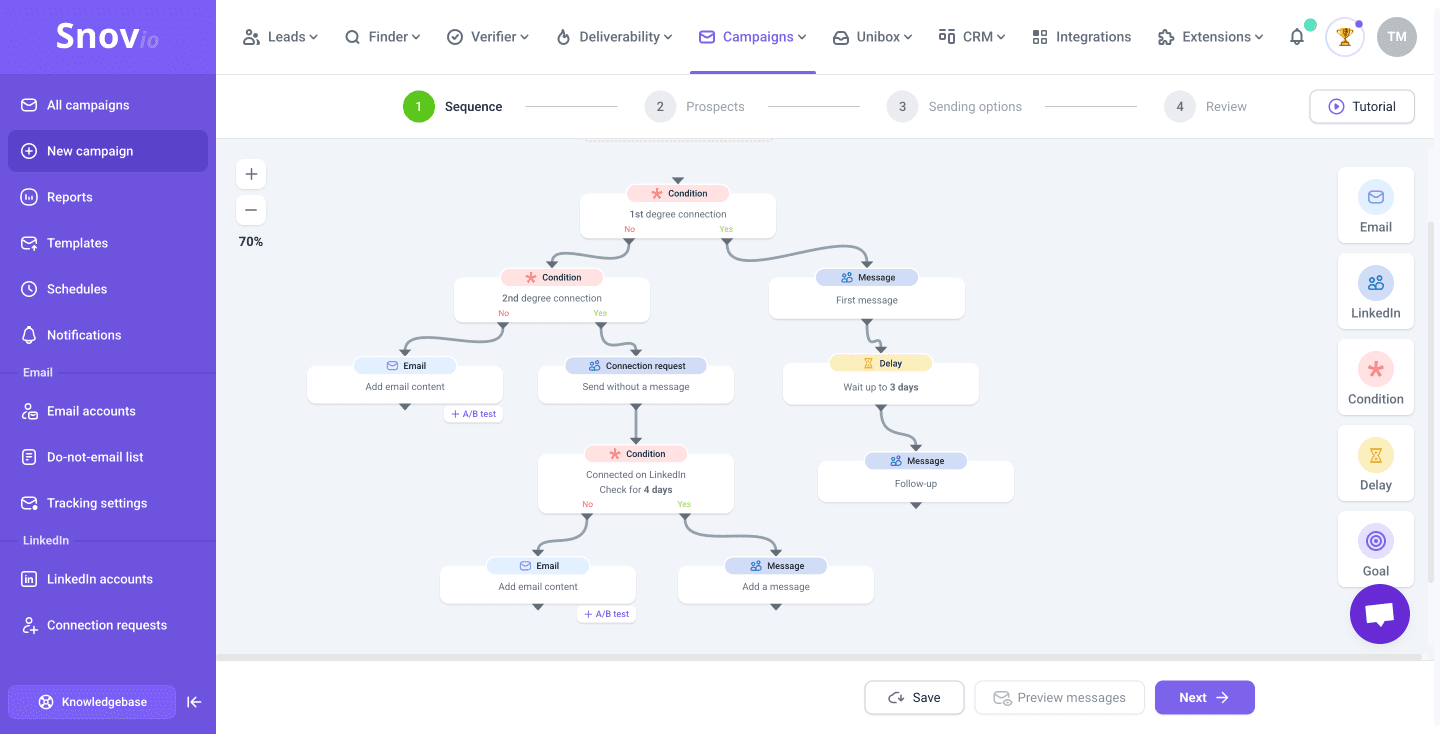
Use case 3: Create separate flows for each degree
Goal: Personalize messages and actions by degree. 1st-degree → send message, 2nd-degree → send a request, 3rd+ degree → exclude from campaign or send email/InMail.
Flow (stacked conditions):
Condition #1: 1st connection degree
- Yes: LinkedIn Message → Delay → Follow-up message
- No: Add the second Condition
Condition #2: 2nd connection degree
- Yes: Send connection request (with a short personalized note) → Condition: Connected on LinkedIn (Check for 5 days).
- No: (they're 3rd-degree):
For the No flow, there are two ways to continue:
Option 1 (recommended): Stop the LinkedIn sequence and switch to email.
Option 2: Warm-up flow (profile views, post likes, profile follows) → Send email or InMail message

Sorry about that 😢
How can we improve it?