By default, your email account uses a shared IP address provided by your email service. This article explains how to set up a dedicated IP for sending cold email campaigns.
What is the risk of using a shared IP:
A shared IP is an address assigned by providers to many users, meaning they all send emails from the same server. The reputation of a shared IP depends on the sending practices of all its users.
Why use dedicated IP:
The dedicated IP is your personal email server’s address. Its main benefit is full control of your sender reputation, as only your actions shape it. This way, you don’t risk deliverability if the shared IP gets a bad rating.
Keep in mind that dedicated IP addresses aren't necessary for everyone.
A shared IP is for you if:
If you send a small volume of emails (fewer than a few hundred per day), it's more effective to use a shared IP. Your daily sending limit changes, and you send campaigns with different schedules and list sizes.
A shared IP doesn't always have a bad rating. In some cases, it could be better to use a shared IP with a good score rather than starting with a new IP that has no reputation data yet.
A dedicated IP is for you if:
You’re a bulk sender consistently sending more than a thousand emails per day. But, keep in mind that it will need a lengthy warm-up period, between 4 to 8 weeks, to build its reputation.
Dedicated IP vs shared IP address:
| Dedicated IP | Shared IP | |
| Email reputation | Your reputation is entirely in your hands, as it directly depends on your own sending practices. | You're relying on the collective reputation of all senders sharing the same IP, which can be unstable if others send low-quality emails. |
| Deliverability | You have control over the quality of the emails you send from that IP address. It will be easier to detect and fix issues that affect it. | Deliverability can change based on the current rating of the shared IP your provider assigns to you. |
| Risk of IP blacklisting | The risk is lower because it depends only on your actions. | The risk is higher because another user can cause a shared IP to be blacklisted, which will impact you as well. |
| Setup | Requires extra expenses, setup and warm-up. | No setup or maintenance is needed, but you still have to keep an eye on the sender score of your IPs. |
| Email volume required | Providers often require a consistently high daily volume to justify using a dedicated IP. | There are no minimum volume requirements. If you send targeted campaigns, your email volume can be as low as 50 to 100 emails per day. |
If you’ve decided to set up a dedicated IP, here’s what to do next:
Step 1: Get a dedicated IP address
Some ESPs do offer dedicated IP addresses, but they have requirements on who is eligible to have one. They often offer it only to senders with high volumes (as much as 100,000 emails per month). This is because they want good senders to remain on shared IPs to contribute to their reputation.
Below are some examples of email providers:
Zoho: Provides a dedicated IP address for senders who send more than 100,000 emails per month or 50,000 per week.
Google Workspace: Google doesn’t provide dedicated IPs for sending emails. But, if you get a dedicated IP from your domain provider, you can configure Google Workspace to send emails through that IP.
In Google, this is called an outbound gateway – you add the IP address as a host in the Google Workspace settings. In this setup, the emails you send from Gmail will be routed through that IP address rather than a shared one.
Read the official Google documentation for detailed instructions: Set up an outbound mail gateway →
Microsoft (Outlook): Offers a dedicated IP, but you must meet specific eligibility criteria and apply to use it.
Sendgrid: Provides a dedicated IP for high-volume senders.
Mailgun: Offers a dedicated IP for senders who are sending a minimum of 100,000 messages per month. Read more →
Amazon SES: Offers a dedicated IP for senders whose sending volume reaches hundreds of emails over a period of a few days. Read more →
If your email service provider isn’t on the list, get in touch with them to check if they provide this option.
Step 2. Update domain settings
After you get your IP address, you'll update your domain’s DNS settings to connect it with the IP. This step is crucial for email authentication – it authorizes the new IP to send emails on behalf of your domain.
Log in to your domain’s admin account (on your registrar’s website) and find the DNS settings. This is where you add and update DNS records.
If you're unsure of your domain registrar, you can find this information in the deliverability test results. Follow these steps:
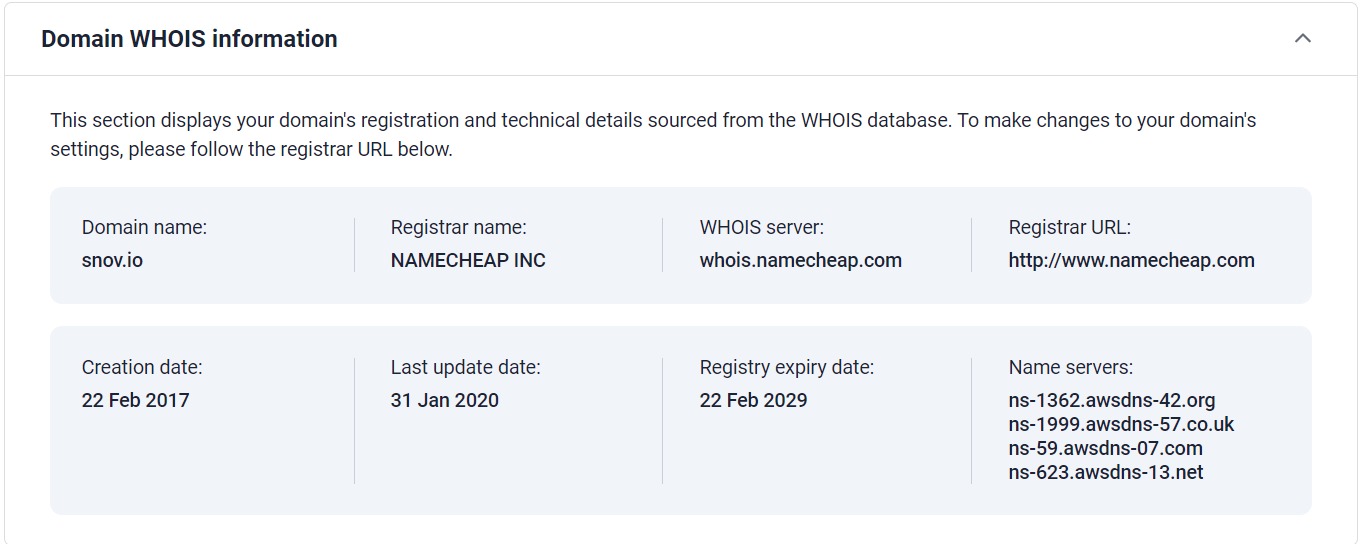
Start a new test or open the details of a previous test. In the results section, open the Domain Health tab and select Domain WHOIS Information.
Here, you'll see your domain's details, including the registrar's name and its website (Registrar URL).
What to configure in domain settings:
1) A Record:
In the DNS settings, add a new A Record by selecting "A" as the record type. In the Hostname field, enter “@,” which means your root domain address. In the Value field, enter your new IP address. This process links your domain to your dedicated IP.
2) SPF Record:
A Sender Policy Framework (SPF) specifies which email servers are allowed to send emails on behalf of the domain.
To set up an SPF, create a new TXT record in your domain’s DNS settings. To access DNS settings, log in to your domain hosting account and find the section where you add DNS records.
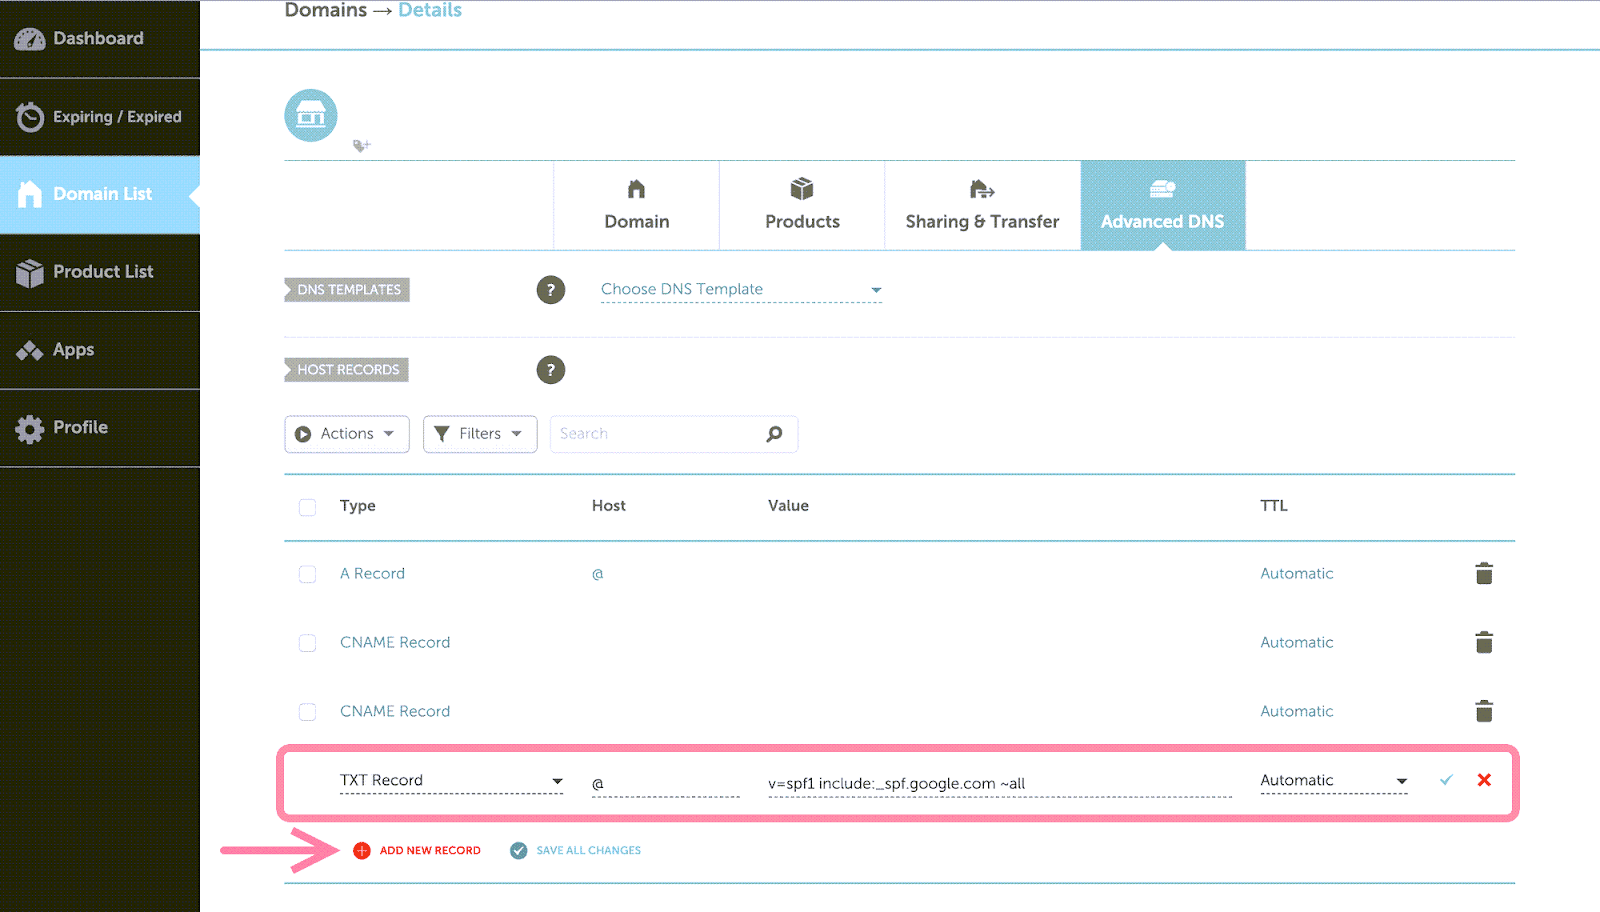
For example, if your domain registrar is Namecheap, do the following:
Log in to your Namecheap account. Open the Domain list menu and click on the Manage button next to your domain. Go to the Advanced DNS tab.
Click Add new record and choose TXT type.
Put @ in the Host field. In the Value field, use this format: v=spf1 ip4:111.222.33.444 ~all, where 111.222.33.444 is your unique IP address.
If you already have an SPF record, it will contain the email servers that can send emails on behalf of your domain. You can update this record to add your dedicated IP or create a new one.
For example, if you've used Google Workspace, the SPF record would look like this: v=spf1 include:_spf.google.com ~all.
When you add your dedicated IP, it should be updated like this: v=spf1 ip4:111.222.33.444 include:_spf.google.com ~all.
Step 3: Warm-up new IP
Once you get a dedicated IP, email providers and spam filters will see it as a "new" sender and may flag emails from it if you start sending too much right from the start.
To get good deliverability, you need to build a reputation for it through a warm-up process. Snov.io helps you achieve that with the email warm-up tool.
The recommended warm-up period for a new IP address is 4 to 8 weeks.
Start an automatic warm-up process here →
Read tips for best warm-up results →
Step 4. Test the new IP address
After completing the warm-up, run a deliverability test again to check your sender score. Remember, a dedicated IP isn't a magic solution to all the issues. Check other results of the deliverability test as well.
Make sure to set up email authentication (SPF, DKIM, and DMARC) on your domain. Without it, a dedicated IP address won’t be effective.
If you have a question that we haven't covered, feel free to reach out to our Customer Care team. You can contact us at help@snov.io or through live chat. We're here to assist you!

Sorry about that 😢
How can we improve it?