This article will explain the various statuses that campaign recipients may acquire as they progress through the sequence or when specific actions are taken with them.
When prospects from your lists are added to a drip campaign, they automatically become recipients of this campaign.
As they go through the sequence, interact with your emails, or when you take actions to manage them, they can have several statuses assigned to them within this specific campaign.
Let’s break down the meaning of every possible status of the recipient:
Recipient statuses
–> Active:
Recipients receive this status when they initially enter the campaign. This status indicates that the sequence is currently running for this recipient.
–> Paused:
You can set the status to Paused when you want to manually stop the campaign for a specific recipient. It means the sequence for this recipient won’t continue.
To resume the sequence again for this recipient, change the status back to Active.
–> Finished:
The system automatically assigns this status when the sequence is finished for a recipient, indicating that they have received all the campaign emails.
–> Unsubscribed:
The system applies this status when a recipient chooses to unsubscribe from the campaign by clicking on the unsubscribe link that you included to your emails.
–> Moved:
The system assigns this status when you transfer a recipient from one prospect list to another.
For recipients with the Moved status, the sequence stops, and you cannot switch their status back to Active to restart or resume the sequence.
–> Over Limit:
The system automatically assigns this status to recipients who are still in the campaign when your email recipient balance runs out.
To restart the sequence for these recipients, ensure you have enough email recipients in your balance, and then change their status back to Active.
–> Bounced:
The system automatically marks the status as Bounced when the message couldn’t be delivered to the recipient, and a bounce was detected.
For recipients with the Bounced status, the sequence stops. You can switch them back to Active status, and the bounced email will be resent.
However, be aware that sending again to such recipients may have an impact on your deliverability score if they bounce back again.
Snov.io automatically stops campaigns that reach the bounce rate threshold to protect your sender reputation. Learn more –>
–> Replied:
This status is given when a recipient responds to one of the sequence emails.
By default (with Stop after a reply option enabled), the sequence stops for recipients with the Replied status.
You can change it back to Active if you want to continue sending the next emails in the sequence.
–> Auto-replied:
The system automatically assigns this status if it detects an auto-reply message from the recipient.
When a recipient has the Auto-replied status, the sequence stops for them. However, you can switch their status back to Active if you want to resume sending the sequence.
–> Replied from another email:
This status is given when the system detects that recipient replied from an email address different from the one in their profile.
The sequence stops for recipients with this status. You can resume it by switching their status back to Active.
–> Deleted:
The system automatically assigns this status to a recipient when you remove the prospect from the list associated with the campaign.
For recipients with the Deleted status, the sequence stops. You can’t switch their status back to Active.
–> No-send:
The system gives this status if the recipient’s email address is added to the Do-not-email List in your account.
You can switch it back to Active status only by removing the recipient’s email address from the Do-not-email List.
–> Locked:
The system assigns this status if the email campaign has started for the prospect, but they’ve requested to delete their data from Snov.io through the dedicated form.
These prospects can’t be contacted through Snov.io drip campaigns anymore.
Filtering recipients
You can filter recipients based on various parameters, such as their status or email activities.
With recipient filtering, it’s possible to create groups of recipients who meet your filter criteria.
For example, you wish to identify recipients of a specific campaign who haven’t opened any emails or haven’t clicked any links. In that case, you can create a segment that contains only those recipients and move them to another list for the re-engagement campaign.
Let’s create a recipient segment consisting of those who have viewed at least one email and clicked on a link.
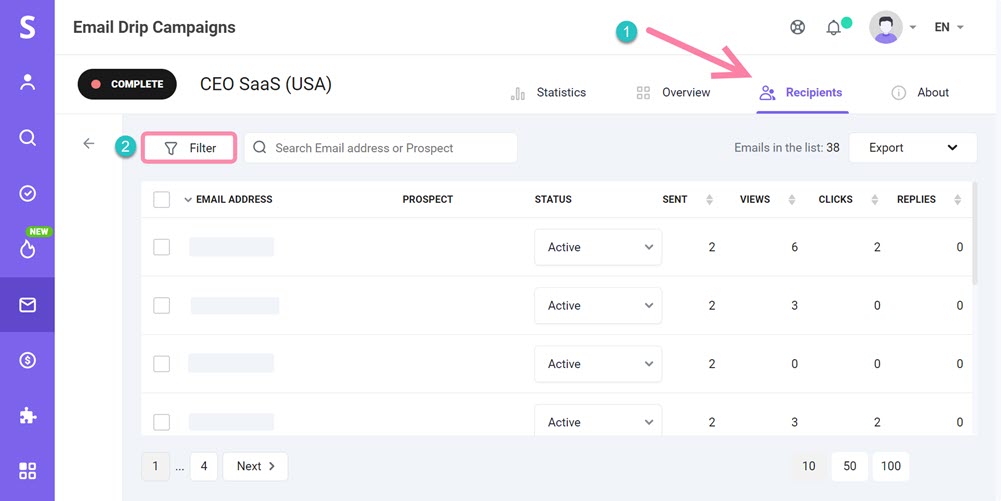
To get to a Filter menu, open the overview of the required campaign on your campaigns list.
- Select Recipients tab.
- Click on Filter to begin creating a filtering condition.
Select one or multiple filters from the menu to filter recipients based on:
- Status: their status in this campaign
- Views: how many times they opened your emails
- Clicks: how many times they clicked a link
- Replies: how many times they responded to your emails
- Sent: how many emails were sent to them in this campaign
- Delivered: how many emails were delivered
- Goals: whether they reached a Goal element in your sequence
- Emails: select to display recipients who received a certain email from your sequence
After selecting the necessary filters, click the Apply button.
Manage your filtered list
Once you have created a recipient segment, you can further manage it as needed using the available set of actions.
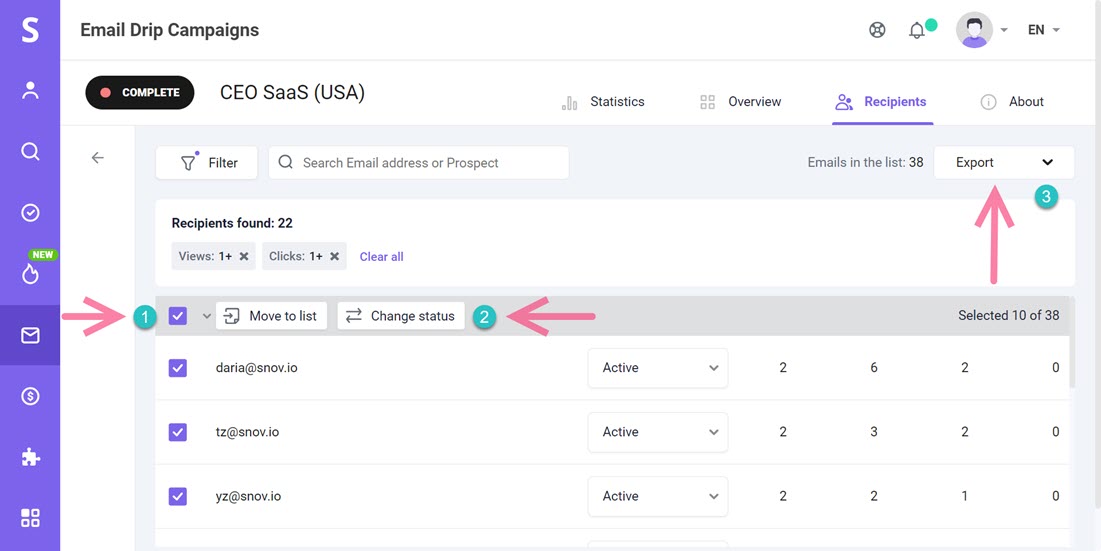
Click the square icon near the Email address column to select the segment.
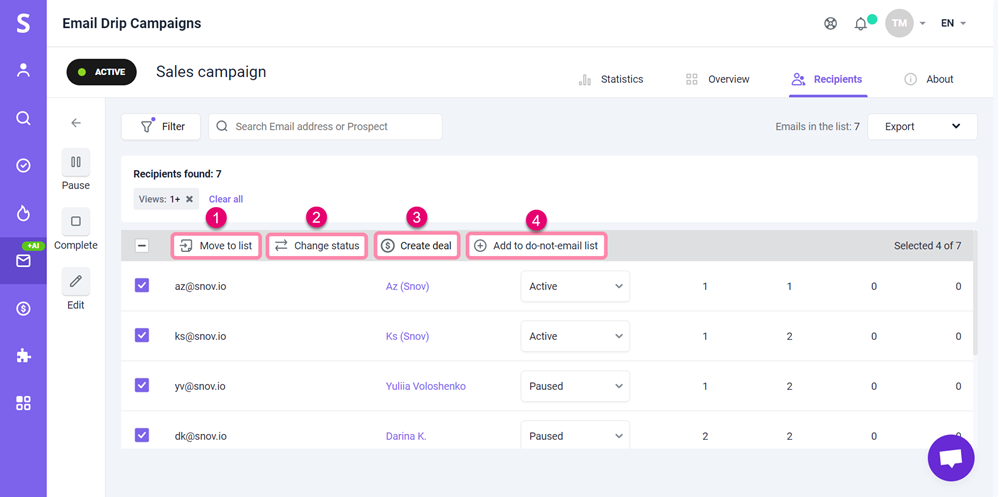
Select the quick action to perform with this segment in bulk.
- Move to list: move selected recipients to another prospect list.
- Change status: change the status to Active or Paused.
- Create deal: create deals for prospects in the CRM to manage further.
- Add to do-not-email list: add selected recipients to a blacklist if you don’t want to email them again.
Export recipient activity reports
After filtering the recipients, you can export the segmented list to a CSV file.
The following information will be included for each recipient:
- Event time
The time and date when the activity occurred is shown in your timezone.
- Event type (sent, open, click, reply, bounce, etc.)
- Email number and subject line
The subject line of the email in which the activity occurred is displayed, along with a number indicating its order in the sequence of emails sent to that recipient. The first email sent is numbered #1, the second is #2, and so on.
- Recipient email
- Recipient name
Note: The export feature has a maximum time range of one month. Please select a period of 31 days or less for report export.
Click Export → Recipient activity report in the top right corner.
Choose a period for export: from Today to 31 days.
Click the Export button to download activity report.
Note: Use ‘Send a copy to my email address’ when exporting activities for large campaigns for a faster export.
Have more questions? Feel free to contact us at help@snov.io or via live support chat.


Sorry about that 😢
How can we improve it?