In this article, you will learn how to connect your IP address with your domain in DNS settings for better email deliverability.
--> Chapter 1: How to set up A record for your domain
--> Chapter 2: How to set up rDNS record for your domain
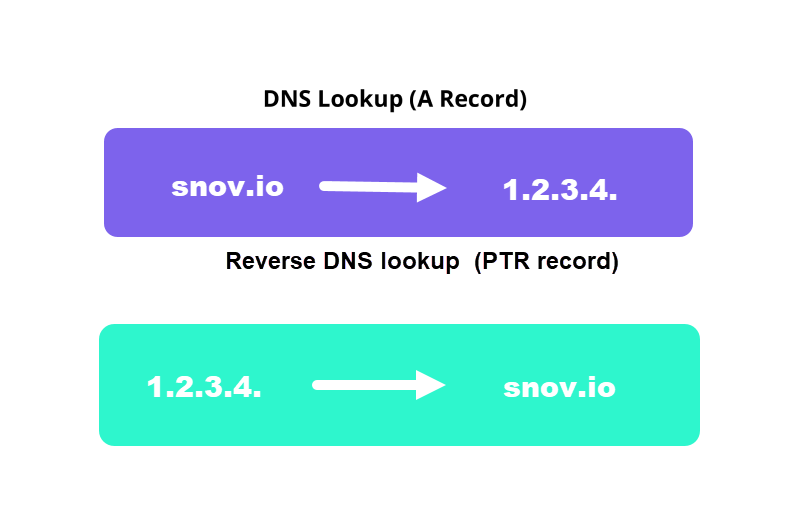
The A-record in DNS settings is used for DNS lookup.
DNS lookup means finding the correct IP address of a website when you type its name (domain) into your browser.
It's what helps to link your domain name to its corresponding IP address so the visitors come to the right website.
Why your domain should have A record?
Although DNS lookup is not directly involved in the process of sending and authenticating emails, it contributes to your overall domain health score.
#1: How to set up A record for your domain
Here's a general guide on how to set up an A record:
Step 1: Go to DNS settings of your domain
Sign in to your domain hosting account and find the page for managing your domain's DNS records.
Within the DNS management section, choose the domain for which you want to set up the A record. Click on the domain name to access its DNS settings.
- If your domain provider is Namecheap: Add A record -->
- If your domain provider is GoDaddy: Add A record -->
Step 2: Create A record
Look for an option to add a new DNS record. This option is typically named Add Record or Add New Record.
Select A from the list of available record types.
Step 3: Enter the details
In the Name or Host field: enter "@" to represent the main domain, or enter the prefix for your subdomain, e.g. blog.
In the Value or Points to field, enter the IP address.
Important: The value of your domain's A record IP address should be the same as your hosting (web server) IP address.
Ensure that you enter the correct IP address to avoid any malfunctions. If you're unsure about the IP address to use, you should contact your domain hosting provider or system administrator for guidance.
How to check A record
To confirm that your A record is correctly configured and functioning, you can run a quick test within your email account settings.
It's best to do this after waiting for about 48 hours to ensure the changes have fully propagated in your domain settings.
To check your A record:
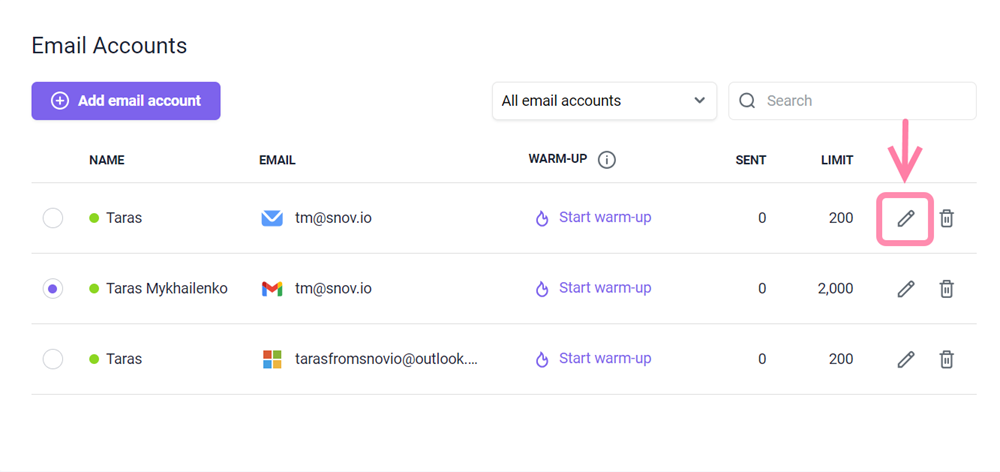
Go to your email accounts list.
Find the email account linked to your domain and click Edit.
Scroll down to the Optional settings section and select the Domain health tab.
Click Check health.
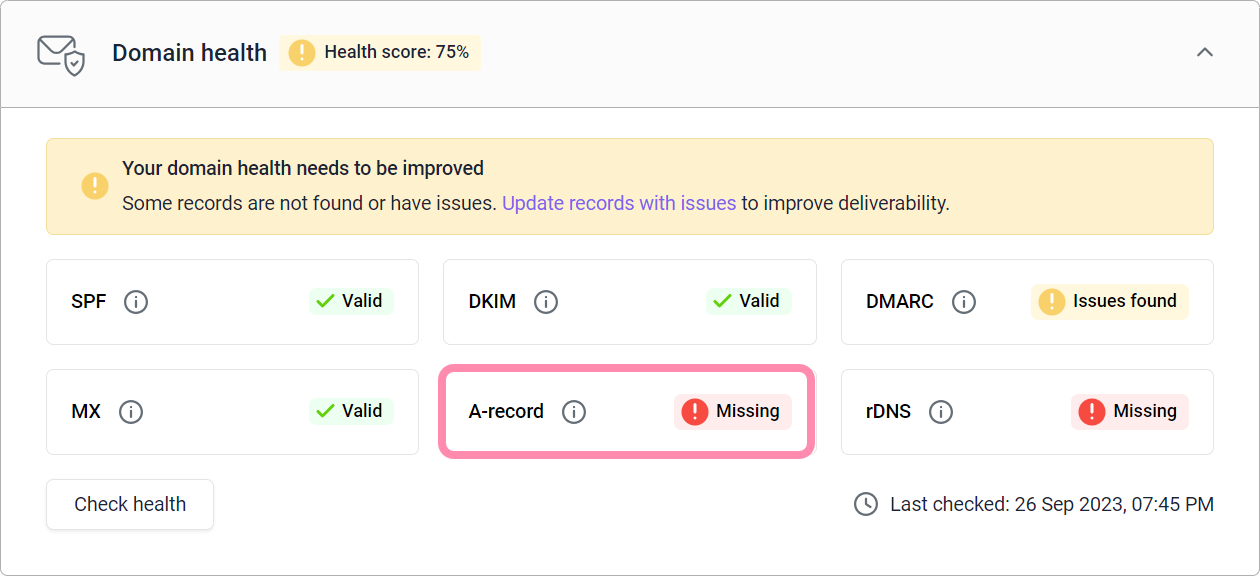
Once the check is finished, you'll see the status of your A record, along with other domain records.
Valid status means it’s set up properly. If there’s an issue found, click on the record to see a detailed description.
#2: How to set up rDNS record for your domain
PTR record (short for Pointer), also known as a reverse DNS record, is used to perform a reverse DNS lookup and works the opposite of an A record.
It connect your IP address with your domain name, but also helps with email authentication.
Why you should set up rDNS:
Most email providers perform a DNS lookup along with a Reverse DNS lookup and compare the results for a match.
If they do not match, or if a PTR record does not exist, an email is likely to be marked as spam or rejected.
When you send emails, receiving email servers will check your IP address to confirm that it routes back to your domain.
Learn: Email servers and anti-spam filters often use reverse DNS lookup. It helps with email authentication by confirming that the sending domain matches the one mentioned in the email's "From" field.
Many email providers will not accept or may treat as spam emails from domains that don't have the right reverse DNS set up, are missing a PTR record, or have a difference between the IP address and domain.
To set up rDNS record, follow these steps:
Let’s now learn how to add a PTR record to a domain’s DNS. The exact steps can vary depending on your DNS provider's interface.
Important: Having multiple PTR records is not recommended. It might result in a failed DNS/rDNS lookup and lower the chances of your email getting delivered.
If your domain has a PTR record but doesn't pass the DNS check, just fix the current record instead of making a new one.
Step 1: Access Your DNS Settings
Log in to your domain registrar or DNS hosting provider's website. Look for a section related to DNS or domain settings.
Step 2: Create a reverse DNS zone
In your DNS settings, find an option for a reverse DNS zone.
If you can access your DNS settings, start with creating a reverse DNS zone.
Step 3: Find out your hosting IP address
Let's imagine your domain's IP address is 192.168.0.111. To create a reverse DNS record, omit the last three digits to make it 192.168.0 and reverse the order of numbers to be 0.168.192.
Next, the reversed version of your IP address is followed by ".in-addr.arpa."
The hostname will look like 0.168.192.in-addr.arpa.
What is "in-addr.arpa" suffix?
This is a special ending added to IPv4 addresses because PTR records are kept in the ".arpa" top-level domain. If you were using a regular IP address in the IPv6 system, the address for a PTR Record would finish with "ip6.arpa."
If you're unsure which IP address to use, contact your domain provider to request your IP's reverse DNS zone.
Step 4: Create a PTR Record
Create a PTR record within your reverse DNS domain:
Click Add a new record in DNS settings and choose PTR type.
In the Hostname or Reverse zone field, enter the value of your PTR record.
In the Points to field, enter the domain you’d like the PTR to point to.
A PTR record example looks like this:
| Host | Type | Points to: | TTL |
| 0.168.192.in-addr.arpa | PTR | emailserver.example.com | Auto |
How to check rDNS record
To confirm that your rDNS record is correctly configured and functioning, you can run a quick test within your email account settings.
It's best to do this after waiting for about 48 hours to ensure the changes have fully propagated in your domain settings.
To check your rDNS record:
Go to your email accounts list.
Find the email account linked to your domain and click Edit.
Scroll down to the Optional settings section and select the Domain health tab.
Click Check health.
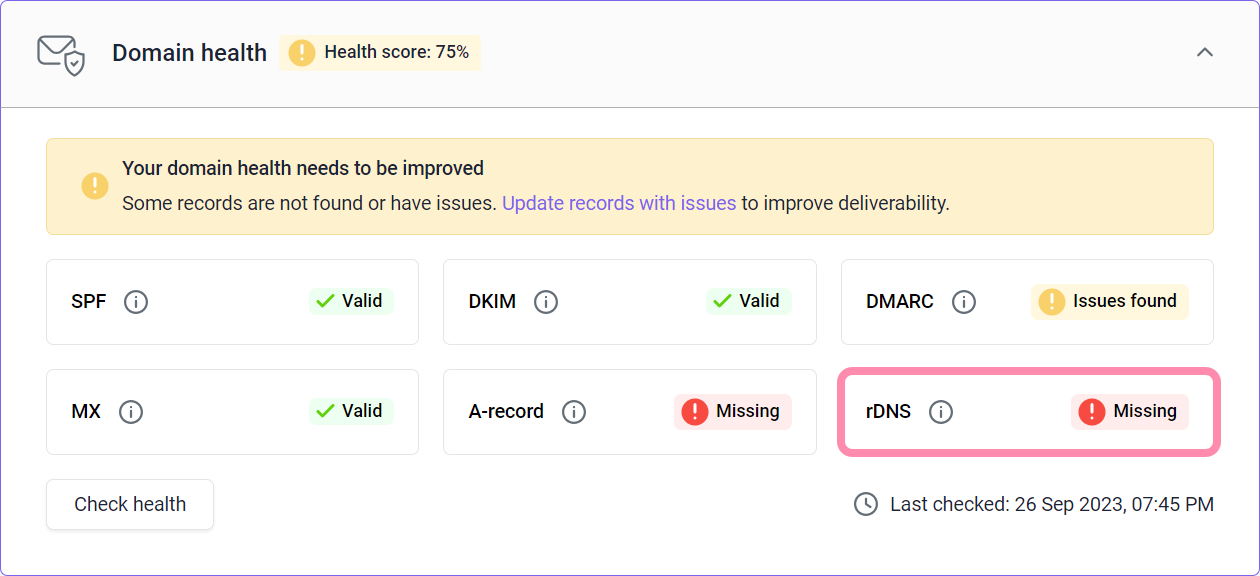
Once the check is finished, you'll see the status of your rDNS record, along with other domain records.
Valid status means it’s set up properly. If there’s an issue found, click on the record to see a detailed description.
Note: Keep in mind that DNS changes can take some time to propagate across the internet.
It might take several hours or even up to 48 hours for the changes to take effect.
What's next:
Creating A record and PTR record doesn't always guarantee that your emails will land in the recipient's main inbox. While it helps to improve domain health, there are other important factors that affect email delivery.
Make sure to complete your domain configuration using the other tutorials from the DNS settings checklist:
To make it less likely for your emails to go to spam folders:

Sorry about that 😢
How can we improve it?