Outline:
- What are webhooks
- Snov.io Webhooks parameters
- How to subscribe to webhooks via Snov.io API
- How to manage webhooks via Snov.io API
Webhooks are a way for apps to communicate with one another. In essence, they are notifications sent from one app to another when a predetermined event happens:
- One app triggers a webhook when a chosen event occurs
- The other app then receives real-time information about the event
For instance, when a recipient responds to a campaign email, a webhook is sent to the specified URL endpoint. The endpoint is then able to take action based on the information received from a webhook. This creates possibilities to set up automated integrations.
Using Snov.io Webhooks, you can:
- integrate your own application with Snov.io
- get notified of events or activities that happened in your Snov.io account
- send real-time data from Snov.io to your application
There are three webhooks available in Snov.io at the moment (with more to come in future updates):
Campaign email sent
Snov.io will send a webhook when your email drip campaign is sent. You can choose when to get it: only when the first email is sent to a recipient or after every sent email.
Campaign reply received
Snov.io will send a webhook when you receive a reply to your email drip campaign. You can choose when to get it: only after the first reply from a recipient or after every reply.
Campaign email opened
Snov.io will send a webhook when your drip campaign email is viewed by a recipient.
Webhook information will include:
- Recipient’s email
- Timestamp of an event: when the event occured
- Campaign name: the name of the drip campaign where the event occured
- Email subject: the subject line of the email sent to a recipient
- Email body: the content of the email sent to a recipient
Webhook parameters
Webhook parameters include the following:
- Object: the object the action is performed on. In other words, this is a Snov.io component (email, reply, prospect, or a deal) that is linked to a webhook.
- Action: the action performed on the object. To put it simply, this is the event that activates a webhook.
- Endpoint: the URL address where the webhook is sent.
Below is the list of currently available objects and actions:
| Object | Action | When it is activated? |
| campaign_email | sent | When any email is sent to the recipient in any drip campaign |
| first_sent | When the first email is sent to the recipient in any drip campaign | |
| opened | When the recipient opens an email in any of the drip campaigns | |
| campaign_reply | received | When the recipient responds to any email in any of the drip campaigns |
| first_received | When the recipient responds for the first time in any of the drip campaigns |
How to subscribe to webhooks via Snov.io API
To see a webhook play out in real-time, let’s use Postman and any of the online endpoint generators.
1) Prepare API testing environment and get an API access token
- Sign up with Postman
- Get an API access token
- Prepare an API call and authenticate it with an access token
Here’s a detailed walkthrough on authenticating your Snov.io API call and using Postman for API calls.
2) Get an endpoint URL address
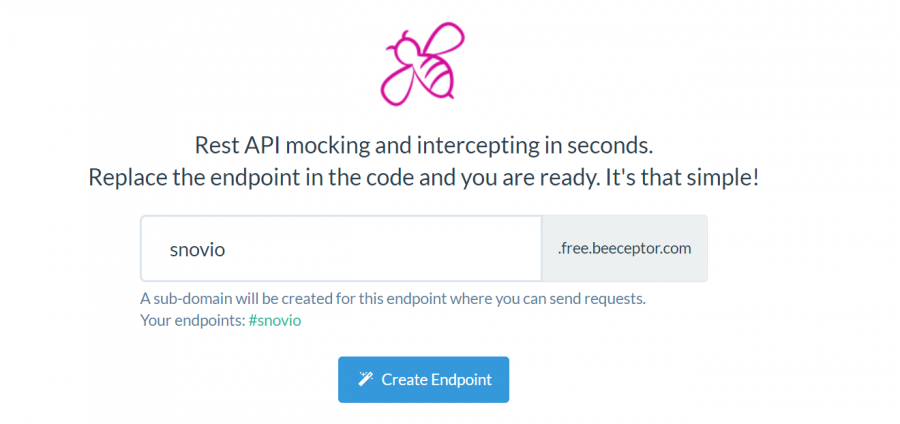
As an example, we’ll use the Beeceptor to generate a free endpoint. On their website, type in any endpoint name and click the Create Endpoint button.
You’ll get an endpoint URL address to which a webhook and data related to an event in Snov.io will be sent. Save or copy this URL to use it in the next step.
3) Subscribe to a webhook via API call
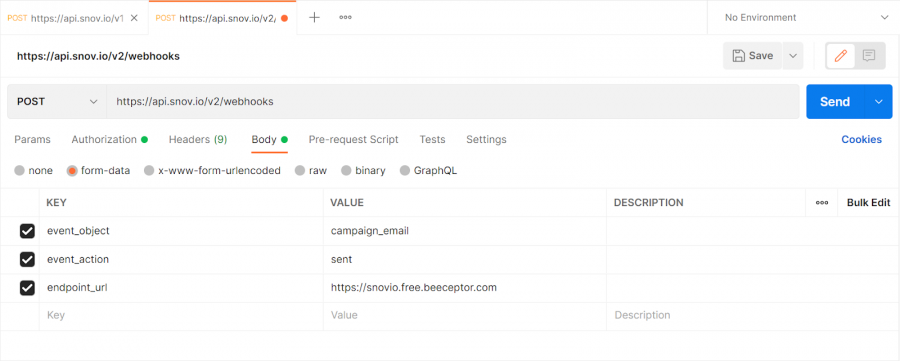
Use the settings below to make an API call in Postman or any other API testing environment of your choice:
- Type: POST
- Request URL: https://api.snov.io/v2/webhooks
- Input parameters (also refer to the Webhook parameters chapter above):
| event_object | campaign_email | campaign_reply |
| event_action | sent
first_sent opened |
received
first_received |
| endpoint_url | https://snovio.free.beeceptor.com | |
After entering all the parameters, click the Send button. You will see the following response:
Status: active means you’ve successfully subscribed to a webhook.
4) Check webhook notification at the endpoint URL
We consider that a webhook was successfully received by the endpoint if it returns a 200 OK success status response code within 3 seconds.
If it doesn’t, then we make several attempts to re-send a webhook:
1st: immediately after the event
2nd: 20 minutes after the last attempt (20 minutes after the event)
3rd: 40 minutes after the last attempt (1 hour after the event)
4th: 60 minutes after the last attempt (2 hours after the event)
5th: 4 hours after the last attempt (6 hours after the event)
6th: 8 hours after the last attempt (14 hours after the event)
7th: 24 hours after the last attempt (38 hours after the event)
If all seven attempts are unsuccessful, the webhook is deactivated.
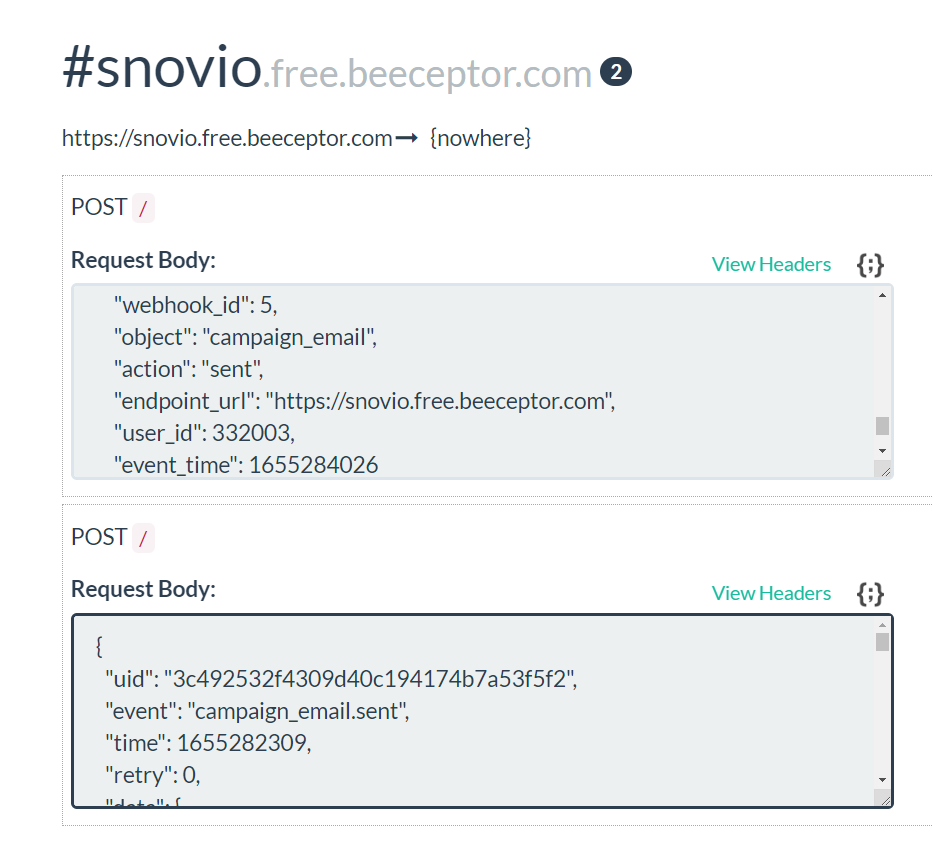
Go back to Beeceptor and find a POST record with Snov.io webhook data. Here’s an example of how it looks:
After you’ve subscribed to a webhook, every time a chosen event happens in your Snov.io account, the data related to an event will be instantly passed on to the URL endpoint.
How to manage webhooks via Snov.io API
List all your webhooks
This API method allows you to get a list of webhooks on your account.
- Type: GET
- Request URL: https://api.snov.io/v2/webhooks
- Input parameters: This method has no input parameters.
Delete a webhook subscription
Deletes a chosen webhook.
Include the unique “id” value of the chosen webhook at the end of the request URL address.
Use the “List all webhooks” method to get the id values of your webhooks.
- Type: DELETE
- Request URL: https://api.snov.io/v2/webhooks/webhook_id
- Input parameters: This method has no input parameters.
- Request URL example: https://api.snov.io/v2/webhooks/8
Change webhook status
Changes the status of a chosen webhook subscription.
Include the unique “id” value of the chosen webhook at the end of the request URL address.
Use the “List all webhooks” method to get the id values of your webhooks.
- Type: PUT
- Request URL: https://api.snov.io/v2/webhooks/webhook_id
- Input parameters:
| status | active or deactivated |
- Request URL example: https://api.snov.io/v2/webhooks/14
Note: You can create up to 50 webhooks. They are available for premium accounts only.
Upgrade your plan now, expand the functionality of your Snov.io account, and subscribe to webhooks!


Sorry about that 😢
How can we improve it?