Email outreach works only if your sending setup is built correctly. It’s a foundation for good deliverability and long-term results.
For many teams building a stable sending infrastructure for cold outreach causes a lot of friction. This is why besides connecting your existing accounts, Snov.io offers done-for-you Google mailboxes.
Using this option, you can buy domains and create Google email senders in bulk directly from your Snov.io dashboard.
Every account is on Google’s native infrastructure, giving you top performance and deliverability out of the box.
Here are the steps needed to set up everything from scratch.
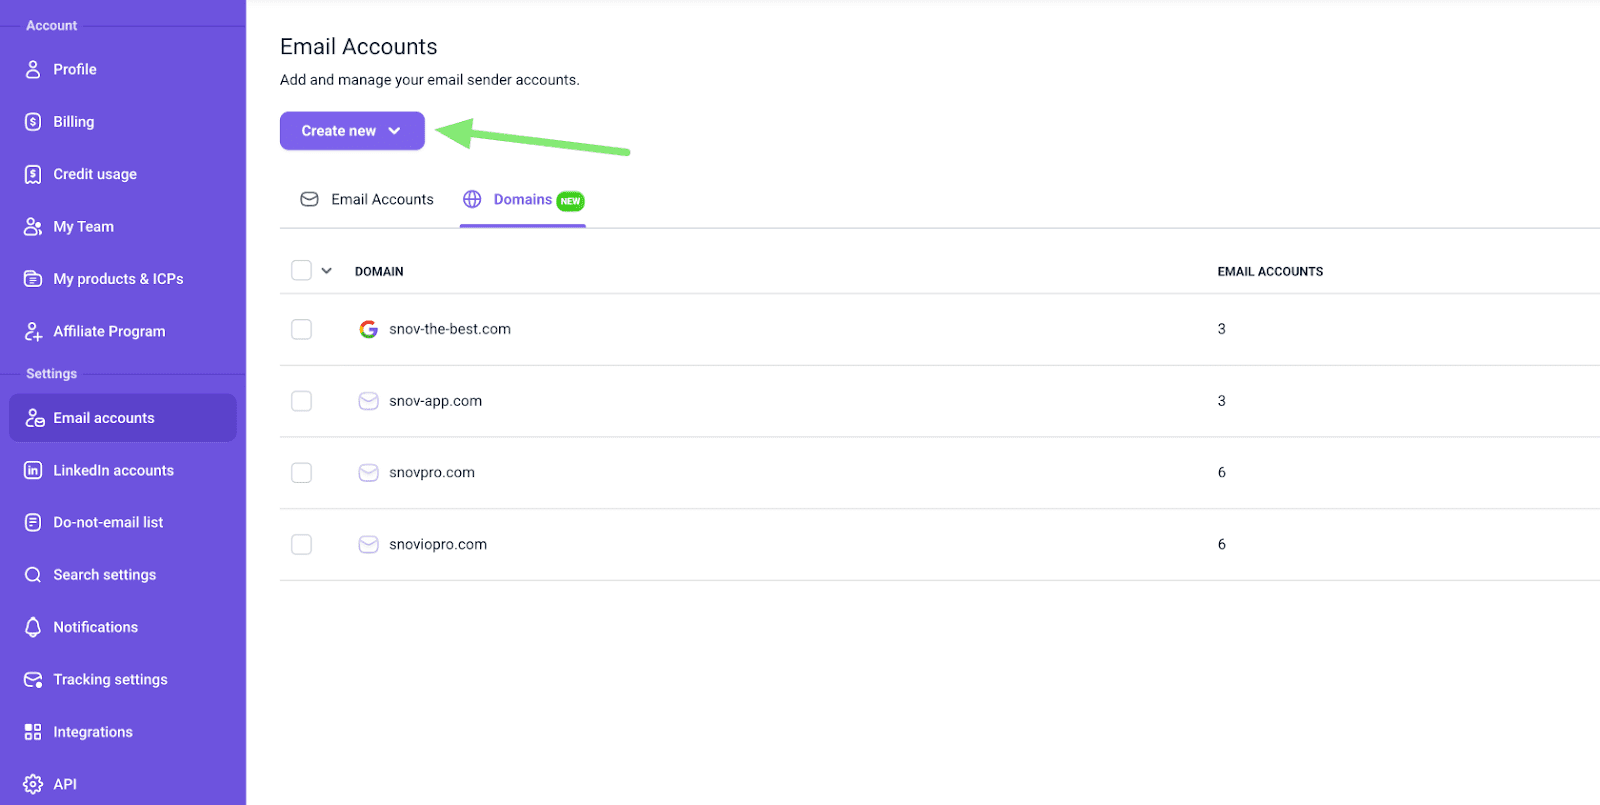
Add domains
First, you’ll need to generate a new domain to host the mailboxes.
As a general best practice, always create separate domains for outreach, so your main domain avoids the negative impact of cold emailing.
To get started, go to Email accounts → switch to Domains tab and click Create new.
If you already own outreach domains, you can also use them in Snov.io to set up done-for-you mailboxes.
We’ll perform a domain transfer procedure as part of the setup process to connect your domain.
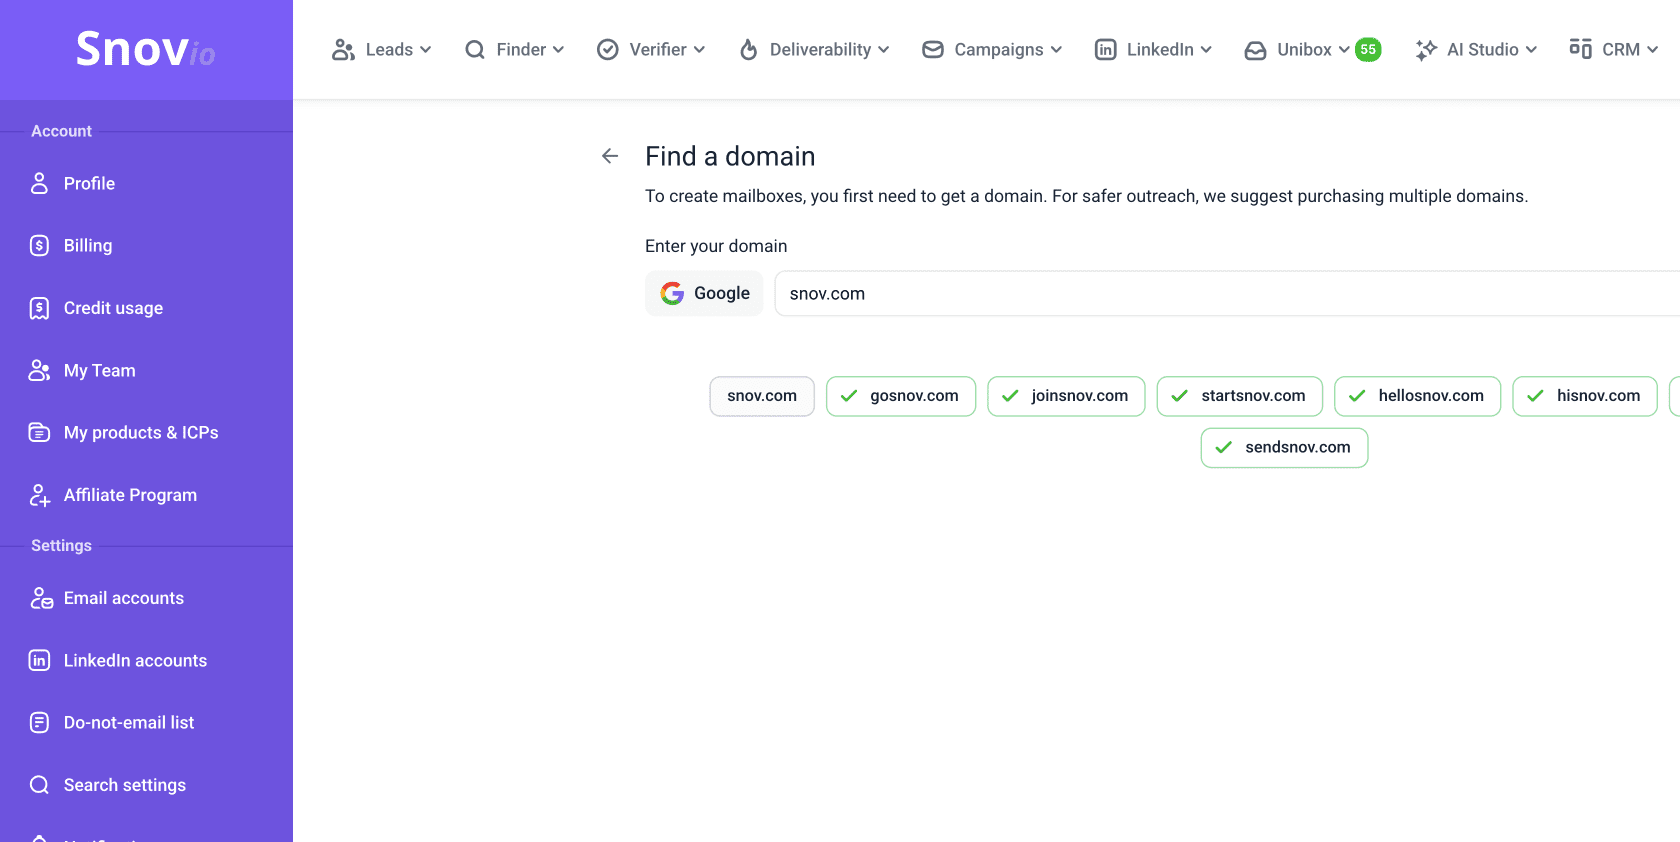
Enter domain name
Enter your primary domain to the field. Snov.io will suggest a list of lookalike domain names you can choose from.
Make sure your new domain name relates to or includes your main domain. This keeps your outreach domain recognizable and helps avoid spam filters.
For example, if your main domain is snov.io and your cold domain is hellosnov.io, providers are more likely to treat it as a trusted domain.
If you want your own unique domain, enter the desired name. The first domain in the list will match what you entered. If that domain name is unavailable or the TLD is not supported, you'll see it marked as already taken.
Choose any of the suggested domain names instead or make sure to use one of the supported extensions (.com, .org, .net).
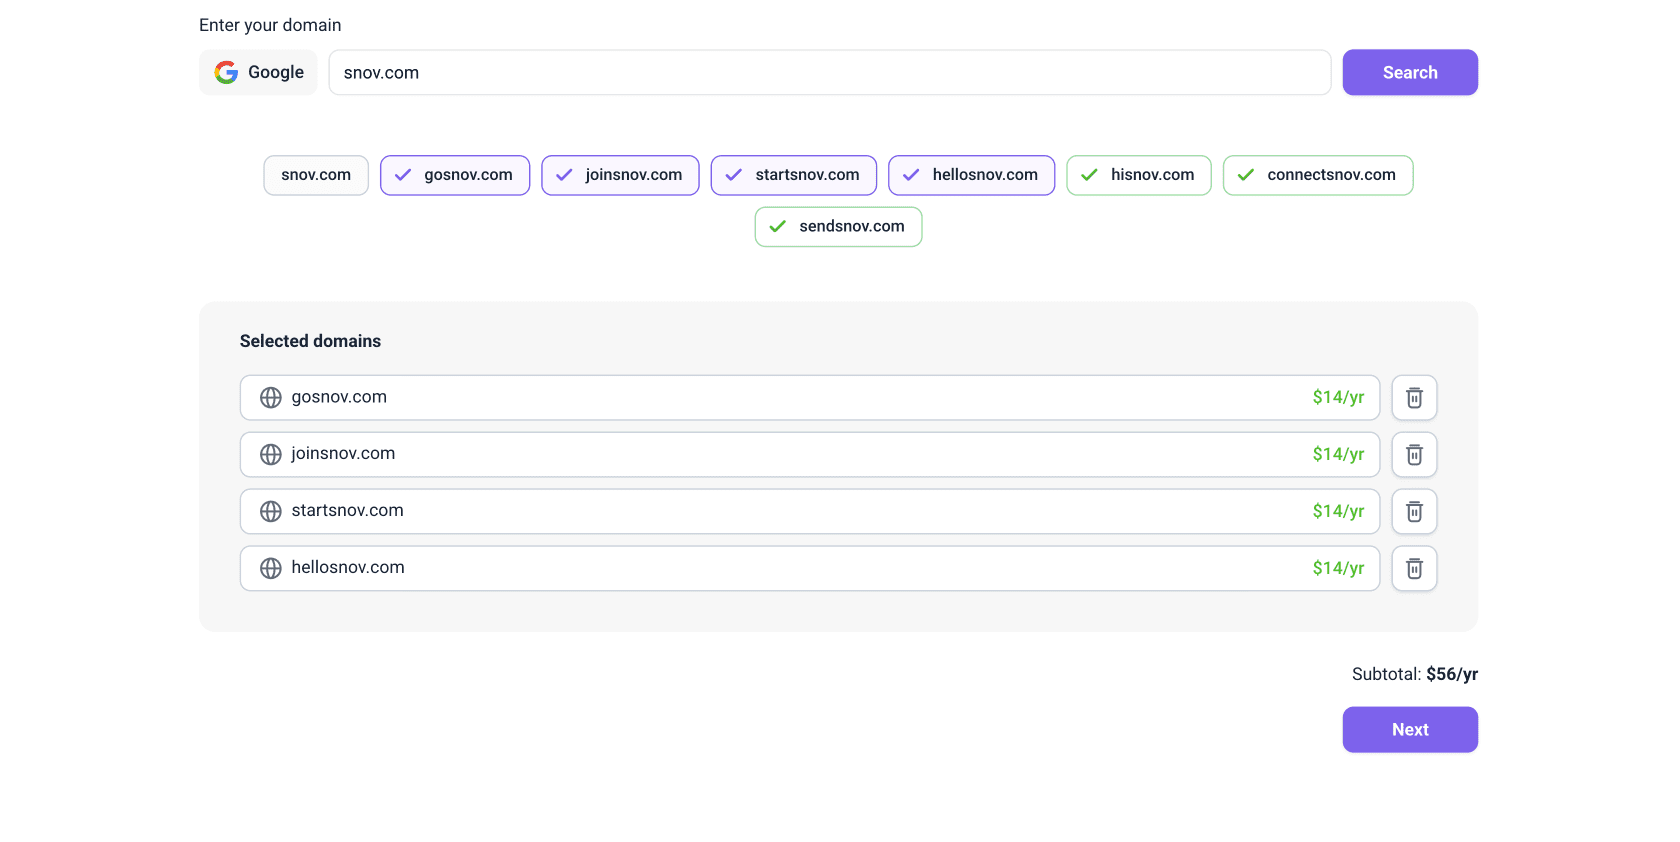
Choose your domains
Green checkmark means the domain name is available. Select the domains you want to use.
Which domain extension (the part after .dot) to use
For DFY accounts, Snov.io supports these domain extensions: .com, .org, .net — all globally trusted and the most reliable for cold outreach.
We recommend .com as the default choice. The yearly cost per domain depends on the extension you choose.
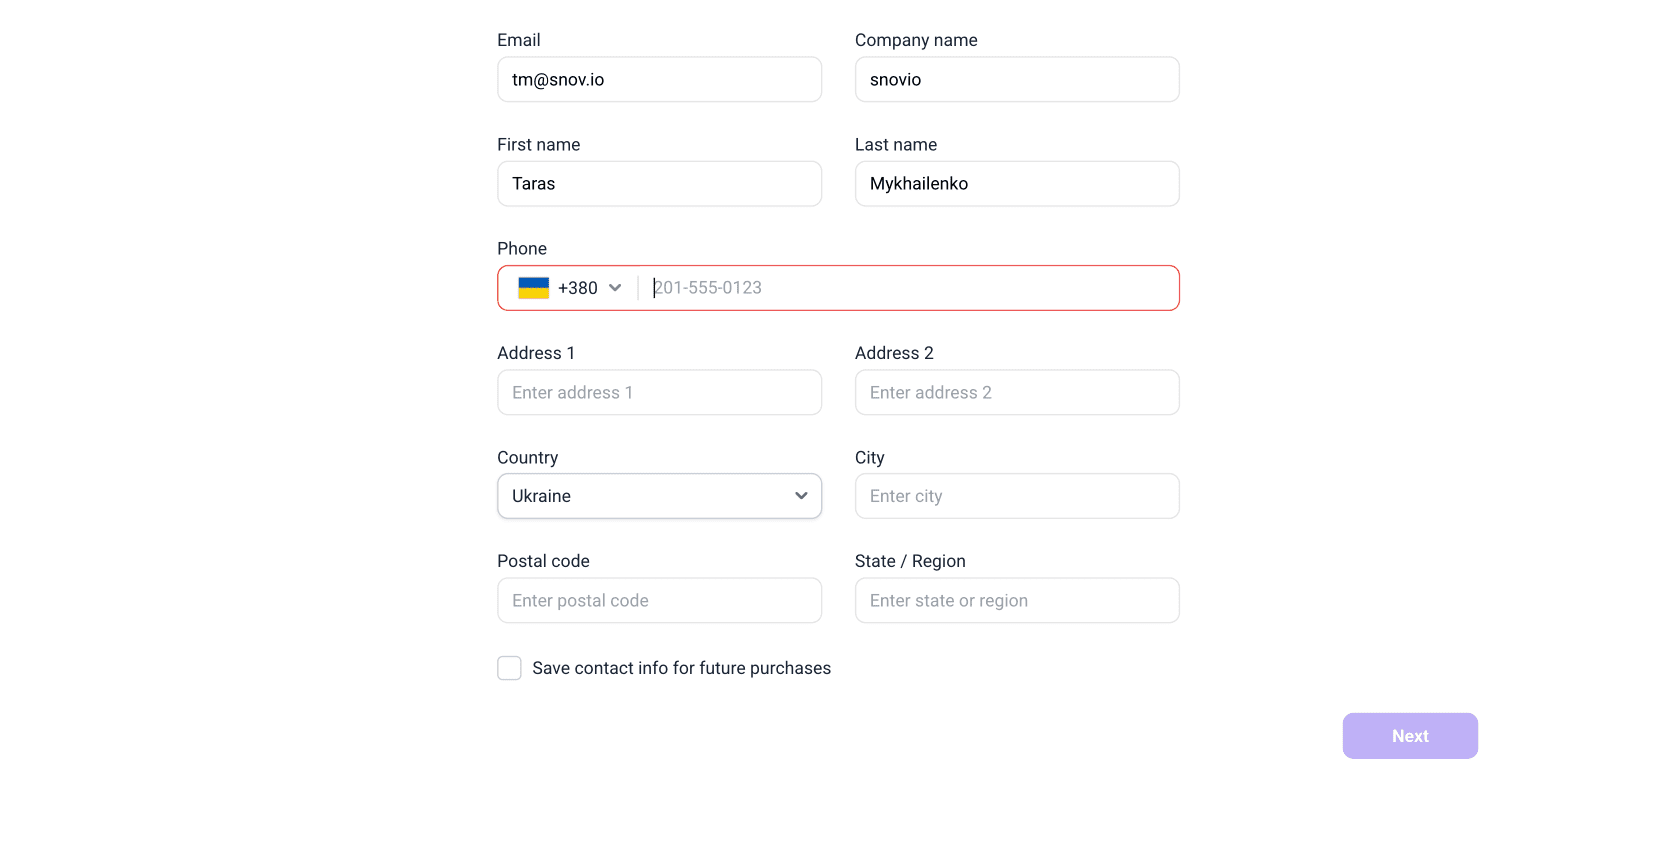
Enter contact details
Fill in your contact details to register the domain in your name. This is required to comply with domain ownership rules.
Enter your email, company name, full name, phone number, and address. Check the box to save contact info for future purchases to reuse these details next time.
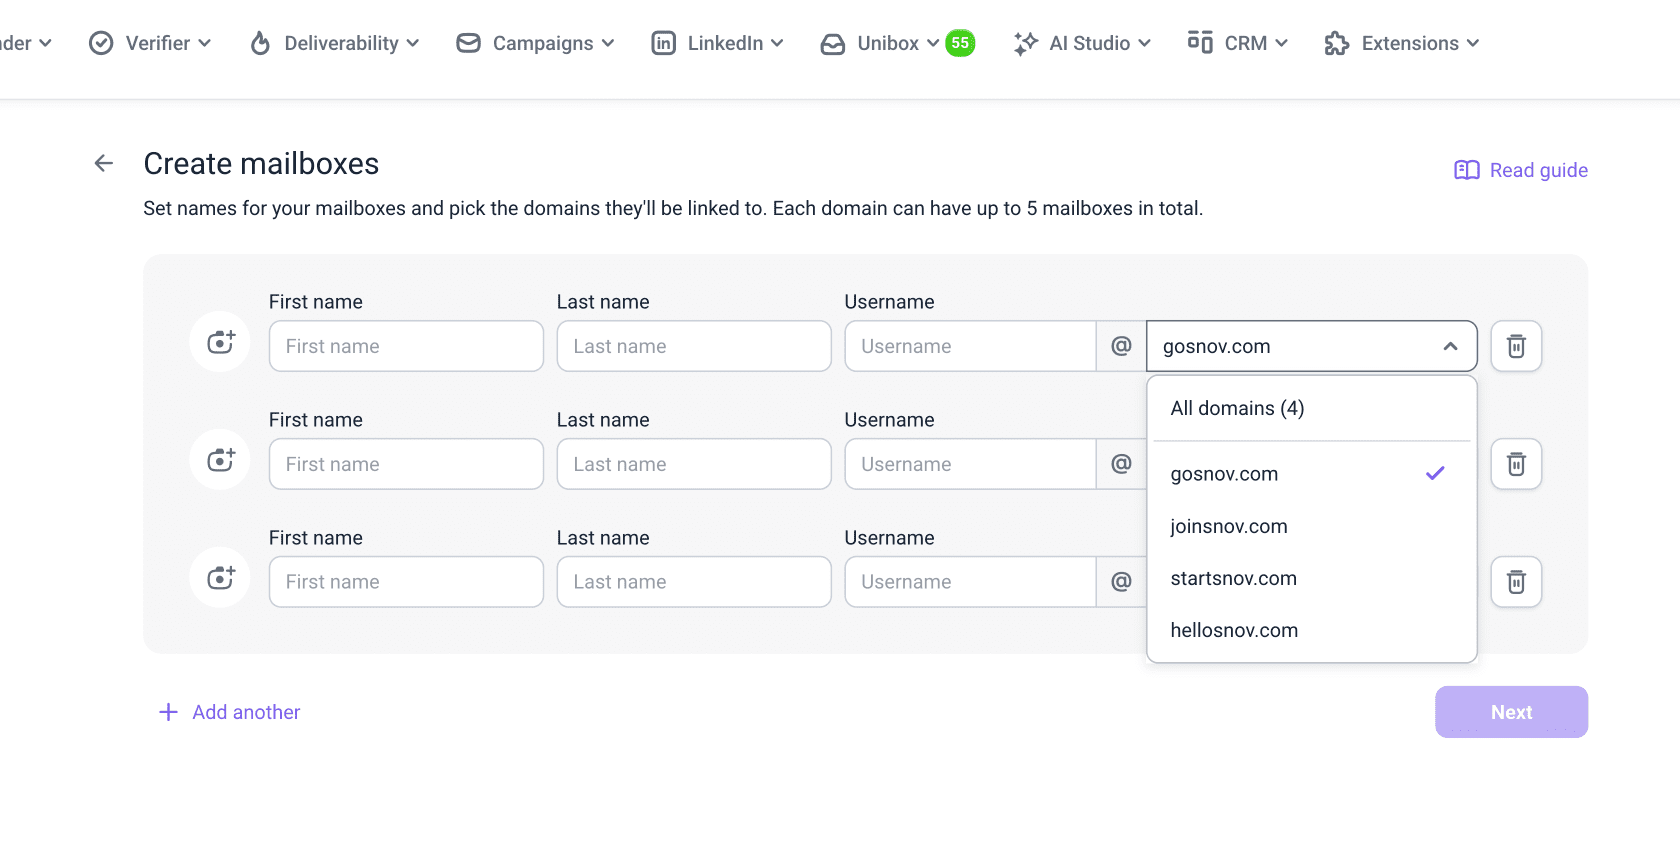
Create and distribute mailboxes
Set up your mailboxes and assign each one to a domain. For each mailbox, fill in these details:
- Profile photo — upload a photo for the Google Account owner's profile. Your recipients will see it as the sender's avatar. This is optional, but recommended as it adds a personal touch
- First name + Last name — shown as the sender name in the From field
- Username — the first part of the email address, before the @
- Domain — select which domain this mailbox will be created on
Distribute mailboxes across domains
You can start with 3 mailboxes on one domain and add more on the same domain later. Click Add another to create more mailboxes at once.
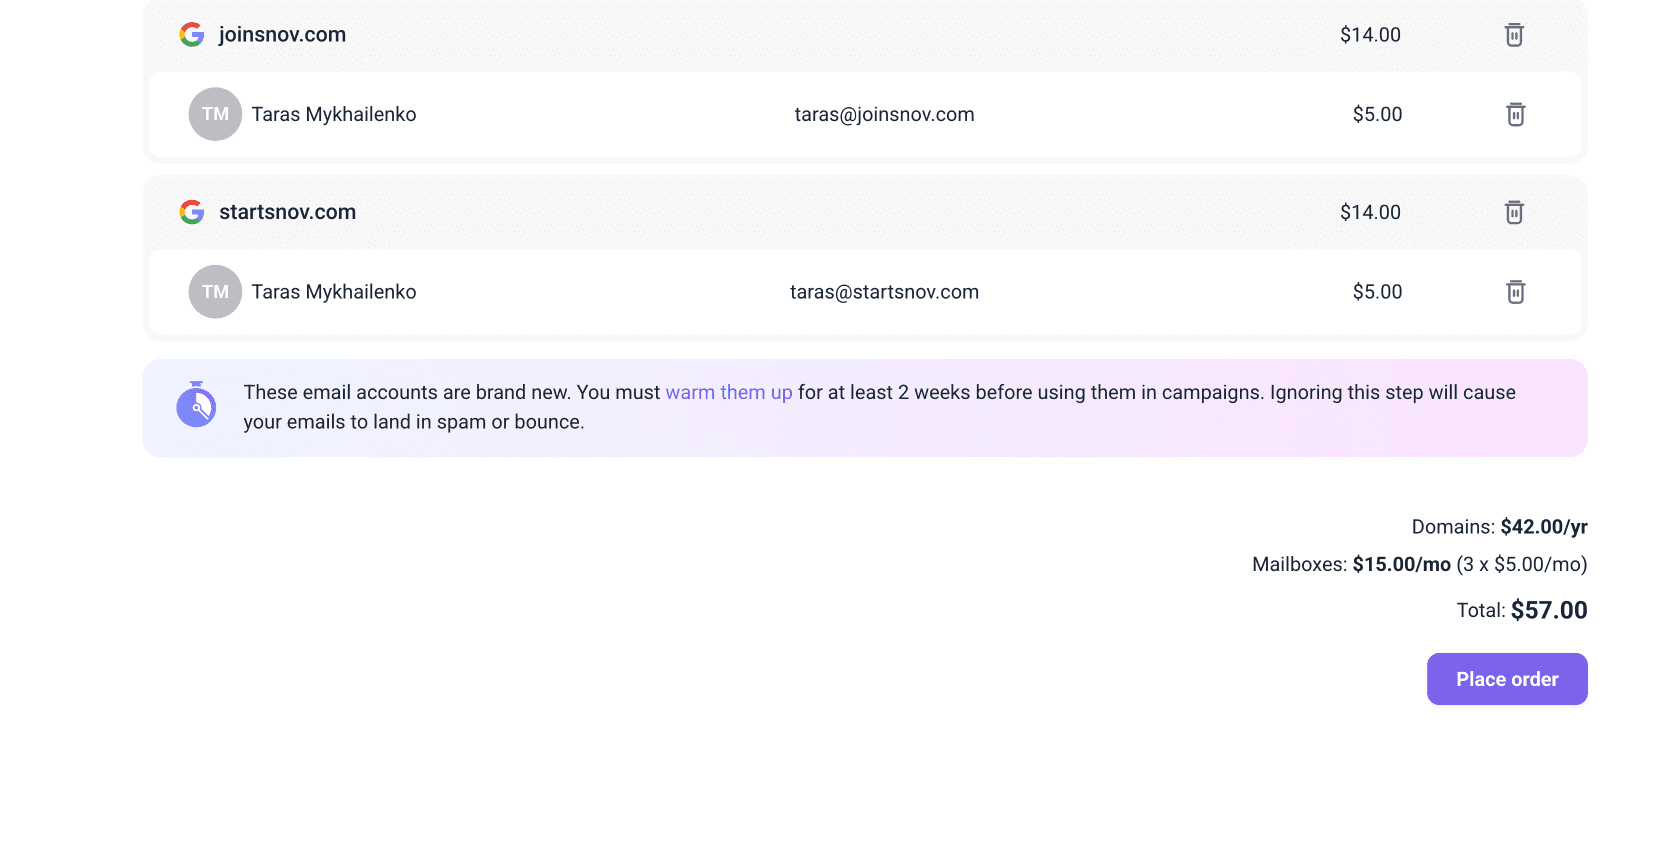
Review and complete checkout
The Total price at checkout reflects your first payment: the full yearly cost for all selected domains plus the first charge for all mailboxes.
The pricing is split into two parts:
- Each Google mailbox costs $5/month
- The yearly price per domain depends on the chosen extension
How billing works
- Domains renew annually. They are active for one year from the date of purchase. Note that you'll be charged a few days in advance to ensure the payment goes through on time
- Mailboxes renew monthly (every 30 days). Make sure your payment method is always up to date. If a mailbox renewal fails, both the mailbox and the domain it's on will be cancelled and permanently deleted. More information on billing rules here
Before you pay:
1) Ensure that the mailboxes are distributed between domains the way you want. This cannot be changed later
2) Domains and mailboxes are non-refundable. You keep the full ownership of purchased domains and accounts even outside of Snov.io
Check your domains and accounts
After your payment is complete, we’ll create the domains and mailboxes with all the necessary settings. The setup may take a few minutes.
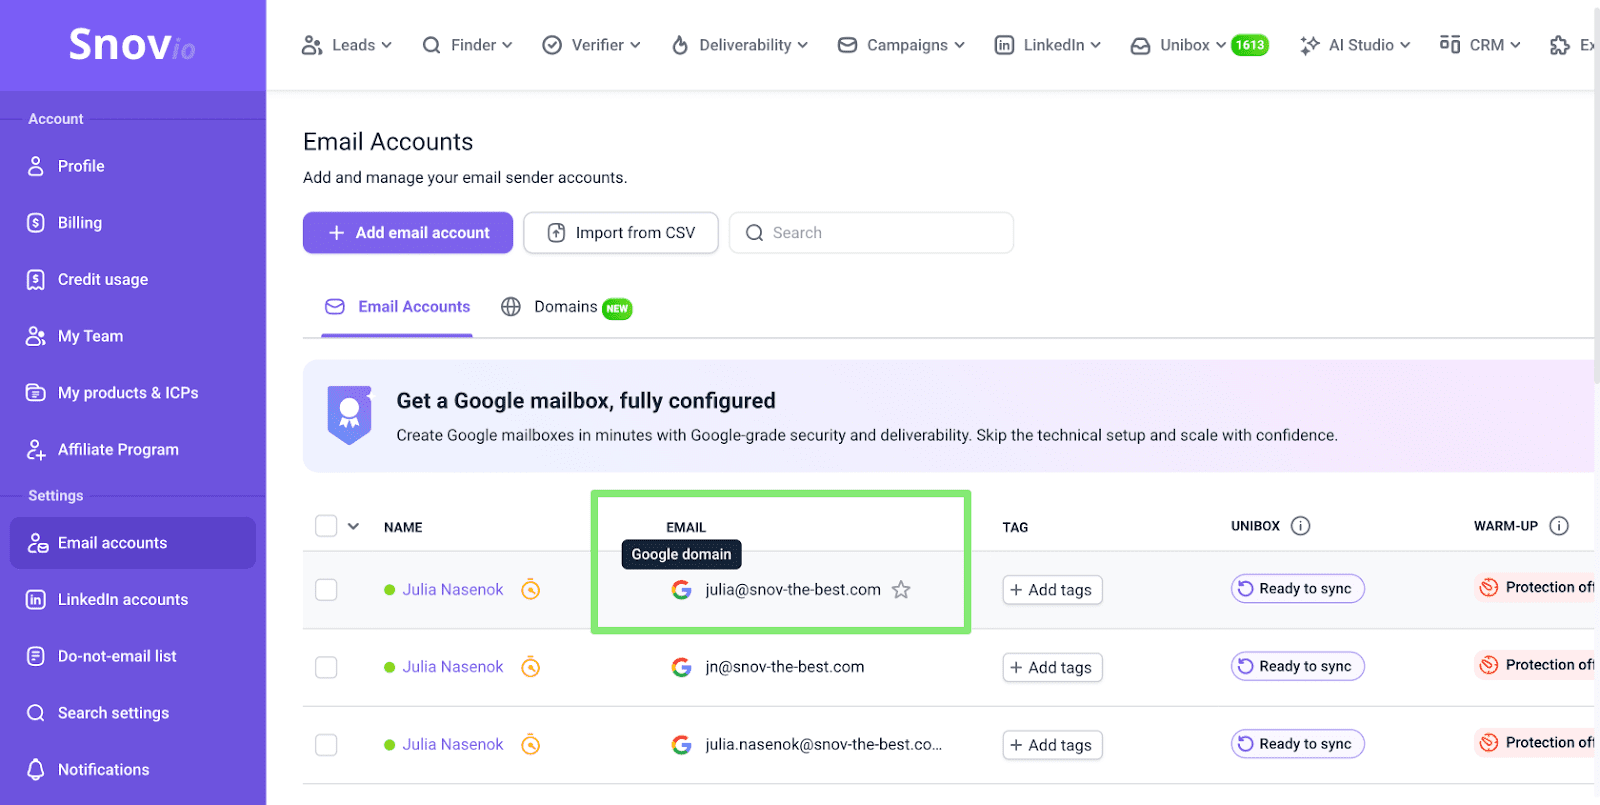
Once everything is ready, you’ll see your domains in the Domains tab, and the new mailboxes will appear in your Email Accounts list with a Google domain label.
You can also use a Filter option on the right to display connected email accounts by provider. Select Google domain in the list.
Manage Google accounts
Besides using your DFY mailboxes in Snov.io, you can also access and manage them directly as regular Google accounts.
How to access your Google mailboxes
Your DFY mailboxes are real Google accounts you can sign in to at any time.
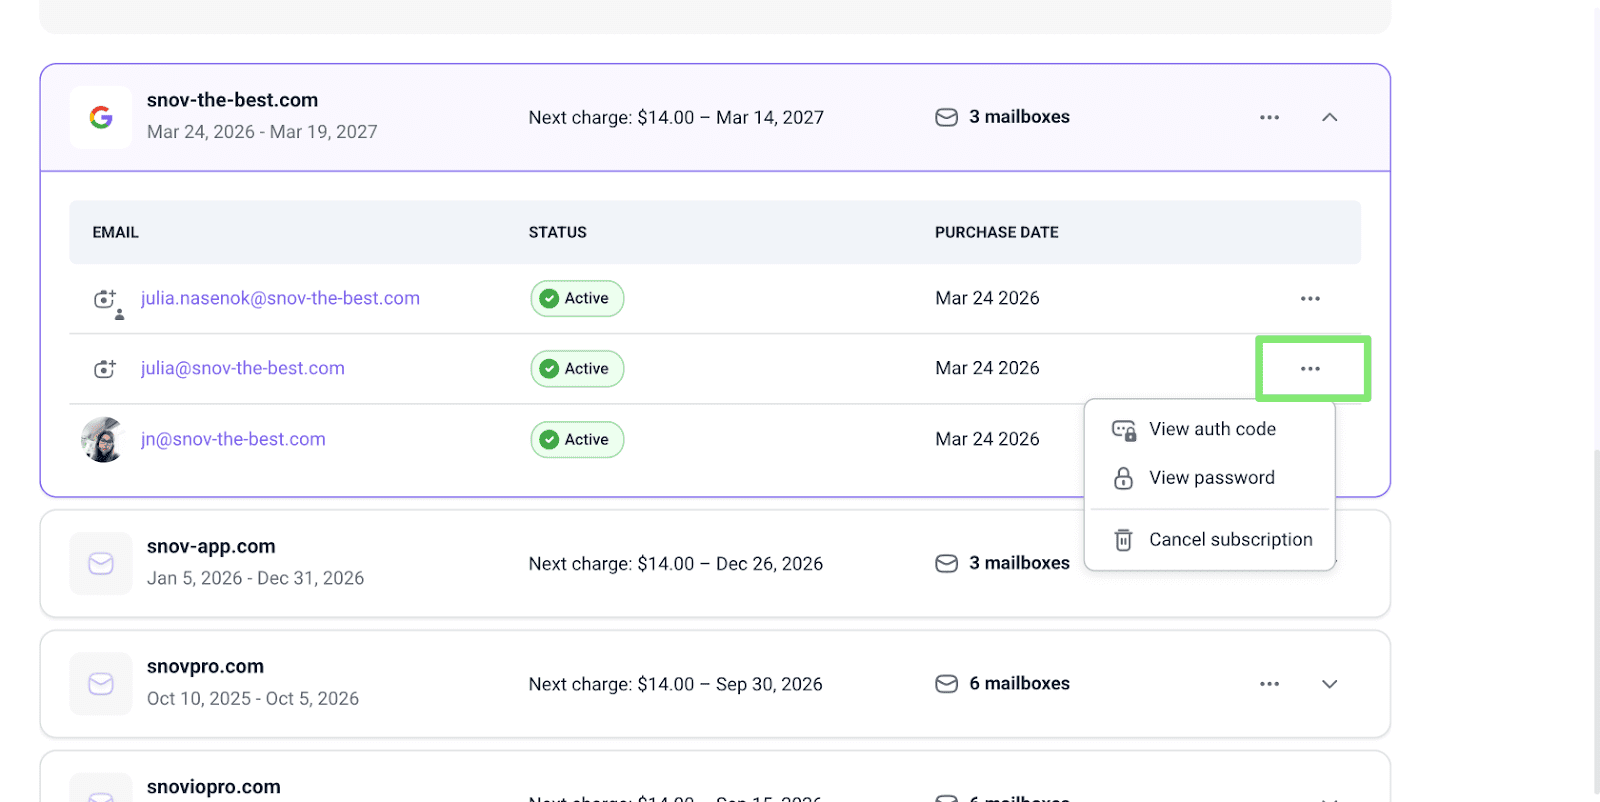
To get the login credentials, go to Billing → Domains and emails tab and click the three-dot menu next to the email address you need.
There you'll find the account password and auth code. The login email is the mailbox address itself.
Prepare accounts for campaigns
In DFY accounts, all essential settings are already configured for you by Snov.io.
SPF, DKIM, DMARC, MX, and CNAME records are configured automatically to ensure 100% domain health.
Here are the steps you still need to do to complete the setup and prepare your domains and mailboxes for campaigns.
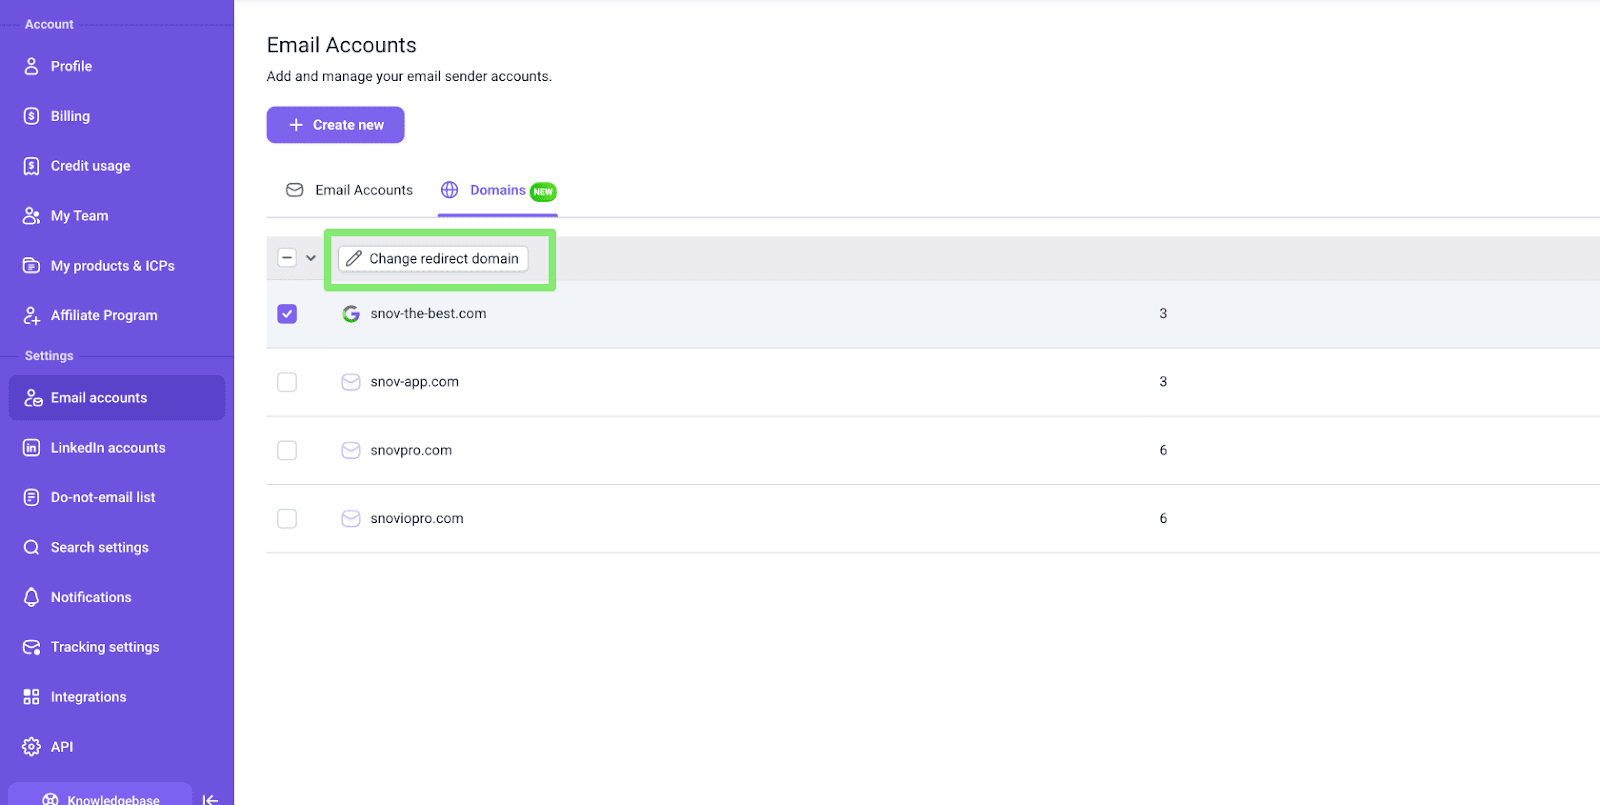
Add redirect domain
Set a redirect domain for each of your outreach domains in Snov.io.
Why it’s needed
We recommend using your main domain as the redirect destination.
To set this up: go to Email accounts → Domains. Select the domain using the checkbox, then click Change redirect domain and enter your domain address.
Snov.io will apply the necessary changes automatically. Later you can update the redirect URL if needed.
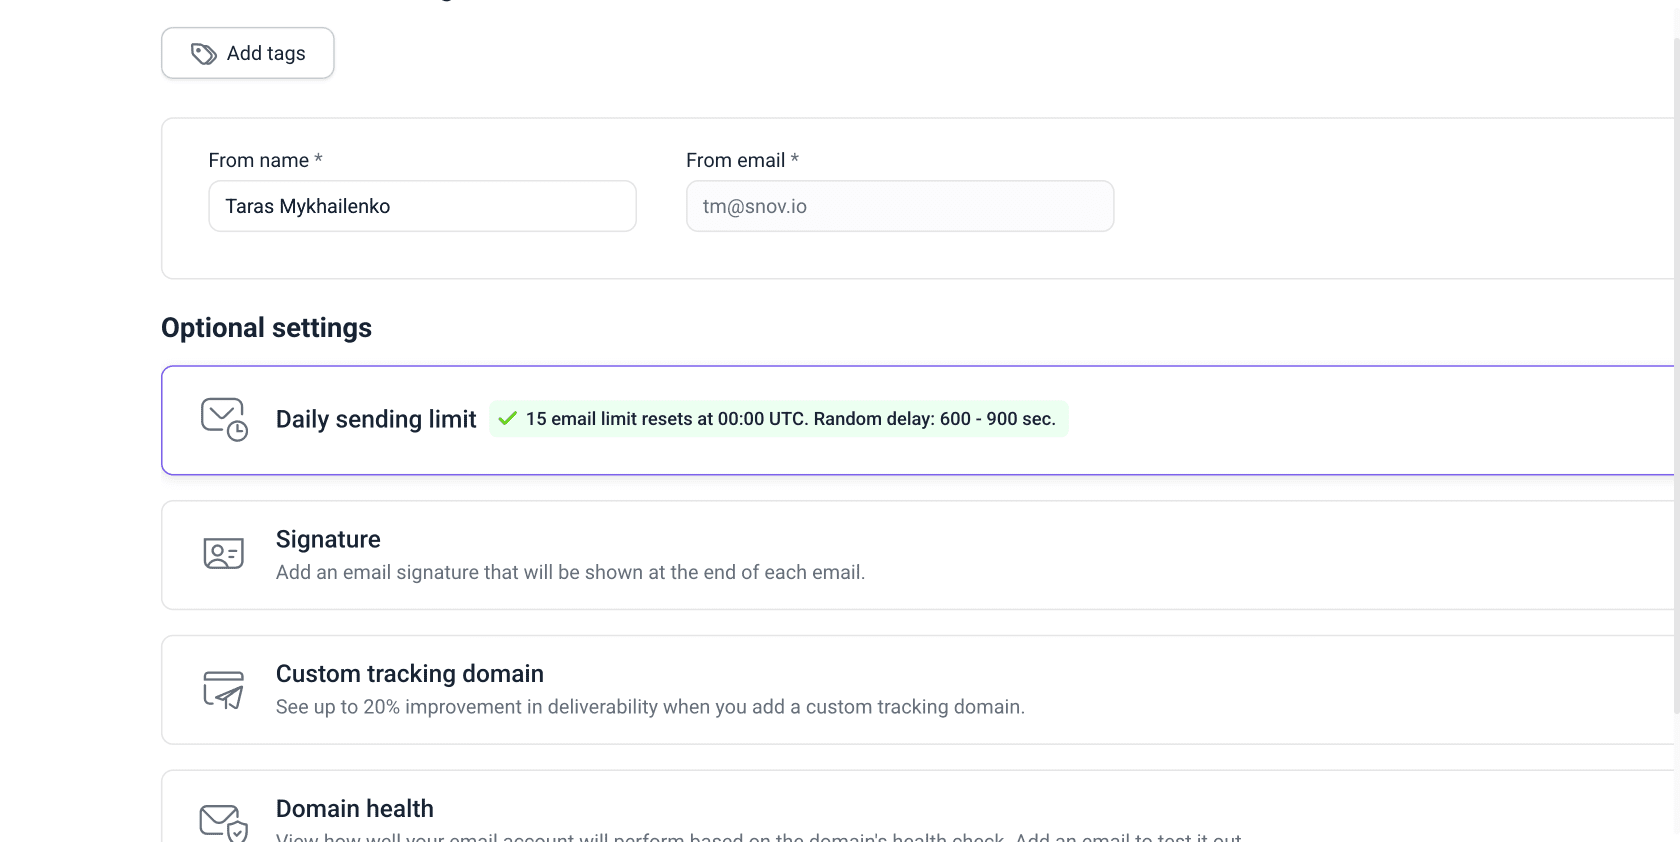
Set daily sending limits & intervals
By default, Google accounts have these settings:
- Daily sending limit: 15 emails/day
- Interval between emails: random within 600–900 seconds
Before you begin warm-up, you can set the limit per account to 40 emails/day as this will be the warm-up goal. Warm-up will increase sending gradually each day until it reaches that limit.
To update limits in bulk: go to Email accounts, select the accounts using the checkboxes, click Edit at the top, and update the value in the Daily sending limit tab.
Our recommended campaign sending limits are:
- 15 emails/day: Safe starting limit for Google accounts
- 30-40 new emails/day: Recommended limit for warmed-up accounts. Safe to use if reply rate is 5% or more
- 50 new emails/day: Risky even with a strong reputation. Use only for a temporary increase, not as your regular limit
- 100 new emails/day: This is a spammer’s limit. Not recommended for cold outreach
These limits apply to campaign emails only. Warm-up emails are set separately in warm-up settings.
Warm up accounts
Google mailboxes are optimized for deliverability but have no sending history yet. Before using them in campaigns, you need to warm them up first.
Email Warm-up will prepare your accounts by sending emails and replies and gradually increasing sending.
Start warm-up for all your accounts, including any you created as backups. Those senders will warm up in the background so you always have prepared accounts for mailbox rotation.
To add accounts to warm-up → go to Email accounts → select mailboxes you want to add → click Start warm-up on the quick actions to do it in bulk.
Recommended warm-up duration:
Warm-up helps speed up sender reputation growth, but takes time to see real impact.
- Minimum: 2 weeks
- Recommended: 4 weeks
If you don’t have this time for all accounts, introduce them to real campaigns gradually. Add 2 mailboxes after 1 week of warm-up, 2 more mailboxes after 2 weeks, and so on.
Don't launch campaigns until the initial warm-up period is complete. Starting a campaign too early hurts both warm-up and campaign performance.
Recommended warm-up settings:
- Starting limit 2 emails/day
- A Progressive strategy to gradually increase to 40 emails/day as your warm-up goal
- Warm–up end date 4 weeks after the start
Advanced warm-up settings:
- Turn on the Premium sender pool to warm up with paid business domains only (no free Gmails in the warm-up pool)
- Enable targeted warm-up if you send to both Gmail and Outlook recipients
- Set the warm-up schedule to the same time zone and hours you plan to use in real campaigns
- Enable custom tracking domain warm-up to make tracked links safer. DFY accounts include custom tracking domains by default, but open and click tracking can still hurt deliverability. Warming them up reduces that risk.
Monitor warm-up progress
During the warm-up period, you can monitor its progress on the warm-up dashboard. The process runs automatically until the end.
Deliverability check after warm-up
Before launching any campaign, run a simulation sending with Deliverability check to confirm your mailboxes are ready. This test is closer to a real-world campaign scenario. Check these metrics in the results:
- Inbox rate: If inbox score is 90% or higher — your accounts are ready to launch. If it's below → extend warm-up until it reaches at least 90%
- Placement by provider: If you see no issues with Gmail or Outlook — accounts are ready. If you notice issues with spam → make sure provider-specific warm-up is enabled and run warm-up for a few days more.
Before campaign start
Here are the final recommended steps to take before you use the mailboxes in campaigns.
Sync inboxes
To view replies and work with your inbox while campaigns are active, you have two options:
- Sign in directly to each Google account using its password
- Add your mailboxes to Unibox to sync all communications from all accounts in one place
Keep warm-up active
Use warm-up as a background process to protect deliverability even while the campaign is active.
Keep warm-up active alongside campaigns, but remember to adjust email sending limits.
- When campaigns are active, split your daily limit between campaign and warm-up
- When all campaigns are paused, use the full limit for warm-up
- On days when you send fewer cold emails than usual, add some warm-up emails
Set campaign & warm-up limits
Don’t spend the full daily limit for cold emails. Distribute limits between campaign sending and warm-up. It helps offset the negative signals that come with cold emailing.
When you start a campaign, warm-up emails are not counted toward the limit in email account settings. Only campaign emails are controlled by that limit.
- Set the warm-up limit in warm-up settings
- Set the campaign sending limit per mailbox in email account settings
If you want to be extra safe with limits, start with this limit distribution for the first week:
- 40 warm-up emails/day
- 10 campaign emails/day
Each next week, add 5 emails/day to campaign sending and remove 5 emails from the warm-up limit. As your accounts gain more reputation and usage, 10 warm-up emails/day and 40 campaign emails/day will be optimal.
Adjust limits based on metrics
Increasing limits gradually based on engagement is the safest way to do it.
- If campaigns perform well, you can increase campaign and lower warm-up limit
- If engagement drop, lower campaign limit and increase warm-up so your sender reputation doesn’t fall
Reply rate is 5% or more → add +5 campaign emails/day per mailbox every week
Reply rate is lower than 5% → return to the previous sending limit

Sorry about that 😢
How can we improve it?