У цьому посібнику ви дізнаєтесь, як налаштувати записи DNS — SPF, DKIM, DMARC і MX — для покращення репутації відправника, доставки емейлів та здоровʼя домену. Ви знайдете загальні інструкції, які допоможуть налаштувати кожен запис.
Чому записи DNS важливі для надсилання листів?
Коли ви надсилаєте кампанії з корпоративної поштової скриньки, ваша адреса пошти завжди пов’язується з вашим доменним іменем. Наприклад, адреса john@company.com пов’язана з доменом company.com. Налаштування домену відправника та його записи DNS безпосередньо впливають на продуктивність вашого email-акаунту та відіграють вирішальну роль в автентифікації пошти.
Перейти до налаштування:
Переваги DNS-записів: email-провайдери сприймають ваші листи як надійні = менше шансів запустити спам-фільтри = краще розміщення емейлів та вищий показник доставлення у вхідні
Завершення налаштування DNS вашого домену є важливим першим кроком у підготовці ваших облікових записів відправників до холодного аутрічу.
1) Записи DNS покращують здоровʼя вашого домену та допомагають швидше отримати високу репутацію відправника.
2) Емейли, надіслані зі здорового домену, мають меншу ймовірність будь-яких помилок доставлення.
3) Початок роботи з належним чином налаштованим доменом забезпечує краще доставлення, ніж використання домену без записів DNS.
Перевірте свої записи DNS
Здоровий домен забезпечує оптимальну роботу ваших email-акаунтів. Якщо будь-який запис відсутній або налаштований неправильно, це вплине на вашу репутацію відправника та показник доставлення. У вашому обліковому записі Snov.io є два місця, де ви можете перевірити записи свого домену.
Як Snov.io допоможе вам налаштувати записи DNS:
1) Ви можете перевірити свій домен на основі всіх записів DNS
2) Визначте проблеми конфігурації та отримайте інструкції щодо оновлення домену
3) Отримайте оцінку здоровʼя домену, яка вказує на готовність технічного налаштування
Перевірте здоровʼя домену: у налаштуваннях email-акаунту
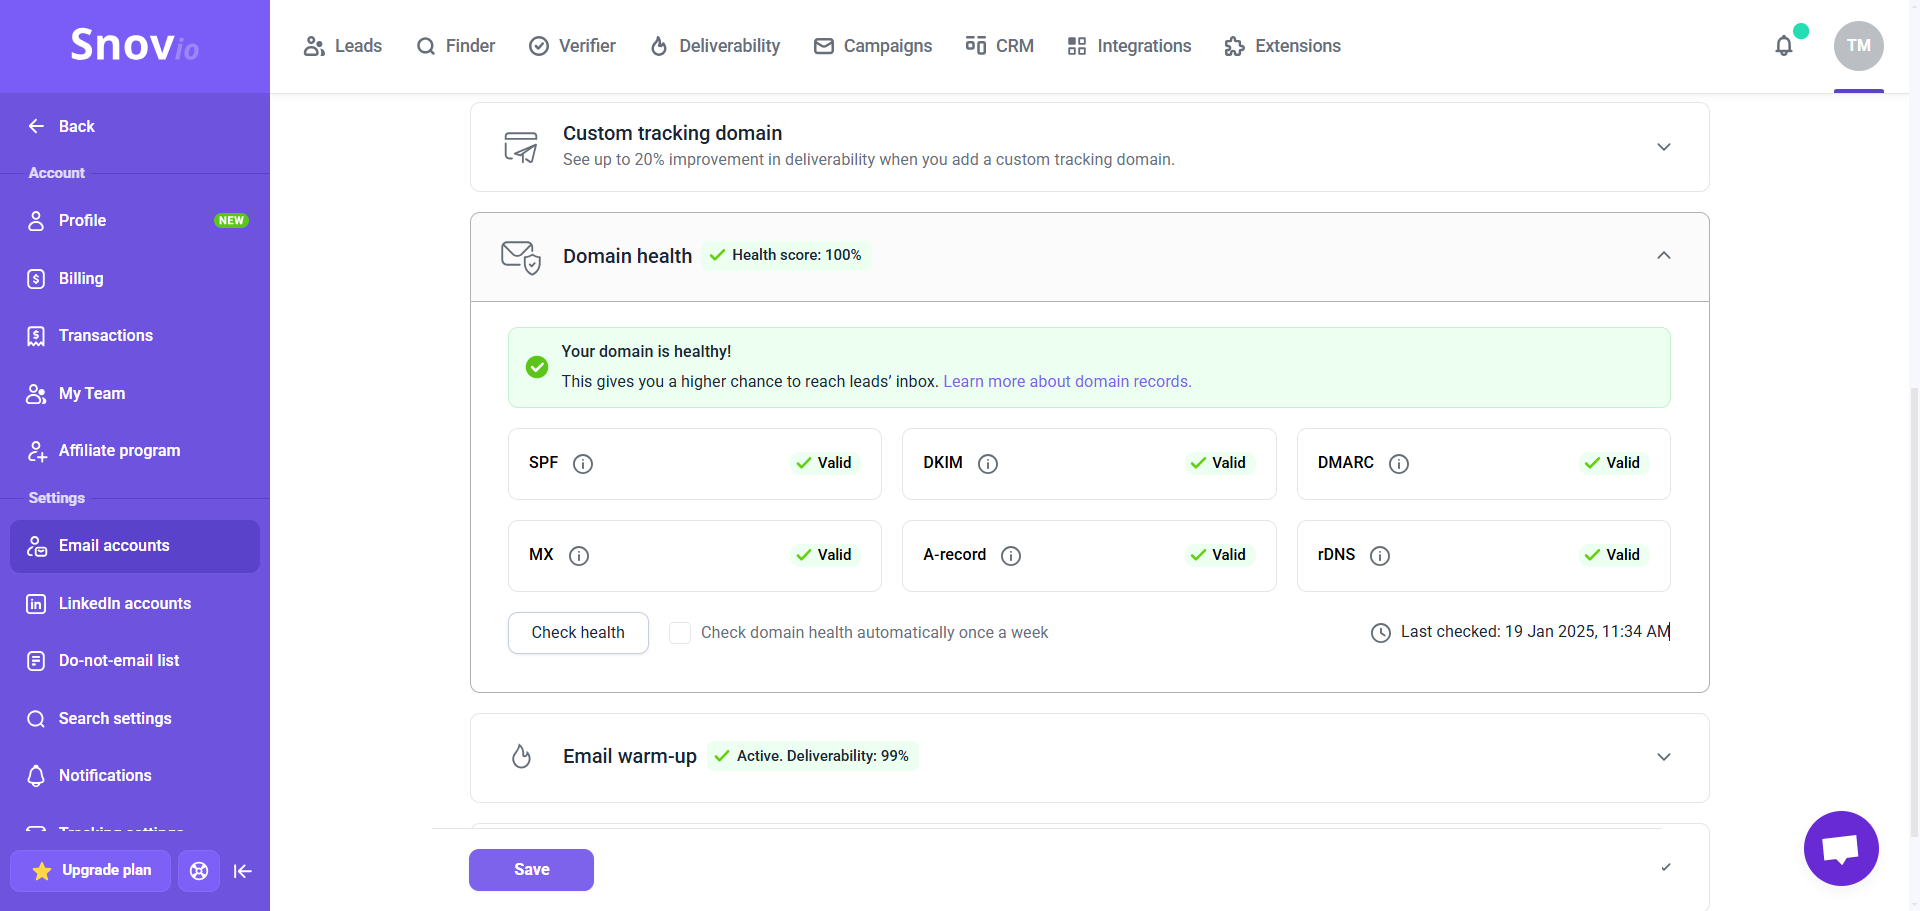
Після додавання поштової скриньки до Snov.io ви можете перевірити стан свого домену в налаштуваннях акаунту.
Перейдіть до списку email-акаунтів. Натисніть “Редагувати” біля потрібного облікового запису. Прокрутіть униз до розділу “Додаткові налаштування” та відкрийте вкладку “Здоровʼя домену”.
Після завершення перевірки ви побачите статус кожного запису домену разом із загальною оцінкою здоровʼя. Якщо якийсь запис відсутній або має проблеми, результати вкажуть, які записи потрібно оновити.
Регулярно перевіряйте свій домен, щоб переконатися, що немає проблем з його здоров’ям. Ви також можете ввімкнути автоматичні перевірки, які запускаються раз на тиждень.
Перевірте здоровʼя домену: у тесті доставлення
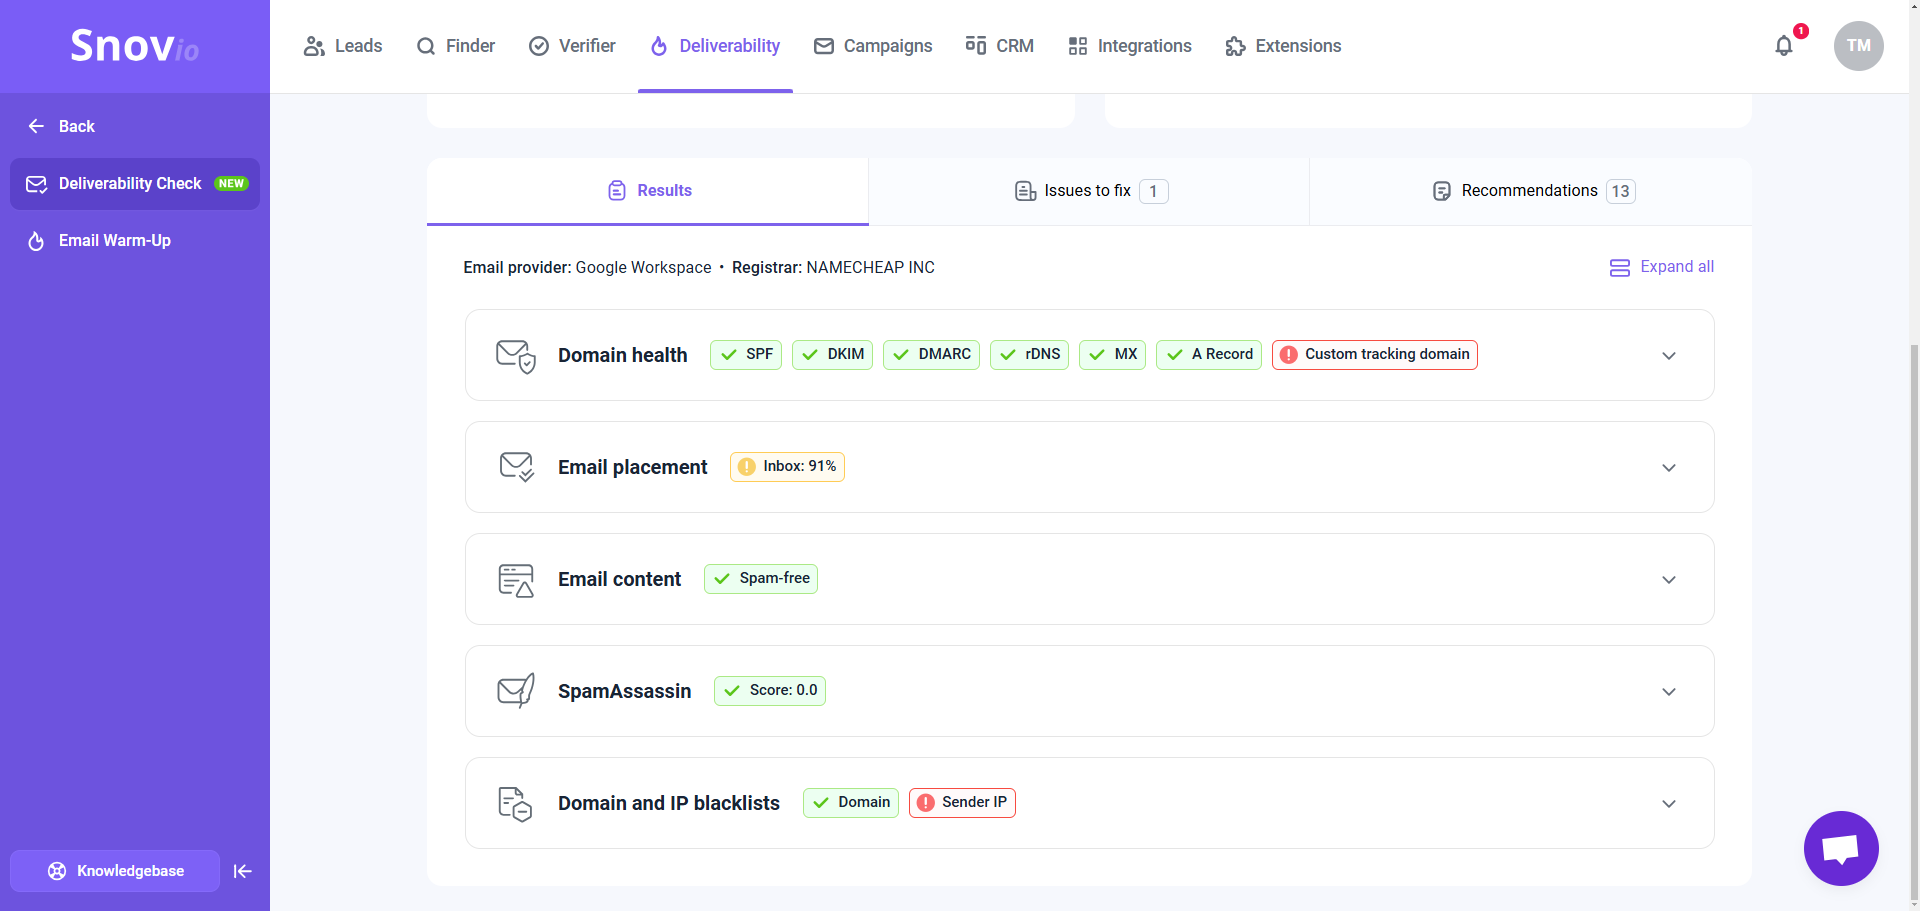
Ви можете перевірити DNS-записи в рамках тесту доставлення у своєму обліковому записі Snov.io.
У звіті про стан домену ви побачите результати перевірки та статус кожного запису DNS (чи він дійсний і чи правильно налаштований).
Ви також отримаєте персоналізовані інструкції щодо оновлення налаштувань домену для вашого конкретного провайдера (у вкладці “Виявлені проблеми”), а також підказки та рекомендації щодо підвищення доставлення.
Детальніше про результати перевірки доставлення.
Налаштуйте записи DNS
Перш ніж запускати email-кампанії, наполегливо рекомендуємо додати та перевірити всі необхідні записи DNS для ваших доменів відправників.
Крок 1. Визначте свій провайдер/реєстратор домену
Спочатку визначте провайдер свого домену. Це служба або платформа, де ви зареєструвалися та придбали доменне ім’я.
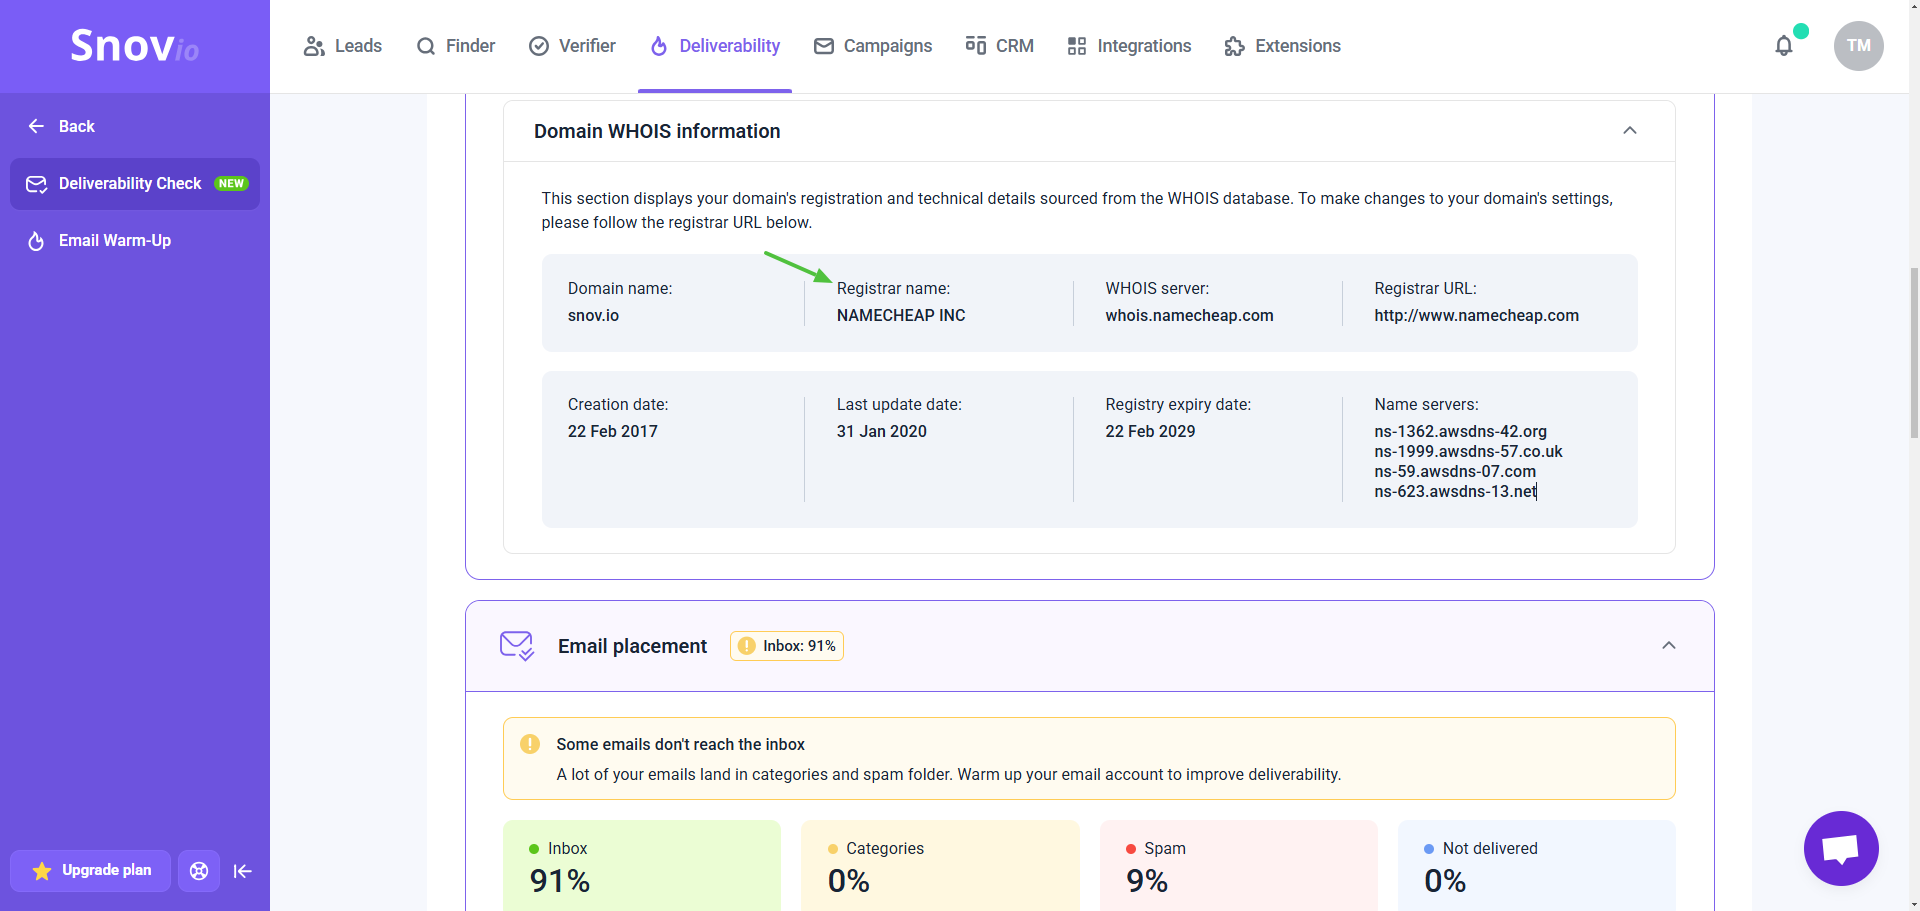
Якщо ви не впевнені, хто є вашим провайдером, Snov.io може автоматично визначити інформацію про постачальника домену та email-провайдера під час перевірки доставлення.
У результатах тесту відкрийте вкладку “Здоров'я домену” та знайдіть розділ “Інформація з домену WHOIS”. Тут ви знайдете інформацію про свій домен, зокрема URL-адресу реєстратора (сайт вашого провайдера).
Крок 2. Увійдіть у свій домен
Перейдіть на сайт провайдера та увійдіть у свій обліковий запис реєстратора домену.
Крок 3. Відкрийте DNS-налаштування домену
Щоб змінити налаштування свого домену, вам знадобиться отримати доступ до меню керування DNS. Тут налаштовуються або оновлюються записи DNS.
Крок 4. Налаштуйте записи DNS
Кожен запис DNS є окремим записом у налаштуваннях DNS вашого домену. У меню DNS знайдіть опцію, щоб додати нові записи та налаштувати кожен необхідний запис.
Налаштуйте SPF
Для чого це: запис SPF захищає ваш домен і листи, які ви надсилаєте, від будь-якого шахрайства чи підробки. Без SPF ваші листи можуть бути заблоковані або позначені як спам провайдерами.
Стандартний запис SPF має такий формат:
v=spf1 include:spf.example.com ~all
Частина після include: визначає адресу сервера електронної пошти вашого email-провайдера. У фактичному записі SPF замініть spf.example.com на значення вашого провайдера.
Наприклад: якщо вашим провайдером пошти є Google, запис SPF виглядатиме так:
v=spf1 include:_spf.google.com ~all
Якщо ви використовуєте кілька провайдерів, додайте окреме include: для значення SPF кожного провайдера.
Наприклад: якщо ви використовуєте Google Workspace і Microsoft 365, запис SPF виглядатиме так:
v=spf1 include:_spf.google.com include:spf.protection.outlook.com ~all
Щоб додати запис SPF до налаштувань домену:
Увійдіть у свій обліковий запис домену — платформу чи службу, де ви придбали своє доменне ім’я. Відкрийте налаштування DNS і знайдіть можливість додати новий запис.
Ваші параметри SPF мають бути такими:
- Record type: TXT (за замовчуванням)
- Host: @ (за замовчуванням)
- Value/Content: частина після include: залежить від вашого провайдера— замініть spf.example.com на значення SPF вашого провайдера.
v=spf1 include:spf.example.com ~all
Збережіть запис у налаштуваннях DNS і зачекайте до 48 годин, поки зміни набудуть чинності. Потім перевірте здоров'я домену в налаштуваннях email-акаунту, щоб переконатися, що запис SPF дійсний.
Читайте детальну інструкцію щодо налаштування запису SPF.
Налаштуйте DKIM
Для чого це: запис DKIM використовує цифрові ключі для додавання унікального підпису до ваших листів, дозволяючи серверам одержувачів перевірити, що лист надіслано вами та його контент не було змінено. Без цього підпису провайдери можуть позначити ваші листи як підозрілі.
Щоб налаштувати запис DKIM, вам знадобиться отримати значення та ключі DKIM від email-провайдера. Оскільки Snov.io надсилає листи через ваш провайдер, вам потрібне їхнє значення DKIM, а не Snov.io.
Перевірте налаштування свого провайдера, чи є можливість генерувати DKIM, прочитайте інструкцію з DKIM або зв’яжіться з провайдером, щоб отримати конкретні інструкції.
Отримавши ключі DKIM, виконайте наведені нижче швидкі кроки, щоб додати їх до налаштувань DNS.
Щоб додати запис DKIM до налаштувань домену:
Увійдіть у свій обліковий запис домену — платформу чи службу, де ви придбали своє доменне ім’я. Відкрийте налаштування DNS і знайдіть можливість додати новий запис.
Ваші параметри DKIM мають бути такими:
- Record type: TXT (за замовчуванням).
- Host/Name: це ім’я вашого email-провайдера для DKIM, яке ви можете отримати від свого провайдера. Може виглядати приблизно як example._domainkey.
- Value/Content: це значення запису DKIM, створене вашим email-провайдером.
Ваш запис DKIM може виглядати так (це лише приклад; не використовуйте його у своєму фактичному записі).
v=DKIM1; k=rsa; p=MIIBIjANBgkqhkiG9w0BAQEFAAOCAQ8AMIIBCgKCAQEA7vPxh6zZ7nBLj1QUXGEXAMPLEKEY...
Частина після p= — це ваш публічний ключ DKIM. Запис DKIM може містити лише один ключ DKIM. Якщо ви використовуєте кілька провайдерів для надсилання листів, налаштуйте окремий запис DNS для кожного провайдера.
Збережіть запис у налаштуваннях DNS і зачекайте до 48 годин, поки зміни набудуть чинності. Потім перевірте здоровʼя свого домену в налаштуваннях облікового запису, щоб переконатися, що запис DKIM дійсний.
Читайте детальну інструкцію щодо налаштування запису DKIM.
Налаштуйте DMARC
Для чого це: DMARC визначає, що сервери одержувачів мають робити з листами, надісланими з вашого домену, які не пройшли перевірки SPF та/або DKIM. Запис DMARC посилює безпеку домену (від підробки пошти) і знижує ризик того, що ваші листи будуть позначені як спам або підозрілі.
Записи DMARC відповідають стандартному формату, і стандартний DMARC можна використовувати для будь-якого провайдера. Конкретні параметри можна налаштувати відповідно до ваших потреб.
Ось основний запис DMARC (ви можете використовувати наведене нижче значення як шаблон для фактичного запису).
Політика DMARC: частина після p= відповідає за політику. Ця політика визначає, що станеться з листами, які не пройдуть перевірки SPF і DKIM. Ви можете використовувати політику за замовчуванням p=none або змінити її на p=quarantine (рекомендовано) або p=reject, якщо вам потрібен найсуворіший захист.
Звіти DMARC: Запис містить адресу пошти після mailto: — це спеціальна адреса для отримання звітів DMARC. Створіть окрему поштову скриньку, якщо хочете їх отримувати. Ці звіти показують статистику автентифікації пошти та допомагають у розвʼязанні потенційних проблем безпеки. Детальніше про звіти DMARC.
Щоб додати запис DMARC до налаштувань домену:
Увійдіть у свій обліковий запис домену — платформу чи службу, де ви придбали своє доменне ім’я. Відкрийте налаштування DNS і знайдіть можливість додати новий запис.
Ваш запис DMARC повинен мати такі параметри:
- Record type: TXT (за замовчуванням). Запис DMARC додається як запис TXT у налаштуваннях DNS.
- Host/Name: _dmarc.userdomain.com (замініть userdomain.com своїм справжнім ім’ям домену). Деякі постачальники доменів автоматично додають ім’я домену до цього поля, тому може бути достатньо ввести лише _dmarc.
- Value/Content: налаштуйте значення p= відповідно до ваших потреб і замініть адресу пошти після mailto: на справжню адресу, яку ви створили для звітів.
v=DMARC1; p=quarantine; rua=mailto:your-email@yourdomain.com.
Збережіть запис у налаштуваннях DNS і зачекайте до 48 годин, поки зміни набудуть чинності. Потім перевірте здоровʼя свого домену в налаштуваннях email-акаунту, щоб переконатися, що запис DMARC дійсний.
Читайте детальну інструкцію щодо налаштування запису DMARC.
Налаштуйте MX
Для чого це: запис MX визначає, які поштові сервери відповідають за отримання вхідних листів для вашого домену. Таким чином, він гарантує, що листи правильно направляються на поштовий сервер вашого провайдера, щоб вони потрапляли до вашої папки "Вхідні". Це не впливає на надсилання листів, але якщо його немає, це може спричинити відхилення ваших вхідних листів (оскільки немає поштового сервера, щоб їх отримати).
Записи MX безпосередньо не впливають на вашу репутацію відправника чи покакзник доставлення.
Вони не впливають на те, як фільтри спаму оцінюють ваші листи. Надсиланням керують записи SPF, DKIM і DMARC.
Загальні кроки для налаштування MX: Отримайте значення запису MX від свого email-провайдера –> Перейдіть до налаштувань DNS вашого домену та додайте новий запис MX.
Ваш email-провайдер надає вам значення MX, яке потрібно використовувати під час налаштування запису MX у налаштуваннях DNS вашого домену. Ви можете знайти конкретні інструкції в їхньому довідковому центрі або звернутися до їхньої служби підтримки по допомогу. Якщо вашим провайдером є Google Workspace, зверніться до офіційного посібника Google щодо налаштування запису MX.
Щоб додати запис MX до налаштувань домену:
Увійдіть у свій обліковий запис домену (платформа, на якій ви придбали домен). Відкрийте налаштування DNS і знайдіть опцію, щоб додати новий запис.
Ваш запис MX повинен мати такі параметри:
- Type: Виберіть MX.
- Name/Host name: введіть @ (або адресу вашого домену, якщо @ не приймається).
- Value/Destination: введіть значення MX вашого провайдера. Ваш провайдер надасть вам точне значення, яке потрібно використовувати тут.
- Priority: 10; Якщо у вас лише один email-сервер, ви можете встановити будь-який номер пріоритету. Однак якщо у вашому домені вже є інші записи MX, переконайтеся, що значення пріоритету встановлено правильно, щоб уникнути конфліктів.
- TTL (Time to live): залиште значення за замовчуванням або встановіть 3600 секунд.
Після додавання запису до налаштувань домену зачекайте до 48 годин, доки зміни набудуть чинності. Потім перевірте здоровʼя свого домену в налаштуваннях email-акаунту, щоб переконатися, що запис MX дійсний.


Нам шкода 😢
Як нам покращити статтю?