
In this article, we will give you step-by-step instructions for using Snov.io email drip campaigns and building your automated email campaign – from collecting email addresses to launching a complex campaign to target the prospects, all on a single platform.
Outline
1. Create an email list
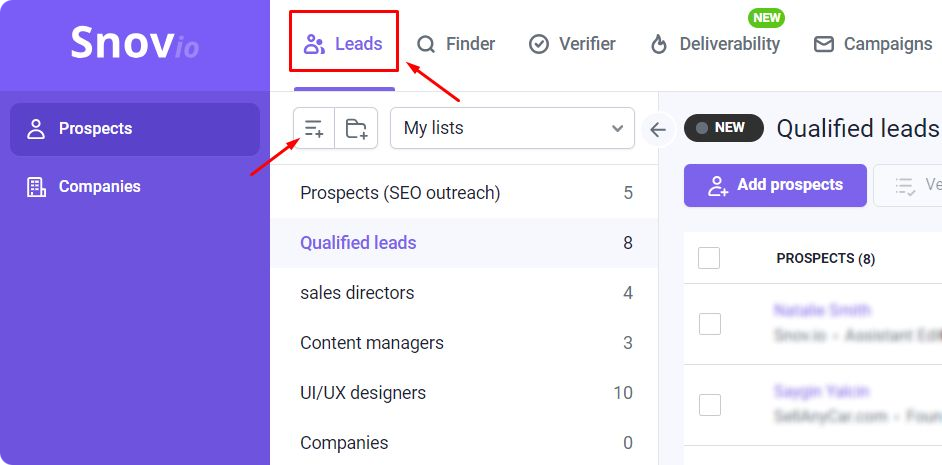
Before starting a campaign, you need to create a list of emails to which your campaign will be sent. Go to Leads section in the upper menu, navigate to the left side, and click the Add List button.
Click it, and a pop-up window will open up. In the pop-up window, name your list. Try to associate your list name with the kind of emails you have or the campaign you’ll use it for. For example, UI/UX Designers, PHP Developers, etc.
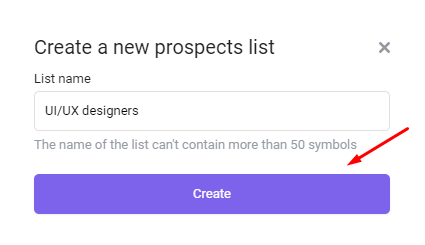
Once you’ve named your list, press Create. You will be automatically redirected to the list you’ve just created.
2. Fill the list with email addresses
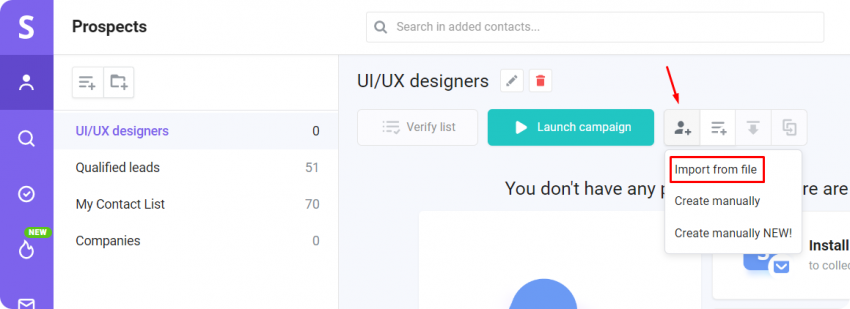
Your new list is empty. There are two options on how you can fill it: you can either upload your own email list or find prospects’ emails on the web.
Option 1: Upload a list of prospects
It’s likely that you already have a list of potential leads, so you will need to import it. Find and click the Create or import prospects button and choose the Import from file option.
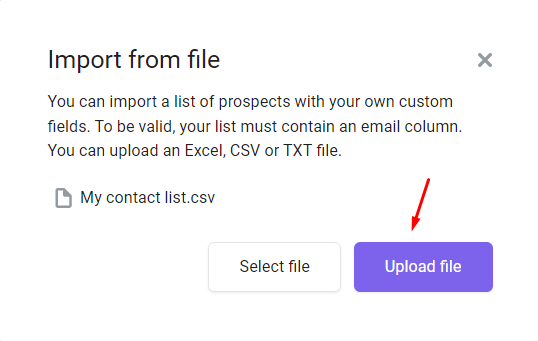
Click it, and a pop-up window will appear. Here you can import an external file with all your email addresses to your list. You can upload your file in any major format: Excel, CSV, or TXT.
Click the Select file button, choose the file in one of the accepted formats, and press Upload file to add the file to your Snov.io dashboard.
By default, the Update existing contacts with new data (1) option will be chosen. If this is your first email list, you don’t need to do anything. This option and two others – Upload duplicates with new data (2) and Skip duplicates (3) – work for users who already have another list of prospects.
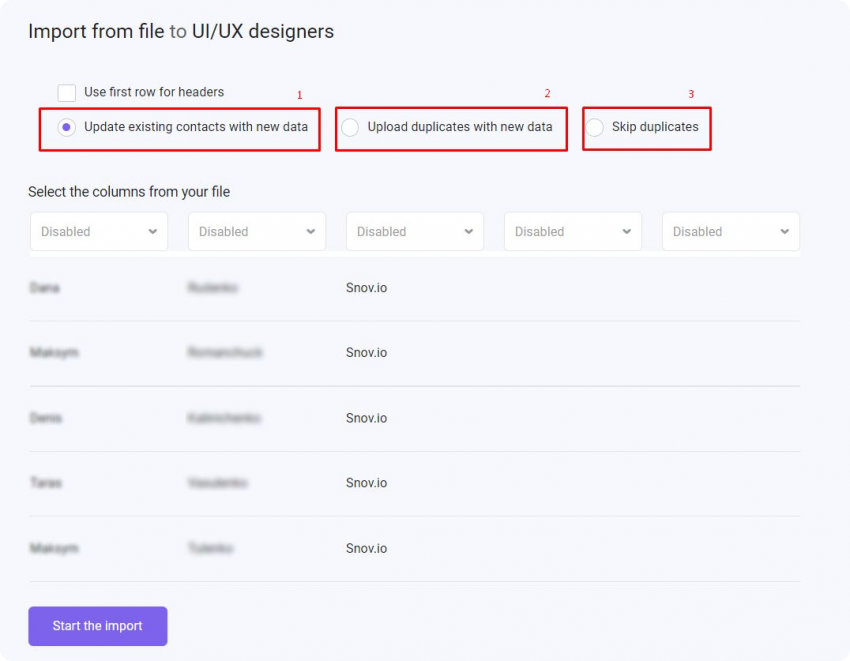
Update existing contacts with new data (1) option means that in case you upload a contact that already exists, Snov.io will update their information without creating a duplicate.
Upload duplicates with new data (2) option means that in case you upload a contact that already exists, Snov.io will create a duplicate of it with the updated information.
Skip duplicates (3) option means that in case you upload a contact that already exists, Snov.io will neither create its duplicate nor update it.
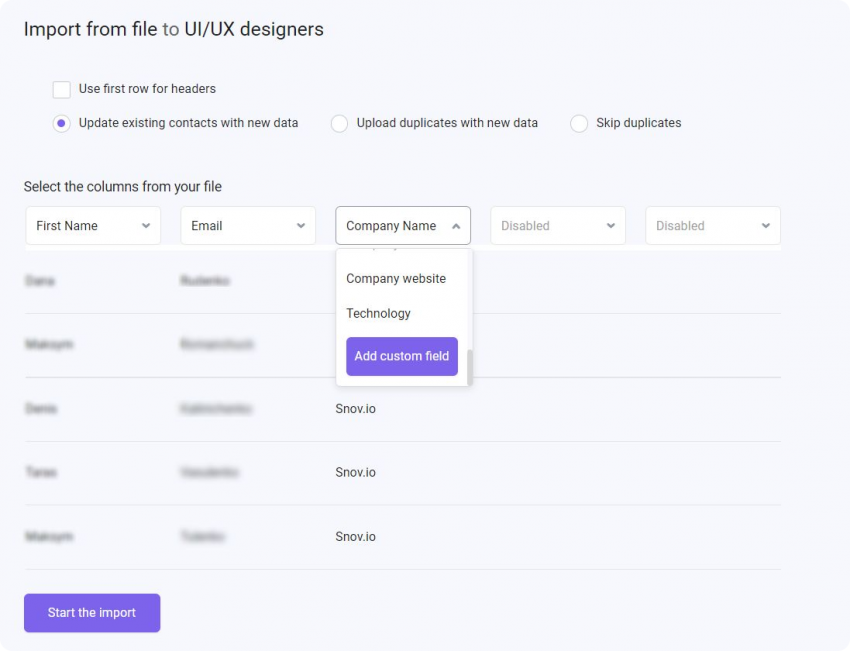
Now match the columns from your file with the fields to use this data while creating your personalized emails. For every column in the file, you can choose one of 12 variables or add your own custom fields.
Option 2: Find emails on the web
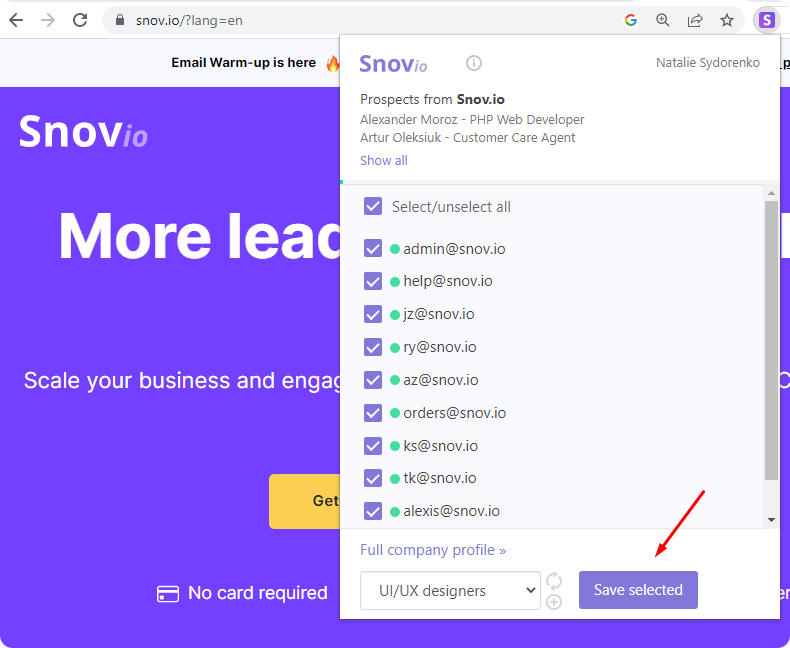
You can visit any company website and find people you are interested in with the help of the Snov.io Email Finder extension. Simply add the extension to Chrome, set the right search filters in the website’s search field, and click the Find Emails and Save button.
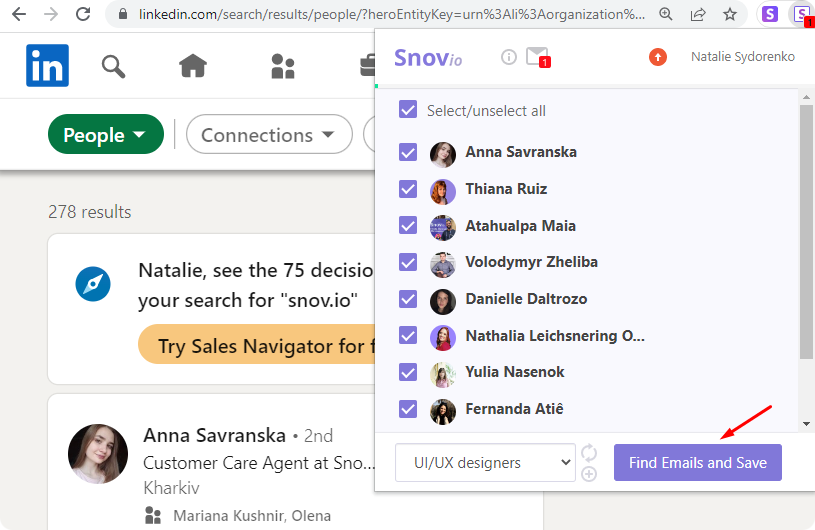
To find people on LinkedIn, use another extension from Snov.io – LI Prospect Finder. The algorithm is the same:
If the prospects list you’ve uploaded is verified, you can skip this paragraph. But if you’re still unsure about the quality of your list, or you’ve collected emails from the web, you need to clean the list. Go to the list and click the Verify current list button.
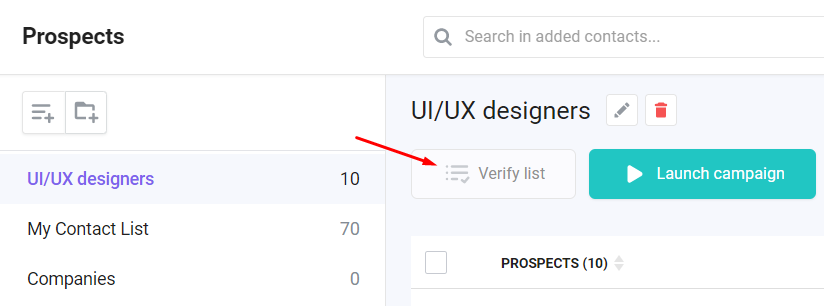
This will clean your list from invalid, abandoned, or dubious email addresses to save on sending and improve your delivery rate.
3. Add an email signature
Nothing says professional quite like a professional email signature. Add a signature to your sender account and it will automatically appear at the end of all emails sent from it in a campaign.
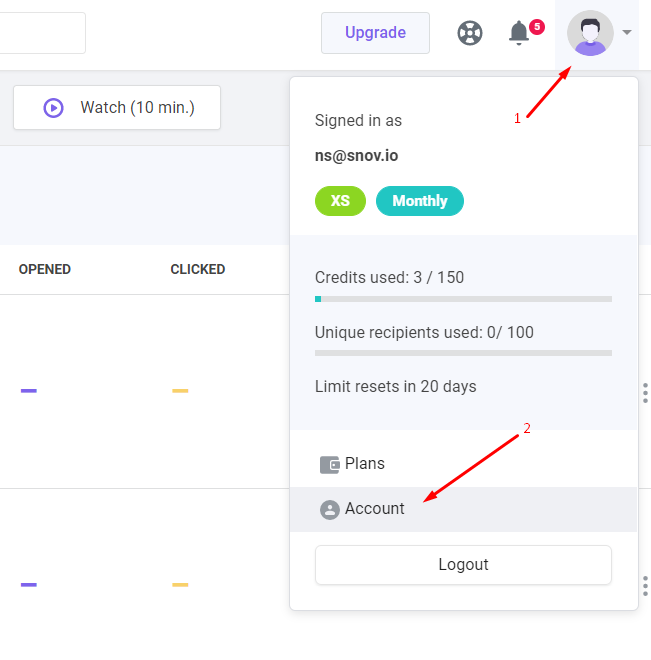
Open the user avatar drop-down menu and then the Account tab.
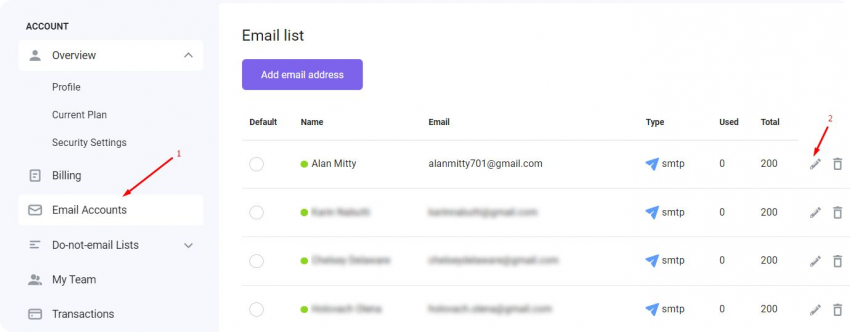
Go to the Email Accounts tab and click the Edit button for the necessary email account.
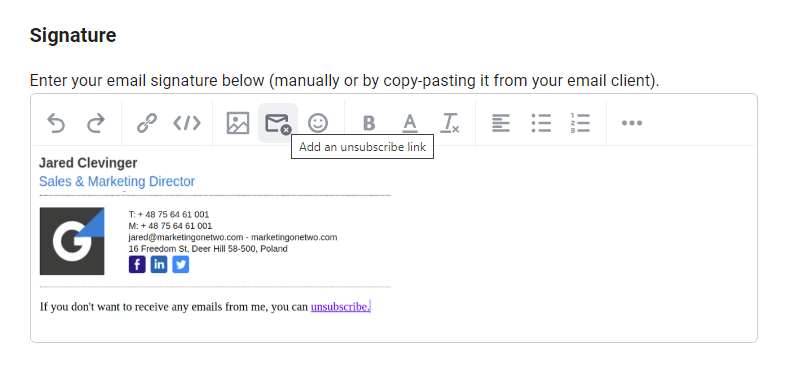
Here, you can either type in a text-based signature or copy-paste it from a signature builder. You can also add the unsubscribe link right in the email signature so it will be automatically added to every email. In the email signature builder, click the Add an unsubscribe link button and type in the unsubscribe word.
Click the Save Settings button to save the changes.
You can create a separate signature for each synchronized email account. When you build a new campaign and select an email account as a sender, the signature for that account inserts automatically in every sent email.
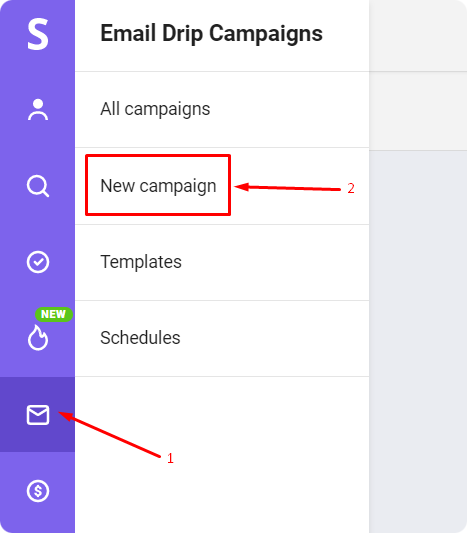
4. Create a new campaign
When you’re done with the email list, it’s time to create your email campaign.
Find the Email Drip Campaigns icon on the left menu and choose New Campaign.
You will be taken to the campaign creation window. You will be able to create your drip campaign in 4 easy steps:
- Sequence – building an email sequence
- Prospects – choosing the prospect list
- Sending options – setting sending options
- Review – reviewing the campaign before sending it out

Let’s discuss these steps one by one.
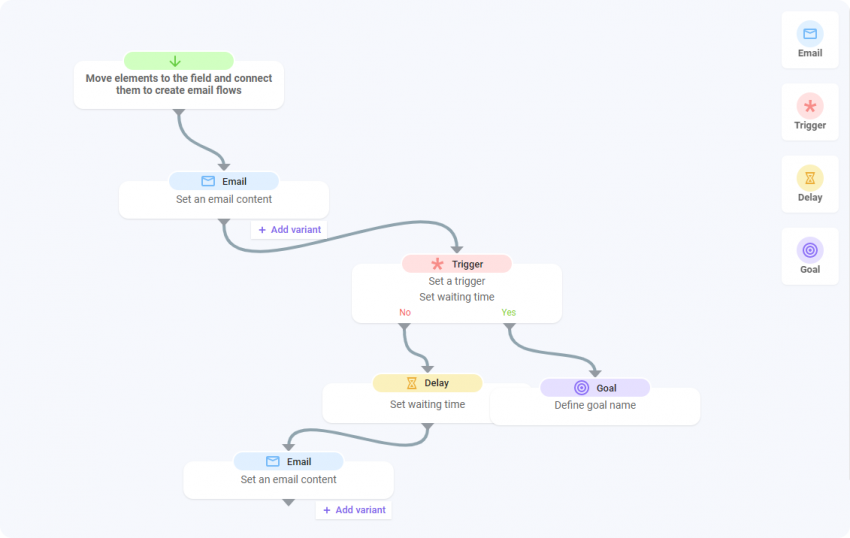
4.1. Build an email sequence
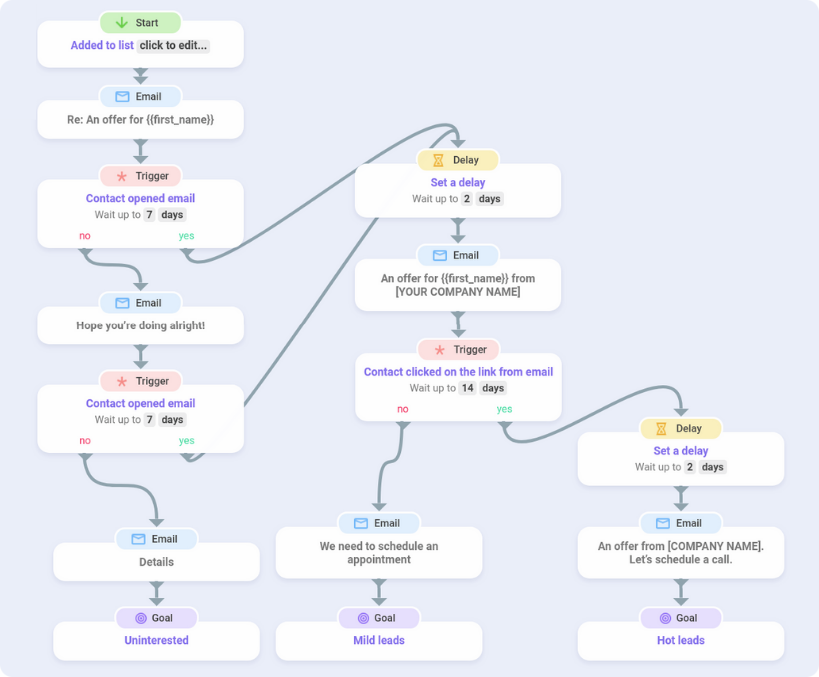
The drip campaign consists of different elements (aka steps) connected in a certain order. In the Snov.io cold email tool, you will see four components – Email, Trigger, Delay, and Goal. To build a campaign, you should drag and drop these elements into the campaign creation field. Elements will be connected automatically.
Email is the main part of the campaign. Within Snov.io Drip Campaigns, you can create messages with lots of modifications: change the font, add links, attach files (up to 6 MB), etc. You can create highly personalized emails. To do this, add custom variables to the subject line and the message body.
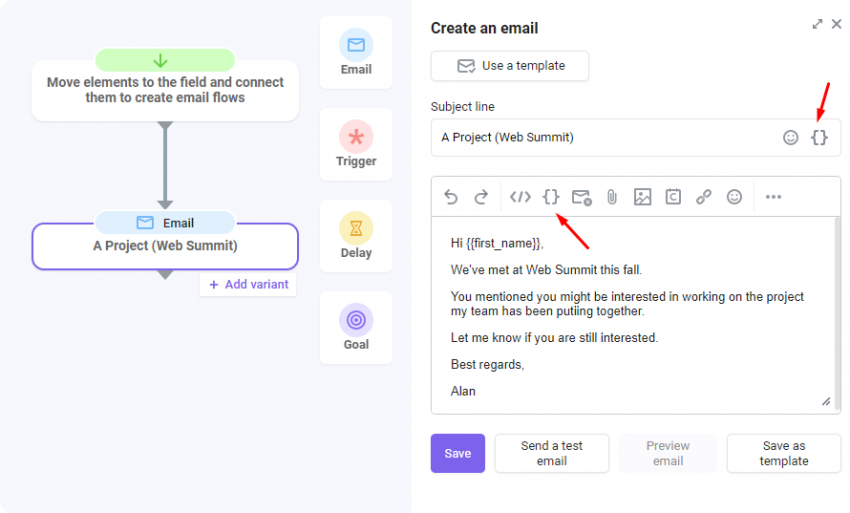
You can also add trackable links in the message. To do this, select the necessary text, click the link icon in the email window and add the link.
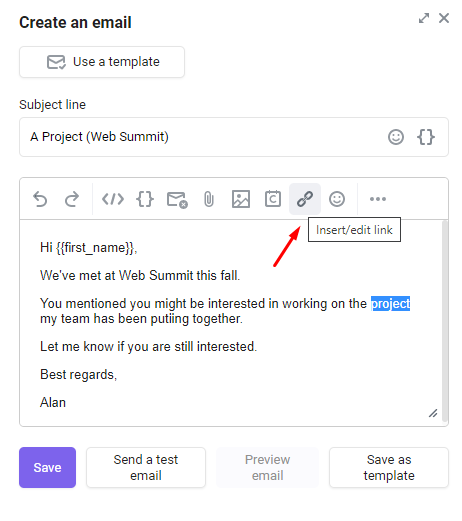
Note: you need to use the link icon to create tracked links. If you copy-paste the link into the email, the link will not be tracked.
You can also add the unsubscribe link in the email body (instead of the signature). Click the Add an unsubscribe link icon and type in the word or word combination that will be displayed as the unsubscribe link.
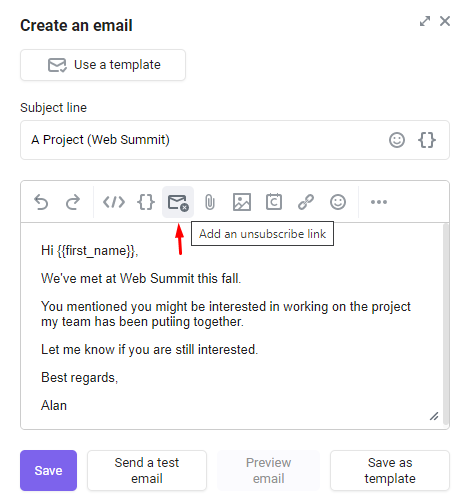
Note: if you decide to add an unsubscribe link directly into the email body, you will have to do it manually for every email. It is also not recommended to add multiple unsubscribe links to an email. We advise you to use one either in the email body (will appear only in a specific email) or in the email signature (appears in every email sent from that email address).
If you want to use an HTML template, you can do it by clicking the </> icon.
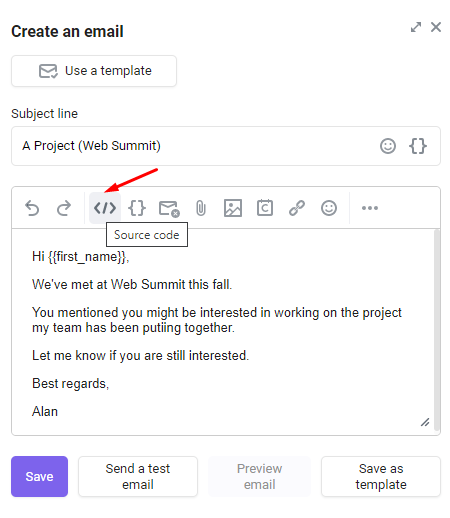
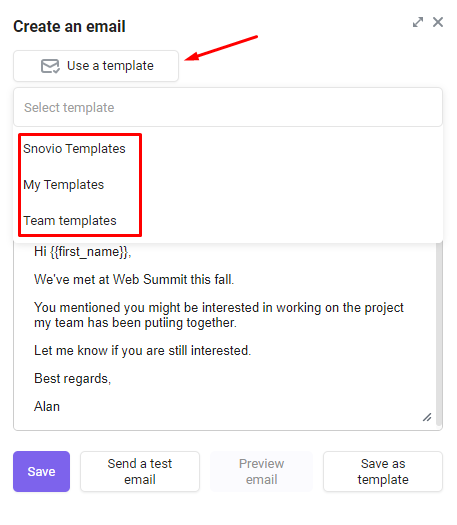
Apart from typing an email message from scratch, you can use ready-made templates – either Snov.io templates or your own (in this case, you should create them in advance).
Make sure the first email really stands out; this is the first and biggest chance to convert the leads.
Trigger
The trigger is the component of the campaign that automates it. When the addressee performs the action you’ve set as a trigger, the system activates the next step once the time specified in the trigger expires.
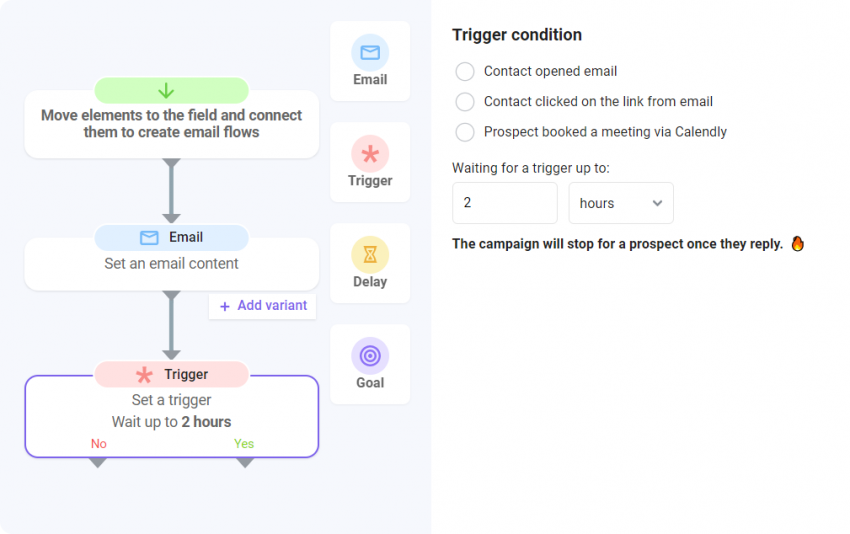
You can set up a trigger duration, after which the yes or no flow will be activated according to the action. Currently, there are two types of triggers:
- Contact opened email
- Contact clicked on the link from the email
- Prospect booked a meeting via Calendly
Note: if the Trigger is activated outside the scheduled time, the next email will be sent as soon as possible according to the Schedule you’ve set.
If the recipient opens the email or clicks on the link (depending on the Trigger option you’ve chosen), you can connect another email to this Trigger, which will better reflect the recipient’s interest in the message.
Delay
This element lets you create delays between emails. It can be added either after an email or after the trigger.
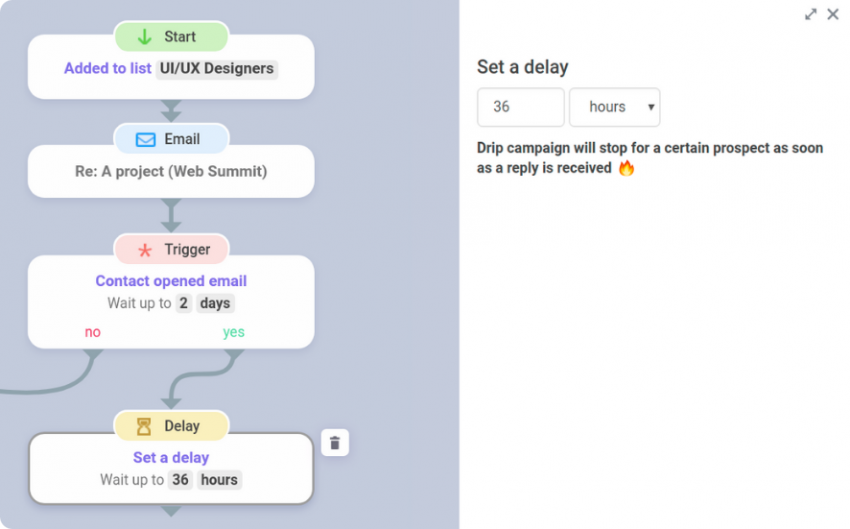
Delay will help you create natural pauses between emails if the triggers are activated right away, spacing them evenly so that they won’t annoy your recipients. Delay can be set for hours or days, with a maximum delay of 30 days.
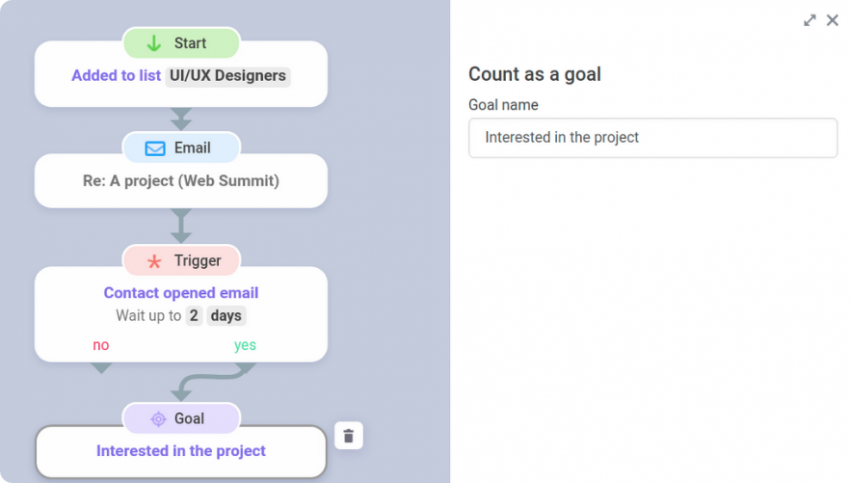
Goal
This is the end of the campaign. Here, you can type in the goal you are trying to achieve with your campaign. Once the campaign ends, you can see how many times this particular goal has been reached and by which prospects.
The picture below illustrates only a fraction of what you can achieve using Snov.io cold email tool. You can build any campaign – from super simple to extra complex. Add multiple elements with numerous triggers, branches, and goals. The only limit is your imagination.
4.2. Choose a prospect list
As soon as all components of your campaign are organized in your campaign creation field, it’s time to choose the list of recipients for your campaign. Click the Next button and you will be forwarded to the next stage – Prospects.
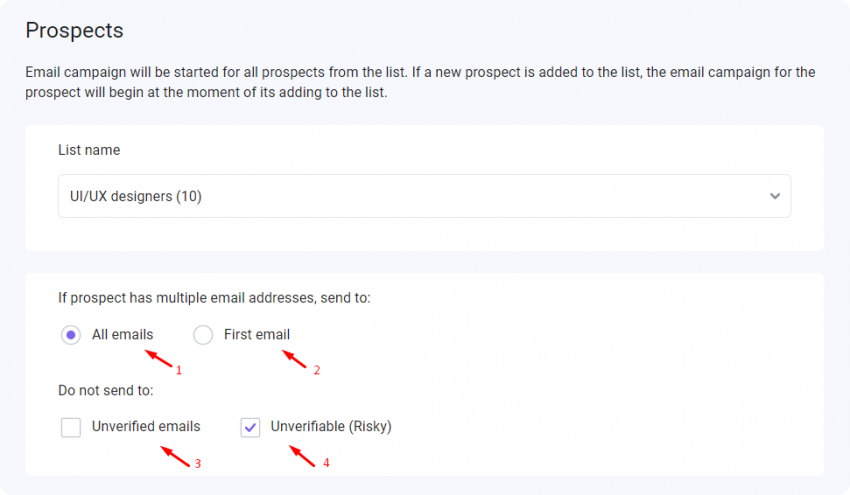
Here you are to select the list of prospects you want your campaign to be sent to:
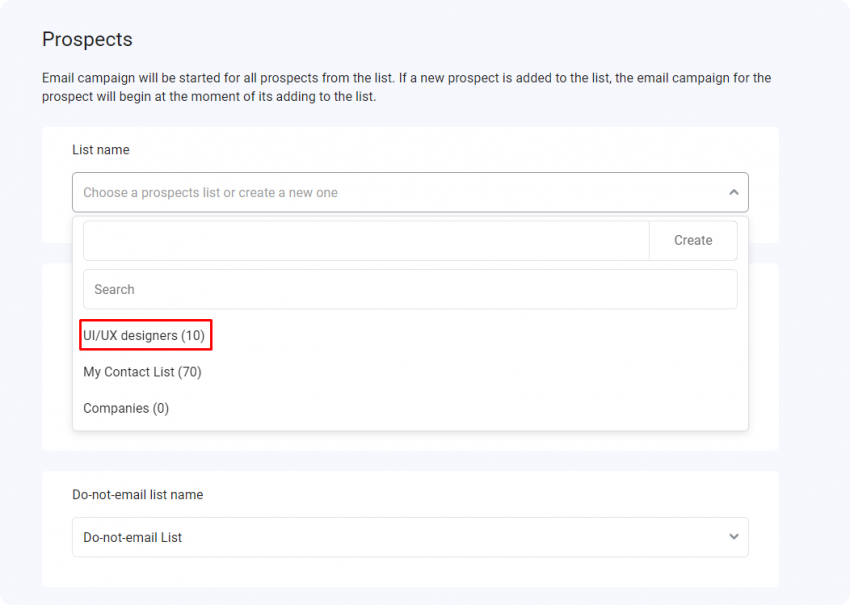
Note: The campaign will be started for all prospects from the list. If a new prospect is added to the list during the time the campaign is active, it will begin the moment it’s being added to the list.
You can also choose between two options for campaign recipients. The All emails option (1), which is set by default, means that if any of your prospects within the list has several emails, your campaign will be sent to all of them. The First email option (2) presupposes you’ll send your campaign only to a prospect’s primary email address.
In addition, you can exclude Unverified (3) and Unverifiable (Risky) emails (4).
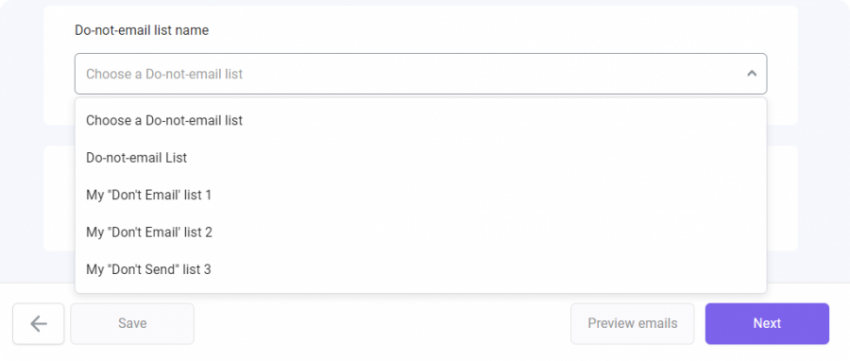
If you already have a list of emails you don’t want to send emails to – a Do–not-email-list, choose it in the Do-not-email list name drop-down menu. Emails and domains from a chosen list will not be emailed by this specific campaign. If this is your first email campaign and you don’t have such a list now, just leave this field blank.
If you are unsure whether all prospects in your list don’t have missing variables, choose the Send it to the To check list (1) option. In this case, all prospects that are missing variables necessary for personalization will be sent to the To Check list, where you can manually add missing data. Otherwise, choose the Send campaign anyway option (2).

On the bottom panel, you can see the number of recipients to whom the email campaign will be sent.

Now it’s time to proceed to the Sending options stage.
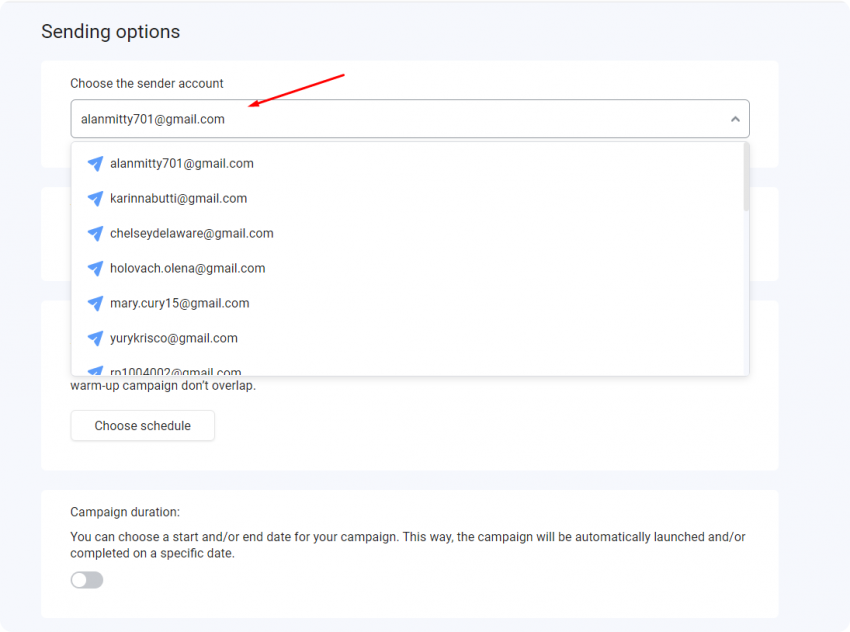
4.3. Set sending options
The first thing you should do at this stage is to choose an email account from which your campaign will be sent.
Now choose tracking settings for your emails. If you need link tracking in your campaign, enable it (1). You need to activate this option if you have previously set the Contact clicked on the link from the email trigger. But keep in mind that by default, link tracking is disabled because it may negatively affect your email deliverability.
If you have set the Contact opened email trigger previously, activate Enable open tracking option (2).
By default, the Stop for those who reply option (3) is ticked in the settings. It means that as soon as your prospects reply to your email, the campaign stops. If you want the campaign to continue for the prospect even if they reply, disable (untick) this option.

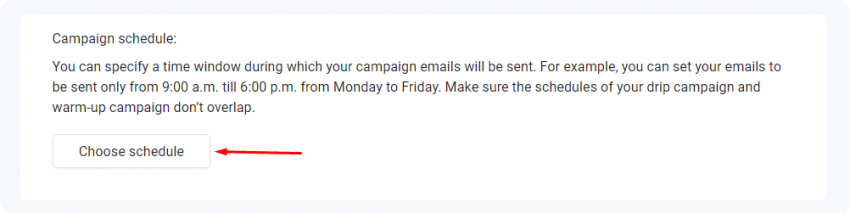
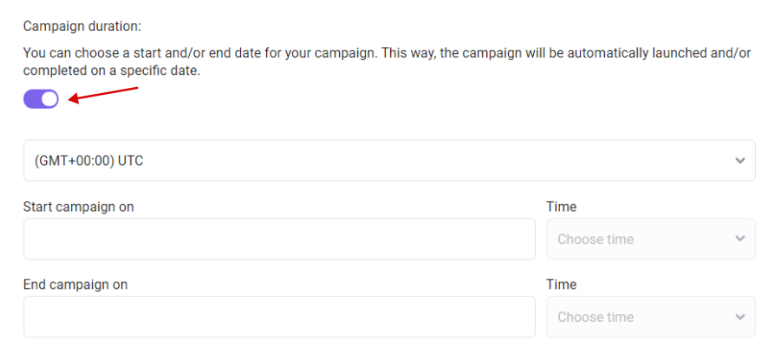
In addition, you can specify the day and time when you want your emails to be sent.
Likewise, you can choose the duration of your campaign.
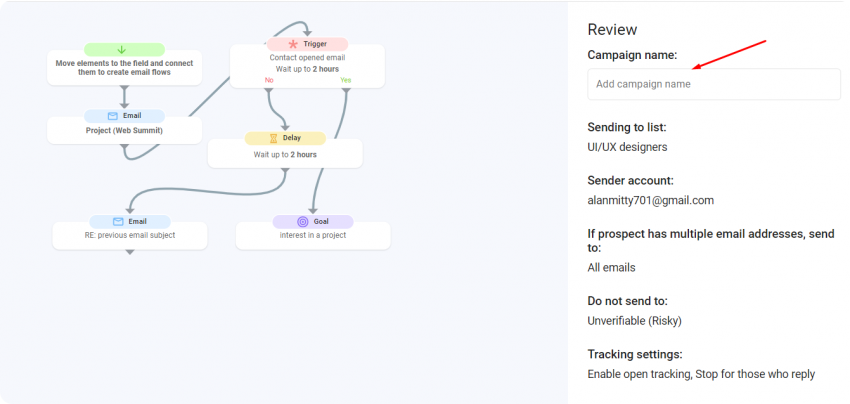
4.4. Review the campaign
As soon as you’ve done with the Prospects stage, click the Next button. Here you’ll see the preview of your campaign with all the campaign elements and connections between them.
You can name your campaign or use the default name that will be generated with the date and time.
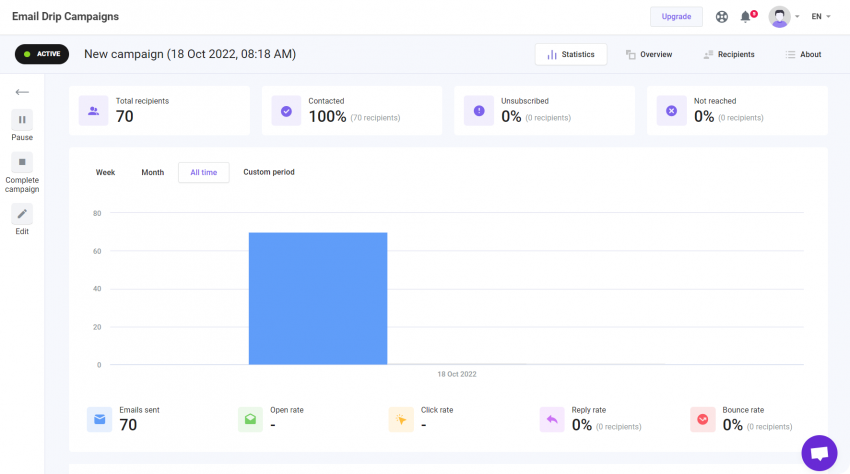
5. Launch the campaign and follow statistics
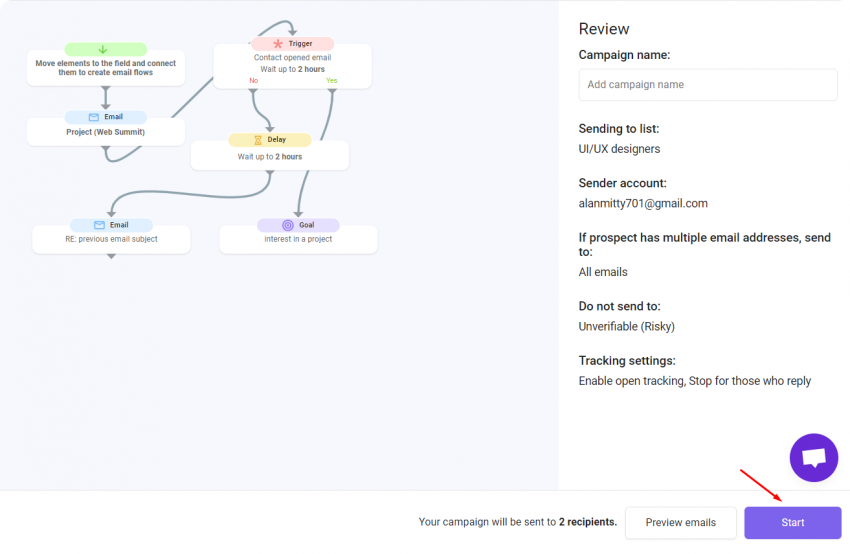
Once you’ve built your perfect campaign, there’s only one thing left – click Start and relax.
This will launch your campaign. You will be redirected to the Campaigns list, where you can follow the statistics for your campaign. Here you will also see all the basic information. Status shows whether your campaign is currently active, paused, finished, or new and unlaunched.
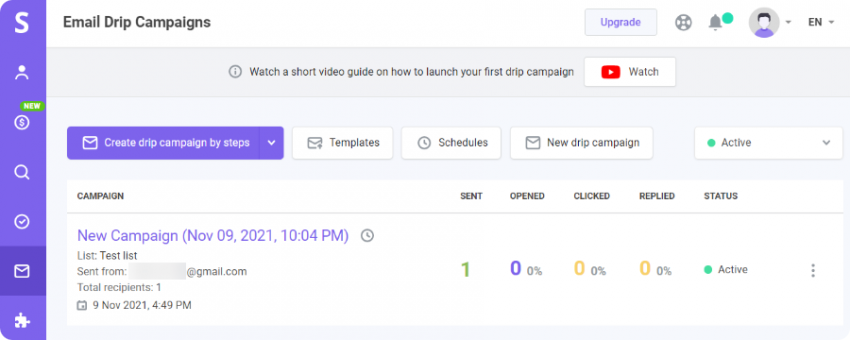
You can always see detailed statistics on opens, clicks, and replies in real time. You can also find out how many people have unsubscribed, how many emails haven’t reached the recipients, and detailed information on every email sent within the campaign, including how many clicks and replies they got. Simply go to the Campaigns tab and click on the campaign you are interested in.
Note: Need to track individual emails right from your Gmail? Tracking email opens and clicks right in your Gmail, scheduling follow-ups, setting reminders, and getting weekly statistics reports is easy with free, unlimited, signature-free Email Tracker from Snov.io.
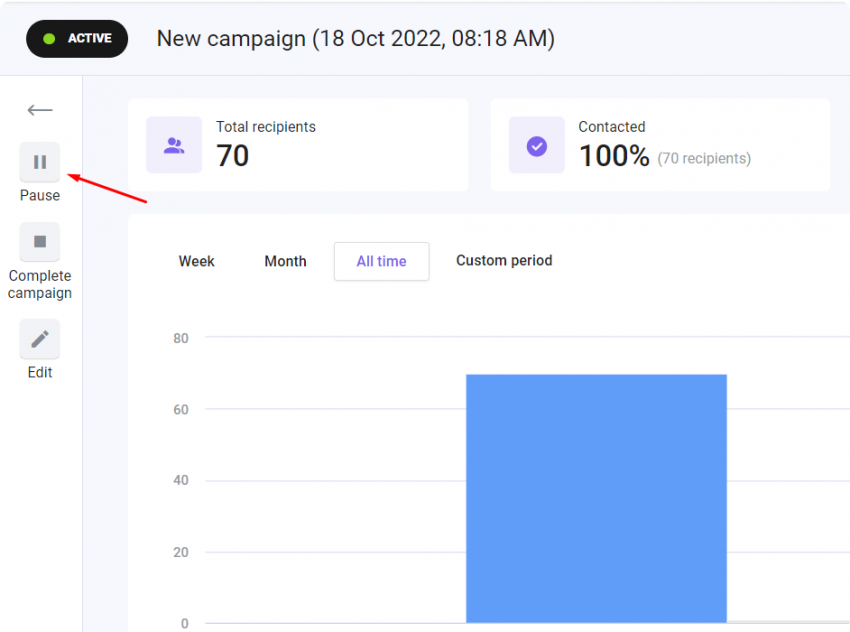
If the email account you’ve chosen for sending the campaign becomes invalid for any reason, your campaign will be paused, and you will receive an email notification. This can happen if you’ve reached the server send limit for the day or changed your email password. Once the problem is fixed, you can resume the campaign in the campaign window.
If necessary, you can edit your campaign even after it’s been launched. To do this, you will have to pause your campaign first. After all the edits, you can resume your campaign.
Final thoughts
Snov.io Email Drip Campaigns service is meant to help you automate outreach and make it easier to build and customize the campaigns, improving both the campaign rates and workflow.
But in the end, it’s only a tool, and the success of your campaigns depends solely on YOU. This is why we want to share some tips for you to make sure every campaign you send is perfect:
- Create a buyer persona. If you don’t know your target audience, you will never be to the point.
- Always personalize your emails. It’s been said before, but personalization is the closest to a magical solution when it comes to marketing.
- Always verify your emails. We’ll never stop repeating how important it is to maintain email hygiene.
Study in depth how successful campaigns are built and evolve your methods and approach with each campaign. Implement new ideas, but never forget the golden rules.
You have everything you need to build a great campaign. We hope you use the Snov.io Drip Campaigns tool to take your marketing to the next level. Many more features and updates are in the works.
Good luck and enjoy!


If only I could add my original email signature
Hi, Hesam! We’re excited to let you know that html emails will soon be available in drip campaigns, meaning you’ll be able to add your custom email signature!
How do we unsubscribe a email from our campaign or remove from campaign without removing from list?
Hi, Sysamone! Click on the Status button next to the recipient’s name and in the drop-down menu select Pause. You can find more details about this in our Knowledgebase article here.
Let us know if you have any more questions! 🙂
While reading this I just kept thinking why the hell are people still using bulk emails when personalized triggered emails are a thing??
Thank you, Dana, great article and an amazing tool too
Thanks, Mary!
We’re doing our best 🙂
Let us know if there are any other features you would like to see in our Drip Campaigns!
Thank you, guys, for this comprehensive guide!
It covers all the points of using your drip campaigns and it has become far easier for me to set one up!
Thanks, Jerald!
If you have any questions as for other tools, look through our knowledgebase.
Thanks for the guide, guys! The tool definitely seems much easier to understand now 🙂
Glad we could help, Mitchell! Let us know if you ever have any questions or issues by contacting our Customer Care team at help@snov.io or via the live chat.
any more features coming soon?
Surely, Judi!
We are currently working on the Team Work feature, integrations with numerous CRMs, and some other exciting features.
If there’s something definite you’d like to see in our tools, you are most welcome to share your ideas here.
Stay tuned for updates!
thank you snov
What a comprehensive guide!
Sending one email campaign as one thread would be great. Hope to see this feature soon!
Thanks, Linda!
That’s simply amazing but you can send emails as one thread. Read more about this feature in our Knowledgebase.
thanks for collecting all this in one place
Thax, Ferne. We are glad to be helpful 😊
Hi! We are a team of volunteers and starting a new project in a community in the same niche.
Your blog provided us some valuable information to work on. Thank you!
Effie, we are glad to be supportive of you! If you have any questions, we are always here to help you ✌️