In this guide, you'll learn how to connect an SMTP account in Snov.io using your SMTP credentials and server settings.
In Snov.io, you can connect your own email accounts via SMTP settings and start cold email automation through your email provider's or custom servers.
This allows you complete control over your sender account's performance.
The process of creating a custom SMTP sender account in Snov.io involves the following steps:
1) Get your SMTP credentials and server settings
2) Add a new email account in Snov.io
3) Enter SMTP and IMAP settings
1) Getting your SMTP credentials and server settings
When setting up an SMTP account, you will need to provide your SMTP username and password.
Below, we will explain the terminology used in this article so that you can understand what kind of information is needed.
| Terminology | Explainer |
| SMTP/IMAP username | The SMTP username is the login or email address associated with your email account and is used to authenticate with the SMTP server.
Typically, the SMTP/IMAP username is the same as your email address, but it can also be a different username you selected while creating your email account. |
| SMTP/IMAP password | The SMTP/IMAP password is the password used to log in to your email account. |
| SMTP/IMAP Host | The Host is the server address. For example, smtp.gmail.com.
You can find it in your email account settings or by checking your provider's help center. |
| SMTP/IMAP Port | Port refers to the specific port number used for SMTP/IMAP communications.
The most commonly used ports are:
|
Make sure to use the correct SMTP credentials and server settings for Snov.io to authenticate to your email account and guarantee successful sending of your campaigns.
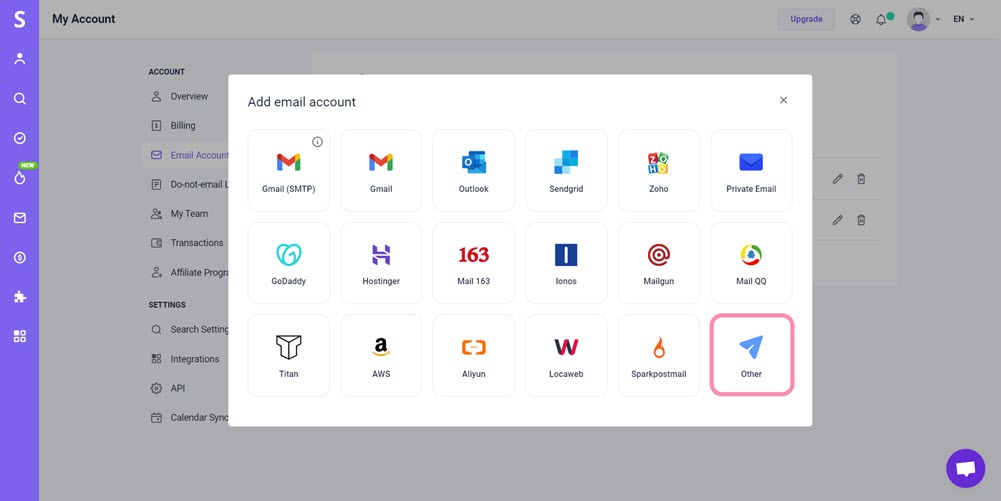
2) Configuring a new email account
In the second step, you'll need to enter your SMTP and IMAP information on the email account settings page.
- Go to the Email Accounts page.
This page will display a list of all the email accounts that you have connected to Snov.io.
- Click the Add email account button.
- If you provider is not on the list, choose Other (SMTP)
3) Enter SMTP and IMAP settings
 Entering SMTP settings
In the SMTP section, enter your SMTP credentials and the server settings for sending emails.
Refer to the explainer table below for guidance on the information you need to enter in each mandatory field.
SMTP credentials:
| Field | Explainer |
| (1) From name | This is your sender name.
Enter your name or company name to be displayed in the 'From' field when your recipients receive your email. |
| (2) From email | This is the email address you will be sending emails from. Enter your SMTP username here.
To set your alias address as the From email, follow these steps:
Please note that you can only add alias addresses that are associated with your primary email account to the From email field. |
| (3) Password | Enter your SMTP password here. |
SMTP server settings:
Snov.io connects to your provider's SMTP server to send emails to your recipients.
| Field | Explainer |
| (4) Host | Enter the SMTP host that matches your email account's default settings. |
| (5) Port | Select the SMTP port that matches your email account's default settings. |
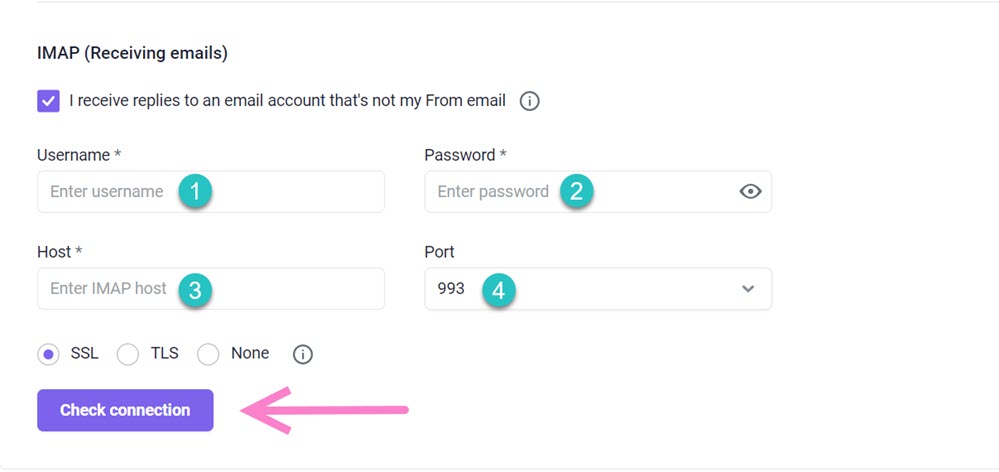
Entering IMAP settings
In the IMAP section, enter the server settings for receiving emails.
The IMAP server is responsible for tracking incoming responses and letting Snov.io to log them into the email campaign statistics.
Typically, your IMAP credentials are the same as your SMTP credentials, so there's no need to enter them again here.
However, if you want to connect to another IMAP server, enable the "I receive replies to an email account that's not my From email" option.
You can connect to another mailbox that receives responses by entering IMAP credentials for that email account.
IMAP credentials:
| Field | Explainer |
| (1) Username | Enter your IMAP username. |
| (2) Password | Enter your IMAP password. |
IMAP server settings:
| Field | Explainer |
| (3) Host | Enter the IMAP host. |
| (4) Port | Select the IMAP port from the dropdown list. |
Attention: Adding IMAP settings is optional, but if you don't add them, your email account will be connected conditionally.
As a result, Snov.io will not be able to track responses to emails sent from this email account and reply statistics may be inaccurate.
Read more about conditional connection here ⇒
4) Check connection
Complete your email account setup by testing the connection after entering all required settings.
Click the Check connection button.
Snov.io will send you the test email with the subject "Testing your new email with Snov.io" confirming the successful connection.
Click Add account to save it.
5) Set your daily sending limit
You can set how many emails this email account sends per day.
After reaching the Messages per day limit, it will stop sending emails and continue the next day.

You can also adjust the Delay between emails. This represents the interval in seconds between each email sent in your campaigns.
Learn more about daily sending limits in Snov.io -->
What's next:
Check other optional email account settings to improve your email performance.
After connecting your SMTP email account to Snov.io, you can select it as a sender for your email campaign.


Sorry about that 😢
How can we improve it?