Snov.io Campaigns lets you build your email sequence once and run it automatically. Once you set emails, delays, and schedule, the campaign runs on its own. You can also add LinkedIn steps to your sequence to reach people on both channels. This guide walks you through your first campaign from start to launch.
Step 1: Build your email sequence
Step 3: Configure sending settings
Step 1: Build your email sequence - start simple
For your first campaign, we recommend starting with a simple sequence instead of a complex sequence with conditional triggers and LinkedIn actions. It’s easier to manage and troubleshoot, and you can add more steps later.
To get started, go to Campaigns in your Snov.io account and click + New campaign.
You'll see a visual sequence builder. Add email steps and delays in the order you want them to send.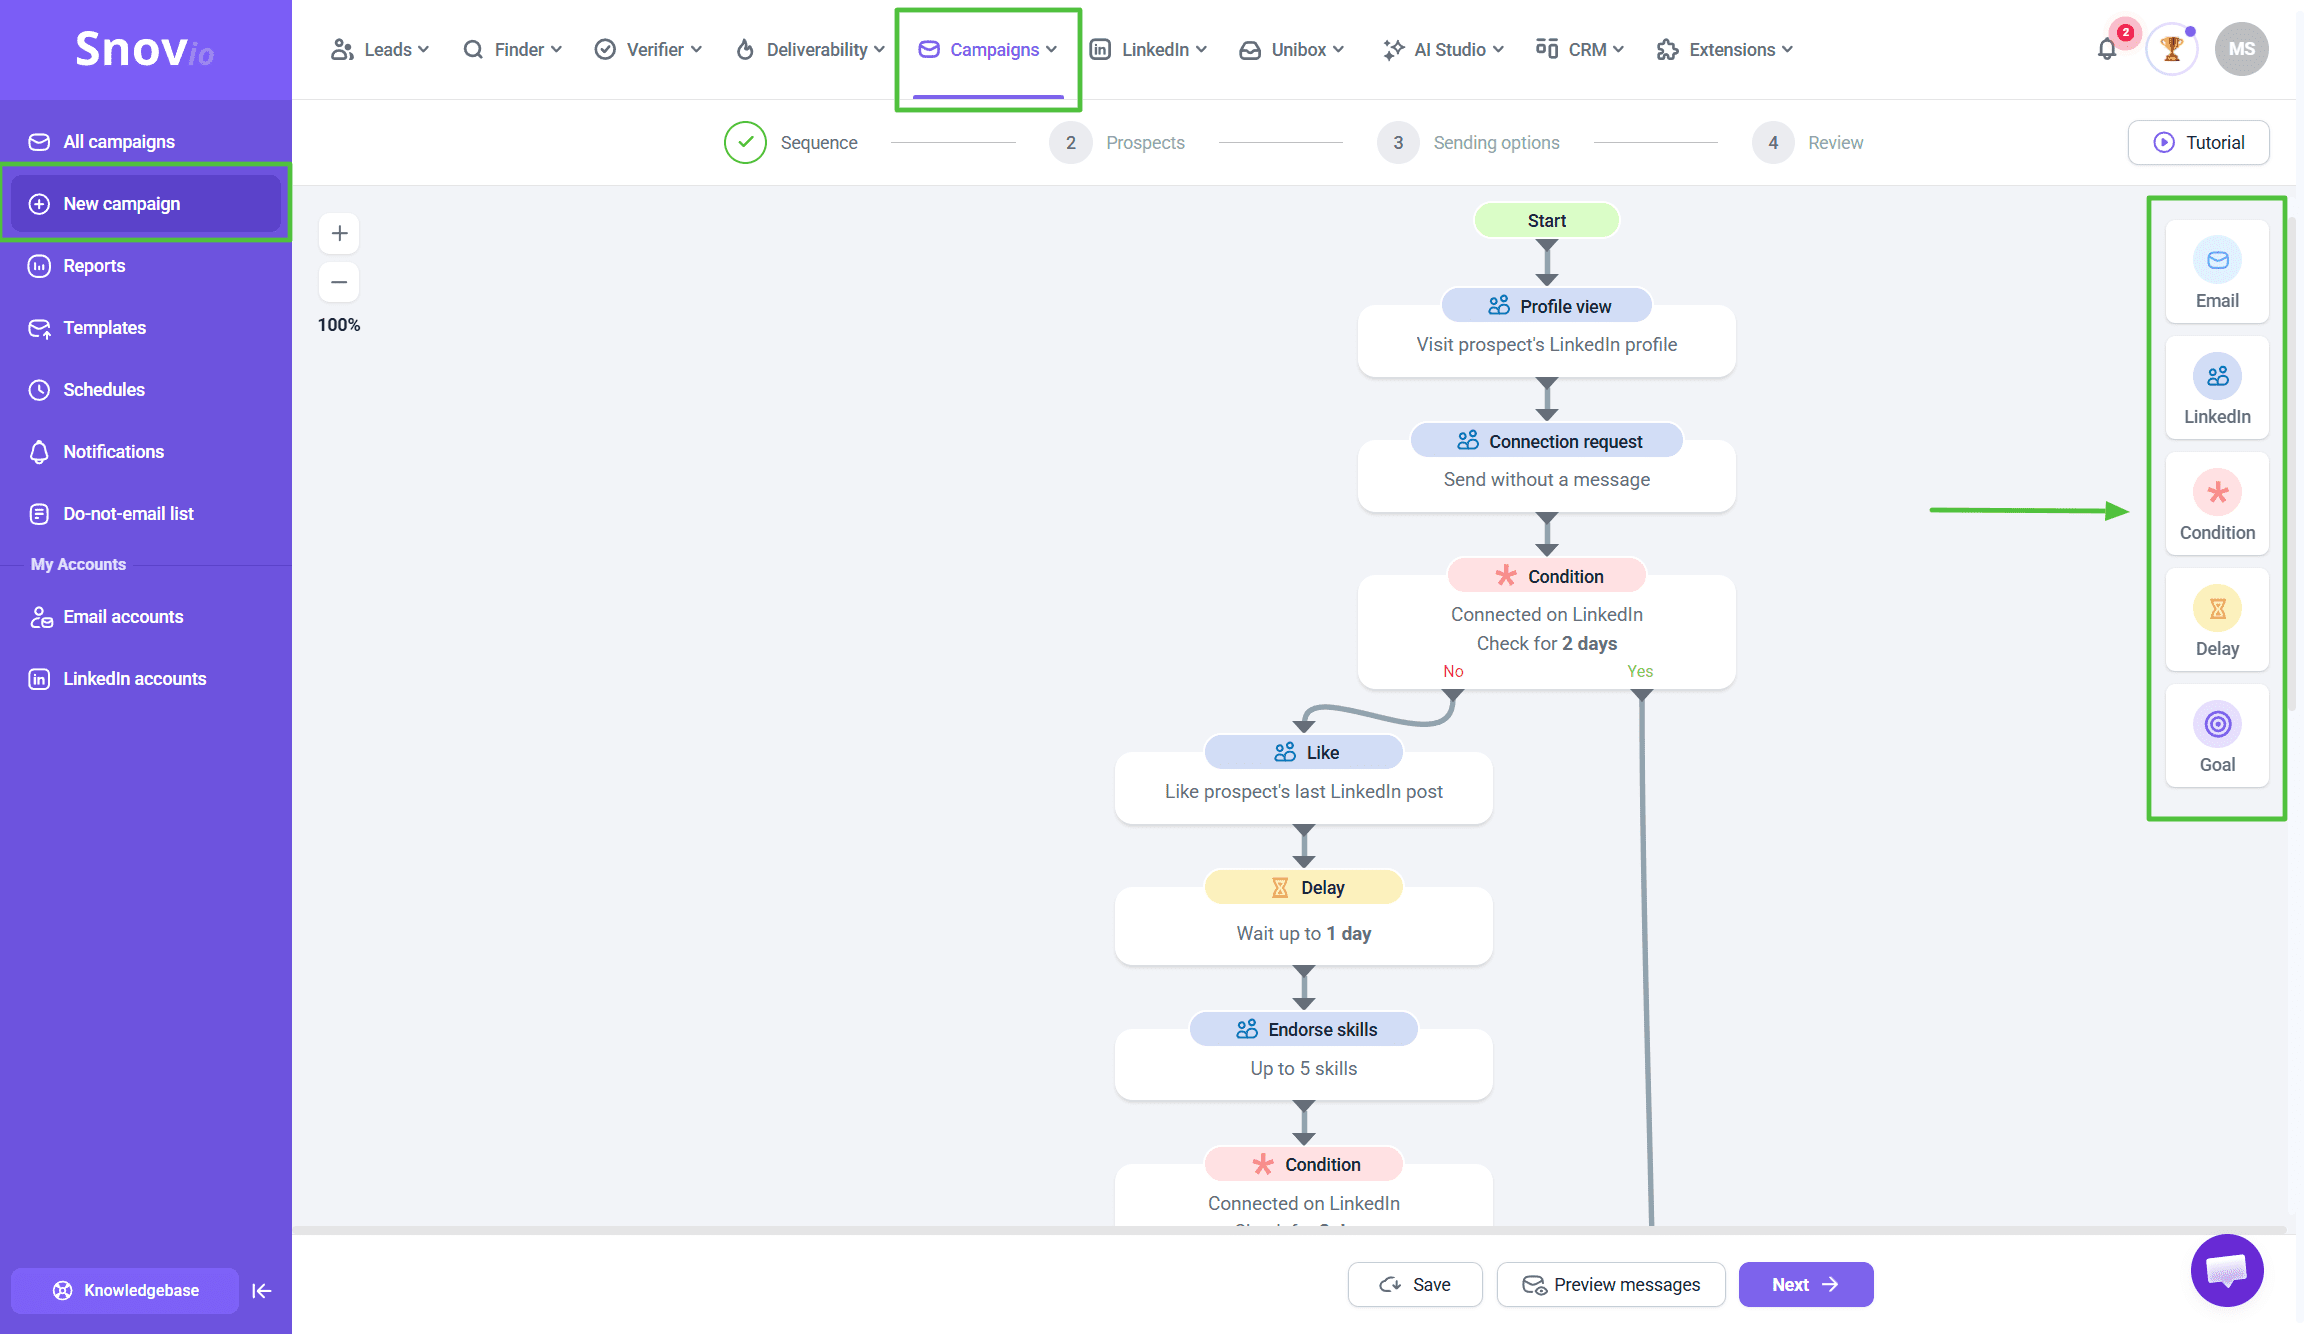
Add your first email
Click the Email element (or drag it onto the canvas) to open the Email editor. Write your message here. Sequence elements:
1) Email: Add dynamic personalization to make it more relevant for your recipients.

For higher engagement, send targeted emails highlighting specific benefits and value.
2) LinkedIn: Add LinkedIn actions to the sequence to automatically contact prospects on LinkedIn. You'll probably want to skip this for your first campaign and add it later once you're comfortable with the flow.
3) Condition: Set up different follow-ups based on what a recipient did: opened your email, clicked a link, or booked a meeting.
4) Delay: Set waiting times between emails.
Add delays of 2-4 days between your follow-up messages to avoid overwhelming recipients while gradually building their interest.
5) Goal: Use this to close the sequence and segment leads by how they engaged throughout.
Need help writing emails?
Use Snov.io's AI Studio to generate drafts. Go to AI Studio → Click the button Build my email → Select your product and audience → Add your unique selling points (USP) → Generate drafts.
Add your follow-up emails
Click Email again to write your follow-up.
A follow-up should:
- Reference the previous email briefly
- Add new information or angle
- Keep same CTA or offer alternative
Sequence stops automatically on reply
By default, when someone replies, Snov.io stops sending them follow-ups automatically. You don't need to configure anything.
This prevents awkward situations where someone replies to your first email but still receives your second email asking if they saw the first one.

Recommended first sequence:
- 1 initial email + 1-2 follow-ups = 2-3 emails total
- Delays between emails: 2-4 days
- Just emails, no conditional triggers or LinkedIn actions yet
Keep it short. If your email needs scrolling to read, it's probably too long. Two to three short paragraphs is a good goal.
Step 2: Add recipients
Choose which list to send this campaign to. Click List name dropdown → Select your list.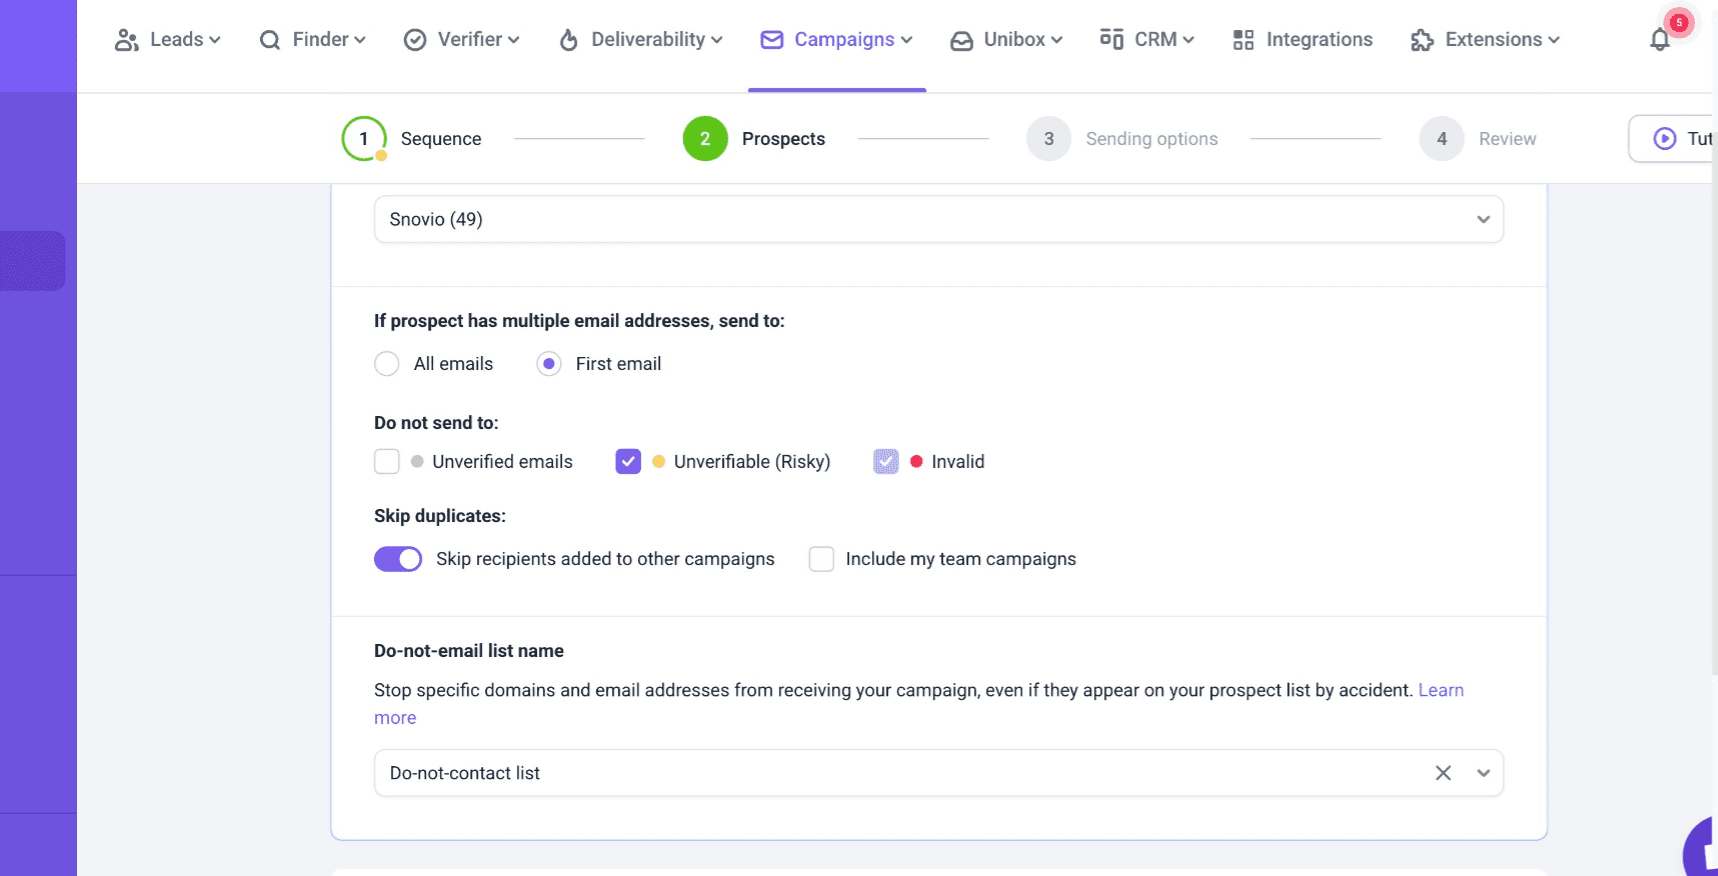 For your first campaign: We recommend starting with 100-200 prospects. A smaller list is much easier to manage: replies are easier to handle personally, results are faster to read, and if something needs fixing, it's a smaller problem to fix. You can always add more prospects later.
Skip duplicates
We also recommend enabling this option. It saves your daily sending limit and removes prospects who are already active in another campaign. It protects you from accidentally sending the same person two different sequences at once.
Turn this on before launching. You can't change it after the campaign starts.
Filter out invalid emails
Under Do not send to, enable both options:
- Don't send to unverified emails
- Don't send to invalid/risky email status
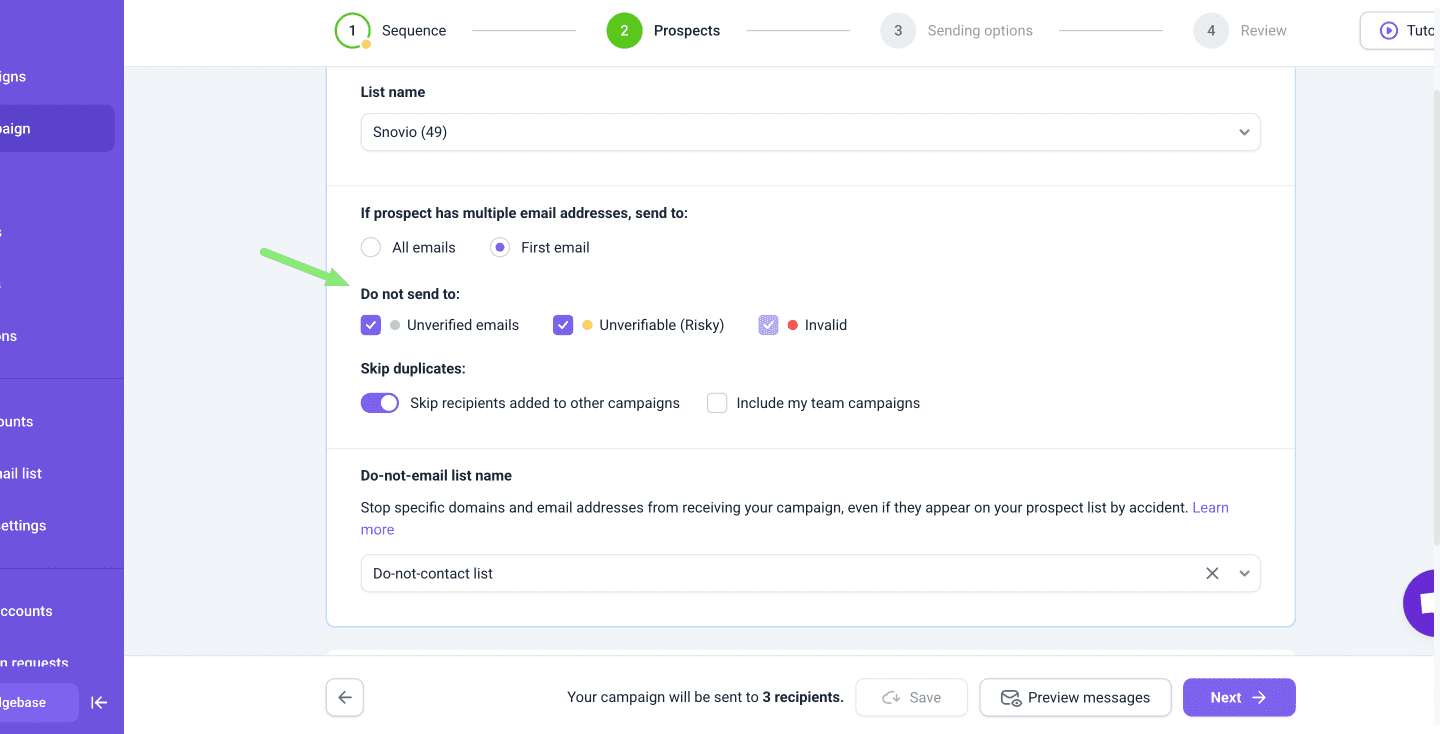 Why this matters: Sending to invalid emails creates bounces. Bounce rate over 5% is risky for your sender reputation. Future campaigns are more likely to land in spam regardless of content quality.

Snov.io will automatically pause a campaign if the bounce rate reaches 15% to protect sender reputation.
If your list isn't verified: Go to Leads page → Select list → Click Verify emails → Remove invalid emails → Return to campaign setup.
Handle other missing personalization data
If a prospect is missing data for variables (like First Name), Snov.io moves them to the To Check list.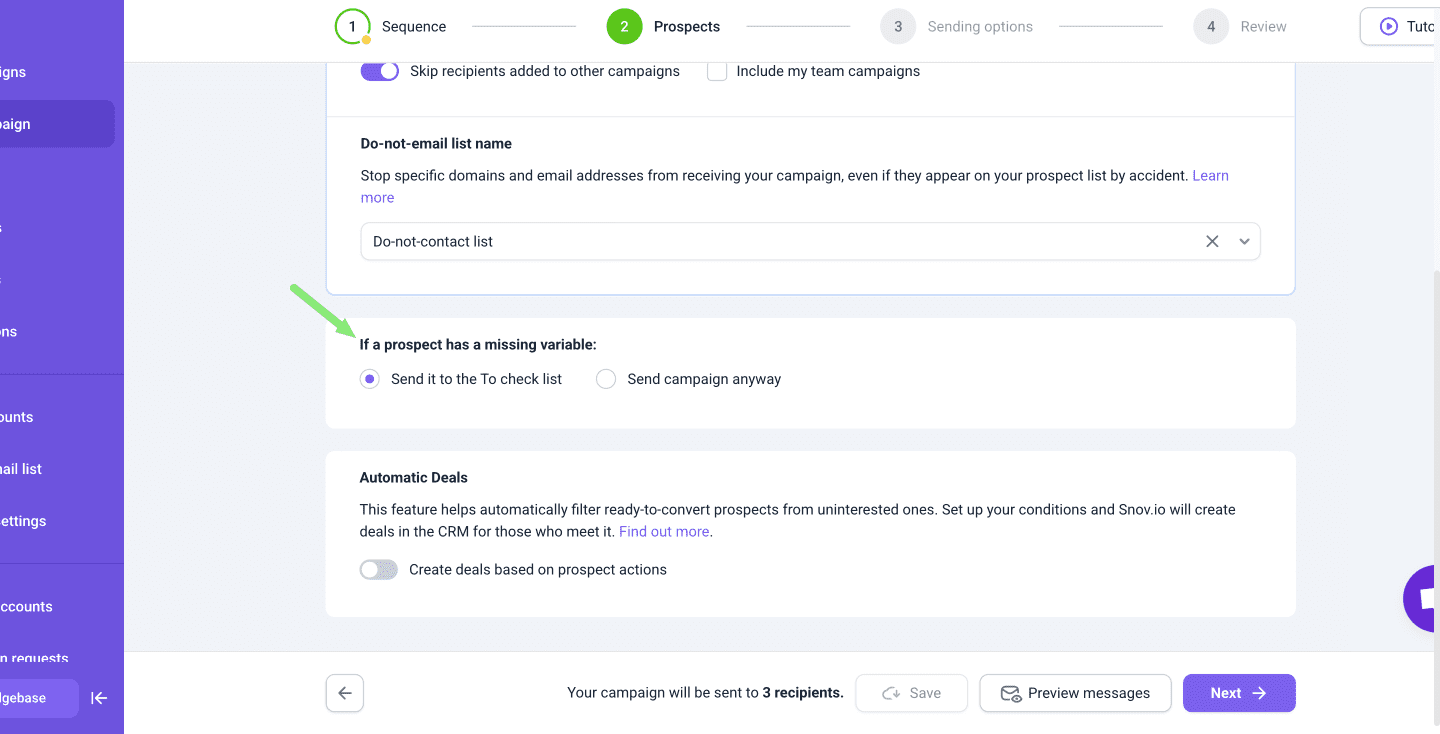 You can:
1: Add fallback text. If {{First Name}} is missing, use "Hi there" instead.
2: Skip prospects with missing data entirely.
For the first campaign, we suggest adding fallbacks. Don't skip prospects just because their first name is missing.
Learn how to add fallbacks to variables.
Step 3: Configure sending settings
Choose which email accounts send your campaign, set tracking, and configure schedule.
Select sender accounts
Click Add email account→ Choose your connected email account(s).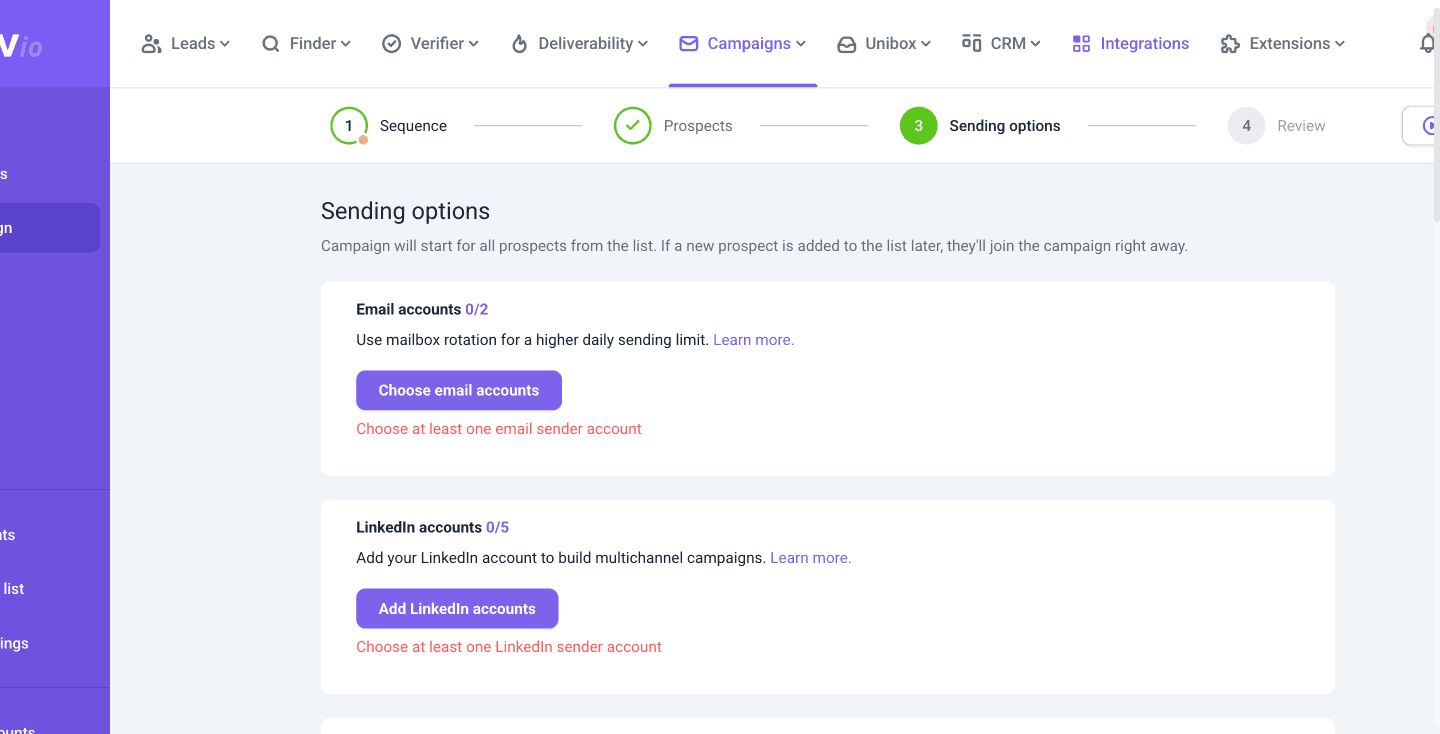 For your first campaign, start with one sender account. Add mailbox rotation later once you are ready to scale your volume.
Make sure your sender account has:
- Completed warm-up (required for any new email account)
- DNS (SPF, DKIM, DMARC) records configured correctly
- A daily sending limit that fits your list size
To check the daily limit: go to Email Accounts → Click the account → See Daily sending limit.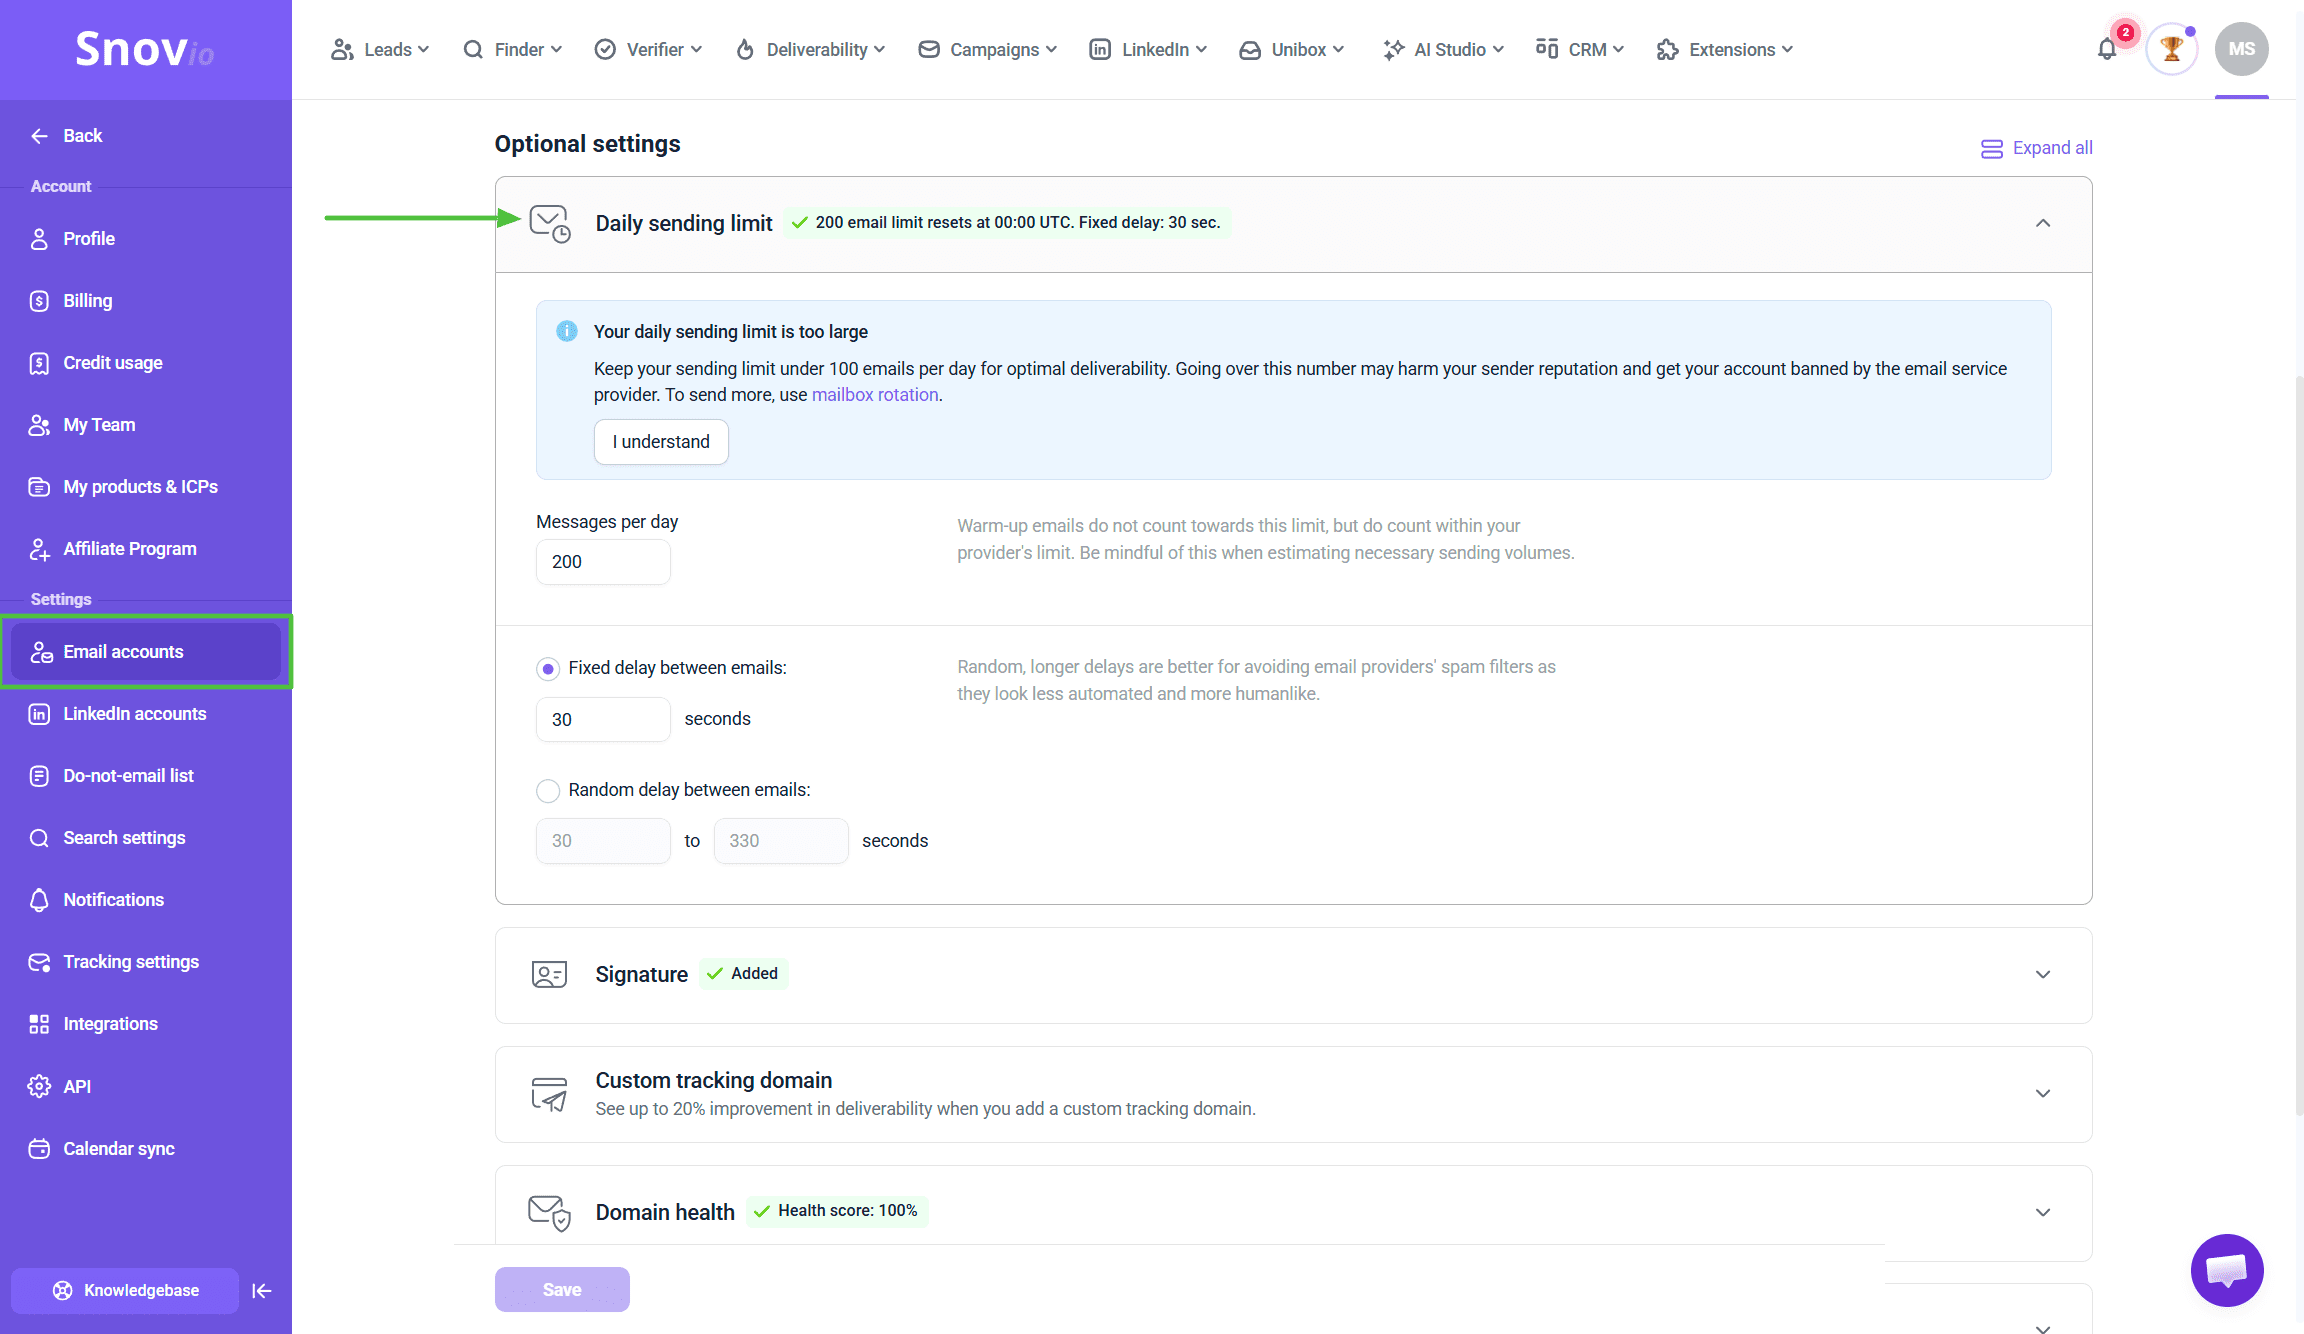
The recommended daily limit for cold sales emails is 15-30 emails per day. Sending more than 50 emails per day is considered risky, even for warmed-up accounts with a good reputation.
Set up tracking
Track opens: Shows when prospects open your emails.
Track clicks: Shows when prospects click links in your emails.
Turn both ON for your first campaign. You need this data to see what's working.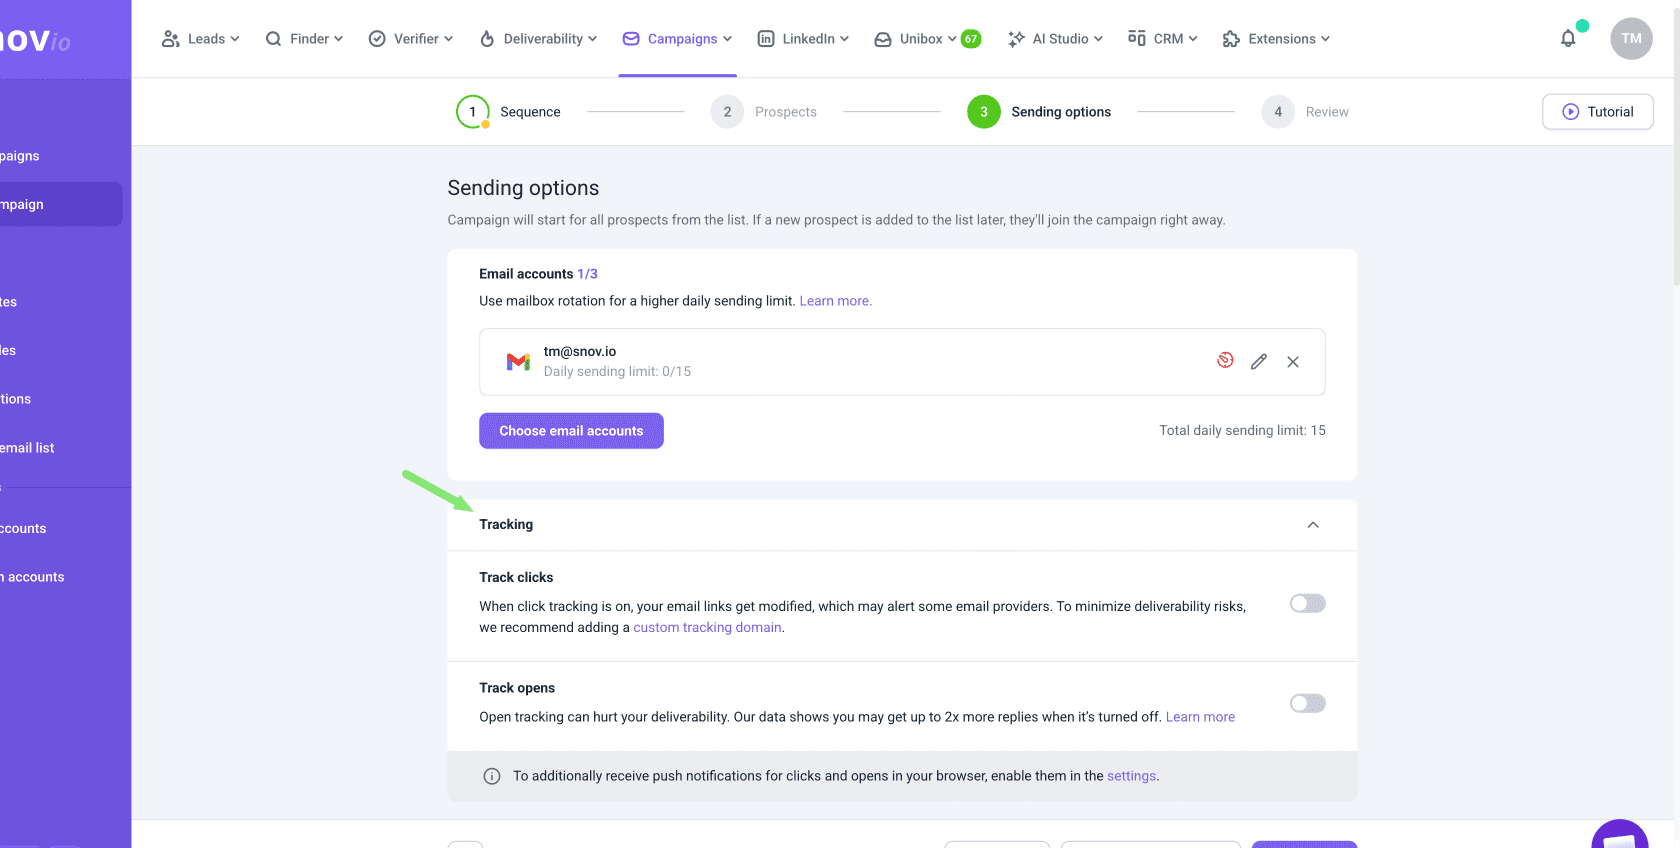 Also, use a custom tracking domain if possible. Shared tracking domains carry slightly more deliverability risk.
If you haven't set up a custom tracking domain yet, tracking still works.
→ How to set up custom tracking domain
Set your schedule
Click Schedule, then create a new schedule or use an existing one.
We recommend setting:
Active days: Monday-Friday (for B2B outreach)
Active hours: 9 AM - 5 PM in recipient's timezone, not yours
Timezone-based scheduling means each person gets your email at a normal time in their day. It makes a real difference to open rates when your list includes multiple countries or regions.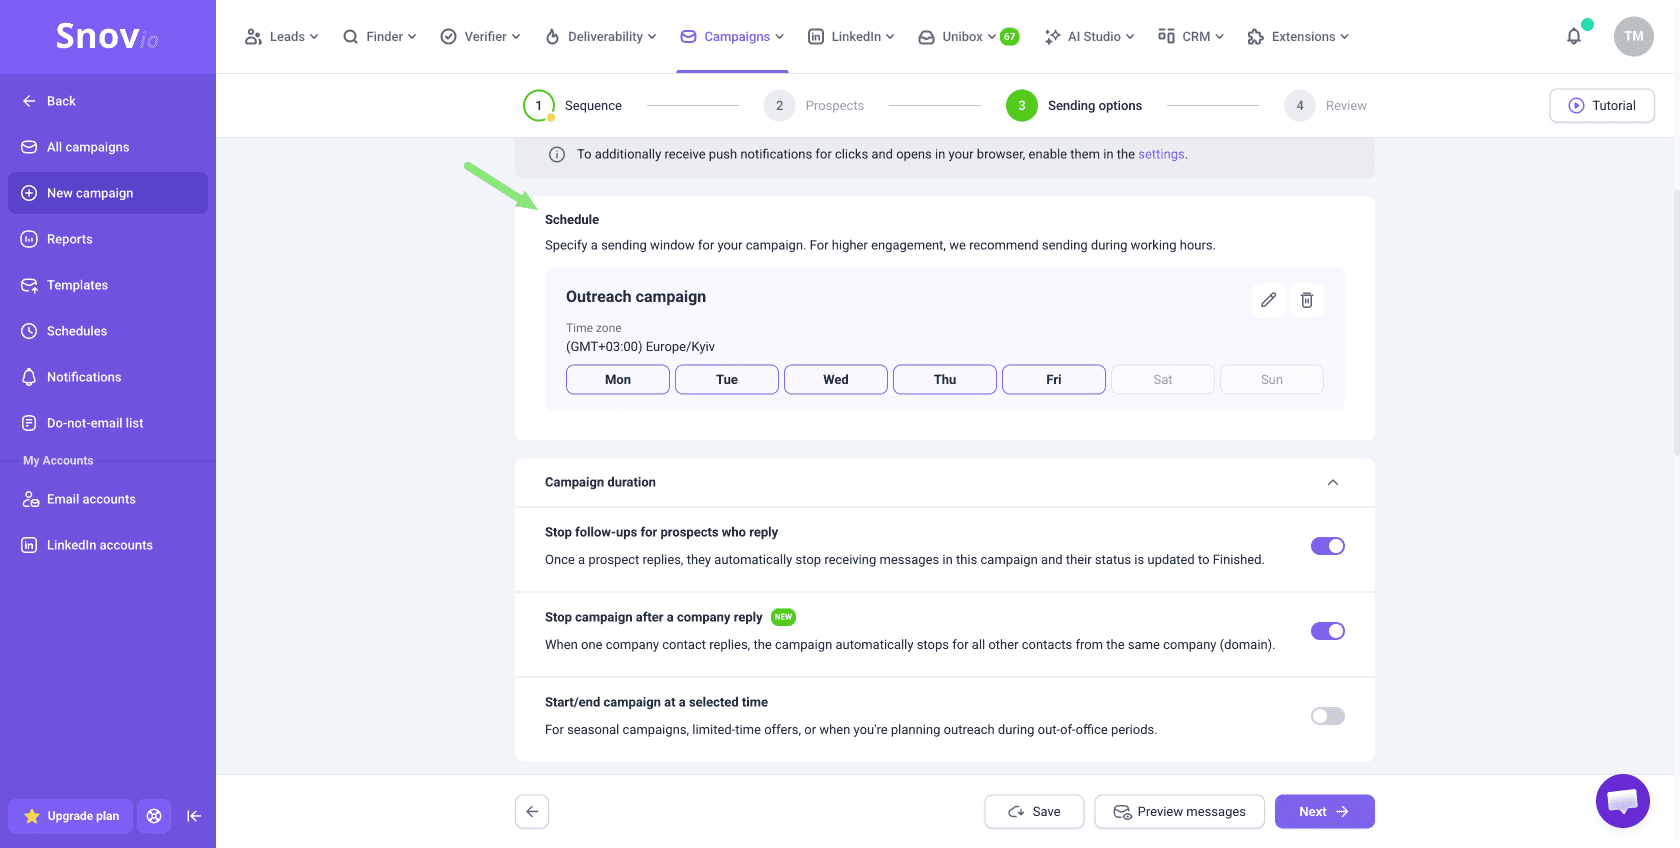 Schedules also make your sending pattern look natural, which helps deliverability.
Advanced settings (optional)
When you’re running multiple campaigns at the same time, these options become useful:
Campaign priority: Set which campaigns send first.
New recipients daily limit: Control how many new prospects enter sequence per day.
Provider matching: Routes Gmail senders to Gmail recipients, Outlook to Outlook (improves deliverability at higher volumes). For your first campaign, you can skip advanced settings. Default configuration works fine for beginners.
Step 4: Review your setup
Before clicking Start, verify everything is set up correctly.
Pre-launch checklist (click here)
Click Preview messages → Send test to your email → Check if everything displays correctly.
Click every link in your test email. Make sure they go to the correct pages.
Test email should show your actual first name, not "{{First Name}}". If you see brackets and variable names, something's wrong with your personalization setup.
Check test email in both if possible. These are the most common email clients prospects use.
If using a new email account, run warm-up for 2-4 weeks first. Don't skip this.
Check that the list was verified and invalid emails were removed.
Verify the schedule is set for business hours in the recipient timezone.
Step 5: Name and launch
Give your campaign a clear name you'll recognize later.
Something like "Q1 Partnership Outreach - SaaS" or "Event Invite - Healthcare Q2" tells you exactly what it is when you're looking at a list of ten campaigns. Something like "Campaign 1" or "Test" tells you nothing.
Review everything one more time: the sequence, the list, the settings, the schedule. When everything looks good, click Start.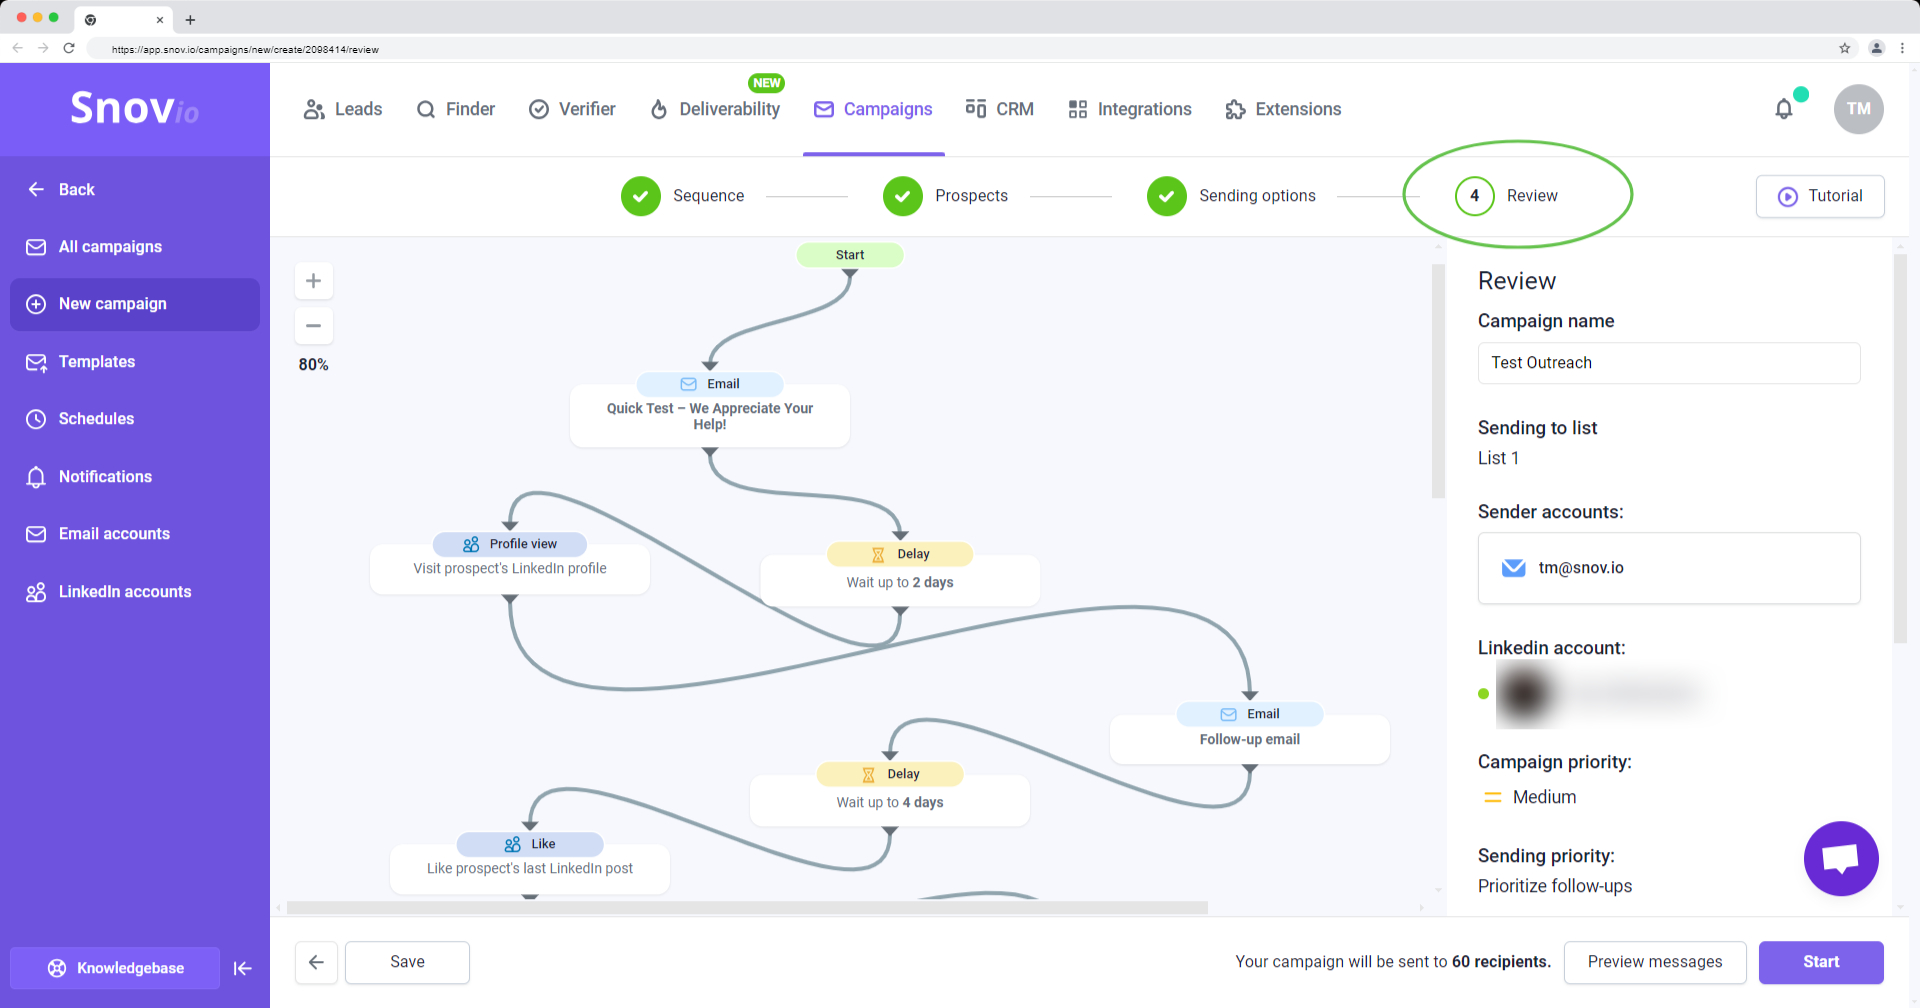 The campaign status changes to Active, and Snov.io starts sending according to your schedule and daily limits.
Common mistakes
| Mistake | What happens | Fix |
|---|---|---|
| Starting with complex sequences | You build a 5-email sequence with conditional triggers, LinkedIn actions and advanced settings. It gets confusing fast and becomes hard to troubleshoot. | Start simple. Use one initial email and one or two follow-ups first. |
| Not testing before launch | You launch to real contacts and discover broken links, missing variables or formatting errors after emails are already sent. | Always send test emails to yourself first. Check links, variables and formatting in Gmail and Outlook. |
| Judging results too early | You panic after one day of low numbers and change everything before the sequence has fully run. | Wait at least 3-5 days before evaluating performance. |
| Using unverified lists | High bounce rates can auto-pause campaigns and damage sender reputation for weeks. | Verify every list before sending and re-check older lists regularly. |
| Writing long, complex emails | Long emails with too many features or CTAs often get ignored or deleted. | Keep emails short. Use 2-3 short paragraphs and one clear ask. |
| No clear CTA | Recipients may read the email but not know what to do next. | End every email with one clear next step or question. |
| Giving up after one campaign | You assume outreach does not work after weak first results and stop improving. | Treat the first campaign as a learning campaign. Improve with every new campaign. |
Still have questions? Contact support at help@snov.io or via live chat.


Sorry about that 😢
How can we improve it?