TL;DR:
SPF, DKIM, and DMARC are essential email authentication protocols that protect your domain from spoofing and help mailbox providers verify that your emails are legitimate.
- SPF specifies which servers can send emails on behalf of your domain.
- DKIM adds a digital signature to confirm that messages haven’t been altered.
- DMARC brings SPF and DKIM together and tells receiving servers what to do with emails that fail authentication: monitor them, send them to spam, or reject them.
You can check your SPF, DKIM, and DMARC setup through Gmail, command-line tools, MxToolbox, or an email deliverability test.
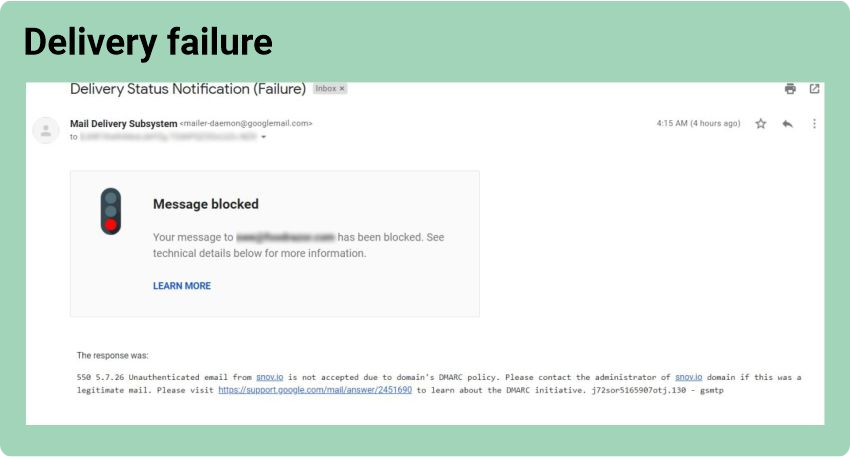
Bounces and a high spam complaint rate can hurt your sender reputation and email deliverability, and can even lead ISPs to block you. One reason your emails may be marked as spam is incorrect configuration of DMARC, DKIM, and SPF records.
Meanwhile, according to Snov.io’s 2026 report, proper email authentication correlates with stronger campaign performance:
- DMARC-valid campaigns achieve a 20.11% open rate vs. 17.31% without DMARC.
- DKIM-valid campaigns see a 1.58% click rate vs. 1.23% without DKIM.
- SPF-valid campaigns follow the same pattern, generating more opens, clicks, and replies.
Read on how to configure these records correctly to ensure strong email performance and higher deliverability.
What do SPF, DKIM, and DMARC stand for?
Let’s start off with clearing up some terms.
When reading SPF, DKIM, and DMARC definitions, you will notice DNS being mentioned a lot. DNS (Domain Name System) is a repository of domain names (example.com) and their corresponding IP addresses (111.222.333.444). Each domain can have more than one IP address, for example, a subdomain or domain mail server will have different IPs.
To set up SPF, DKIM, and DMARC, you need access to DNS. Usually, your company’s system administrators or, in some cases, developers can help you with it.
SPF helps prevent spoofing by verifying the sender’s IP address
SPF (Sender Policy Framework) is a DNS record that specifies which servers are allowed to send email from a specific domain (for example, snov.io).
With it, you can verify that messages coming from your domain are sent by mail servers and IP addresses authorized by you. This might be your email servers or servers of another company you use for your email sending.
If SPF isn’t set, scammers can take advantage of it and send fake messages that look like they come from you.
It’s important to remember that there can be only one SPF record for one domain. Within one SPF record, however, there can be several servers and IP addresses mentioned (for instance, if emails are sent from several mailing platforms).
DKIM shows that the email belongs to a specific organization
DKIM (DomainKeys Identified Mail) is another technical standard that helps identify fake email addresses, fight against spam, and prevent spoofing and identity theft.
DKIM adds a digital signature to the header of your email message, which email servers then check to ensure that the email content hasn’t changed. Like SPF, a DKIM record exists in the DNS.
DMARC aligns SPF and DKIM mechanisms
DMARC (Domain-based Message Authentication, Reporting & Conformance) defines how the recipient’s mail server should process incoming emails if they don’t pass the authentication check (either SPF, DKIM, or both).
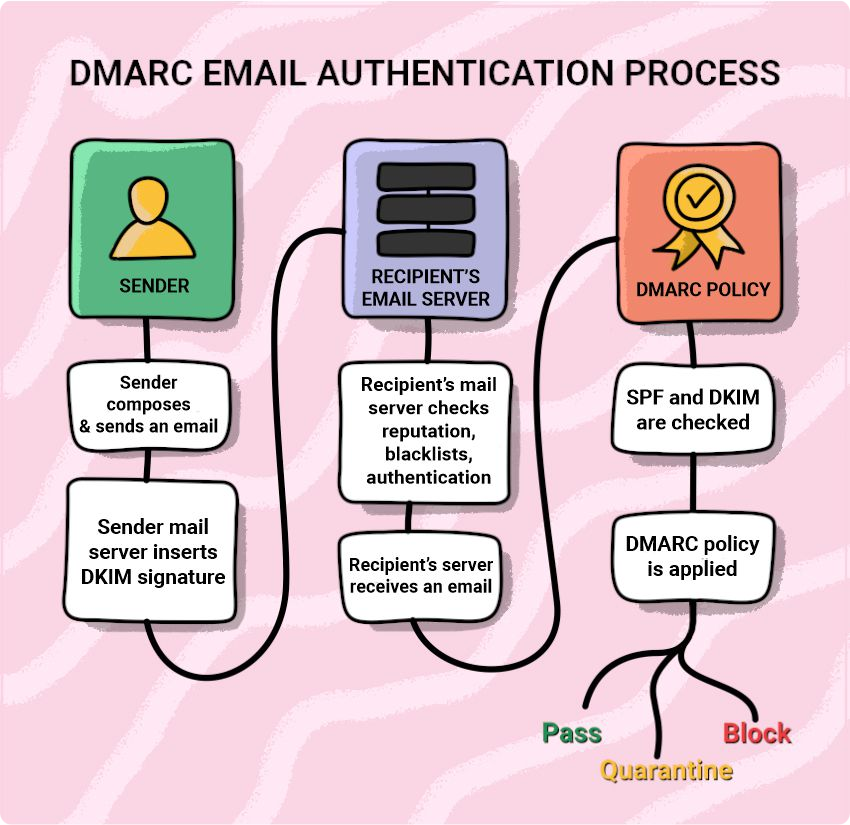
Basically, if there’s a DKIM signature, and the sending server is found in the SPF records, the email is sent to the recipient’s inbox.
If the message fails authentication, it’s processed according to the selected DMARC policy: none, reject, or quarantine.
- Under the “none” policy, the receiving server doesn’t take any action if your emails fail authentication. It doesn’t impact your deliverability. But it also doesn’t protect you from scammers, so we don’t recommend setting it. Only by introducing stricter policies can you block them in the very beginning and let the world know you care about your customers and brand.
- Here, messages that come from your domain but don’t pass the DMARC check go to “quarantine.” In such a case, the provider is advised to send your email to the spam folder.
- Under the “reject” policy, the receiving server rejects all messages that don’t pass email authentication. This means such emails won’t reach an addressee and will result in a bounce.
The “reject” option is the most effective, but it’s better to choose it only if you are sure that everything is configured correctly.
Now that we’ve clarified all the terms, let’s see how you can check if you have an existing SPF record, DKIM record, and DMARC policy set in place.


How to check DKIM, SPF, and DMARC via Gmail
Option 1
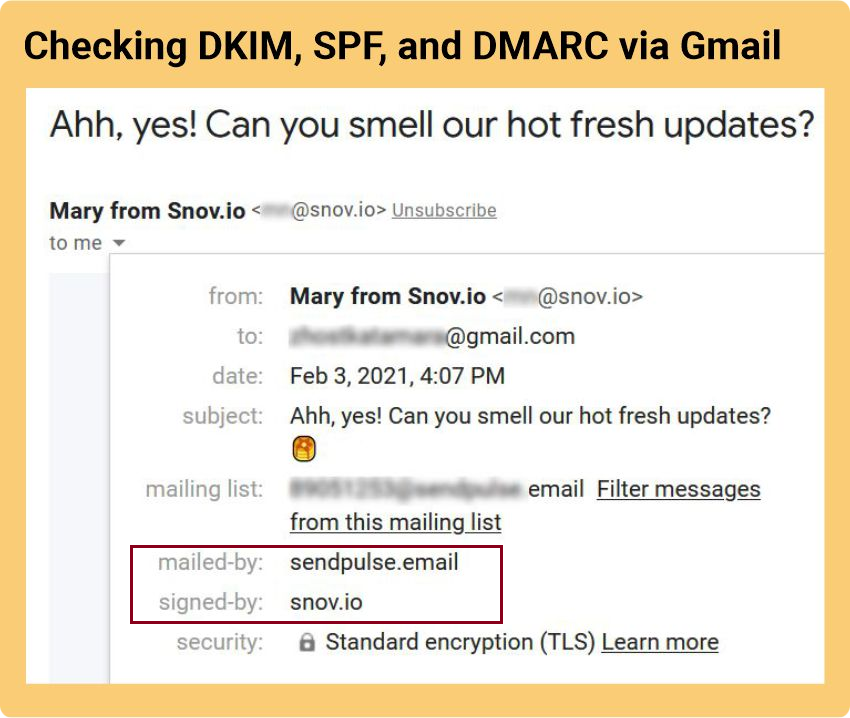
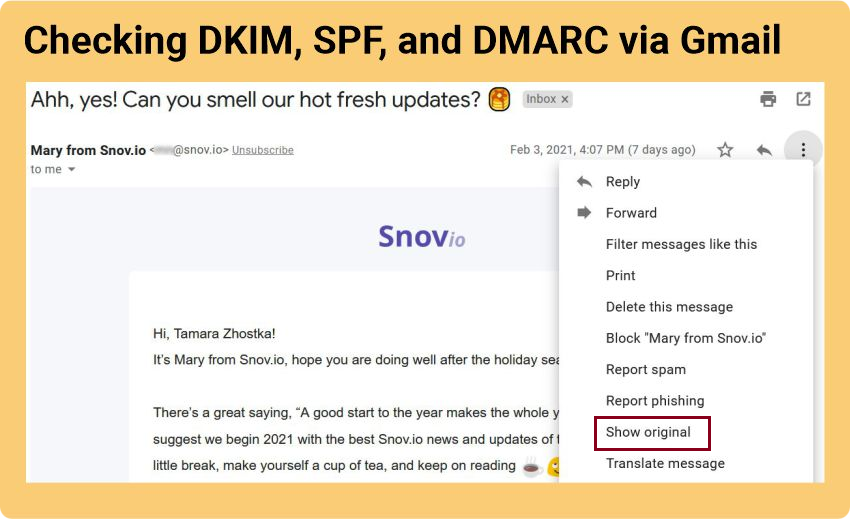
Send a test email to your address and then open the message. Click “Show details.” If you see a “mailed-by” header with the domain name and a “signed-by” header with the sending domain, your DKIM and SPF are fine.
Option 2
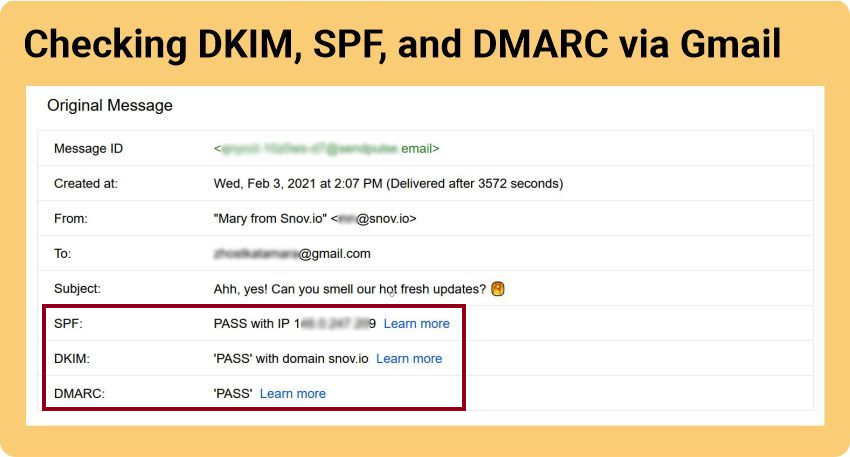
If you go to “Show original,” you can see more information on SPF, DKIM, and DMARC.
Done!
How to check DKIM, SPF, and DMARC via command line
Now let’s look at how you can check SPF, DKIM, and DMARC records in Windows through the command line. For Mac users, the process is a bit different; verification is done through the Mac OS Terminal.
SPF record check
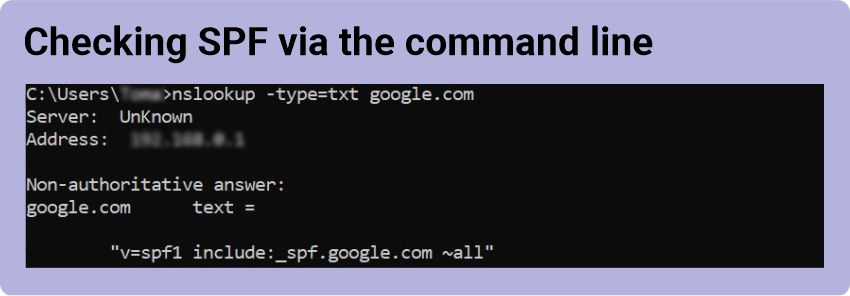
You can check your SPF record using nslookup — a default query tool that provides the user with a command-line interface to access the DNS.
- Open the command line (Start > Run > cmd).
- Enter “nslookup -type=txt” followed by a space and a domain or hostname, for example, “nslookup -type=txt google.com”.
- If an SPF record exists, the result will be something like this: “v=spf1 include:_spf.google.com ~all”.
- If there are no results or no “v=spf1”, then there is a problem getting the record for the domain, or it doesn’t exist.
How to read SPF correctly
- The “v=spf1” part shows that the record is of SPF type (version 1).
- The “include” part lists servers allowed to send emails for the domain.
- The “~all” part indicates that if any part of the sent message doesn’t match the record, the recipient server will likely decline it.
DKIM record check
To check DKIM with the help of nslookup, follow these steps:
- Open the command line (Start > Run > cmd).
- In the command window, type “nslookup” > Enter.
- Type “set q=txt” > Enter.
- Type “selector._domainkey.domain.com” > Enter. Substitute the words selector and domain with the DKIM selector and domain you want to look up.
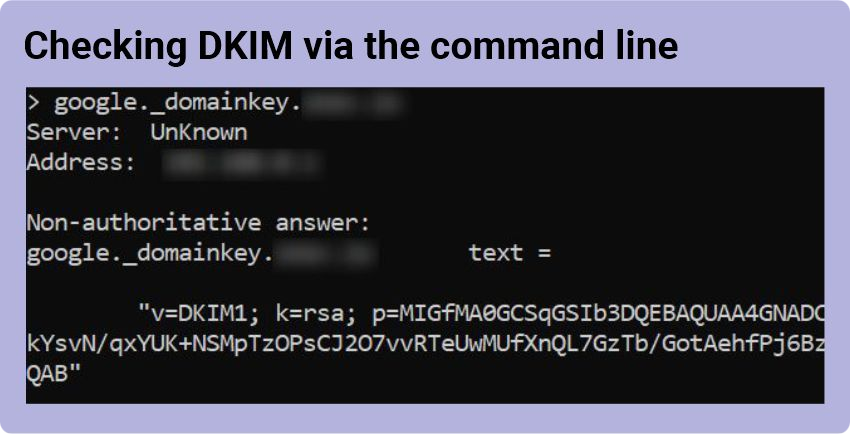
The DKIM selector can be found in the DKIM-Signature email header if you go to any email you’ve sent, click “Show Original” (like we did here), and scroll down. It’s specified as the “s=” tag.

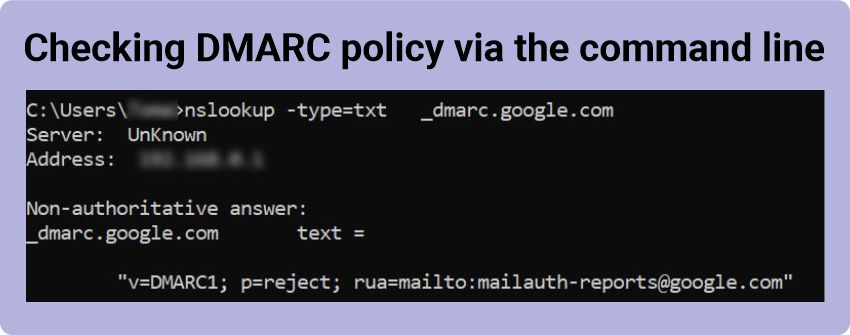
DMARC policy check
You can look up DMARC policy from the command line too:
- Open the command line (Start > Run > cmd).
- Type “nslookup -type=txt _dmarc.domain.com”, for example, “nslookup -type=txt _dmarc.google.com”, > Enter.
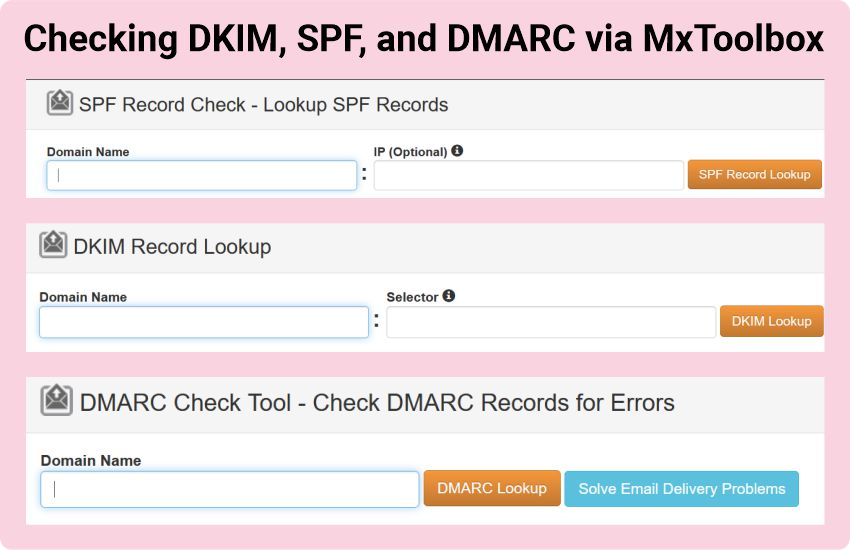
How to check DKIM, SPF, and DMARC with the help of MxToolbox
This one is, perhaps, the easiest option. All you need to do is go to the MxToolbox website and run three checks.
Please note that for the DKIM record lookup, you will need a selector, just like in the case with the command line we’ve described earlier.
How to check SPF, DKIM, and DMARC with Snov.io
Snov.io lets you check your SPF, DKIM, and DMARC records directly from your account. It verifies whether each DNS record is configured correctly, identifies potential issues, and calculates an overall domain health score.
There are two ways to run the check:
1. From your email account settings
Go to your Email accounts list and click ‘Edit’ next to the account you want to check. Scroll down to Optional settings → Domain health. Snov.io will check your domain and display the status of each DNS record, including SPF, DKIM, and DMARC.
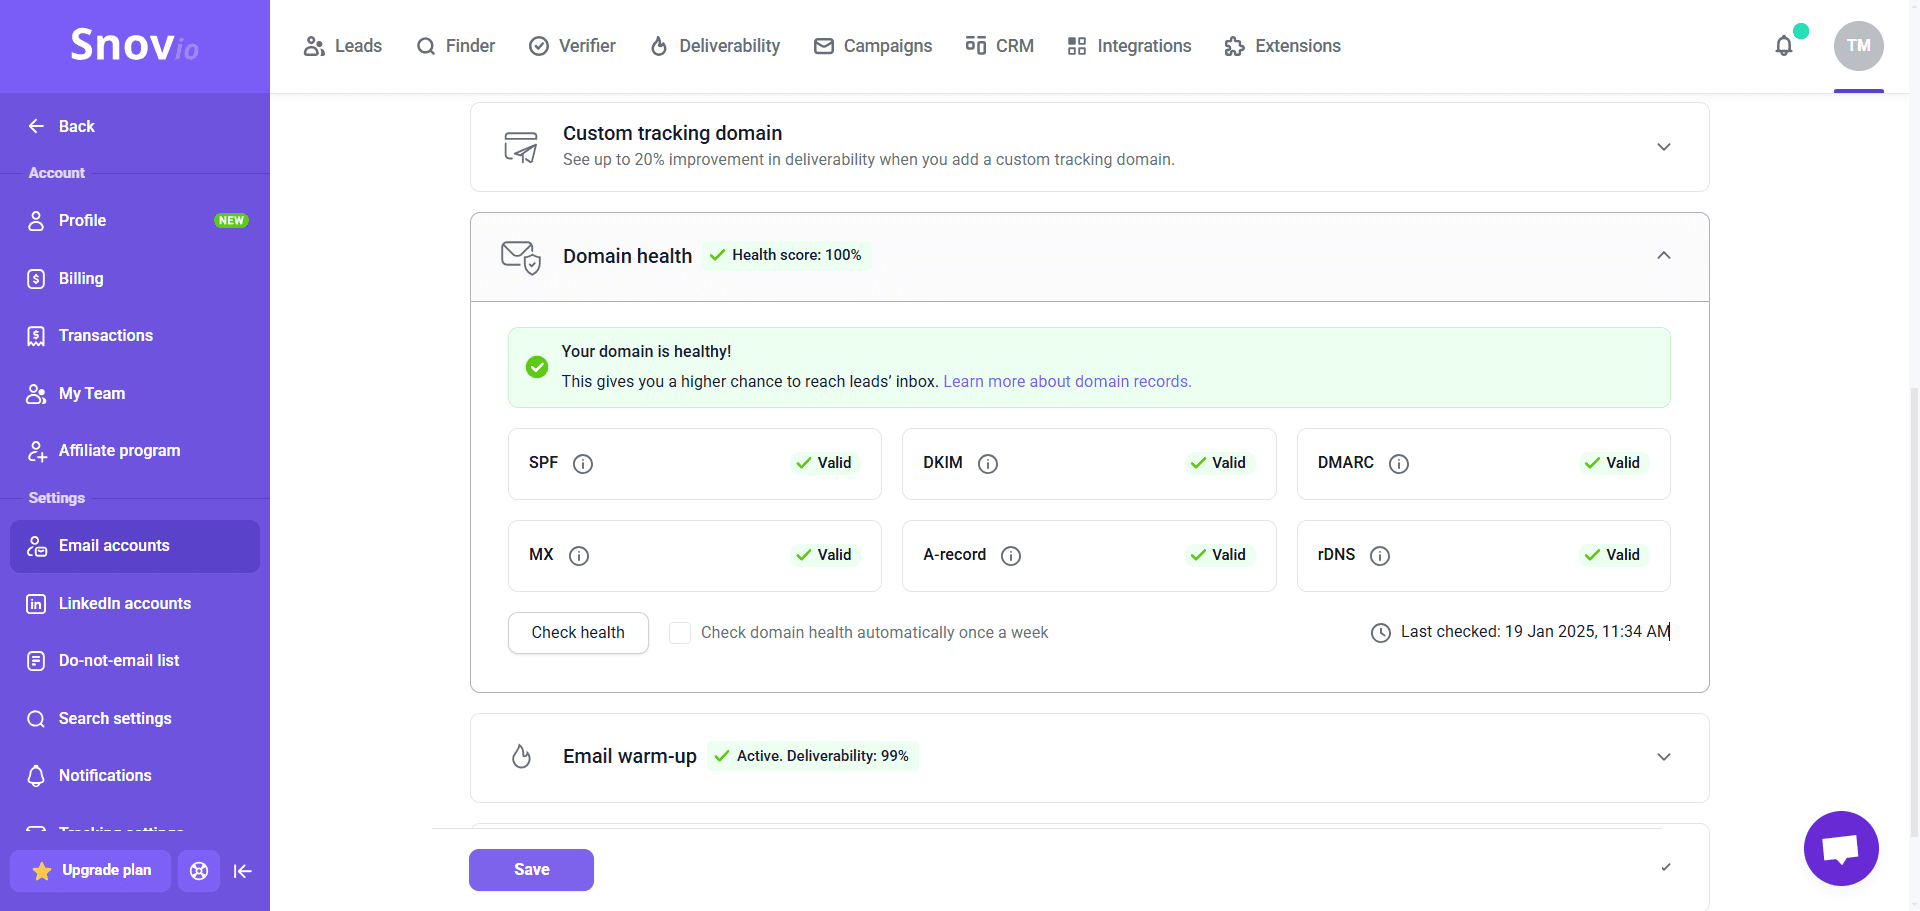
If something is missing or configured incorrectly, you’ll see which record needs attention. You can also enable automatic weekly domain checks.
2. With the Snov.io Email Deliverability Test
Run a deliverability test and open the Domain health section of your report. You’ll see whether your SPF, DKIM, and DMARC records are valid and configured correctly. This option provides a more comprehensive check because the report also analyzes email placement, content, blacklists, and spam filters.
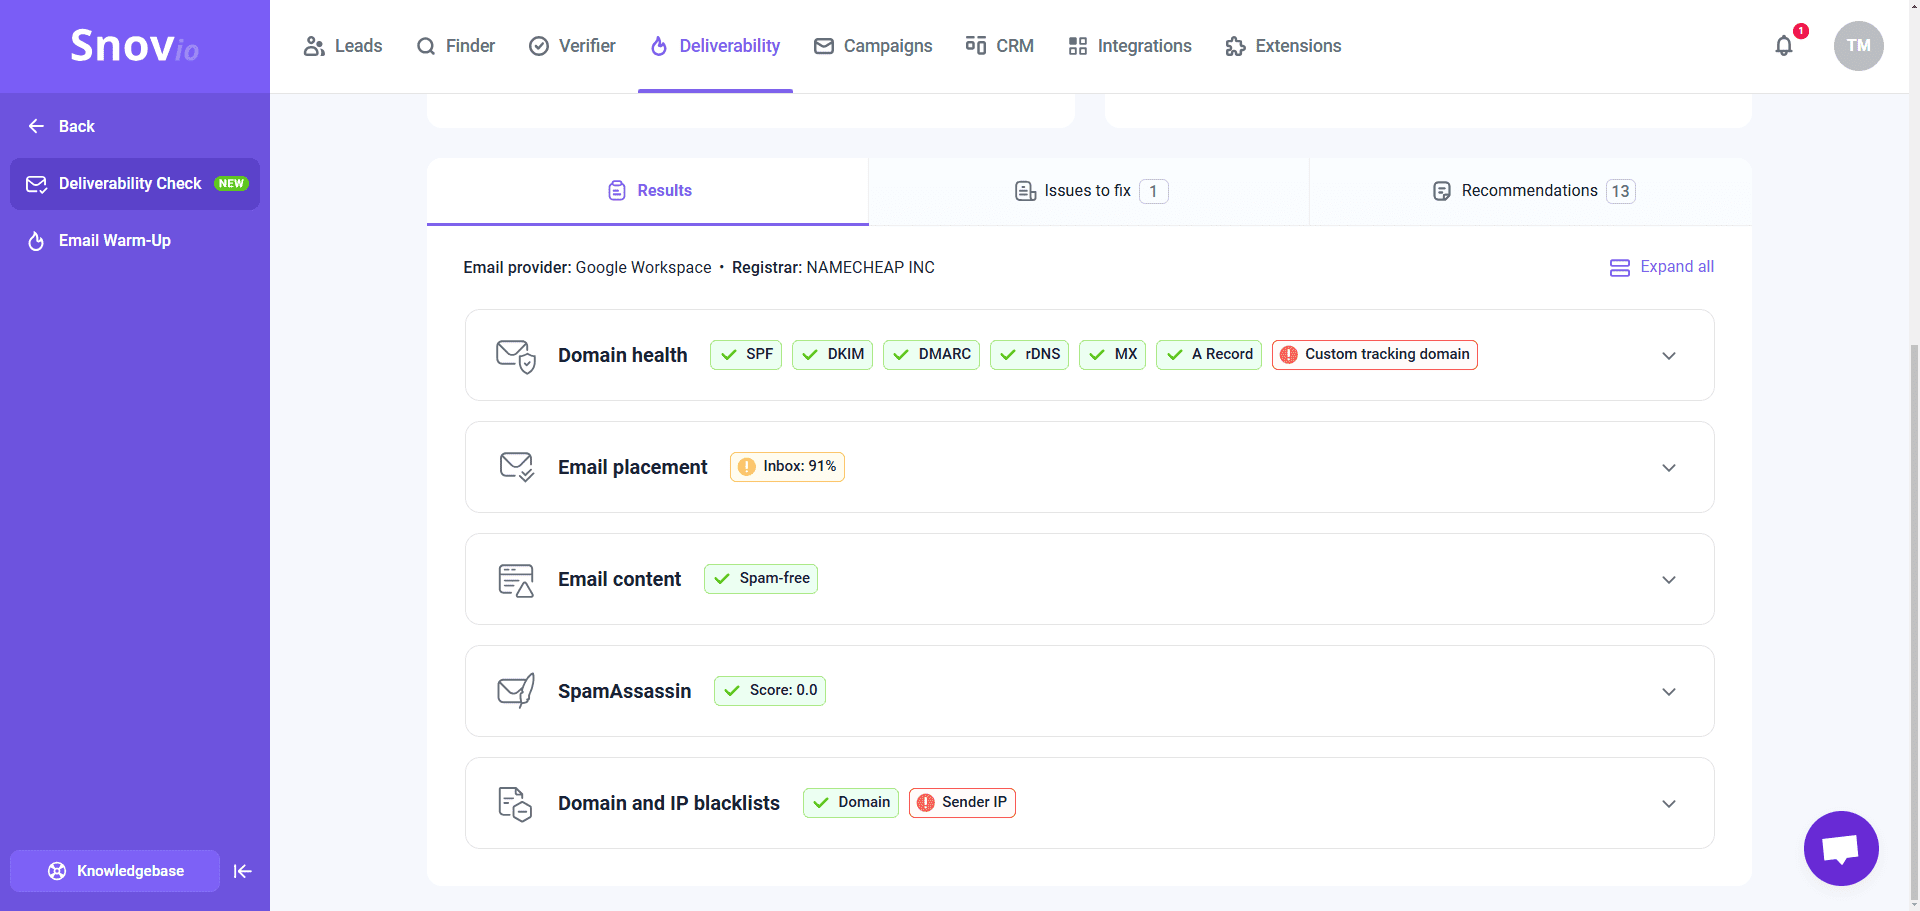
If Snov.io detects a problem, you can get personalized instructions for updating your DNS settings based on your specific domain and email provider in the ‘Issues to fix’ tab.
After changing SPF, DKIM, or DMARC in your DNS settings, allow up to 48 hours for the changes to take effect before checking the domain again.
How to set up SPF, DKIM, and DMARC?
While configuring SPF, DKIM, and DMARC records, you need to follow the correct order, which can be found in Google Workspace Admin Help.
These are the instructions you can follow:
- Set up SPF for the domain.
- Set up DKIM for the domain.
- Set up a mailbox for reports.
- Get the domain host sign-in information.
- Check for an existing DMARC record (you can use MxToolbox here).
- Change DMARC policy.
Remember that both the initial setting of DKIM, SPF, MX, DMARC and subsequent changes must be in the correct order.
Below you can find general settings for all domain providers (using Google as an example). But remember, since you have your own domains, they can all be configured differently.
General SPF setup
1. You need to go to your DNS settings (e.g., Namecheap, Cloudflare, Bluehost, etc.) and create a new record.
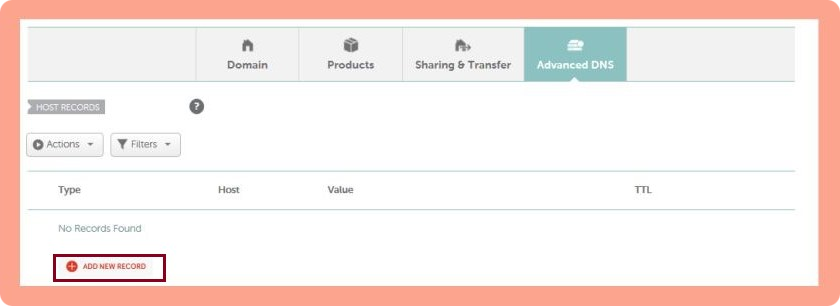
2. Select TXT record and enter “@” in “Name.”
3. Paste “v=spf1 include: _spf.google.com ~all” in “Value” and then save.

General DKIM setup
These steps are for the administrators who manage Google Accounts for your company:
1. Sign in to your Google Admin console.
2. Click on the top left menu and head to Apps > G Suite > Settings for Gmail > Authenticate Email.
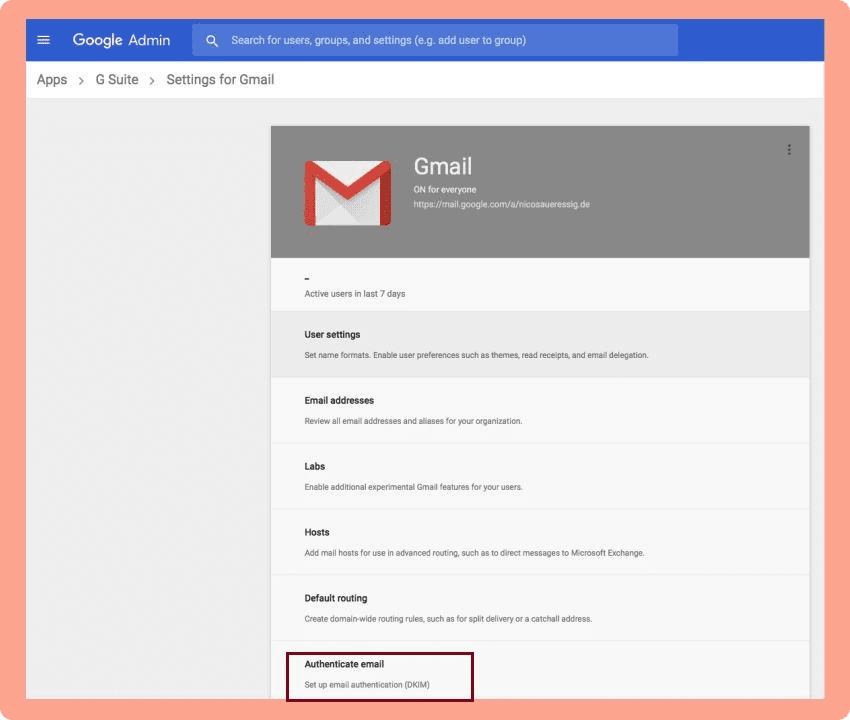
3. Pick your domain from the drop-down list, click “Generate New Record,” and then copy the hostname and the TXT record value.
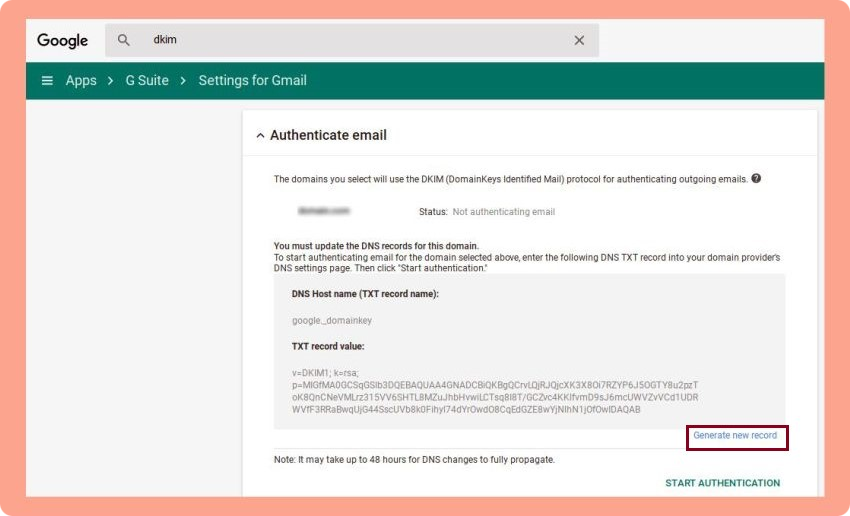
4. Log in to your DNS (e.g., Namecheap, Cloudflare, Bluehost, etc.), go to the domain list, choose your domain, and pick “Add New Record” in the advanced settings.
5. Select TXT record and enter the hostname you’ve just copied from Google in “Name” and TXT record value in “Value.”
 6. Save your changes.
7. Go back to Google and simply click “Start Authentication.”
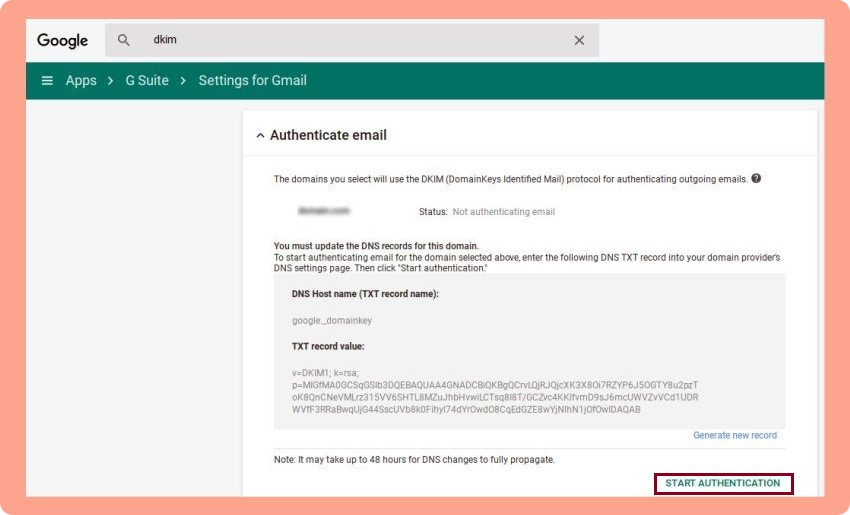
8. Wait for the DNS to update 🙂
Here’s a video instruction if you want a more detailed explanation:
General DMARC setting
Just like SPF and DKIM, DMARC is a simple one-line entry in your DNS records (e.g., Namecheap, Cloudflare, Bluehost, etc.).
Before setting it, make sure you’ve configured SPF and DKIM records for the required domain.
Then follow these steps:
1. Go to your DNS settings and create a new record.
2. Choose a ‘TXT’ record.
3. Add the hostname (for example, _dmarc).
4. Add the value. You can find a sample DMARC entry that you can use to create your own below:
| v=DMARC1; p=quarantine; rua=mailto:example@domain.com; ruf=mailto:email@domain.com; fo=s |
Where:
- v — A mandatory tag-value (don’t change it!).
- p — Mail processing policy. One of the possible options is specified — none, quarantine, or reject.
- rua – Email address for receiving statistical reports. The address must belong to the same domain for which the DMARC record is configured.
- ruf — Email address for receiving reports on failed authentication checks. Since each error when verifying the sender’s address generates a separate report, it’s better to have a separate mailbox for this.
- fo — Determines in what cases reports will be sent to the domain owner. Possible values include:
- 0 — a report is sent if SPF and DKIM checks fail. Set by default.
- 1 — a report is sent if one of the checks fails — either SPF or DKIM.
- d — a report is sent for each DKIM verification performed.
- s — a report is sent for every SPF check performed.
→ Learn how to set up SPF, DKIM, DMARC in Snov.io
I have set up SPF, DKIM, and DMARC, but email deliverability is still low
Even if you’ve set up SPF, DKIM, and DMARC records, your recipients’ inboxes might not completely trust you. That’s often the case when you have a new domain. So, what are the ways out?
Warm up your account
To prove to ESPs that you’re a trustworthy sender, you should warm up your domain before launching bulk email campaigns. Luckily, with Snov.io Email Warm-up, you can do it easily.
We’ve designed this tool to help users increase their email deliverability and improve sender reputation.
The tool’s hyper-intelligent AI will craft realistic same-thread conversations and ensure your emails don’t land in spam. As a result, after the first campaign, you will enjoy open rate growth and higher deliverability.
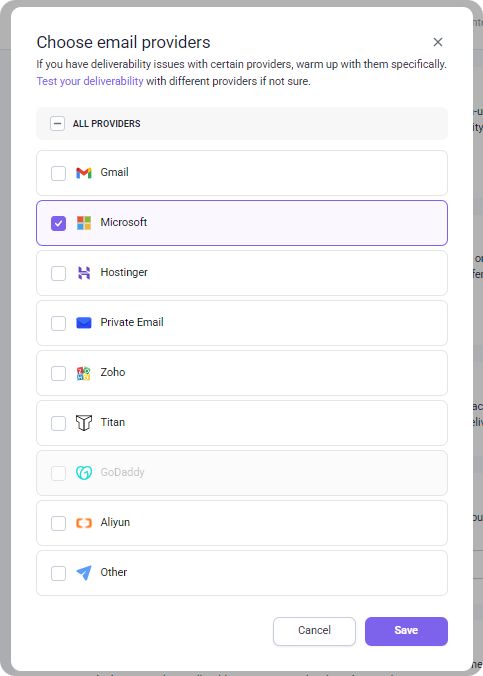
And if you want to improve email deliverability for specific providers, Snov.io allows you to set up a targeted warm-up. For instance, if you’ve noticed some of your emails go to Spam on the Microsoft provider, you can easily fix it separately:
What’s more, you can focus your warm-up only on high-quality accounts from Snov.io’s Premium Warm-up pool. Your warm-up emails will interact exclusively with business or company domains, giving your account a faster credibility boost and a stronger sender reputation.
Match your account with the recipient’s email provider
Did you know that emails between matching providers (Gmail-to-Gmail, Outlook-to-Outlook) have a way better chance of landing in the inbox? If you’re sending bulk campaigns and use several accounts for your cold emails (smart you are!), you can adjust your sending provider to the recipient’s provider automatically.
Just enable the Provider Matching feature from Snov.io, and see the magic in action. The tool will detect your recipient’s provider and use the appropriate sender from the accounts added to this campaign.
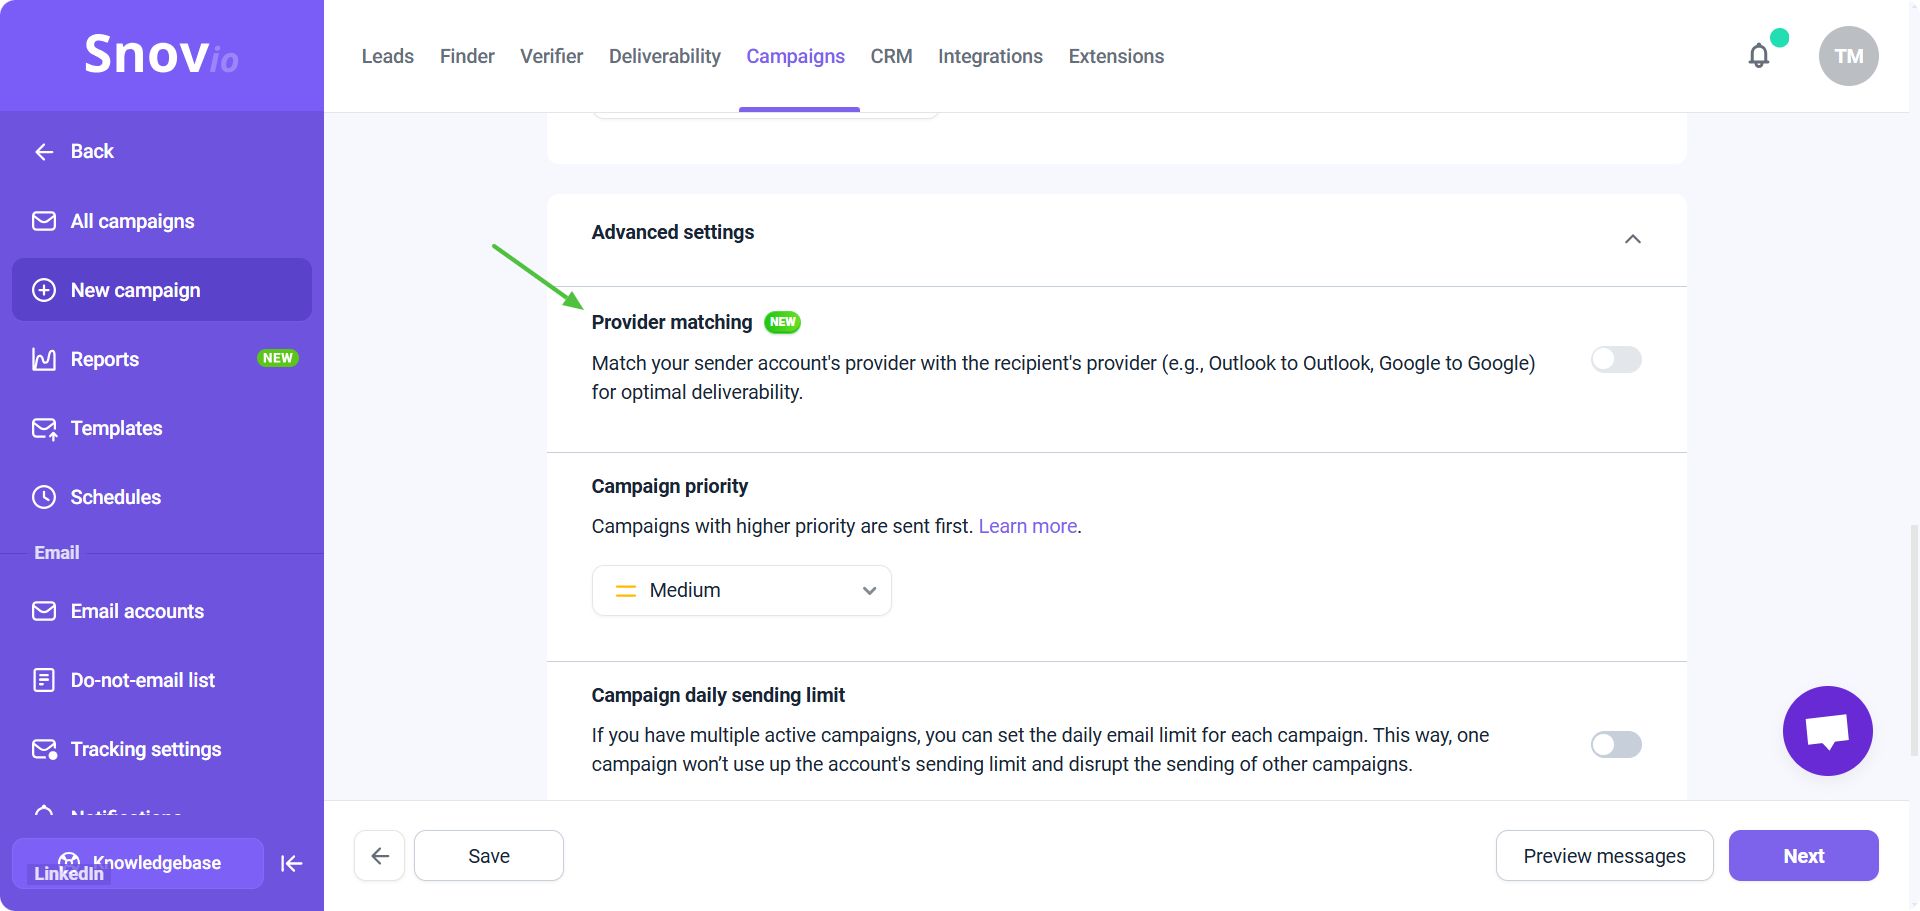
For example, if your recipient uses a Gmail mailbox, the campaign will be sent from a Gmail account. If your recipient uses Microsoft, the email will be sent from your Microsoft account.
→ Read more about how to improve email deliverability based on the provider.
Wrapping up
Now that your SPF record, DKIM record, and DMARC policy are set correctly, and you’ve warmed up your email account, all that’s left to do is to start sending your cold emails!
And remember, Snov.io cold email software is always ready to help you with your email outreach.
Happy sending!