
TL;DR
InMails are LinkedIn messages that you can send to people who aren’t part of your direct network. It’s a premium feature, so to access it, you need to upgrade to LinkedIn Premium, Sales Navigator, and Recruiter (Lite).
How to send InMails that actually work? Personalization and relevance are key. Also, keep your messages short, preferably no longer than 400 characters. Target active users, don’t send InMails on Fridays and Saturdays, and use Snov.io for a comprehensive LinkedIn outreach.
When a regular LinkedIn message isn’t an option, you need to resort to InMails. And after all, it’s not a bad move, considering the average response rate is 10-25%. But the real question is: how to land in the upper end of that range?
In this article, I will present a detailed guide on how to send InMails, describe what distinguishes good ones, and provide important statistics and tips on this topic.
Let’s get into it!
Outline:
What is a LinkedIn InMail message?
LinkedIn InMail is a Premium feature that allows you to contact someone who isn’t part of your direct network. These messages are limited to 2,000 characters in the main body and 200 characters for the subject line.
The feature is available through LinkedIn Premium, Sales Navigator, and Recruiter (Lite) plans. You need to secure one of these subscriptions to access InMail messages.
Once you’ve upgraded, LinkedIn allocates you a certain number of InMail credits depending on your account type. The good news? That number renews on the first day of each month.
| LinkedIn account type | Number of credits |
|---|---|
| Premium Career | 5 |
| Premium Business | 15 |
| Sales Navigator | 50 |
| Recruiter Lite | 30 |
Remember that you can accumulate unused credits and even earn them back if your InMail messages receive responses within 90 days.
|
📍Expert tip LinkedIn users can disable InMails, which means this method of contact may not be available. But no need to panic; alternative ways to connect with people on LinkedIn exist, even without Premium. For example, with the LinkedIn Email Finder Extension, you can find users’ email addresses in no time. Once you have the contact details, the plan is simple: send them an engaging email using your pre-made, personalized copy. |
LinkedIn InMail vs. regular messages
Unlike InMails, regular LinkedIn messages can only be sent to profiles that are part of your direct network. To message someone this way, you first need to send a connection request and have it accepted.
Both InMails and regular messages have their limitations. I have prepared a comparison table to help you gain a deeper perspective:
| Feature | InMail | Regular LinkedIn message |
|---|---|---|
| Availability | Premium users only | All users |
| Network requirement | Can message users outside your network | Only available to 1st‑degree connections |
| Message credits | Limited monthly InMail credits | Unlimited within your network |
| Visibility | Shows as “InMail” in inbox, more attention‑grabbing | Standard message format |
| Use case | Cold outreach, recruiting, networking, sales | Follow‑ups, warm leads, relationship nurturing |
| Response rates | 10–25%, higher with personalization and relevance | Generally high with existing connections |
I recommend using InMails when making a formal sales intro or for recruitment purposes, and send them only to the most important prospects and candidates.
In contrast, LinkedIn messages are more suitable for regular communication with people who are already in your network.
How to send InMails on LinkedIn: step-by-step guide
Whether you’re in sales, hiring, or marketing, this guide will show you how to send LinkedIn InMails step by step.
Find the right prospects
No cutting corners when it comes to filtering the prospects for your InMail outreach. You need to be highly specific about who you’re targeting, as it can make it or break it. Remember, you’ve got only this many InMail credits; choose your LinkedIn profiles wisely.
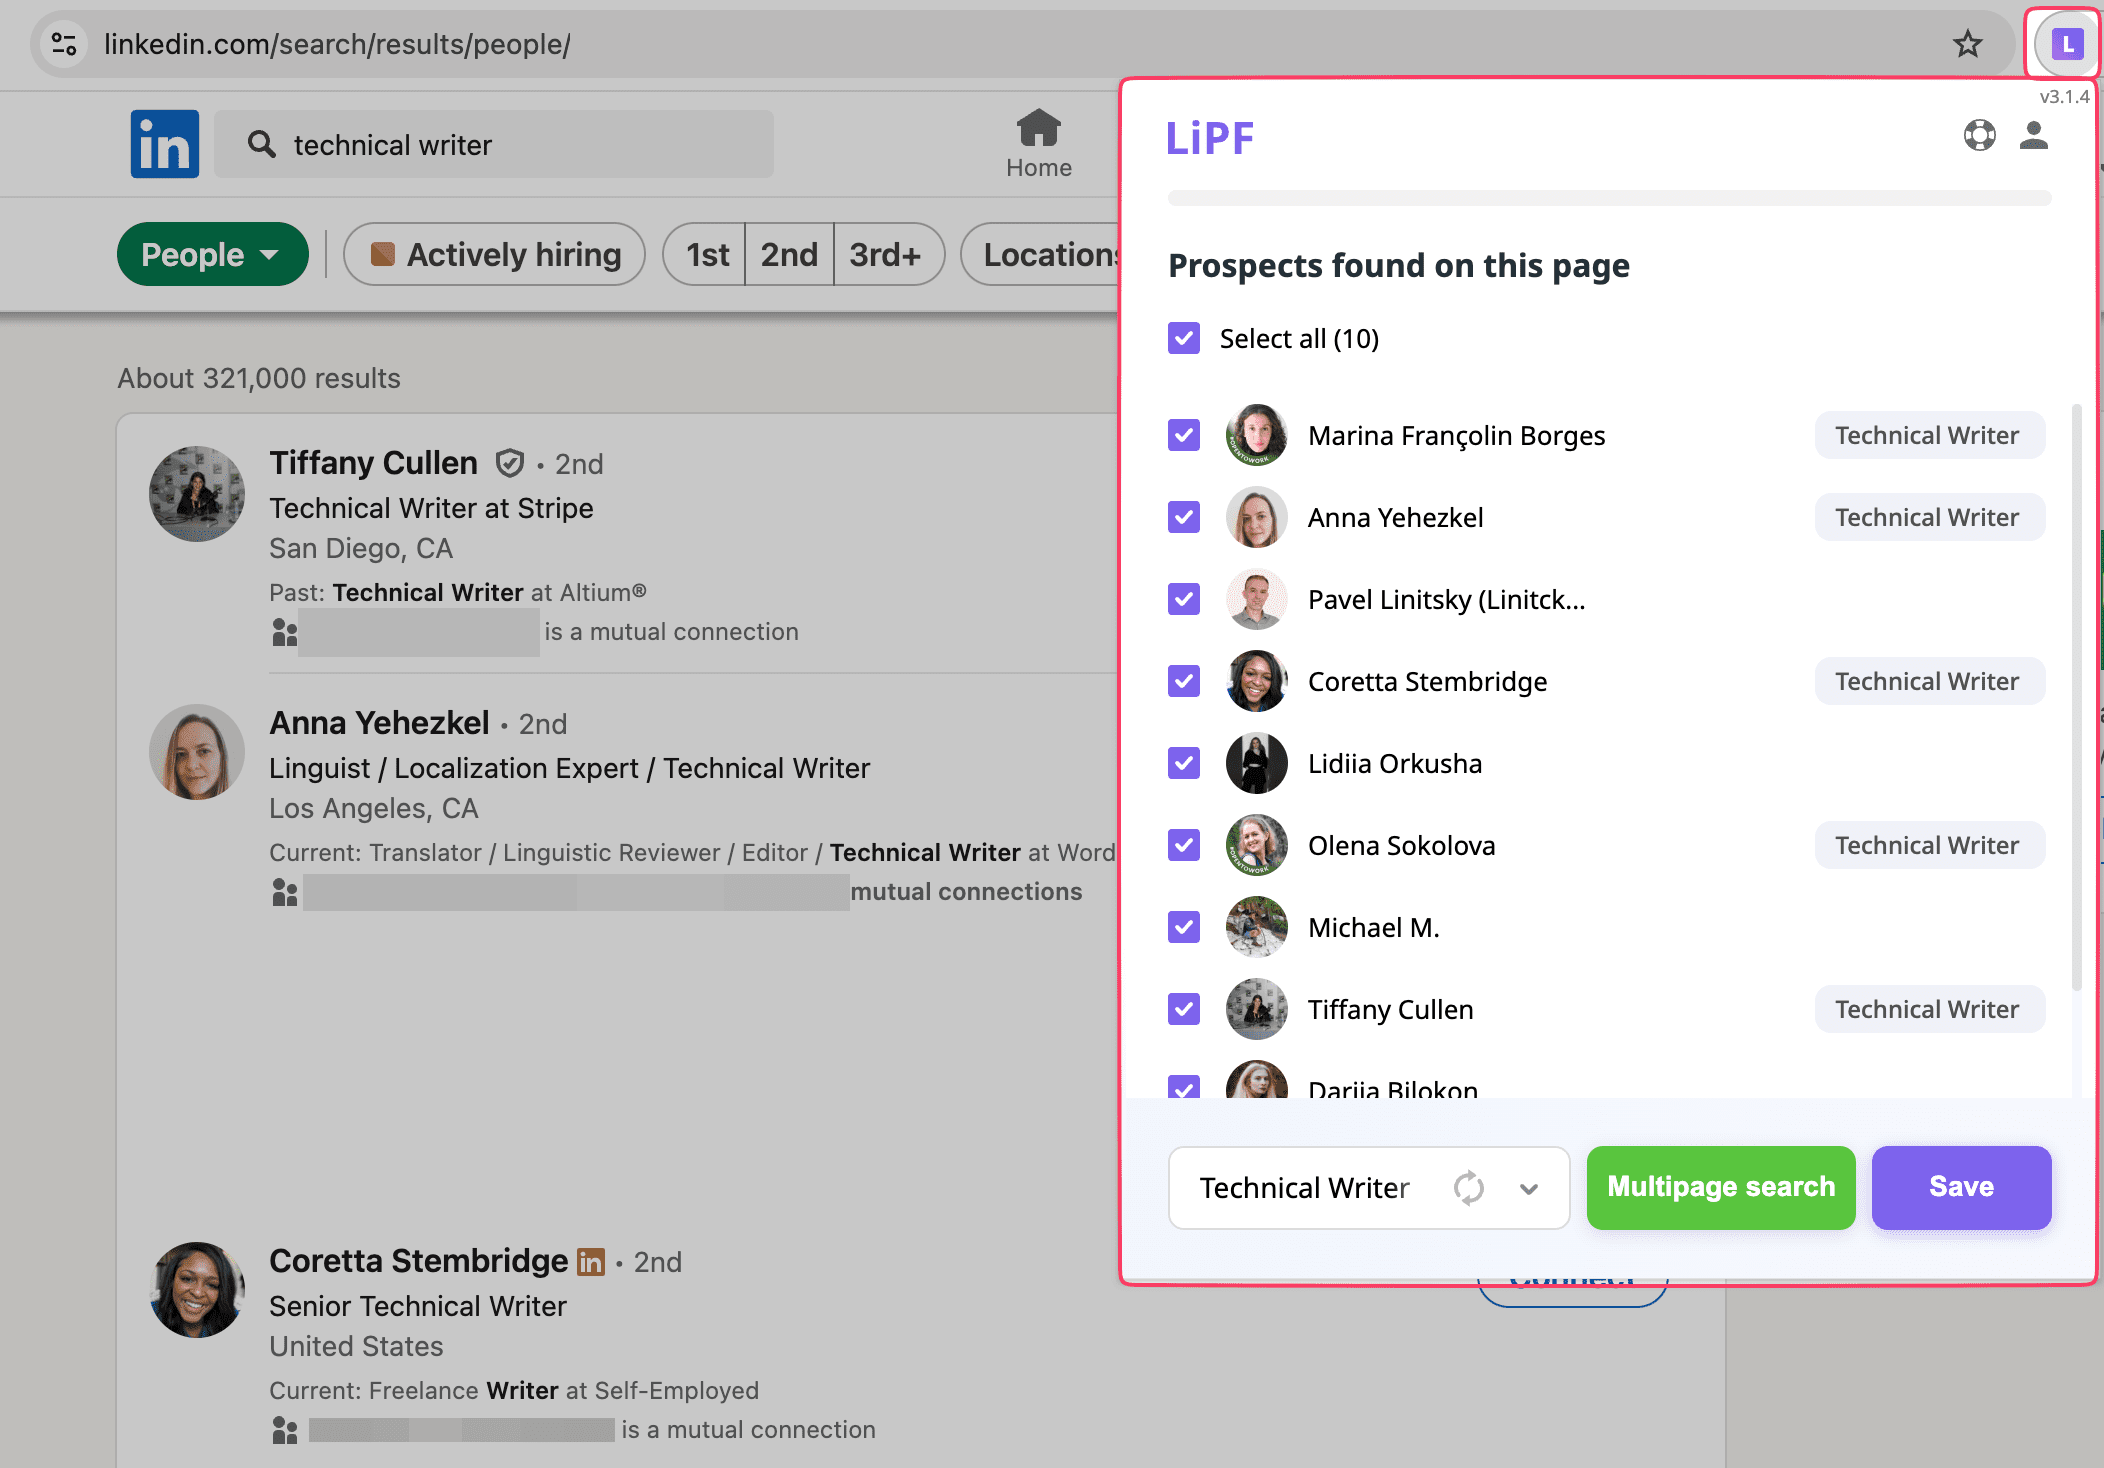
Defining your Ideal Customer Profile (ICP) should be the first step in your action plan. Next, it’s smart to use LinkedIn search filters not only to make finding prospects easier, but also to contribute less to LinkedIn search limits. This especially applies to those using a free account, or Premium Business and Career.
Unlike with a basic account, Sales Navigator and Recruiter (Lite) let you filter out your potential customers to greater detail. And let’s not forget about Boolean search.
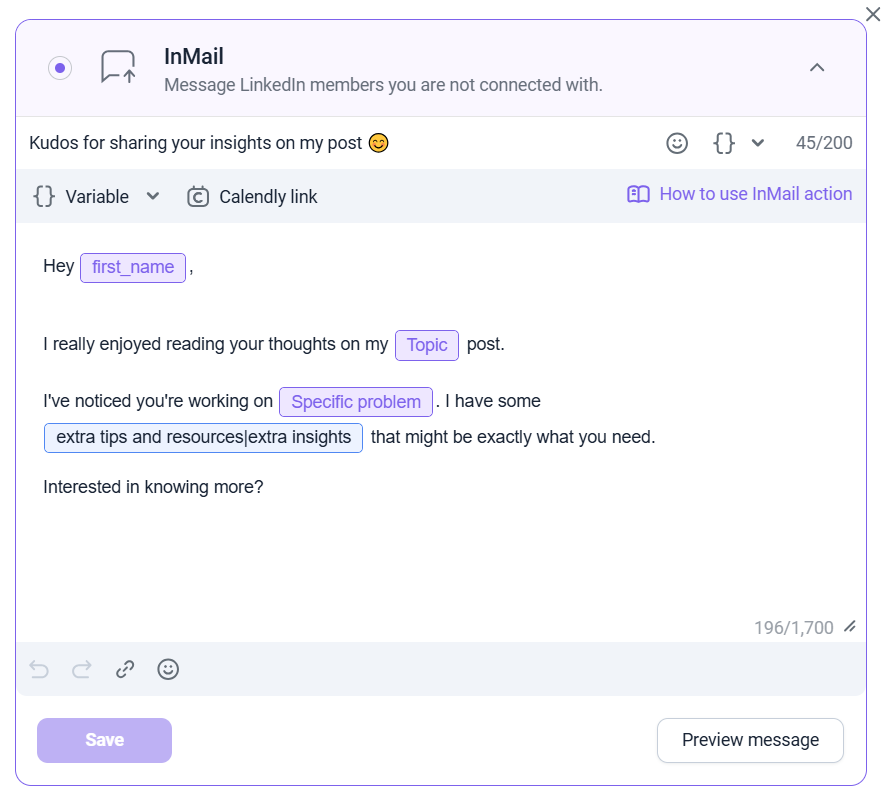
Craft an effective LinkedIn InMail message
As soon as you’ve found your perfect prospects, it’s high time to start crafting your InMails LinkedIn messages. Here are some essential elements:
- Personalization
Show that you’ve done your homework by adding details that matter to your prospects.
- Clear intent
The less guessing your prospects have to do, the better.
- Short and sweet
Most people scan rather than read, so keep your message concise and impactful.
- No sales pitching
Avoid steering the relationship toward a sale from the outset.
- Relevant targeting
Send InMails with a purpose by targeting people aligned with your field or business goals.
Send your InMail manually
But before you send that InMail, make sure to stick around for more in-depth practices for writing quality messages below.
So, how to send InMails? Once you’ve secured a Premium subscription, the next steps are super straightforward.
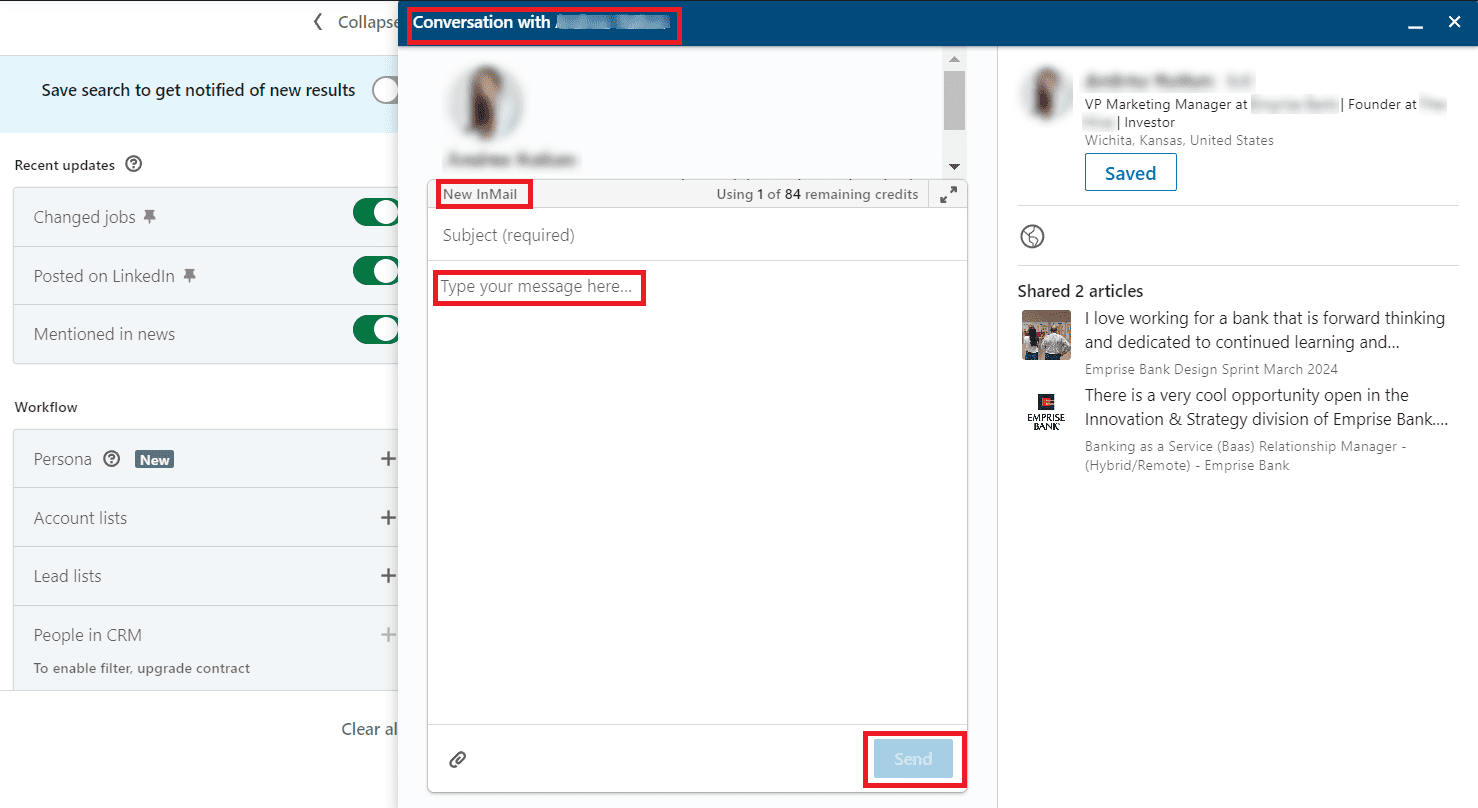
Go to the LinkedIn profile of the person you’d like to send an InMail.
Next, click Message, and a pop-up window will open for you to type your message.
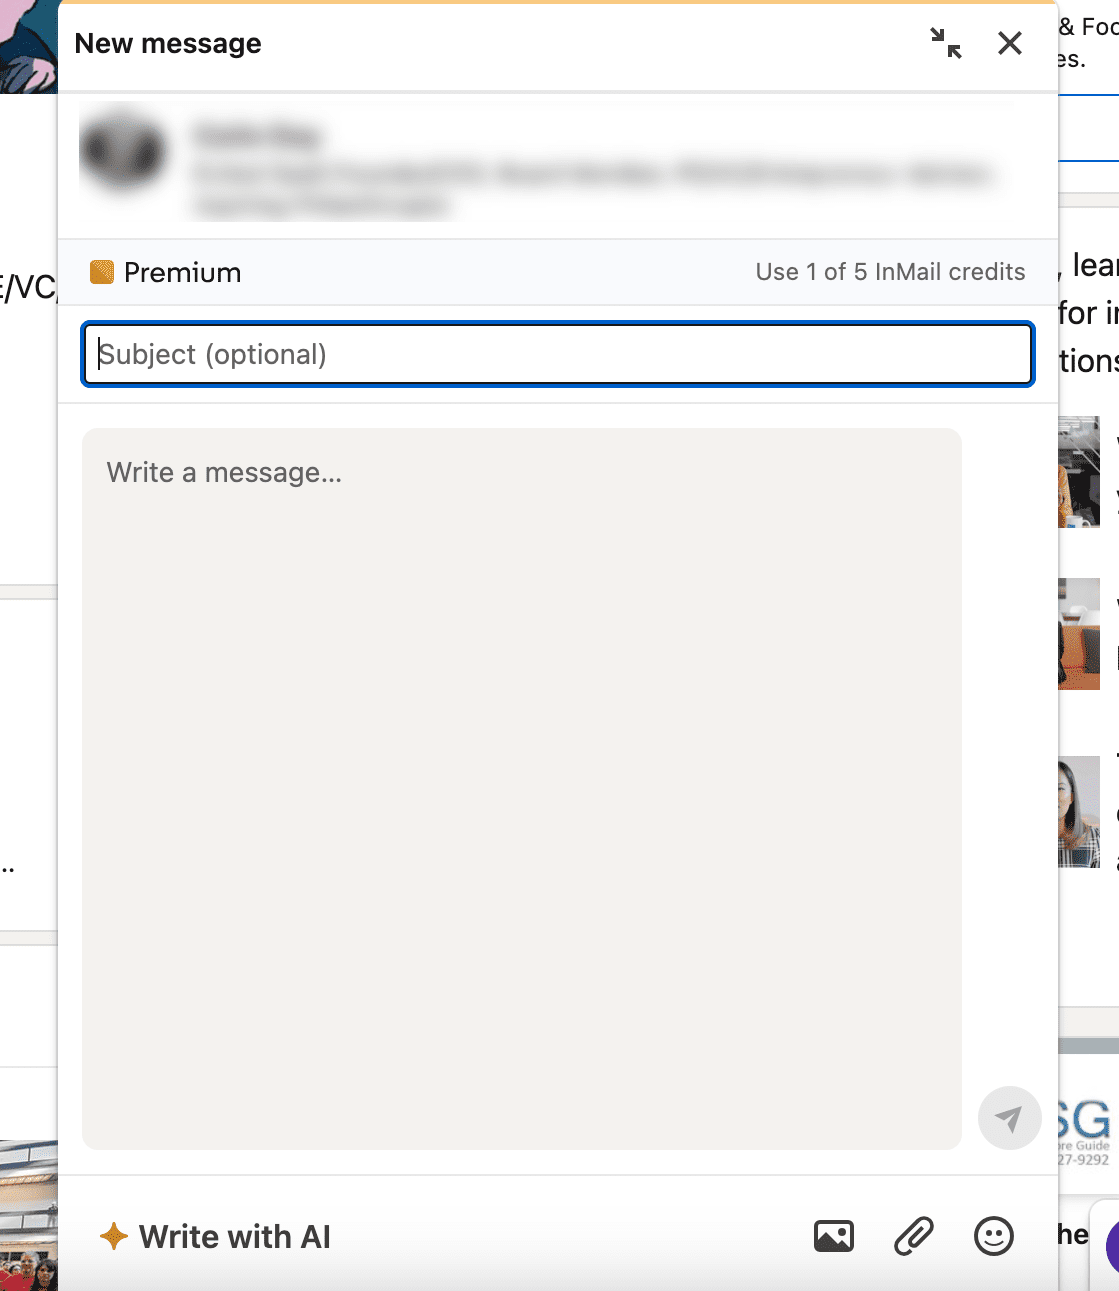
Once you’ve written your InMail, click Send.
Send your InMails in bulk
To speed up the process and reach out to more people, send your InMails with the help of a smart LinkedIn prospecting tool.
Step 1.
Open the Snov.io app and go to the Campaigns tab.
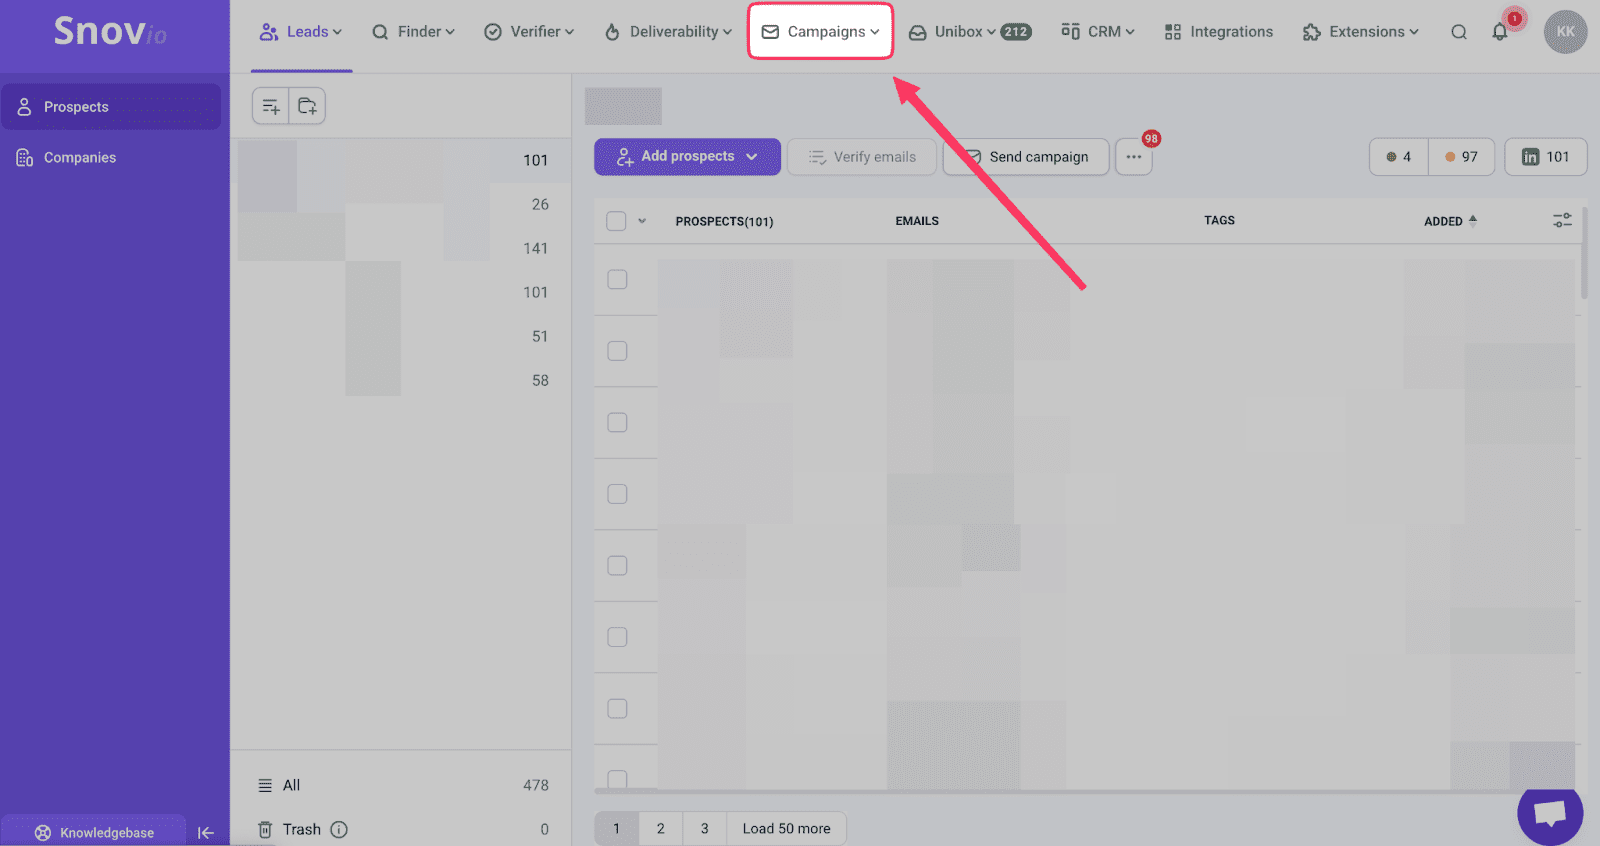
Step 2.
Build a new campaign from scratch. Add necessary LinkedIn actions, such as connection requests or InMails.
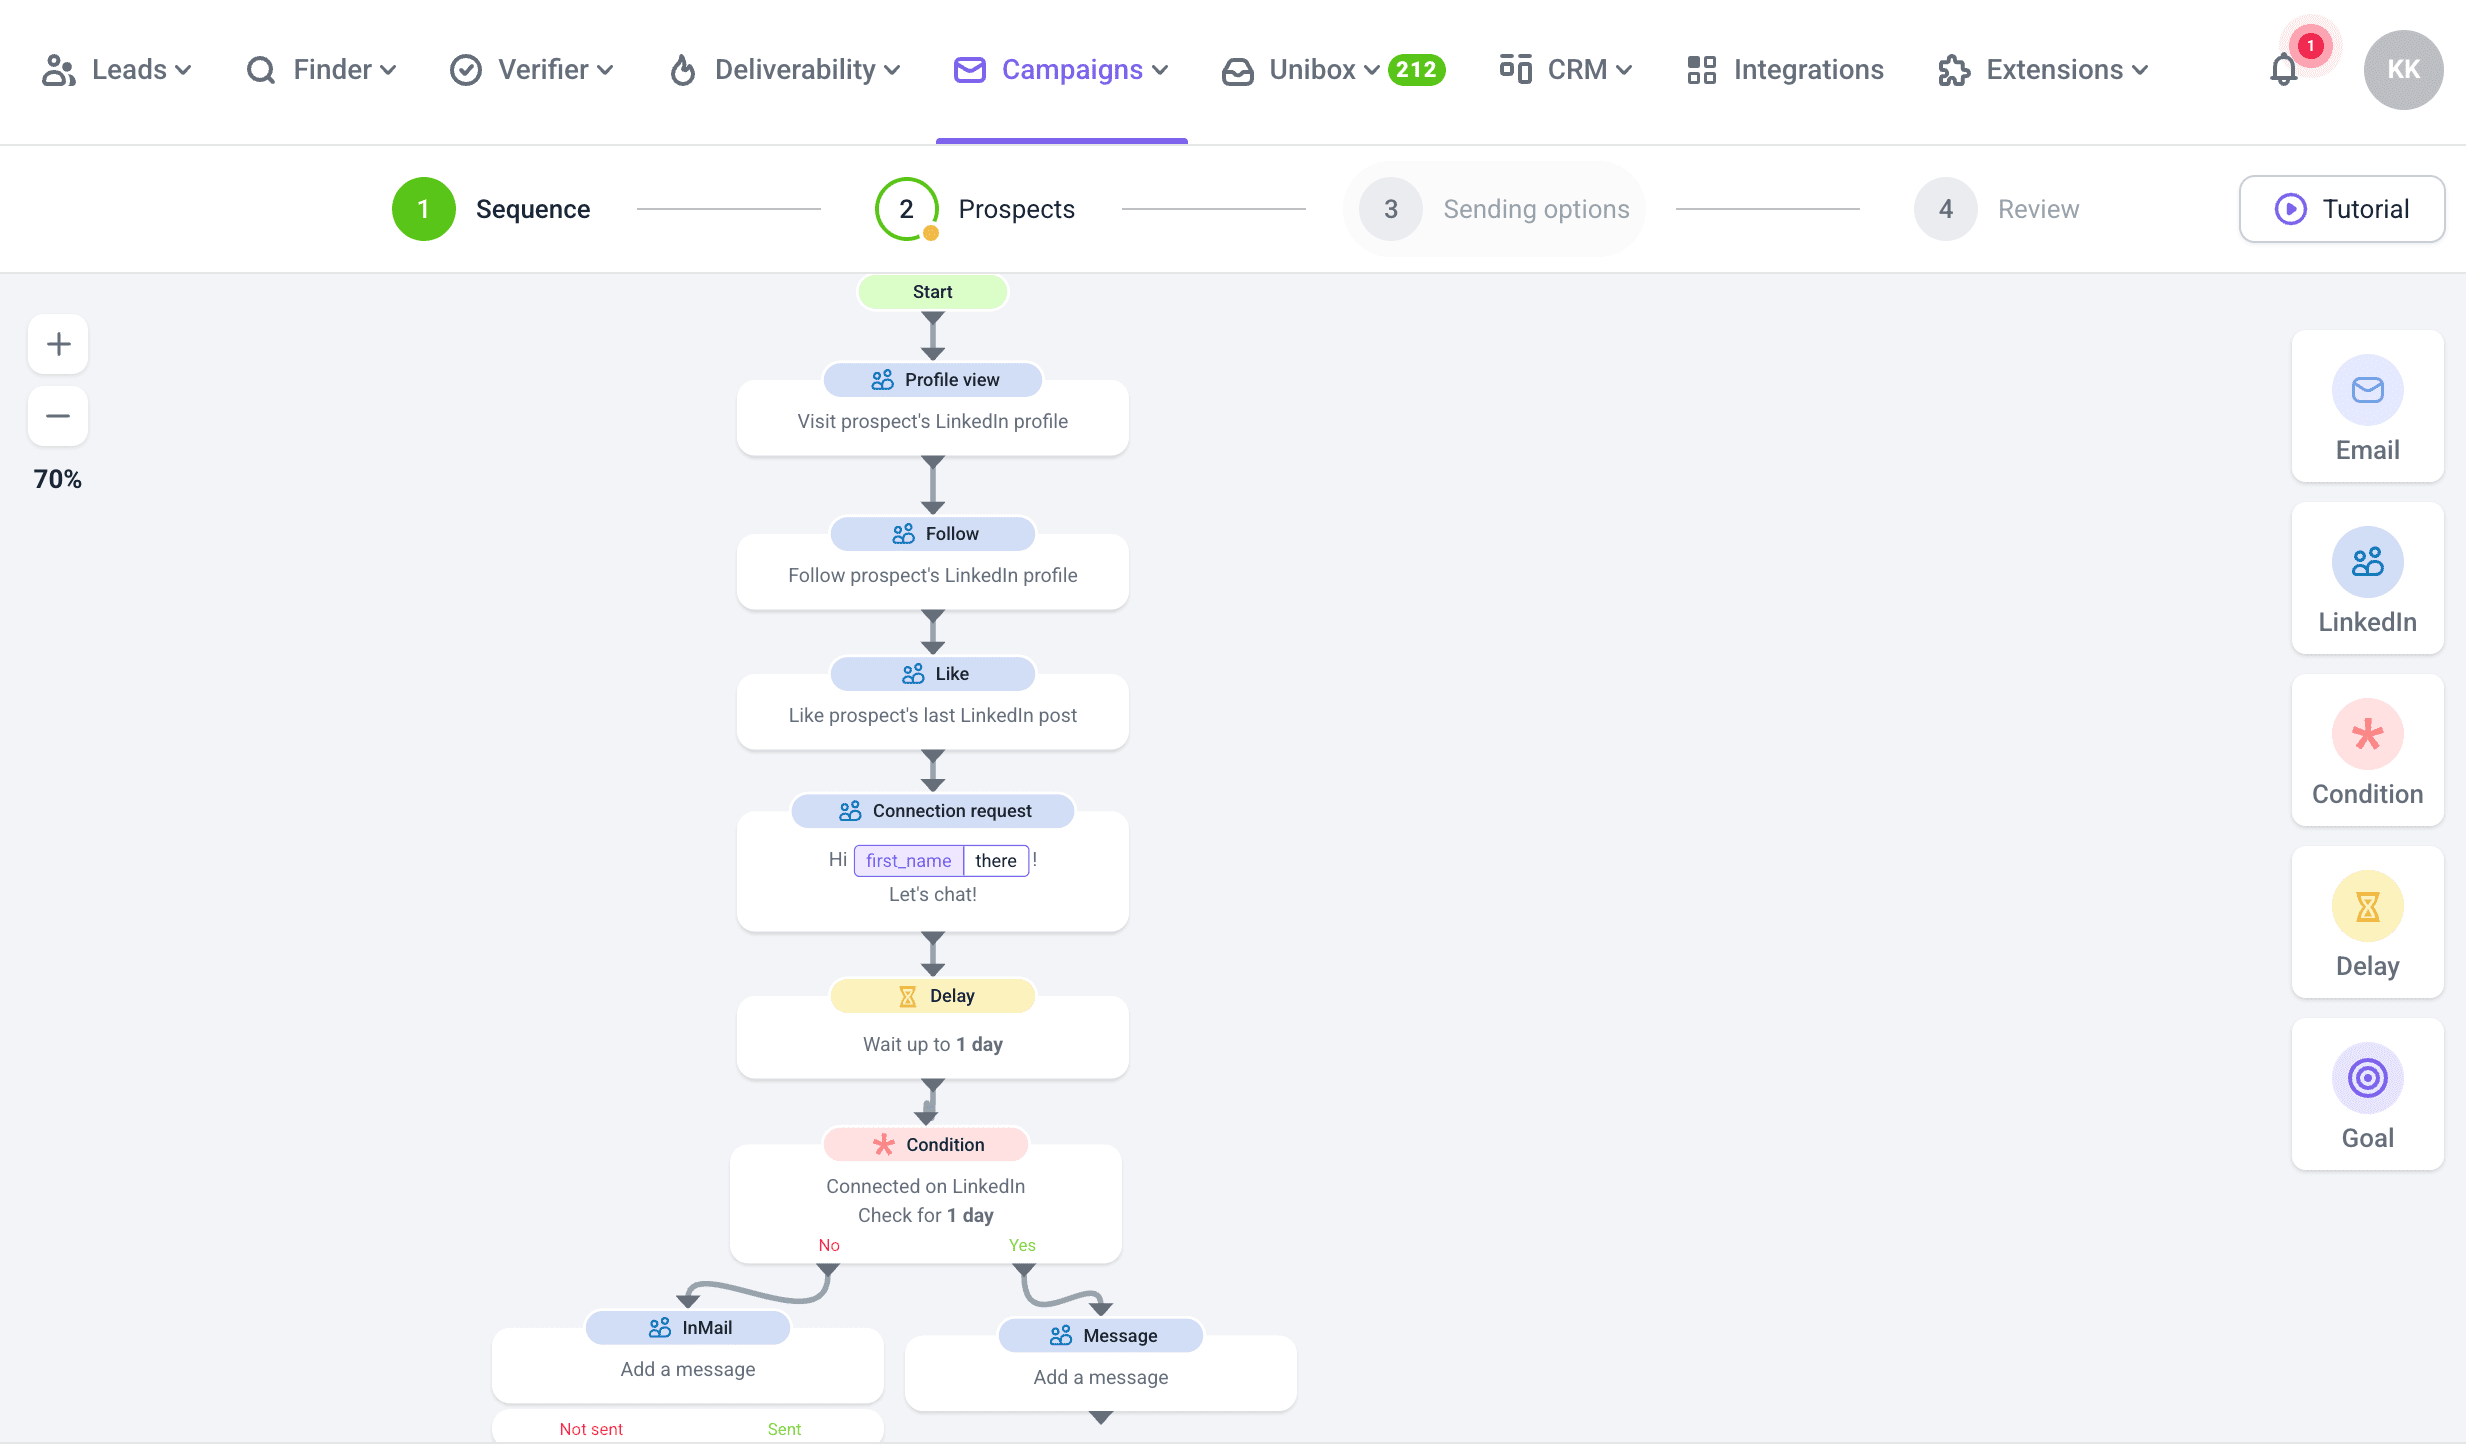
You can filter your sequence by the connection degree to make the outreach more targeted:
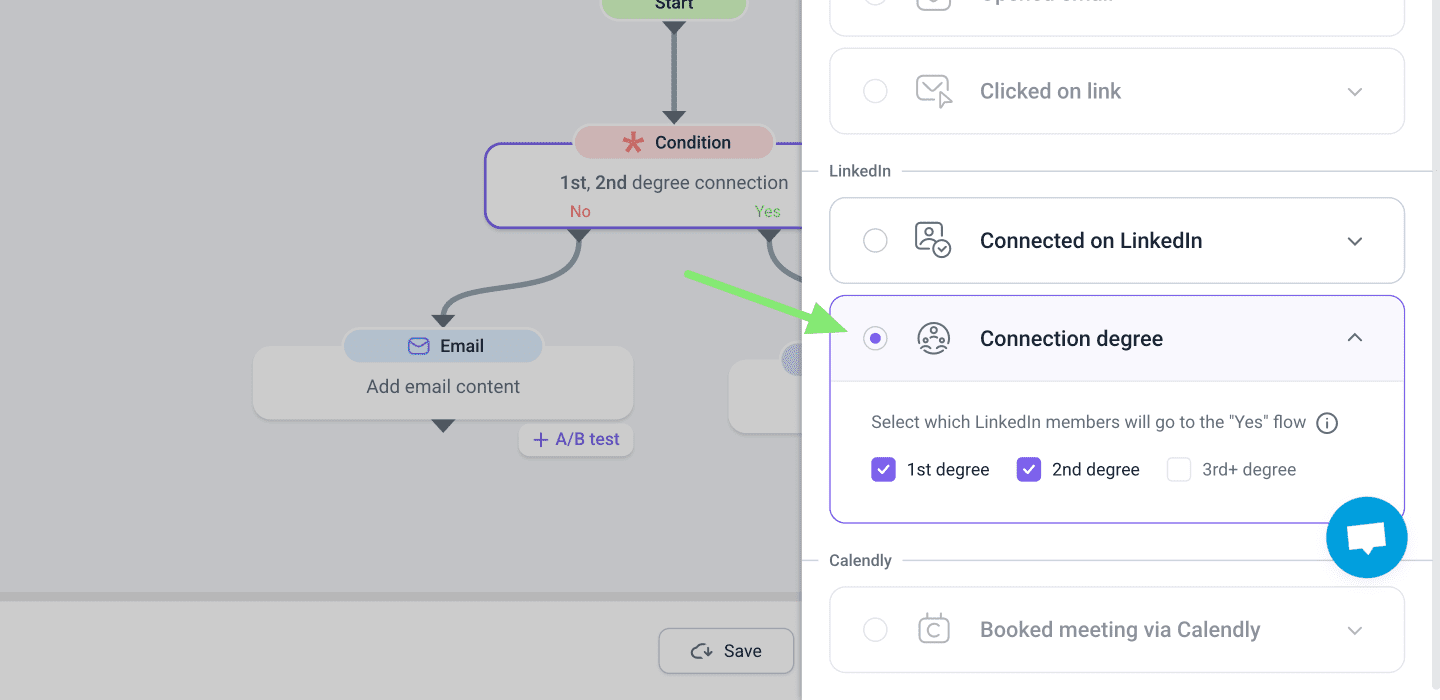
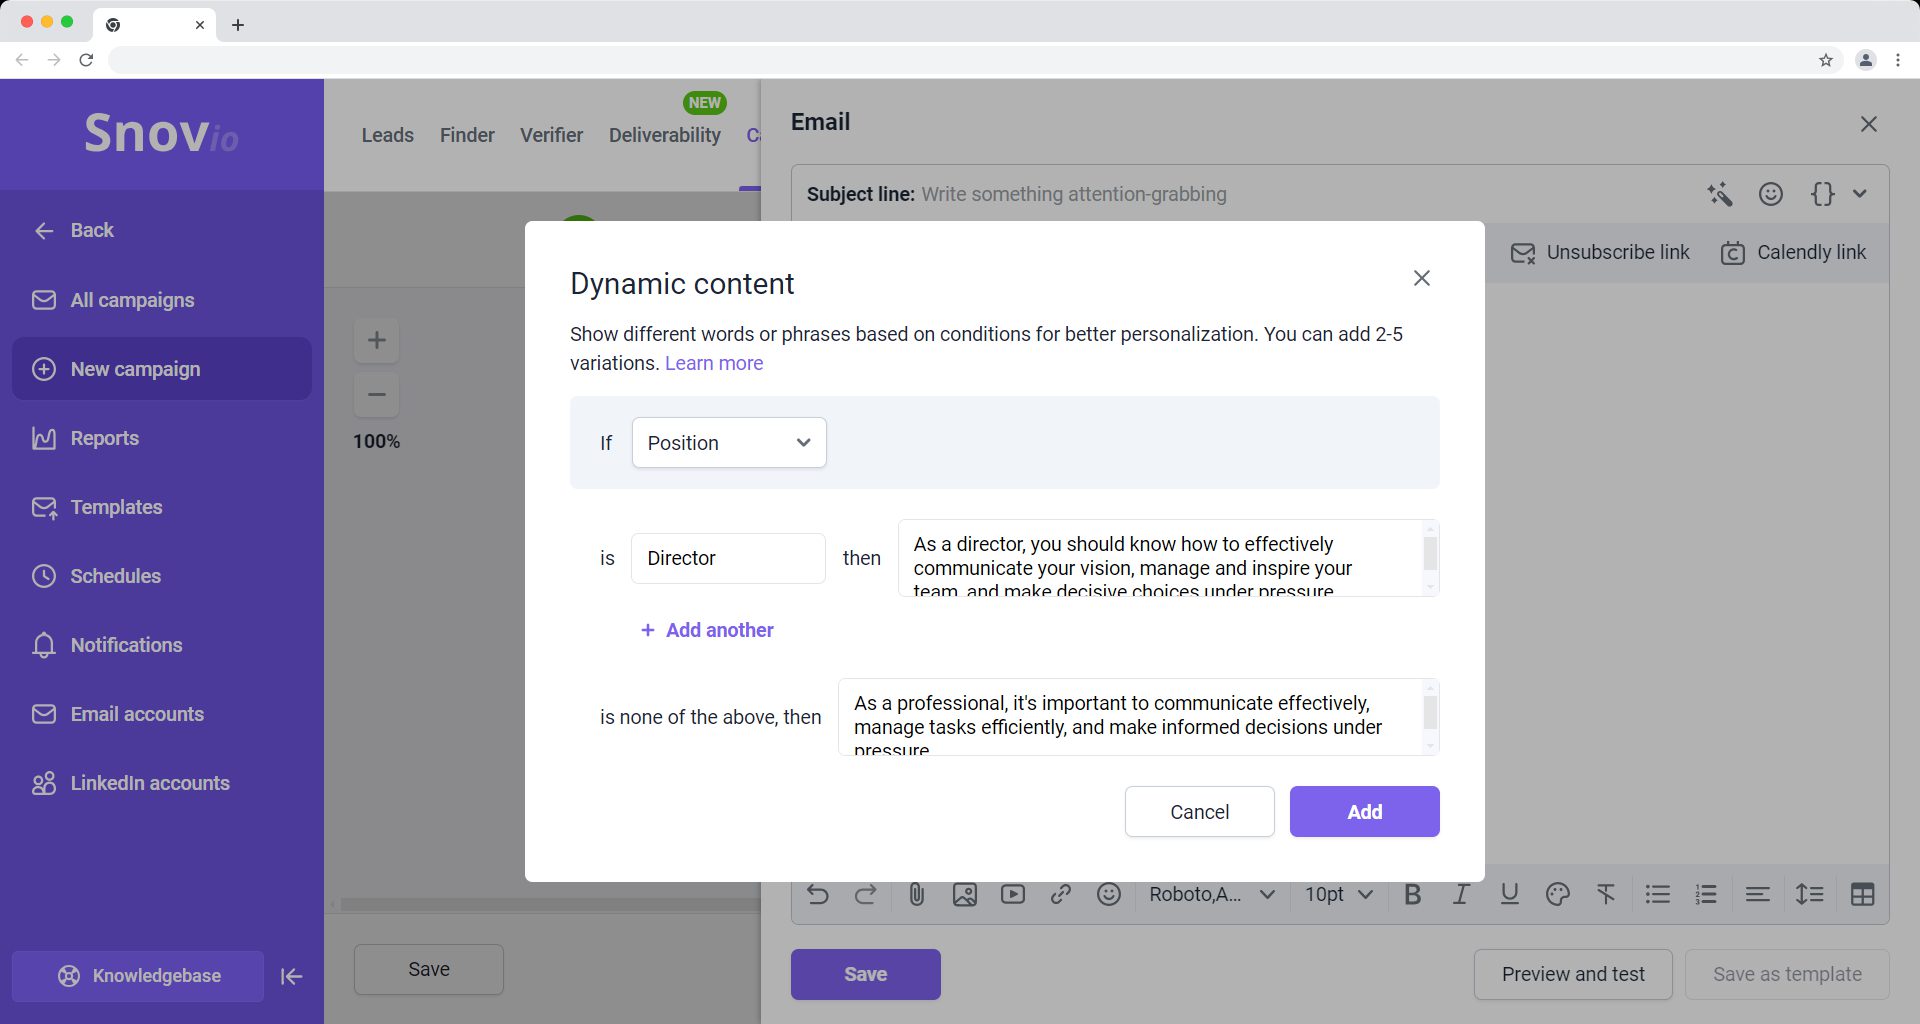
Personalize the copy using Spintax and Dynamic Content:
Step 3.
Add your prospect list that you’ve collected with the LinkedIn Email Finder I’ve mentioned earlier (full circle here!). Fill in other prospect settings.
Step 4.
Select your LinkedIn account and configure the other sending settings, such as schedule and campaign duration.
Step 5.
Review your campaign and launch it.
Voila! Just a few minutes and your first LinkedIn campaign with InMail is ready.
LinkedIn InMail best practices to increase response rates
Let’s now shift the question from “How do I send InMails?” to “How do I make InMails work?” There are a few data-backed steps that can significantly improve your sales results. Here’s what I suggest learning before you send that next InMail message.
Keep InMails under 400 characters
We’re probably not delivering any news to you, but keeping InMails short really works. There is a strong correlation between message length and higher response rates. And there is also real-world data to back this up:
- InMails under 400 characters have, on average, a 22% higher response rate (data by Greg Lewis, Sr. Content Marketing Manager at LinkedIn).
Remember, people tend to skim over most messages, so using strong words is important.
Research prospects before you send your InMails
Start your LinkedIn outreach with thorough research. This way, you can easily identify people’s pain points and match them with your solution.
Buyers’ expectations are at an all-time high these days. You need to be aware of the following aspects before you hit send on that InMail:
- Understand your target audience’s business needs
- Have a clear picture of the clients’ industry and main competitors
- Identify recent changes and events
Fortunately, you don’t have to go overseas; LinkedIn can often provide all the insights you need for effective research and personalization. From job titles and company descriptions to recent posts and engagement history, these details help shape a well-targeted InMail.
Pay attention to what your prospects share, comment on, or celebrate; these moments can serve as perfect entry points. The more relevant your message feels to their current priorities, the higher your chances of getting a response.
And did you know that viewing someone’s LinkedIn profile before you send an InMail can increase your chances of success by up to 78%?
💡 Bonus tip
LinkedIn monitors your profile activity all the time, trying to spot any spam-like behavior. While researching and viewing people’s accounts is vital, you need to move with caution. To stay safe, I recommend keeping these limits in mind:
- Safe: 10-20 profile views per day
- Moderate: 30-40 profile views per day
- Risky: 50+ profile views per day
Optimize your LinkedIn profile
A well-maintained LinkedIn profile is often a direct indicator of your trustworthiness. Remember, you’re not the only one doing the research; others are likely checking you out, too.
So, before you send that InMail, take a closer look at your LinkedIn profile. What’s the first thing that pops into your mind? Is the profile picture professional and approachable? Have you highlighted relevant achievements and experience in your summary?
Mind that every detail counts; All these elements shape the first impression. And don’t get us started on the importance of it.
👉 Make sure to give your profile a glow-up with our free and comprehensive LinkedIn optimization guide.
Keep the most important information in your InMails
And to the essentials, skip the formalities and get straight to the point with your LinkedIn InMail messages. No one wants to read another generic “I hope this finds you well” or anything along those lines.
Your goal is to provide immediate value, even with a short LinkedIn message. Make sure your InMails aren’t overly focused on your offering. As a rule of thumb, aim for an 80/20 balance, where 80% of your message emphasizes the recipient’s needs and only 20% touches on your solution.
Think of it as a business conversation, not a sales pitch. Try to mirror the flow of a natural relationship: show genuine interest and offer value before asking for anything in return. People are more likely to respond when they feel understood, not sold to.
Prioritize active LinkedIn users when sending InMails
It might not come as a surprise that you can achieve better results by sending InMails to active LinkedIn users. In fact, accounts that have posted at least once within the past 3 months are 45% more likely to accept your message.
If you’re on Sales Navigator, there is no need to check each profile manually. Just use the “Posted on LinkedIn in the past 30 days” Spotlight filter in Sales Navigator to easily find active users.
Personalize both the top and bottom of your LinkedIn InMail message
These days, people often use smartphones to check their social media accounts, and LinkedIn is no exception to this. The thing is, the InMail preview can look quite different depending on the device.
On mobile, users typically see the beginning of your message first.

On desktop, however, it’s the end of the message that’s visible in the preview.
That’s why it’s essential to pay special attention to both the opening and closing sentences of your InMail. Make sure they’re highly personalized and relevant, irrespective of where they’re seen first.
Avoid Sending InMails on Fridays and Saturdays
There is no need to worry too much about timing, but it’s not a good enough reason to completely brush it off. According to LinkedIn data, some days are worse for sending InMails than others. Have a glance at these insightful numbers:
- Most InMails get replies quickly. More specifically, 65% come within the first 24 hours, and 90% within the next seven days.
- Mondays seem to be the best for sending InMails. However, there’s not much difference when compared to LinkedIn messages sent between Sunday and Thursday.
- Fridays and Saturdays are the worst days for sending InMails, with 4% and 8% below average response rates.
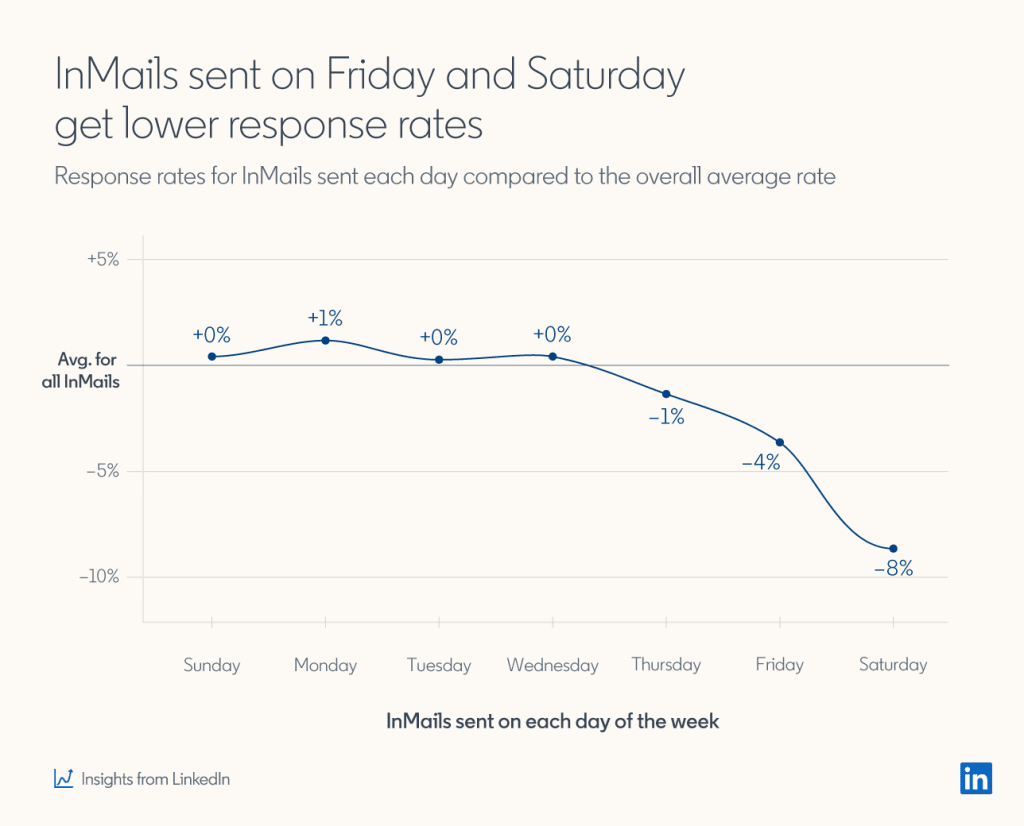
No doubt, the content of your LinkedIn InMail messages matters far more than timing. But when there’s even a slight chance to do better, why not take advantage of it?
Key takeaways
Learning how to send InMails on LinkedIn that actually work requires strategy and empathy. Try to keep it short and sweet, prioritize active users, and don’t forget to personalize the top and bottom of your message.
Effective InMails come down to relevance, timing, and personalization. Apply the insights above and bring Snov.io to your workflow to make the most out of your LinkedIn outreach.