TL;DR: How to configure your email infrastructure
Your cold outreach success depends on your email infrastructure. You have two options to configure it:
In this article, I’ll explain how to set up a domain for cold outreach, both ways. Read on to discover which one would work best for you.
Every day, companies lose opportunities (and money) because of a poor technical setup. Facts prove that:
- In 2024, major email providers Gmail and Yahoo began requiring that sending domains have a valid DMARC record.
- As of early 2025, 84.24% of domains used in email “From” addresses have had no DMARC record.
I wish more senders understood that without setting up a reliable cold email infrastructure, their emails risk being sent to Spam or bouncing. That’s why I’m here to share with you how to set up a domain for cold outreach and save your deliverability in 2026.
What you’ll learn from this guide:
What is a cold email domain setup?
In simple words, cold email domain setup is a process of preparing your domain for reliable and safe email sending – without bounce-backs, going to Spam, as well as other issues harming your deliverability and sender reputation.
A Sinch Mailgun survey found that 88% of senders don’t know what the delivery rate actually measures.
That’s why, before we get into the technical stuff, let’s go over the terminology that will be used throughout this article. Even if you’ve been in the industry for ages, it doesn’t hurt to refresh your knowledge.
- Domain: the main part of a website or email address, like example.com.
- TLD (Top-Level Domain): the extension at the end of a domain name, such as .com, .io, or .co.uk.
- Catch-all domain: a domain that accepts all emails sent to any address under it, which can include invalid mailboxes.
- DNS (Domain Name System): the system that connects domain names to their technical setup, including email delivery rules.
- SPF (Sender Policy Framework): a DNS record that tells email providers which servers are allowed to send email from your domain.
- MX (Mail Exchange) records: DNS settings that define where email for a domain should be delivered.
- DKIM (DomainKeys Identified Mail): a system that adds a digital signature to emails to prove they were authorized by the domain.
- DMARC (Domain-based Message Authentication, Reporting and Conformance): a rule set that tells email servers what to do if SPF or DKIM checks fail.
- Delivery rate: the percentage of emails delivered to any folder.
- Deliverability: the likelihood that your email reaches the recipient’s inbox.
- Sender reputation: a score assigned to senders by email providers based on their sending behavior. A poor reputation means your emails are more likely to be filtered as spam.
- Email warm-up: a gradual process of building up the reputation of a new domain or mailbox.
Below, I’ll walk you through each of these terms and explain how to set up a domain for cold outreach step by step – both manually and with the DFY service.
Option 1 – Manual cold email domain setup
Manual setup is a good choice if you want full control and are willing to go through multiple technical steps. Sure, it requires time and accuracy, but it helps you understand how cold email infrastructure works.
Now, let’s explore the steps you need to complete to safely launch outreach from a separate domain.
Step 1: Buy a domain (don’t use your main one)
You need to get a domain for your cold outreach that is different from your main one. That is because, even if you adhere to all cold email best practices, your emails may still trigger bounces and spam complaints.
If your main domain’s reputation is damaged, all your brand communication can potentially be filtered out as spam. This, of course, may spoil your brand image and lead to revenue loss.
⚠️ Are you a Gmail or Yahoo user?
Did you know that more than three spam complaints for every 1,000 messages can already damage your sender reputation?
Learn more vital rules set by major email providers from this short video: https://www.youtube.com/watch?v=n-O_ue0L5IM
Luckily, nowadays you can purchase a separate domain for your cold email infrastructure that sounds very similar to your main domain. For example, if your main domain is company.com, use getcompany.com or company-outreach.com for outreach needs.
Here are some naming tips for cold email domain setup:
- Keep it short and easy to read. Short domains look more professional; plus, your brand’s name has a greater chance of standing out to the recipient.
- Avoid numbers and hyphens. They resemble spam or phishing domains. Both inbox filters and recipients may treat them as suspicious.
- Use reliable Top-Level Domains (.com, .io, .net, .co.uk, .ca, etc.). Well-established TLDs have higher trust and deliverability.
- Stay away from TLDs like .biz or .xyz. These extensions are frequently used in low-quality campaigns. As email providers don’t trust them, your inbox placement may be in danger.
I also recommend purchasing domains from reputable registrars, such as:
- Google Domains (now part of Squarespace) offers reliable TLDs and strong integration with Google services.
- Namecheap is best if you need bulk domain management and want DNS record changes to become visible across global servers within minutes.
- Porkbun is praised for its clean interface, good TLD availability, and free WHOIS privacy.
- GoDaddy is popular for its large inventory of TLDs and low entry-level prices (but watch out for upsells and higher renewal rates!).
You’re not limited to the above registrars for your cold email domain setup. Just ensure you’re buying from the one with a strong reputation, transparent pricing, and deep support for DNS configuration.
Step 2: Configure DNS records
Once you have the domain, you must configure it for email deliverability. SPF, DKIM, and DMARC essentially confirm to inbox providers that your messages are legitimate:
- SPF prevents spoofing
- DKIM helps the receiver verify that the incoming email wasn’t tampered with
- DMARC instructs providers how to handle suspicious mail.
Configuring these records is considered the trickiest, albeit vital, part. But don’t worry, below is the detailed guide on how to set up a domain for cold outreach in compliance with major email providers’ requirements:
✅ SPF
Set it to authorize specific servers to send email on your domain’s behalf.
- Go to your domain registrar’s DNS settings panel.
- Add a new TXT record:
Name/Host: @ (or leave blank, depending on a registrar)
Value: v=spf1 include:<email-service-provider> ~all
Where ~all (soft fail) or -all (hard fail) depends on how strict you want enforcement to be. Use ~all if you’re still testing or adding new services. Use -all only when you’re sure no unauthorized source should ever send from your domain.
For example, for Snov.io, the value would be “v=spf1 include:snov.io ~all”
- Save the record.
🔎 Expert tip: Use only one SPF record per domain. If you need to give permission to multiple services, combine them all in one SPF record.
✅ DKIM
Set it to add a digital signature to your outgoing emails.
- Generate a DKIM key in your email platform (e.g., Google Workspace).
- It will give you:
- Selector (e.g., google)
- Public key
- In your DNS settings, create a new TXT record:
Name/Host: <selector>._domainkey (for example, if your email platform is Google, it would be “google._domainkey”)
- Value: The public key string provided by your email provider.
- Save the record.
🔎 Expert tip: Each provider uses a different selector, so always check if you’re using the correct one.
✅ DMARC
Configure it to instruct your mailbox provider what to do if SPF or DKIM fails, and also receive reports.
- Create a TXT record in DNS:
Name/Host: _dmarc
Value: v=DMARC1; p=none
If you set
- p=none, your provider will only monitor the cases when SPF or DKIM fails
- p=quarantine, it will send failed emails to spam
- p=reject, the failed emails will be blocked
In order to automatically obtain these reports, specify where to send them during the DMARC configuration. Create a separate mailbox to receive DMARC reports (it can be something like “your-report@getcompany.com”).
In this case, your Value should look like this:
“v=DMARC1; p=none; rua=mailto:your-report@getcompany.com”.
After you’re finished with configuring your DNS records, remember to check if they are valid and detected correctly. There are multiple tools available for this task:
- MXToolbox
- Google Admin Toolbox
- Snov.io Deliverability check
⚠️ Remember: SPF, DKIM, and DMARC changes can take anywhere from 15 minutes to 48 hours to become visible globally, depending on your registrar.
Step 3: Create a branded mailbox
Congratulations! You’re almost done. The only step left is completing the branded mailbox setup for outreach. Creating a mailbox that looks real and trustworthy is no less essential for your outreach success than proper infrastructure configurations.
Your sender identity should feel personal, legitimate, and consistent with your brand.
If you need multiple mailboxes for outreach, it’s best to integrate them with a unified inbox, such as the Snov.io Unibox. This way, you won’t lose track of any of your conversations.
What I love most is how easily Google Workspace integrates with the Unibox. There’s no need to mess with server settings or app passwords. Just a few clicks and voila! Your Gmail account is live inside Snov.io.
Now you have full control over conversations. Meaning, tracking replies takes less time, and your reply rate is actually going up! That’s right, based on analysis of 44M+ emails sent through Snov.io, Gmail API (OAuth) yields 3.45% average reply rate, while the SMTP setup has only 1.66% average reply rate.
Outbound Outreach Expert at Snov.io
Option 2 – Done-For-You setup with Snov.io
Manual cold email domain setup sounds like a headache? If you want to save time and effort, try option number two: Snov.io’s Done-For-You (DFY) mailbox setup. This feature delivers verified domains and mailboxes automatically, so you can start outreach faster without risking deliverability errors.
Why we created the DFY mailbox setup for outreach
Many users don’t know how to set up a domain for cold outreach correctly, which often results in poor deliverability. And we never want that for our clients!
That’s why Snov.io decided to make cold email infrastructure setup instant, reliable, and fully automated.
Moreover, setting DNS records, mailboxes, and warm-up takes time and requires technical know-how, often delaying the start of campaigns. Meanwhile, most cold outreach platforms can’t work properly until the domain and email accounts are configured correctly.
DFY cold email domain setup removes the friction by handling everything for you. So you can focus directly on what matters: launching personalized campaigns, improving deliverability, and generating replies.
Our Done-For-You Domains and Mailboxes solve one of the biggest barriers to successful outreach: technical setup.
By making domain selection, authentication, and mailbox creation easy, we eliminate manual errors and long setup cycles. It gives non-tech users a fast, reliable, and fully compliant email infrastructure from the start.
Head of Product Marketing at Snov.io
What you can do with the DFY cold email domain setup
By using the DFY mailbox setup for outreach, you can:
- Purchase and connect domains
You just need to choose a domain name, and the system will automatically suggest available TLDs for it.
- Create ready-to-use mailboxes
I recommend having at least 2-3 domains, with 3-5 mailboxes per domain. The minimum purchase is 3 mailboxes, but the exact number depends on your sending volume. Consider that the optimal sending volume per mailbox is 20-30 emails per day, while sending more than 50 emails per day is considered risky.
SPF, DKIM, and DMARC will be configured automatically. You’ll also be able to easily set up tracking and forwarding. Normally, forwarding requires DNS changes, but with the DFY cold email domain setup, you only need to update the redirect domain in your account. Snov.io will do the rest for you!
How to set up a domain for cold outreach easily with Snov.io
Arranging a well-configured cold email infrastructure takes only a couple of minutes if you use a DFY option from Snov.io. See how easy it is:
- Go to the Email Account section and click “Add email account.”
Choose the “Done-for-you mailboxes” option.
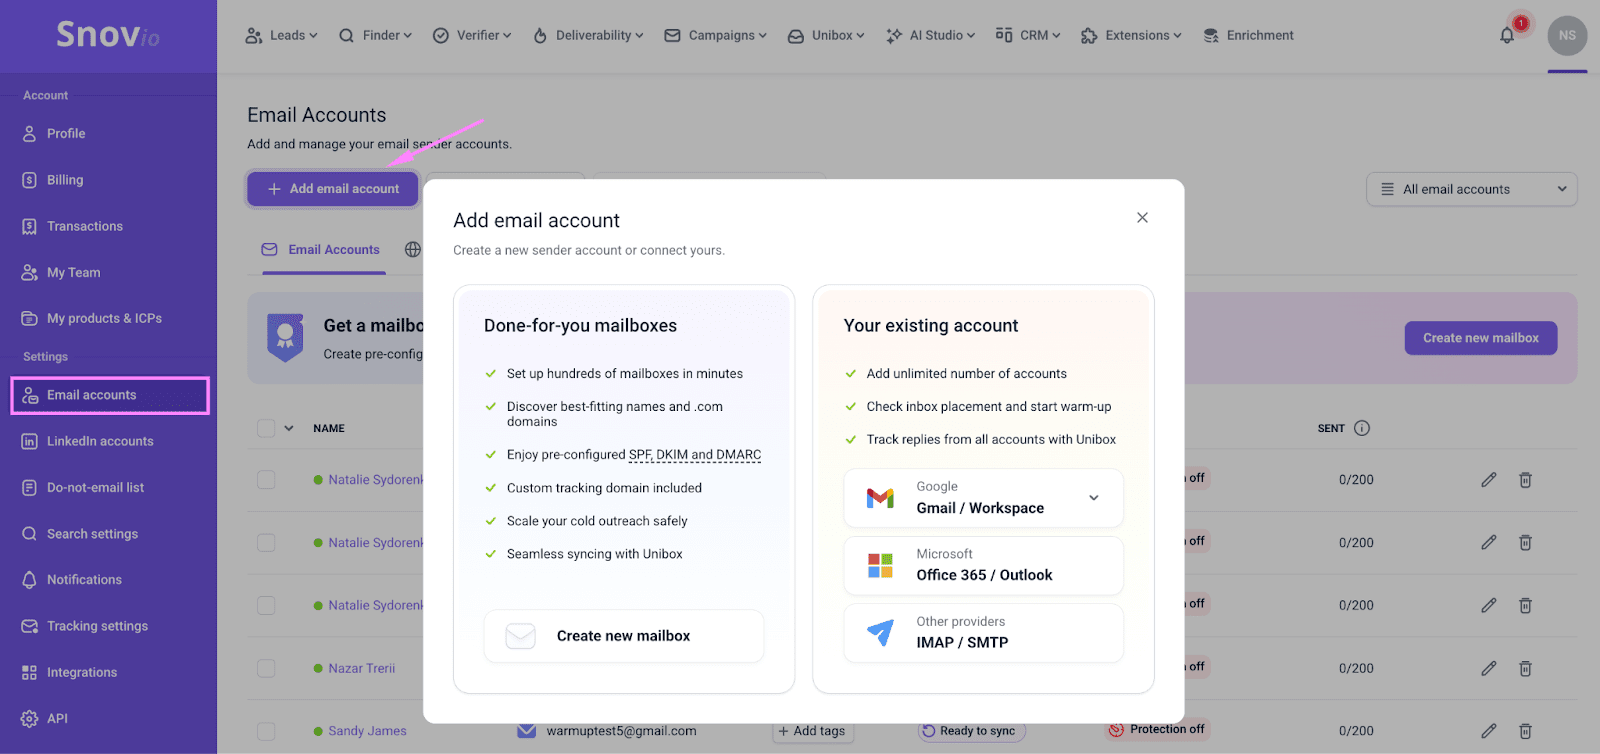
Click the “Create new mailbox” button.
- In the “Find domain” field, enter your company domain name.
Example:
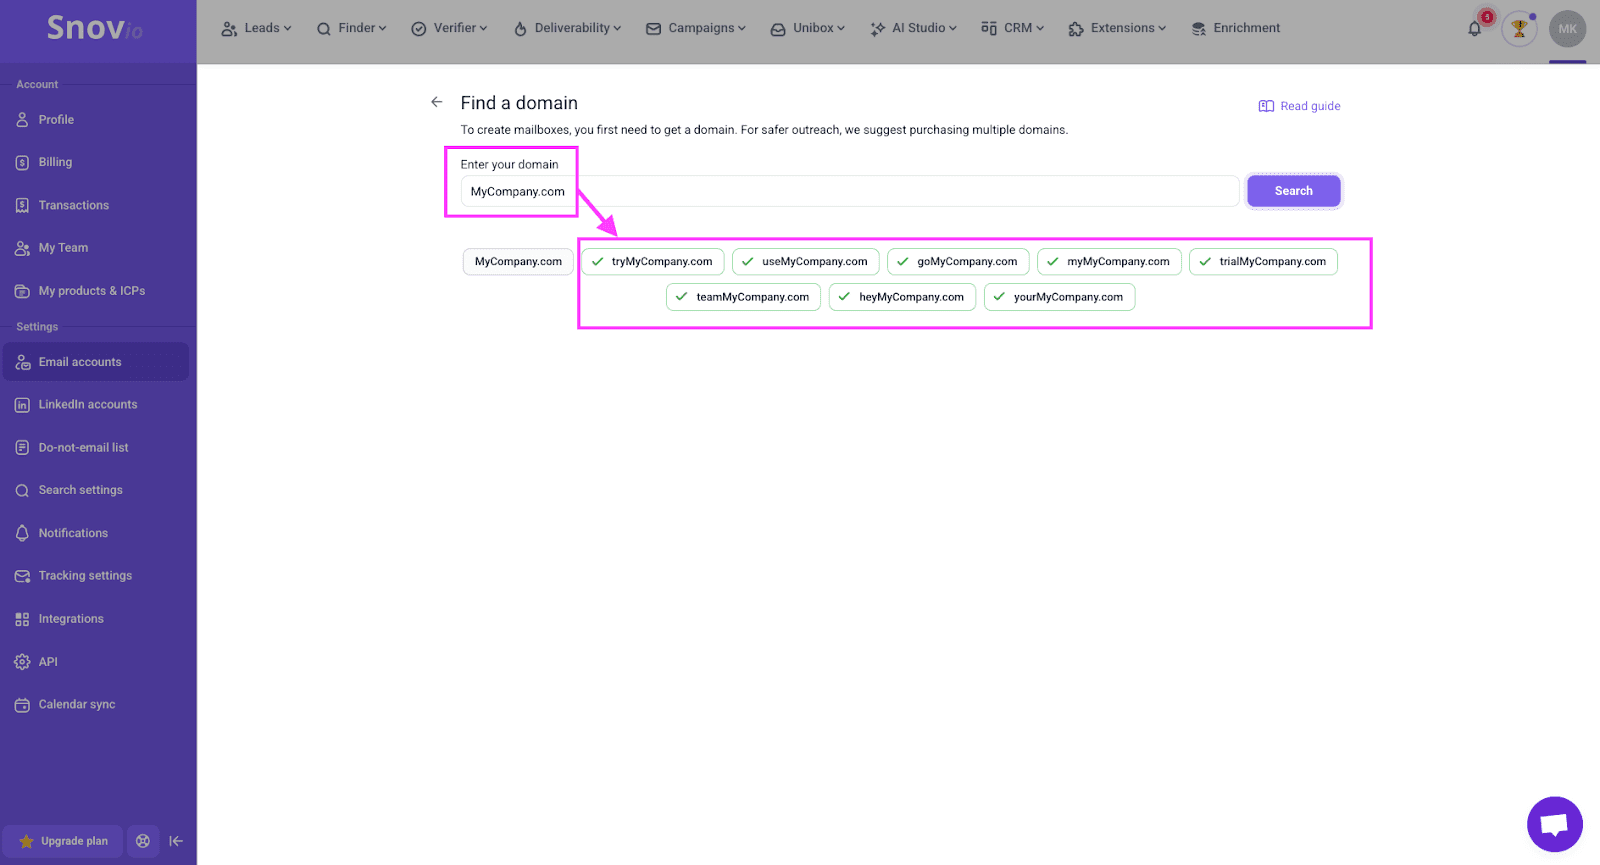
The system will use it as a reference to offer domain variations you can use.
- Select all domains you like in order to see how much each one would cost.
The domain price varies, so if you risk running over the budget, simply try another variation of the domain name.
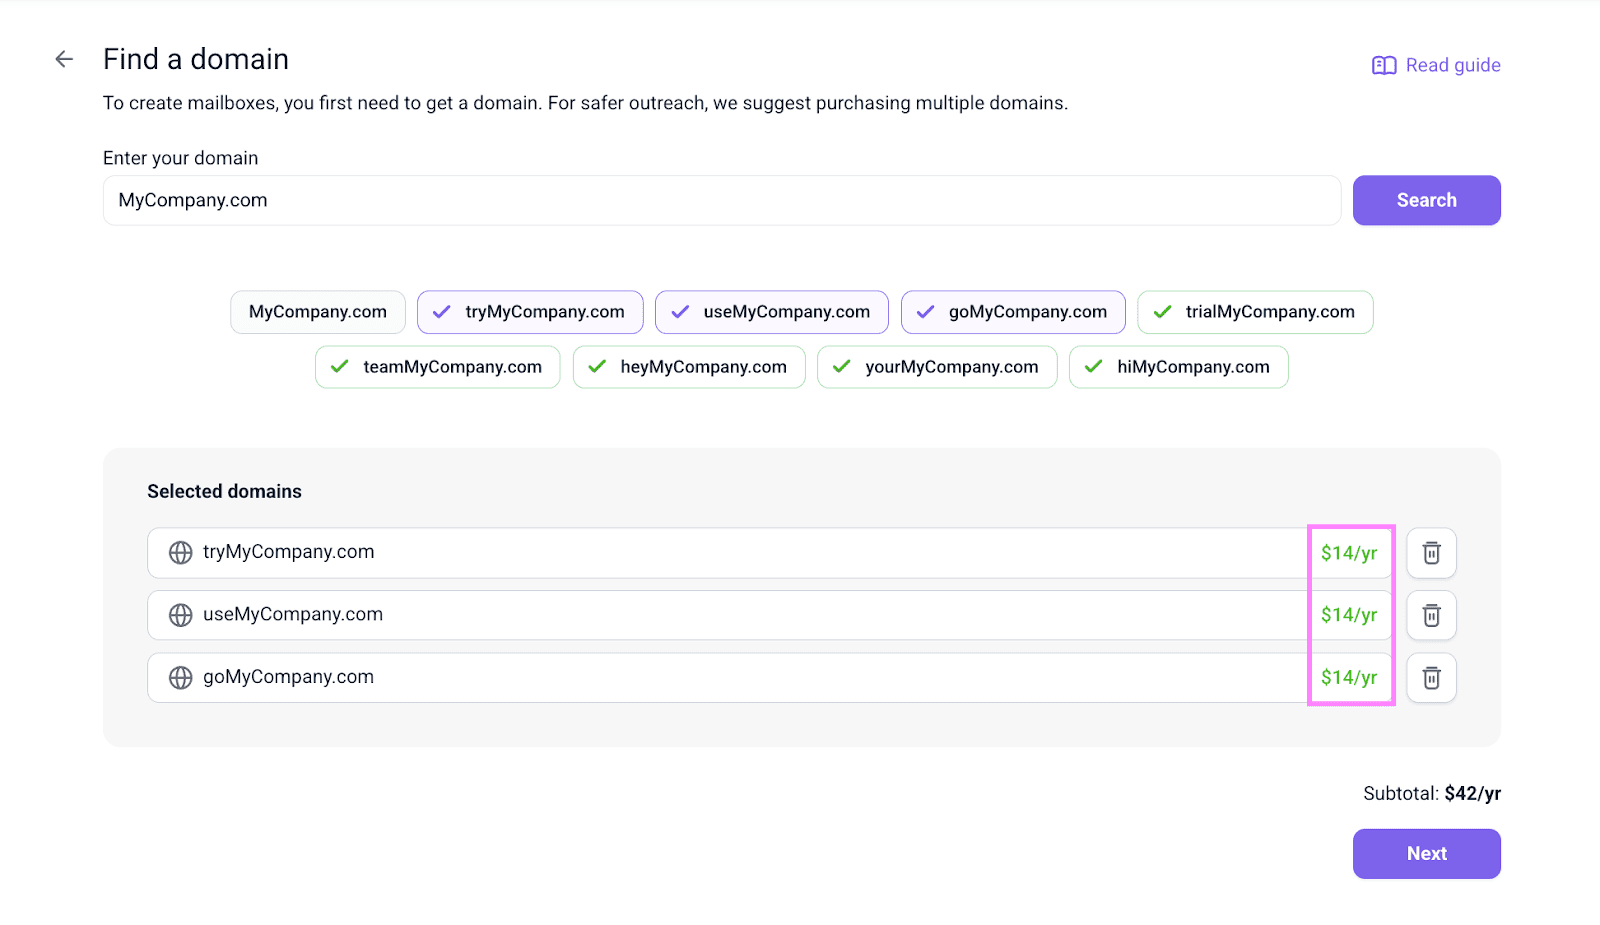
Click “Next”.
- Create a minimum of 3 mailboxes.
You can set the same sender’s name for all of your domains, or a different one for each.
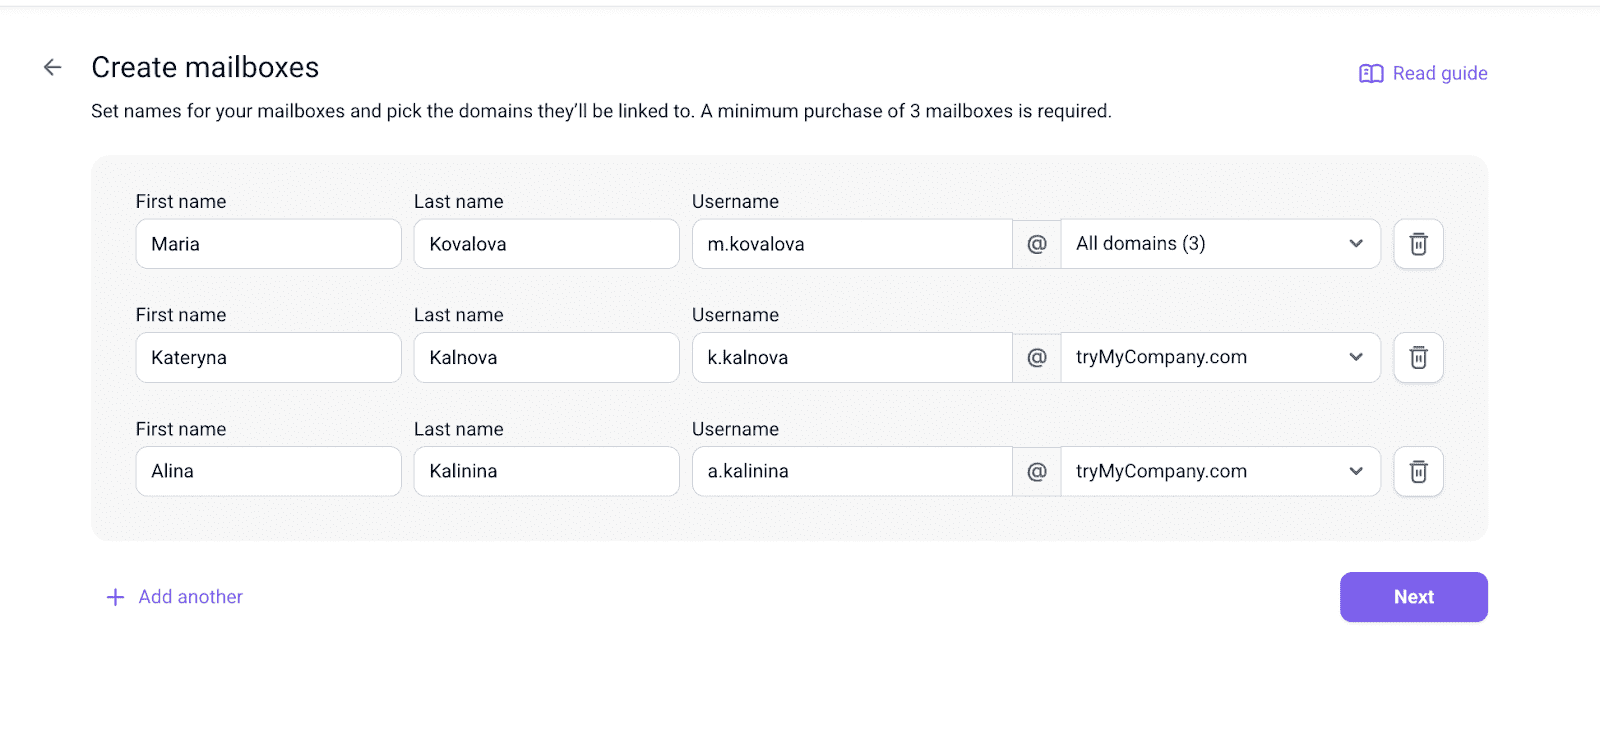
Click “Next”.
- Double-check your order.
Note that you only pay for each domain once a year, while mailboxes cost $ 4/month per mailbox.
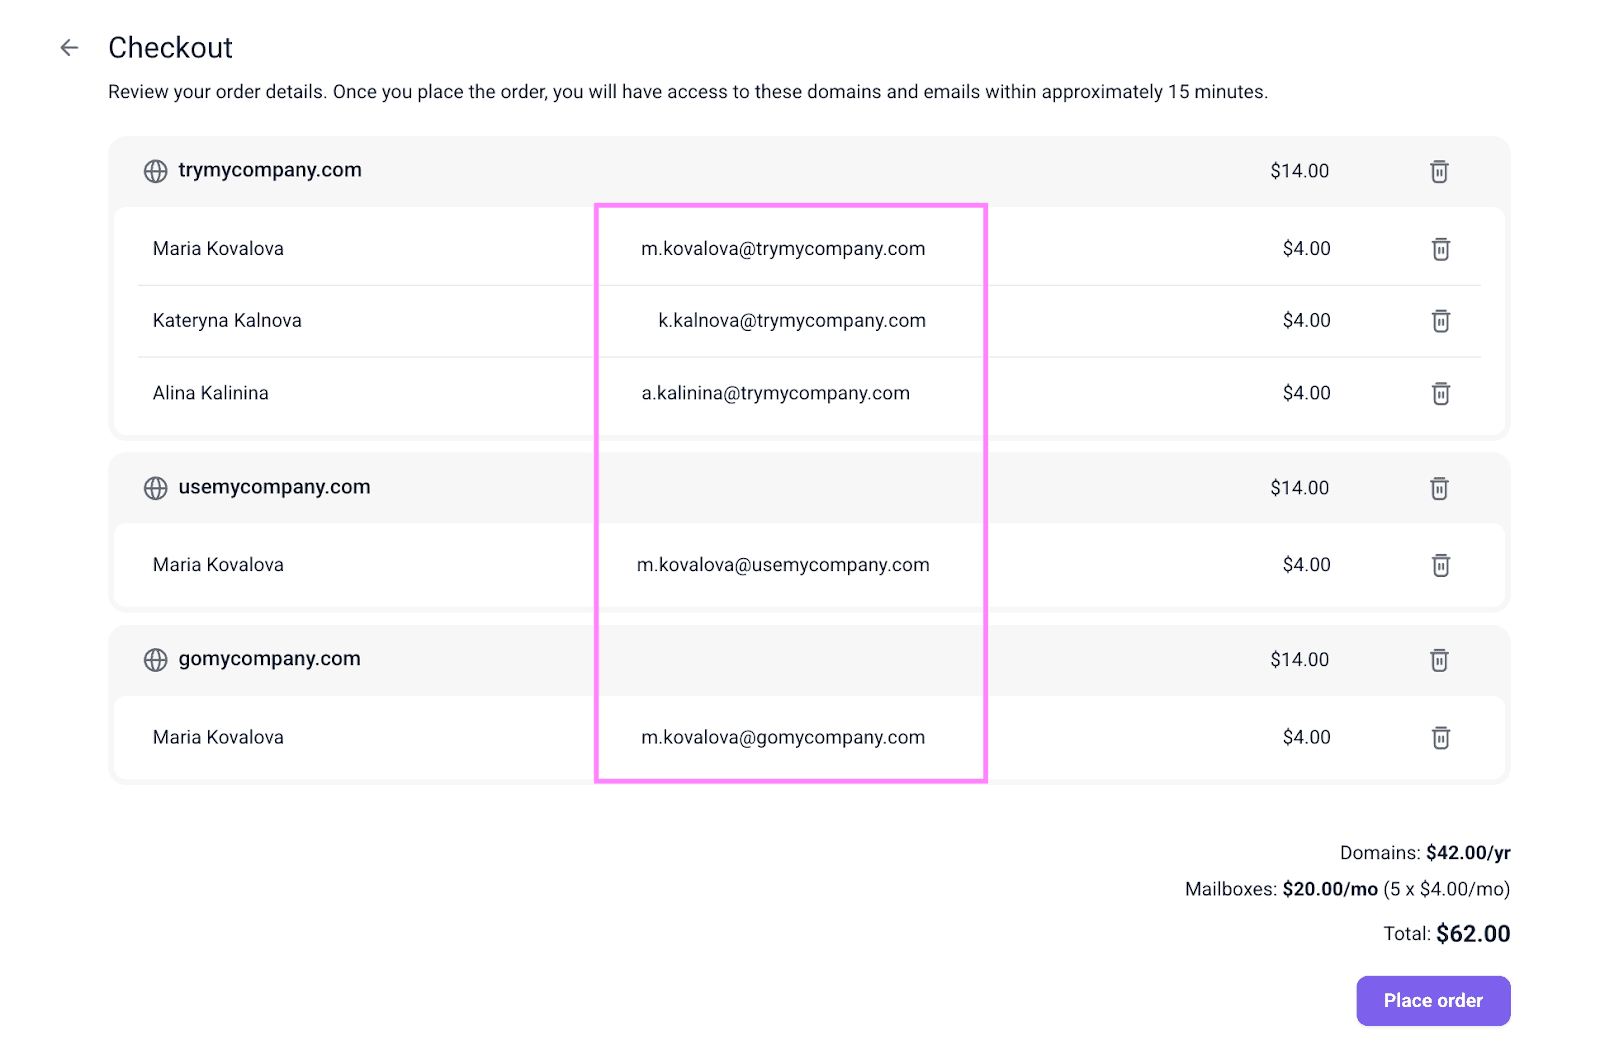
Place the order and wait a few minutes for the setup to complete.
- Once Snov.io does its magic, your mailboxes will appear automatically in your account.
You can treat DFY accounts as regular ones from the moment you’re done setting them up. Meaning, you can start email warm-up right away and later check deliverability, launch campaigns, receive replies, and track results.

How to establish the credibility of your new mailbox with email warm-up
If you’ve never dug into how to set up a domain for cold outreach, you might think warm-up is optional. Well, it’s not.
Why email warm-up matters
A brand-new domain has no decent sender reputation yet. That’s why emails sent from cold domains often land in spam.
At this stage, you should teach inbox providers to trust your new address before starting cold outreach. Email warm-up helps you do this by slowly building a positive sender reputation and ensuring consistent deliverability. It’s like stretching before a workout – essential to avoid injury.
Keep in mind that not only your cold outreach mailbox needs warming, but the tracking domain as well. It will signal to inbox providers that the tracking domain is used for legitimate, low-risk activity, improving the chances your emails land in inboxes.
Outbound Outreach Expert at Snov.io
How to warm up your new mailbox with Snov.io’s Email Warm-up Tool
The fastest and most reliable way to get your new mailboxes ready for launching a campaign is to use dedicated software. Today, one of the best solutions on the market is Snov.io’s Email Warm-up Tool, which may help you run the process with minimum effort.
You can enable email warm-up through Snov.io’s app in just a couple of minutes:
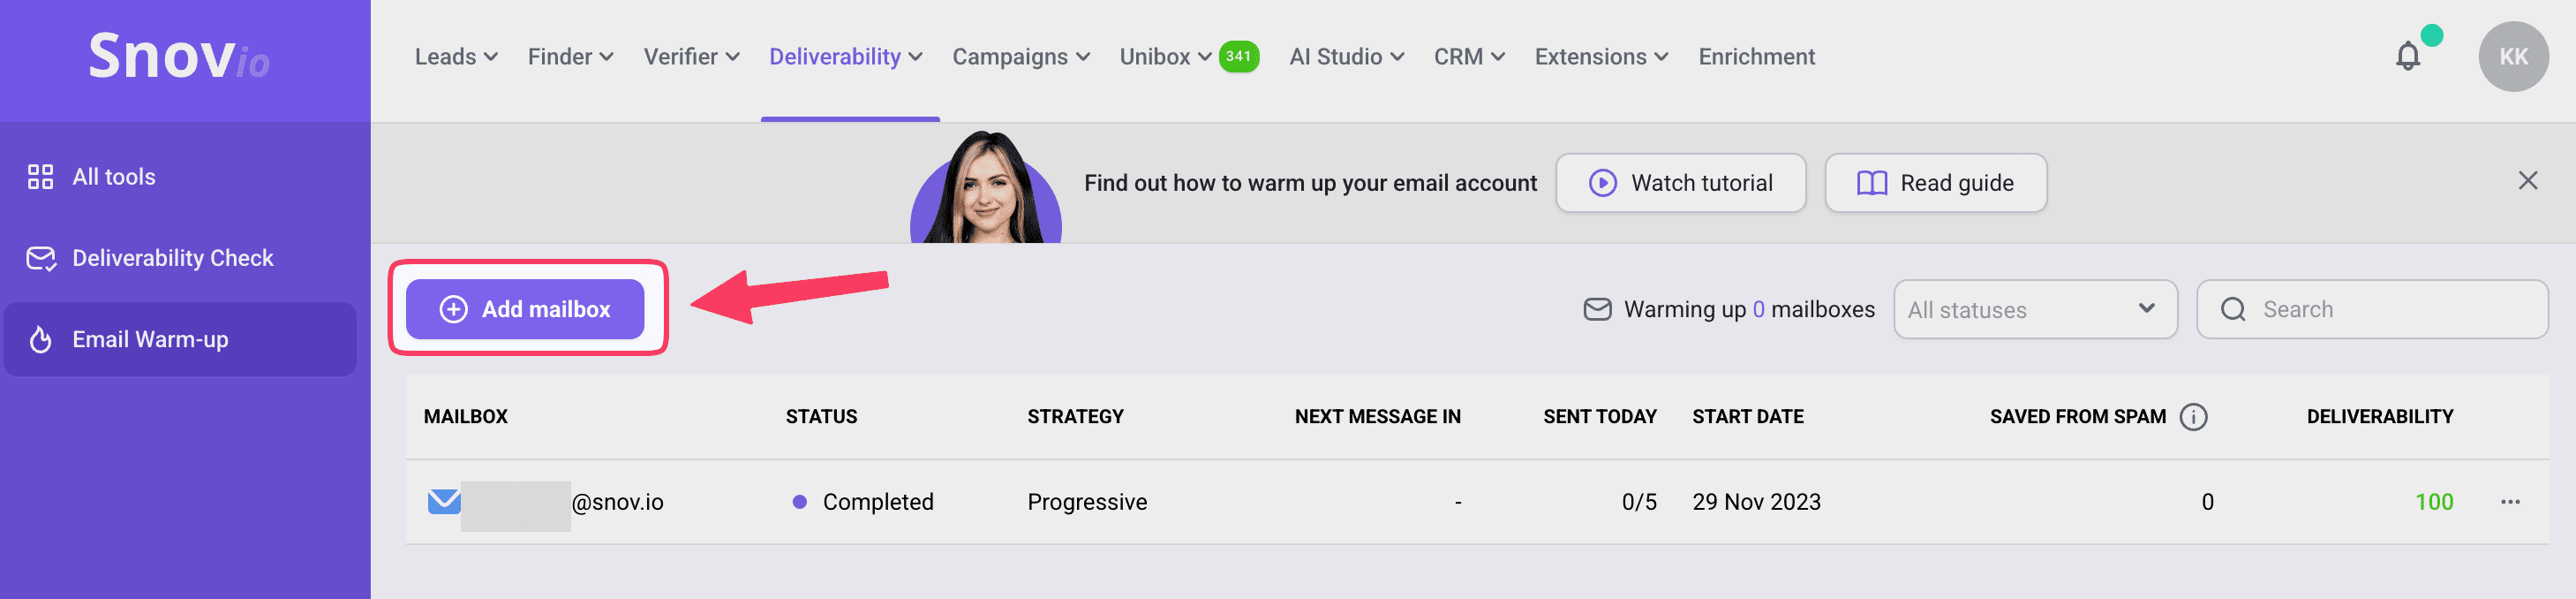
- Select “Email warm-up” under the Deliverability tab at the top of your Snov.io dashboard.
- Click “Add mailbox”.
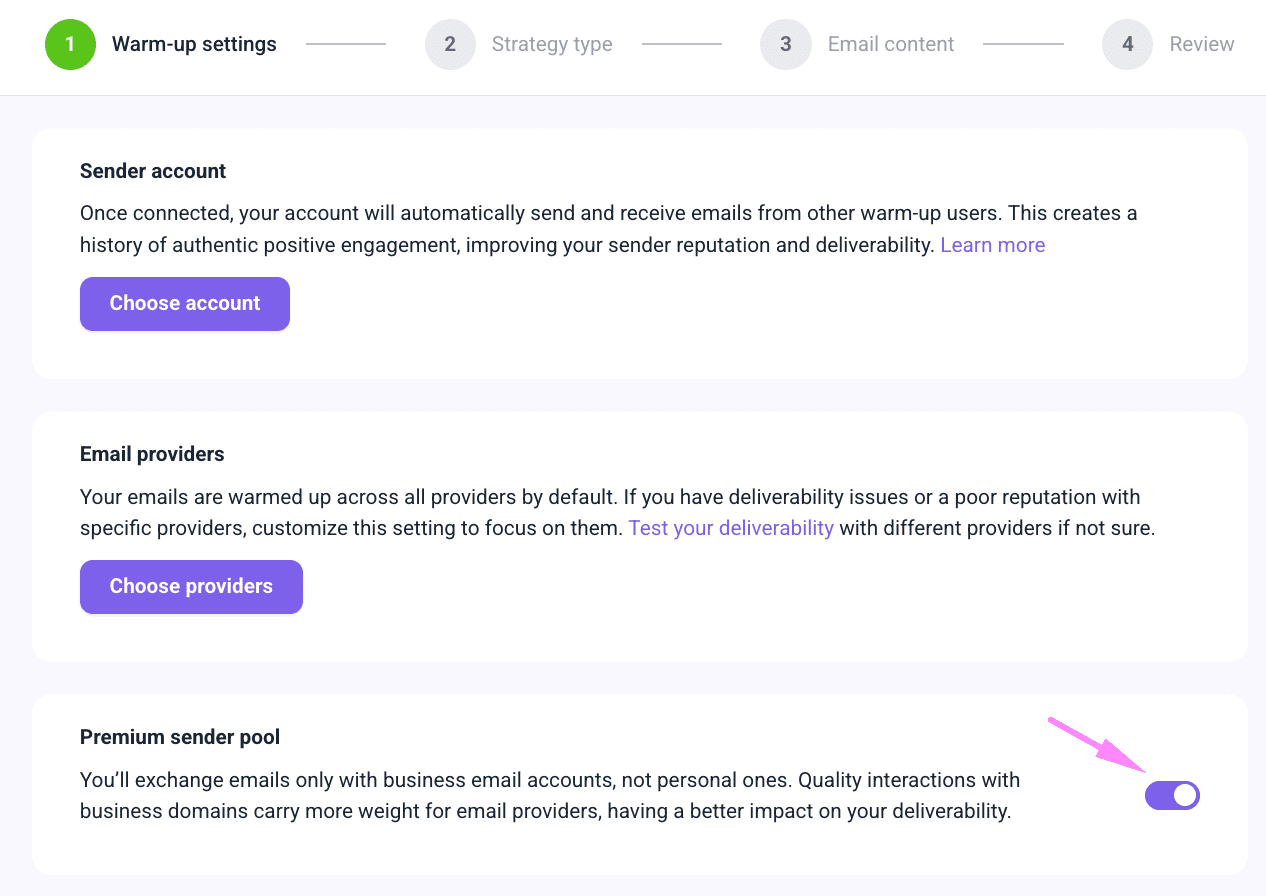
You’ll be able to choose the mailboxes you want to warm up, along with your warm-up pool.
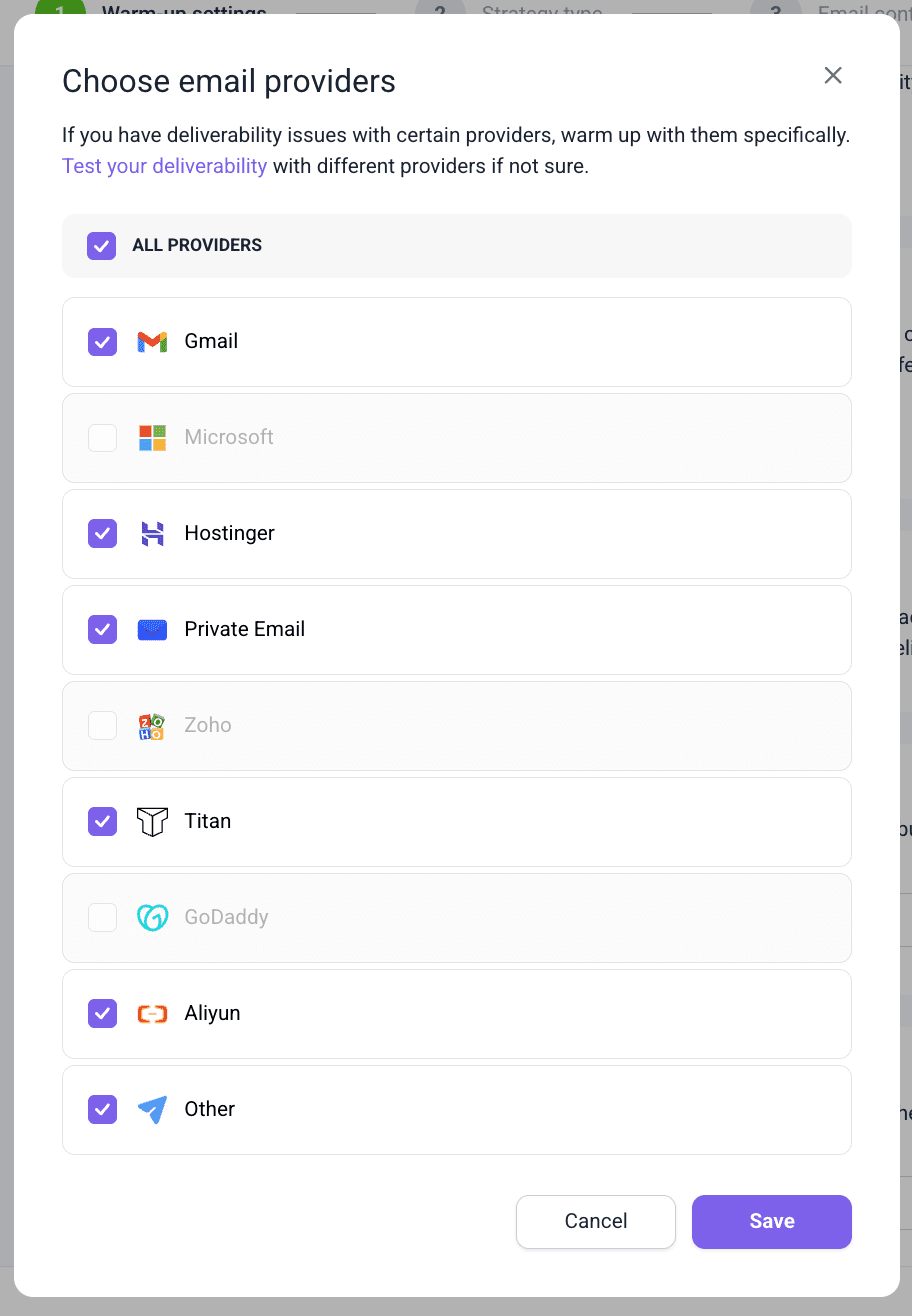
If your prospect base is concentrated within a specific email ecosystem (e.g., Outlook or Yahoo), the smart thing to do is to target your warm-up to these providers. You can do this by choosing the particular providers during this step.
Also, by default, your account will be warmed up together with other accounts on free domains. To signal more credibility and warm up the business account more effectively, select the “Premium warm-up pool” option.
The rest of the settings (reply rate, campaign duration, dynamic proxy, schedule) will be recommended by Snov.io. Don’t worry – our experts know exactly how to set up a domain for cold outreach and provide recommendations that fit this stage perfectly.
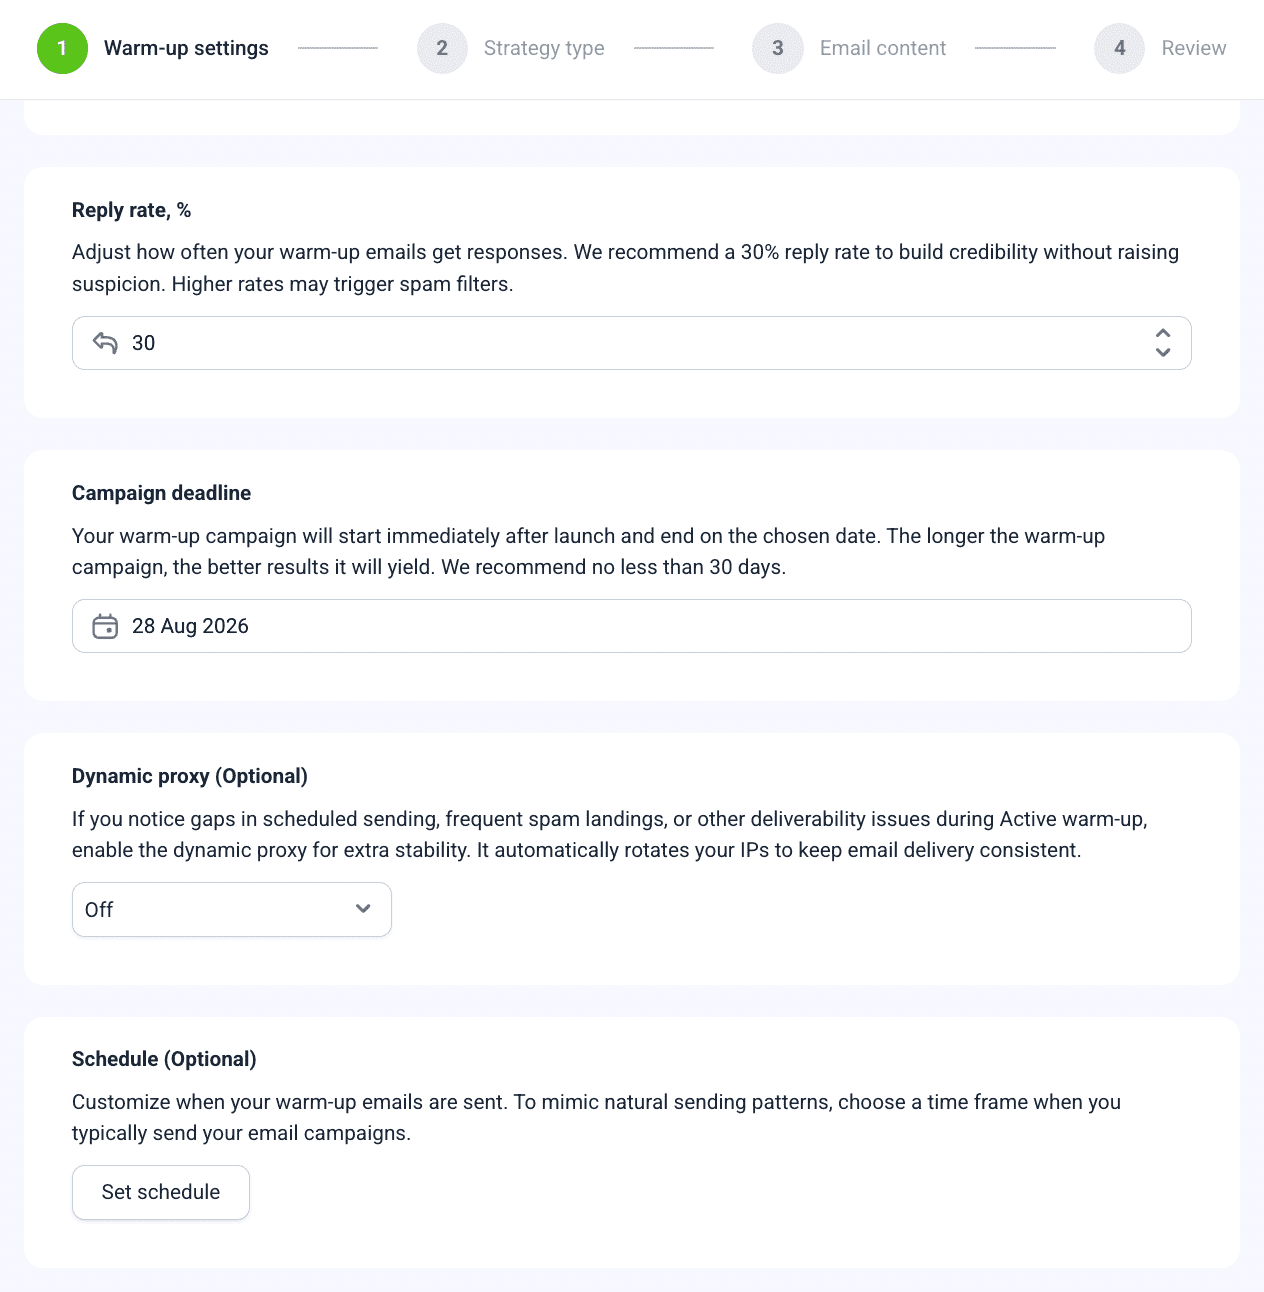
💡Pro-tip: If you’re warming up multiple mailboxes at once, sending across regions, or dealing with strict providers (e.g., Outlook or corporate filters) – turn on dynamic proxy. Dynamic proxies rotate IPs and locations for your warm-up traffic, so it looks more organic and human-like.
- Choose the desired warm-up strategy type.
I recommend picking a Progressive strategy for new mailboxes.
Start with 2-5 emails/day, and increase gradually to 30 emails/day over the course of 2-4 weeks.
- Choose the type of content for your warm-up.
For new mailboxes, it’s best to create plain text messages. They look more like real, person-to-person emails, which is way less suspicious to providers than HTML-heavy content. Also, don’t forget to use Spintax variables while configuring the warm-up messages. It will ensure your account sends many unique versions of the same email.
Or, you can simply let Snov.io AI email generator create messages for you.
💡Note: At this point, you’ll also be able to start warming up your custom tracking domain. This action is essential because inbox providers evaluate not only the sending mailbox but also the domains linked inside your emails.
- That’s it! Review and start your warm-up.
As you can see, this procedure is very straightforward, simple, and fast. Yet it can save hundreds of your messages from landing in spam.
➡ ️Still have questions? Learn more about email warm-up.
Your campaign pre-sending checklist: technical readiness and cold email best practices
Proper preparation prevents issues that could take weeks to recover from. So, before launching your campaign, double-check that your setup is secure, in particular:
✅ SPF, DKIM, DMARC are verified
✅ Tracking domain is configured
✅ Forwarding domain is active
✅ Mailbox is warmed up for at least two weeks
Additionally, remember that even with the properly configured cold email infrastructure, you can hurt your email deliverability unless you follow these cold email best practices:
- Clean your contact list regularly
Removing invalid, unresponsive, or outdated addresses reduces bounce rates and spam complaints. A clean list leads to higher sender reputation, engagement, and deliverability across campaigns.
- Personalize every email to avoid spam filters
Generic, mass-sent content increases spam scores. Personalization signals legitimate intent and improves open and reply rates, which inbox algorithms reward with better placement.
- Keep backup domains warming in the background
Warming backup domains prepares them for immediate use if the main domain is compromised. This ensures continuity without harming your sender’s reputation on your new infrastructure.
- Monitor reply and bounce rates
High bounce or low engagement signals poor list quality or sending practices. Tracking these metrics helps you react early: pausing risky campaigns and making improvements. You can access them from your Snov.io account dashboard.
Wrapping up
In 2026, a proper cold email domain setup directly affects your cold outreach success, hence revenue. In this post, I’ve shared two options of how to set up a domain for cold outreach.
Manual setup gives you full control and technical transparency, but it takes time, skill, and precision. Snov.io’s done-for-you mailbox setup for outreach automates the entire process, letting you focus on messaging and sales instead of DNS settings.
No matter which way you choose, ensure you configure your cold email infrastructure correctly. Remember to warm up mailboxes and tracking domains, and stick to the cold email best practices while launching campaigns.
Invest a few minutes in getting your setup right with Snov.io today, and your campaigns will keep delivering tomorrow.