This playbook answers the most important questions you might have before you start working with Snov.io. It also describes the most important parts of our platform to help you set up your account.
Our goal is to help you deliver results to your clients, increase your own client base and grow your revenue. Here's how you can leverage Snov.io’s tools to achieve that:
Is Snov.io right for your agency?
Part I: How to add unlimited client accounts
Part II: How to improve deliverability and send bulk campaigns safely
Part III: How to upload and find leads
Part IV: How to create personalized email and LinkedIn automations
Part V: How to assign interest levels based on prospects' replies
Part VI: How to monitor statistics and export reports
Part VII: How to integrate with other apps and create automations
Is Snov.io right for your agency?
First, let us address a key question that might be on your mind. Is Snov.io the right choice for your agency? To answer that, here’s what you get using Snov.io:
Flat rates with unlimited key quotas
Growing your agency and revenue requires scalability. We offer flat rates and unlimited seats so you can scale easily. You also have no limit in crucial quotas such as email accounts, storage, and campaigns. This means you can manage more clients without any extra costs.
Upload your own leads or collect lists with our tools
Along with the importing option, Snov.io offers versatile lead generation tools that cover almost any method for finding leads. Plus, we automatically verify any leads you save, so you don't need to purchase extra tools for verification.
Bulk campaigns made safe
You get a built-in deliverability package, also including a built- in warm-up tool, that prepares accounts for outreach and detects any potential issues, allowing you to fix them before they impact your campaigns.
Multichannel (email+LinkedIn) outreach automation
Launch automated sequences of LinkedIn actions in combination with emails for a broader reach and more replies.
Personalized sequences at scale
You’ll have several options at your disposal to send more targeted and personalized sequences in bulk – from adding text placeholders and dynamic content to sending emails based on lead’s details and actions.
Wide range of integrations with other software
You can integrate with popular CRMs like Pipedrive and HubSpot or create your own automations using Snov.io API and no-code integration platforms like Zapier and Make.
Unlimited support and implementation services
We care about your growth—from the moment you sign up and for as long as you are our customer, you receive constant guidance from our Success Managers. We'll help you with account setup, implementation of Snov.io tools, and share insights on using them more efficiently.
On top of that, our Support team will always be at your service to answer any questions or help with troubleshooting.
Part I: How to add unlimited client accounts
In the first part, we’ll show you how to set up a framework for managing client accounts in Snov.io.
1.1 Add clients to your account
Each client will need their own Snov.io account that will then be added to the admin’s team. You can also add existing Snov.io accounts to your team, if your client has one.
Admin account: The account you used to purchase the Snov.io plan will serve as the admin (aka team leader's) account. This account will manage the subscription and create a client dashboard.
Client accounts are set up as team members under the admin's team. To add an account to your team, go to My Team page.
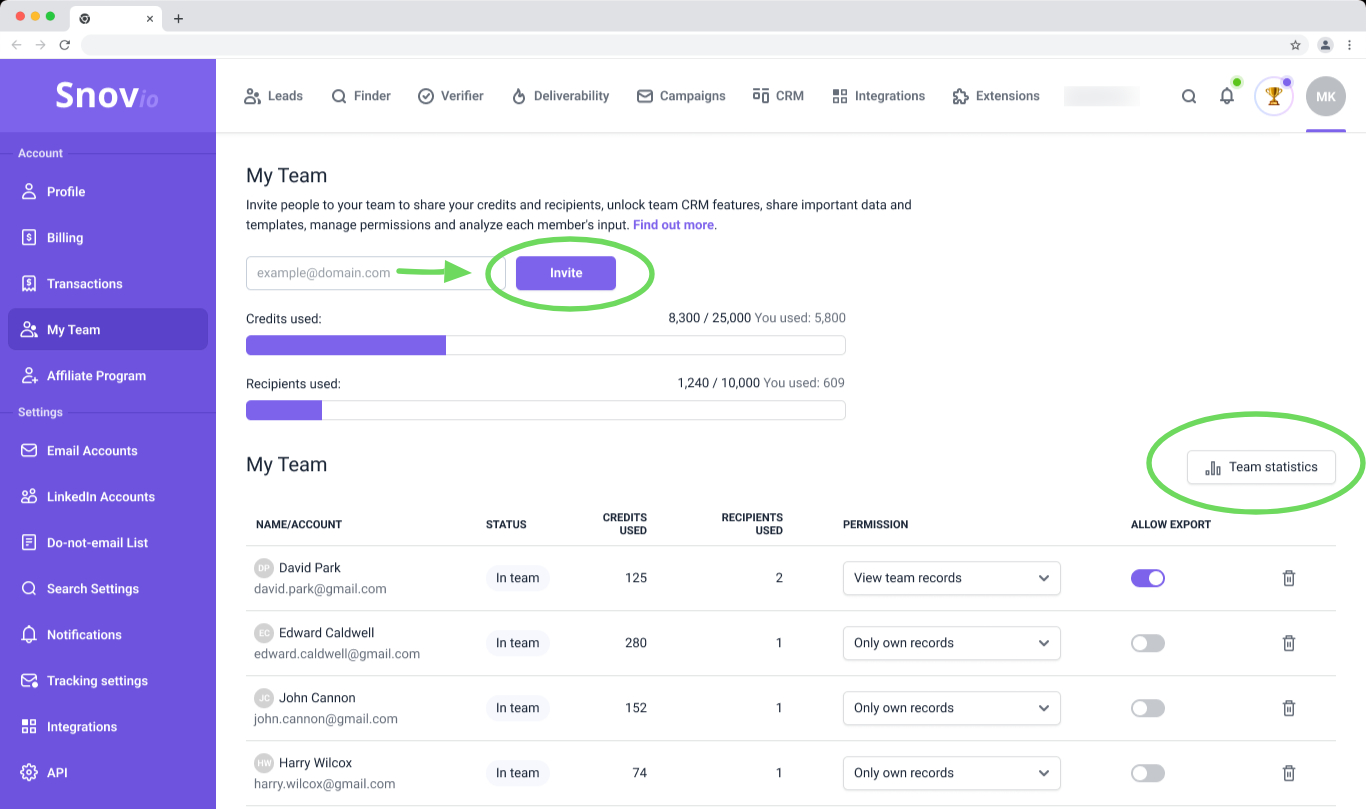
We offer unlimited free team seats so you can add as many client accounts as needed at any point, regardless of your plan size.
On the My Team page, the admin can see an overview of all client accounts under their management.
The accounts you add to the team will use the quotas (credits, recipients, warm-up slots, LinkedIn account slots) allocated to the admin's paid account. Each team member (client account) will also have access to the same features as the admin, with their own lead storage, campaigns, and reports.
As an admin, you can view all records and activities within client accounts, including lead lists, campaigns, and credit/recipient expenditures for each team member account.
Your agency's team members can access client accounts using the login details and manage them with full control. Note that your clients will not have remote access to the Snov.io accounts you manage.
Read more on how Team account works.
1.2 Connect unlimited email accounts
To use deliverability tools and send automated campaigns, you’ll need to connect your client’s email accounts. Open the Email Accounts page to add and manage the senders. We support connection through SMTP with all the popular providers (and any custom host) as well as direct connection with Gmail and Microsoft.
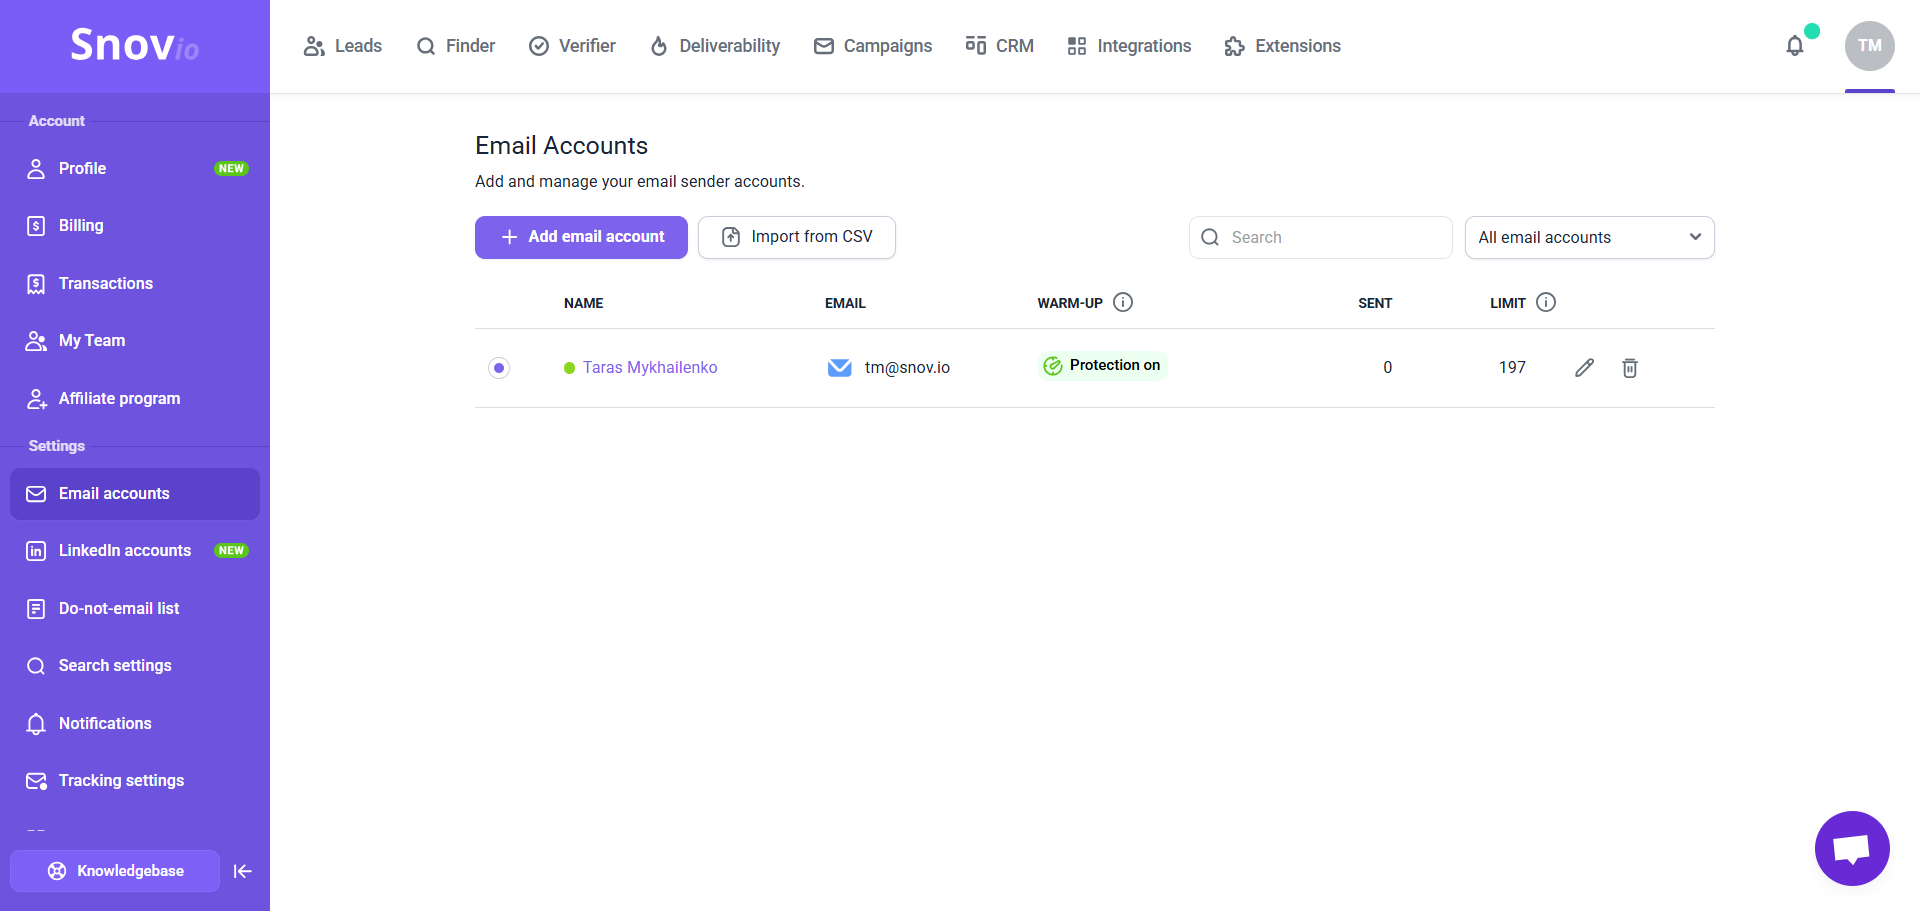
Each team member (client) will have an unlimited number of email account slots. This comes with no extra charges per slot, unlike many competitors who charge per added email address.
To speed up the setup process, you can add email accounts in bulk using the Import from CSV option. You'll need to upload a CSV file with SMTP/IMAP settings, and Snov.io will automatically configure the email senders based on data in your file. You can add up to 100 email accounts in a single import. Read more about CSV requirements.
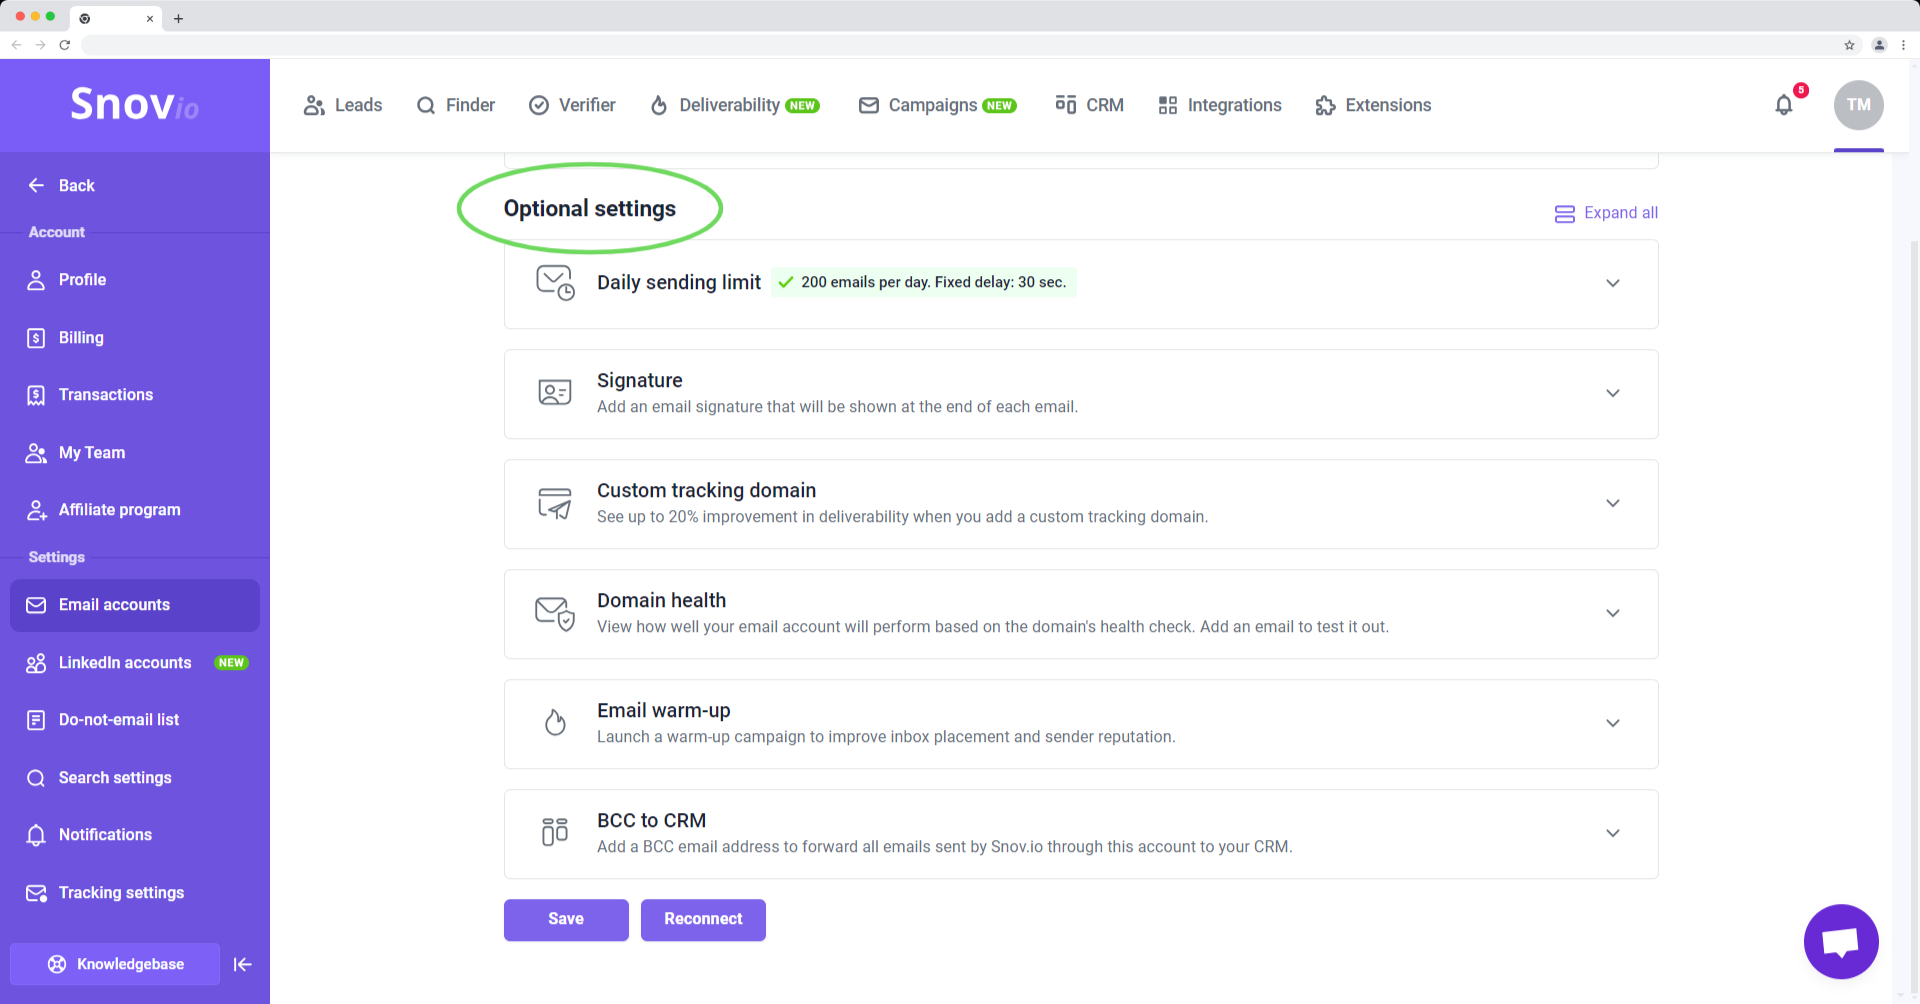
Each email account has optional settings that you can configure, including adding a custom "From" name and signature, setting daily sending limits, and adding custom tracking domains.
1.3 Connect LinkedIn accounts (for LinkedIn Automation)
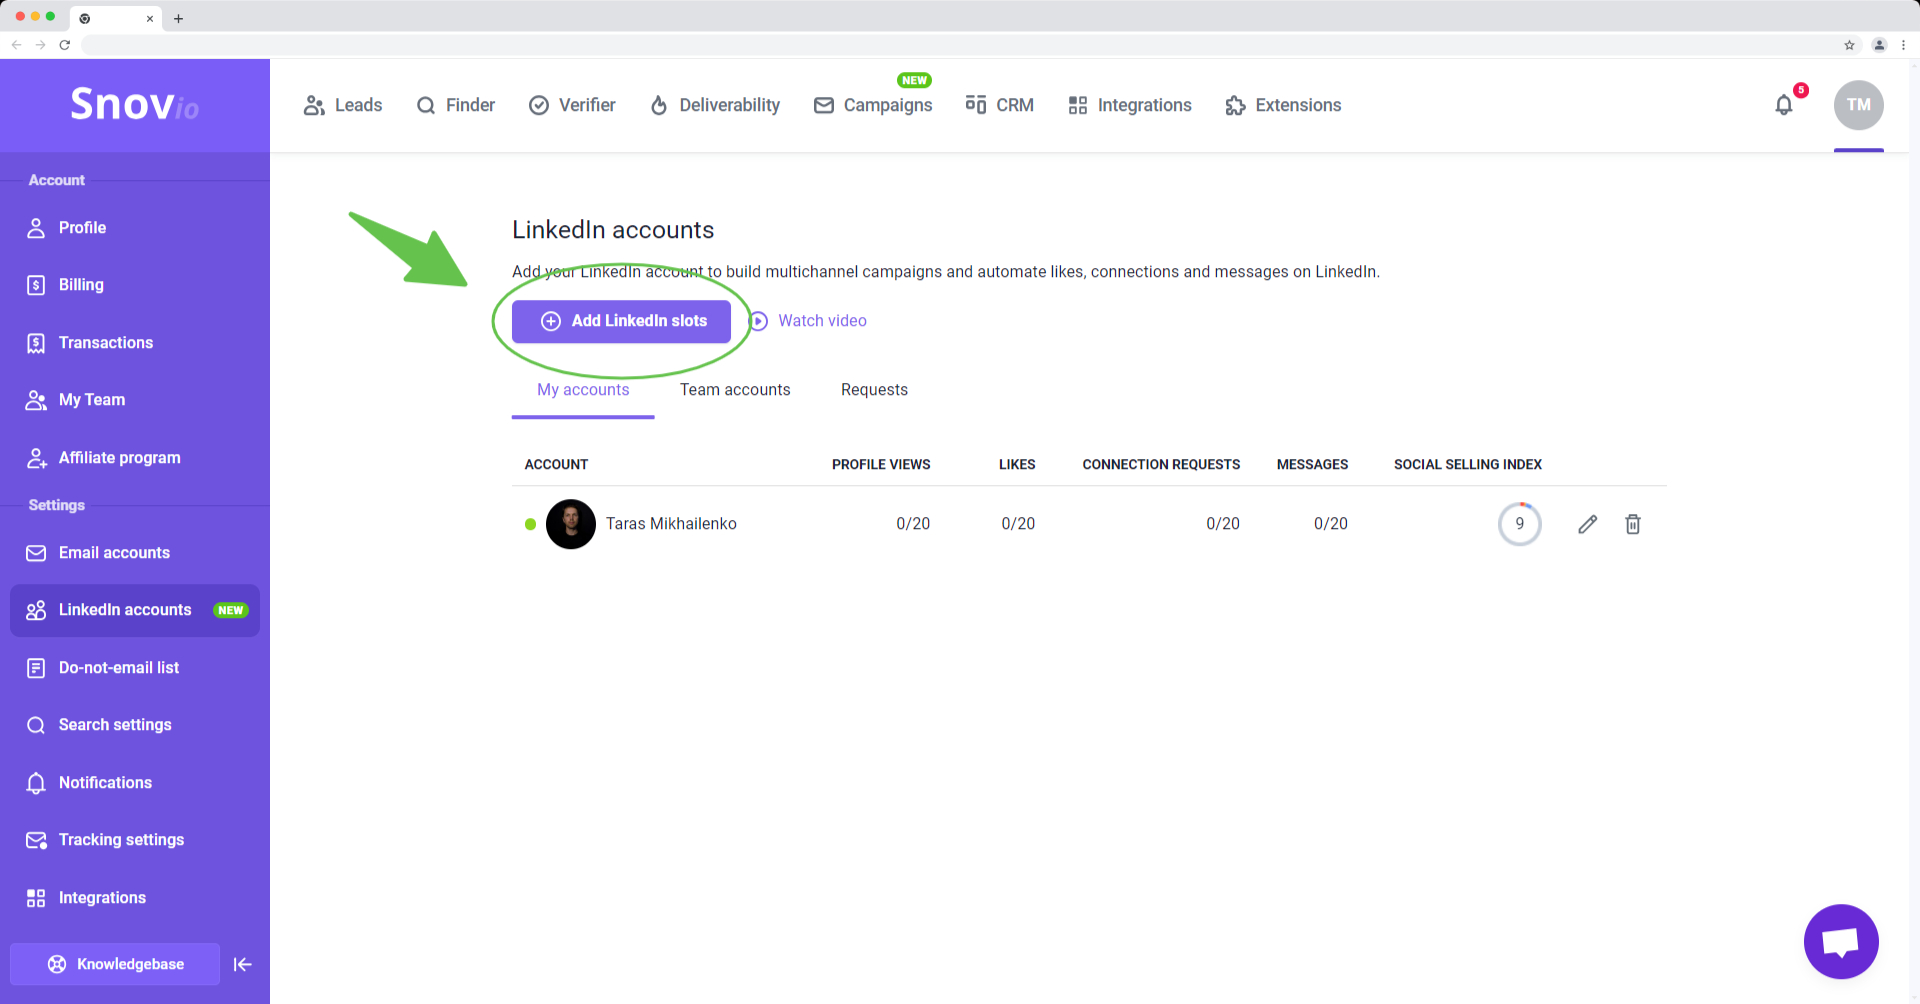
Snov.io's toolset includes a LinkedIn Automation add-on to help you run LinkedIn campaigns for your clients or incorporate automated LinkedIn touches as an additional outreach channel.
LinkedIn accounts are charged per slot on a monthly basis (30-day rolling period with prorated charges). Each LinkedIn slot can store one LinkedIn account.
Go to the LinkedIn Accounts page to get LinkedIn slots and connect accounts.
You can get LinkedIn slots under the Team admin account and distribute them across client (member) accounts. Learn how to assign LinkedIn slots to team member accounts.
Connecting an account requires real login details and confirmation via two-factor authentication. You may need to request these details from your client.
We use location-based proxies with dedicated IP addresses to ensure account safety while using automation. We also set safe daily limits for actions based on the LinkedIn account's SSI score.
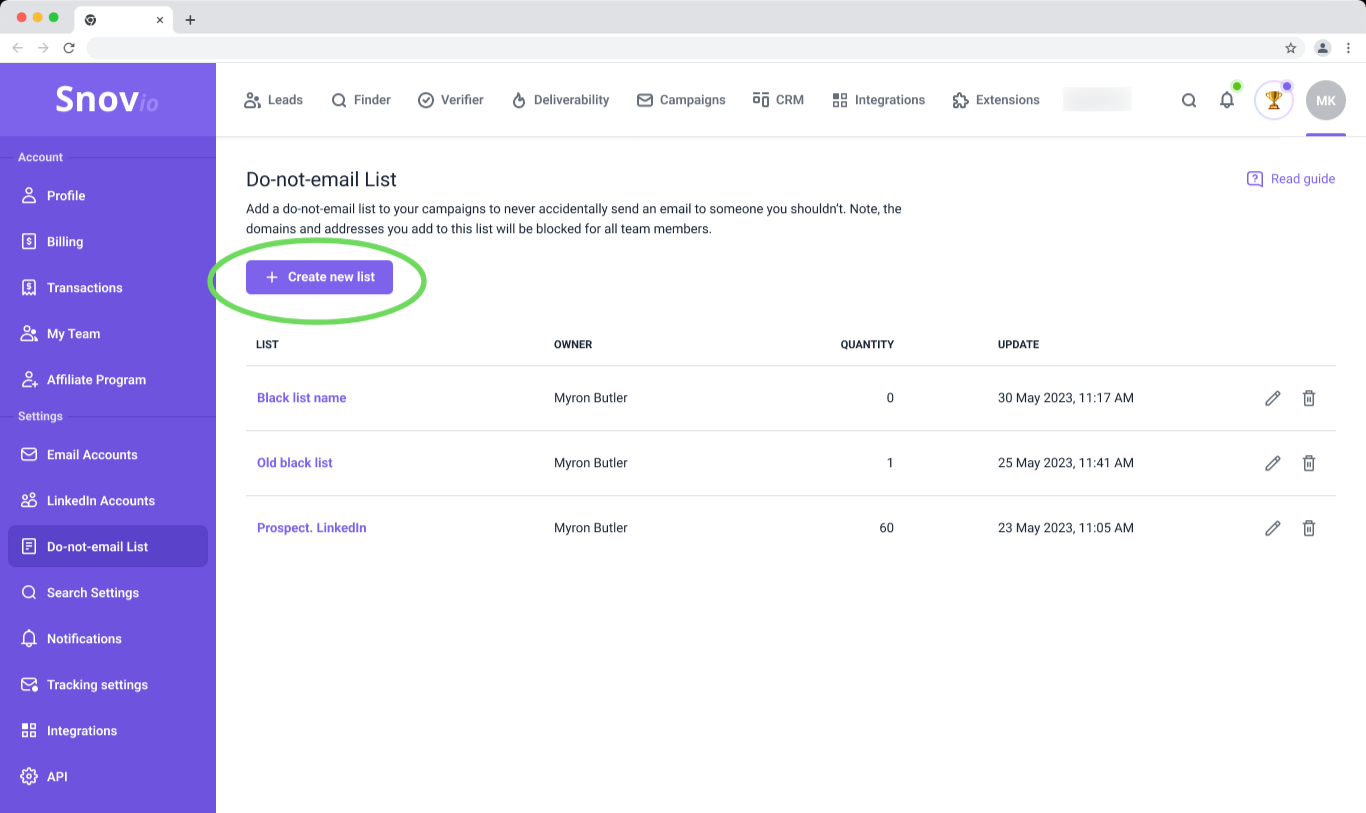
1.4 Add No-send lists
When managing campaigns for your clients, it's crucial to ensure that your emails reach only the intended recipients. To address this concern, there’s the Do-not-send lists feature in Snov.io. This option allows you to upload lists of email contacts/domains that should be blocked from receiving campaigns.
To add no-send lists, go to the Do-not-send Lists page in the account settings.
No-send lists are shared across all client (team) accounts. This means that lists added in the admin (team leader's) account are applied to all member accounts, while lists added to specific client accounts are only applied to campaigns within those accounts.
The capacity for no-send lists is scalable – your Team account supports up to 200 no-send lists, each up to 10 MB in size. If this isn’t enough for your needs, just let us know, and we can look into increasing it for you.
You can also use the API endpoint to create automation that adds contacts to a no-send list. Refer to our API documentation for more information.
Part II: How to improve deliverability and send bulk campaigns safely
Your Snov.io toolkit comes with a set of features that help make your bulk campaigns safe and provide greater control over their deliverability.
Before launching campaigns, you can warm up accounts and run several useful tests to troubleshoot potential issues before they have any impact on the campaign results.
You won’t have to use any additional software for this purpose – deliverability package is built into your Snov.io account.
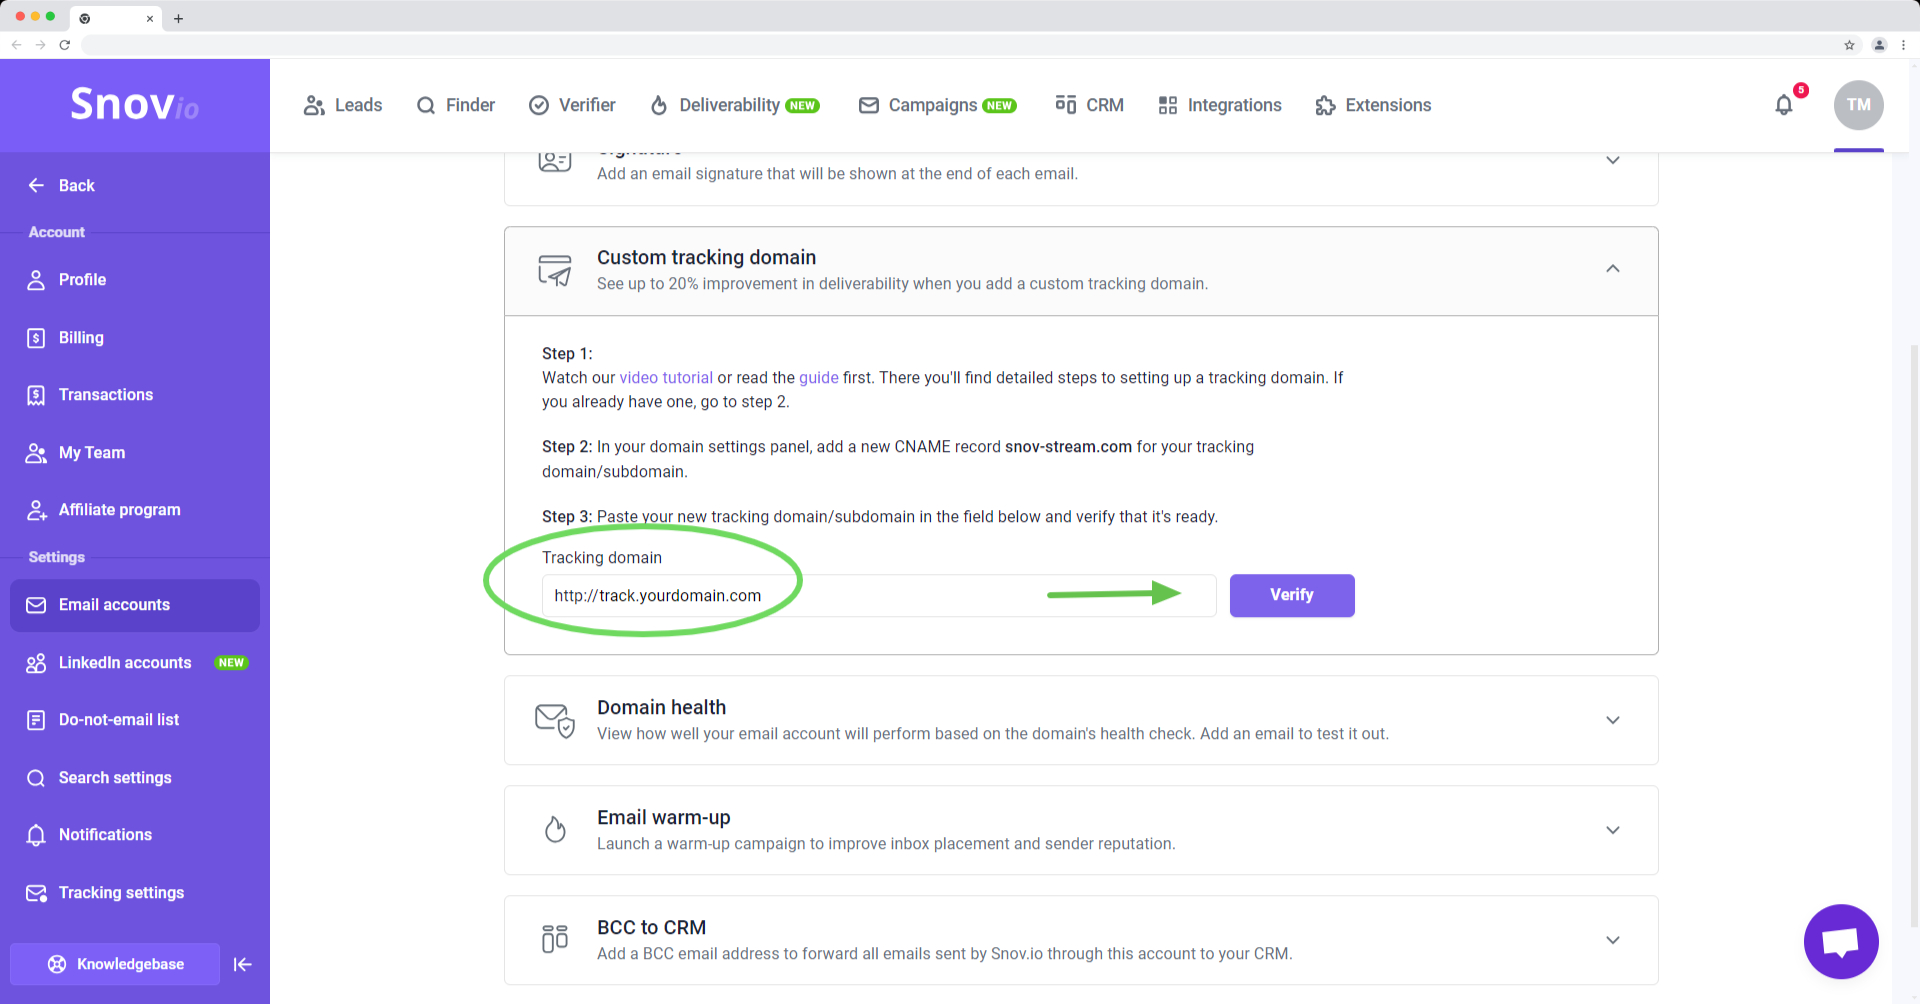
2.1 Add custom tracking domain
A custom domain for tracking opens and clicks replaces a default shared domain.
This is an important step to guarantee a positive effect for deliverability; In Snov.io, you can attach a custom tracking domain to every sender account.
Learn how to add a CTD to email accounts.
2.2 Warm up email accounts
Snov.io's Email Warm-up is compatible with any email service provider or SMTP host.
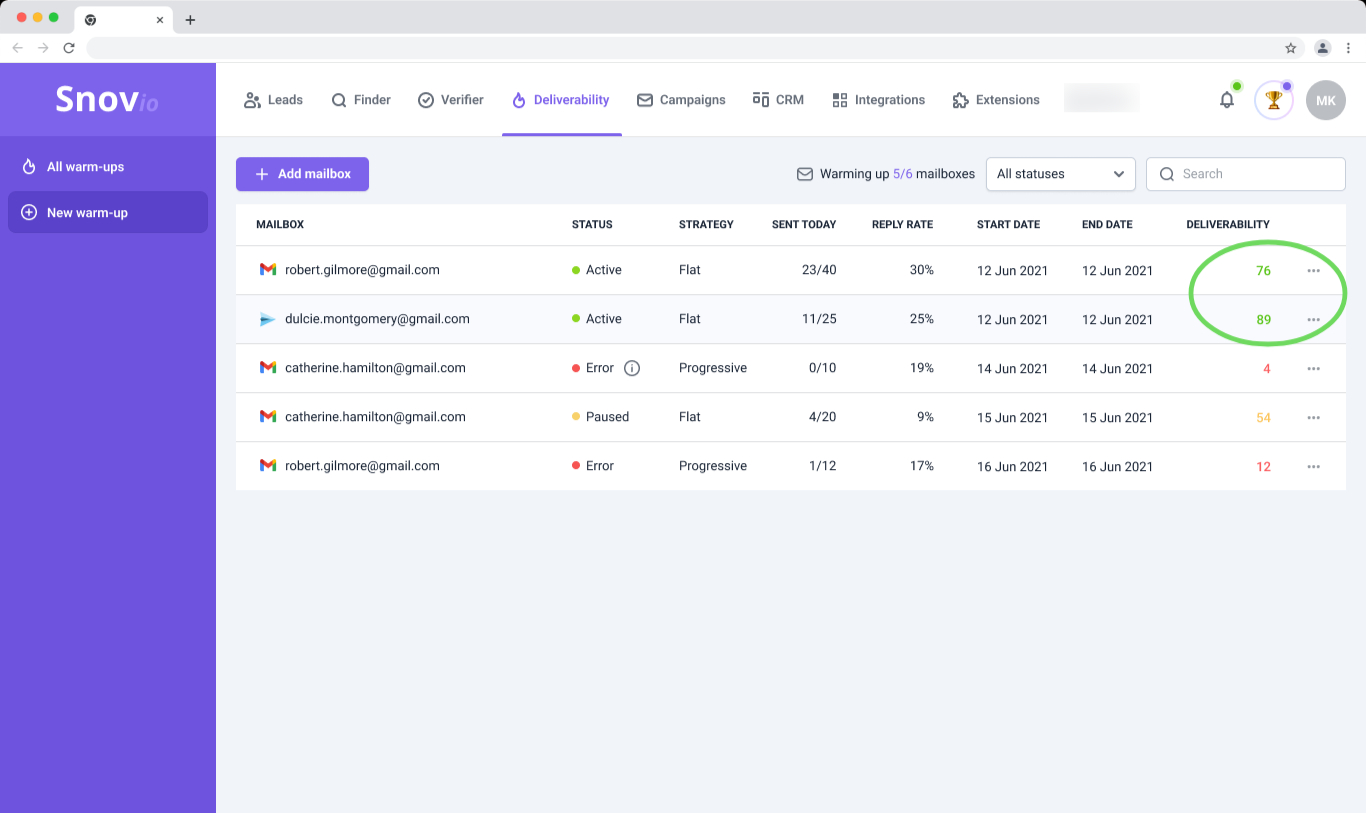
It effectively handles these common scenarios:
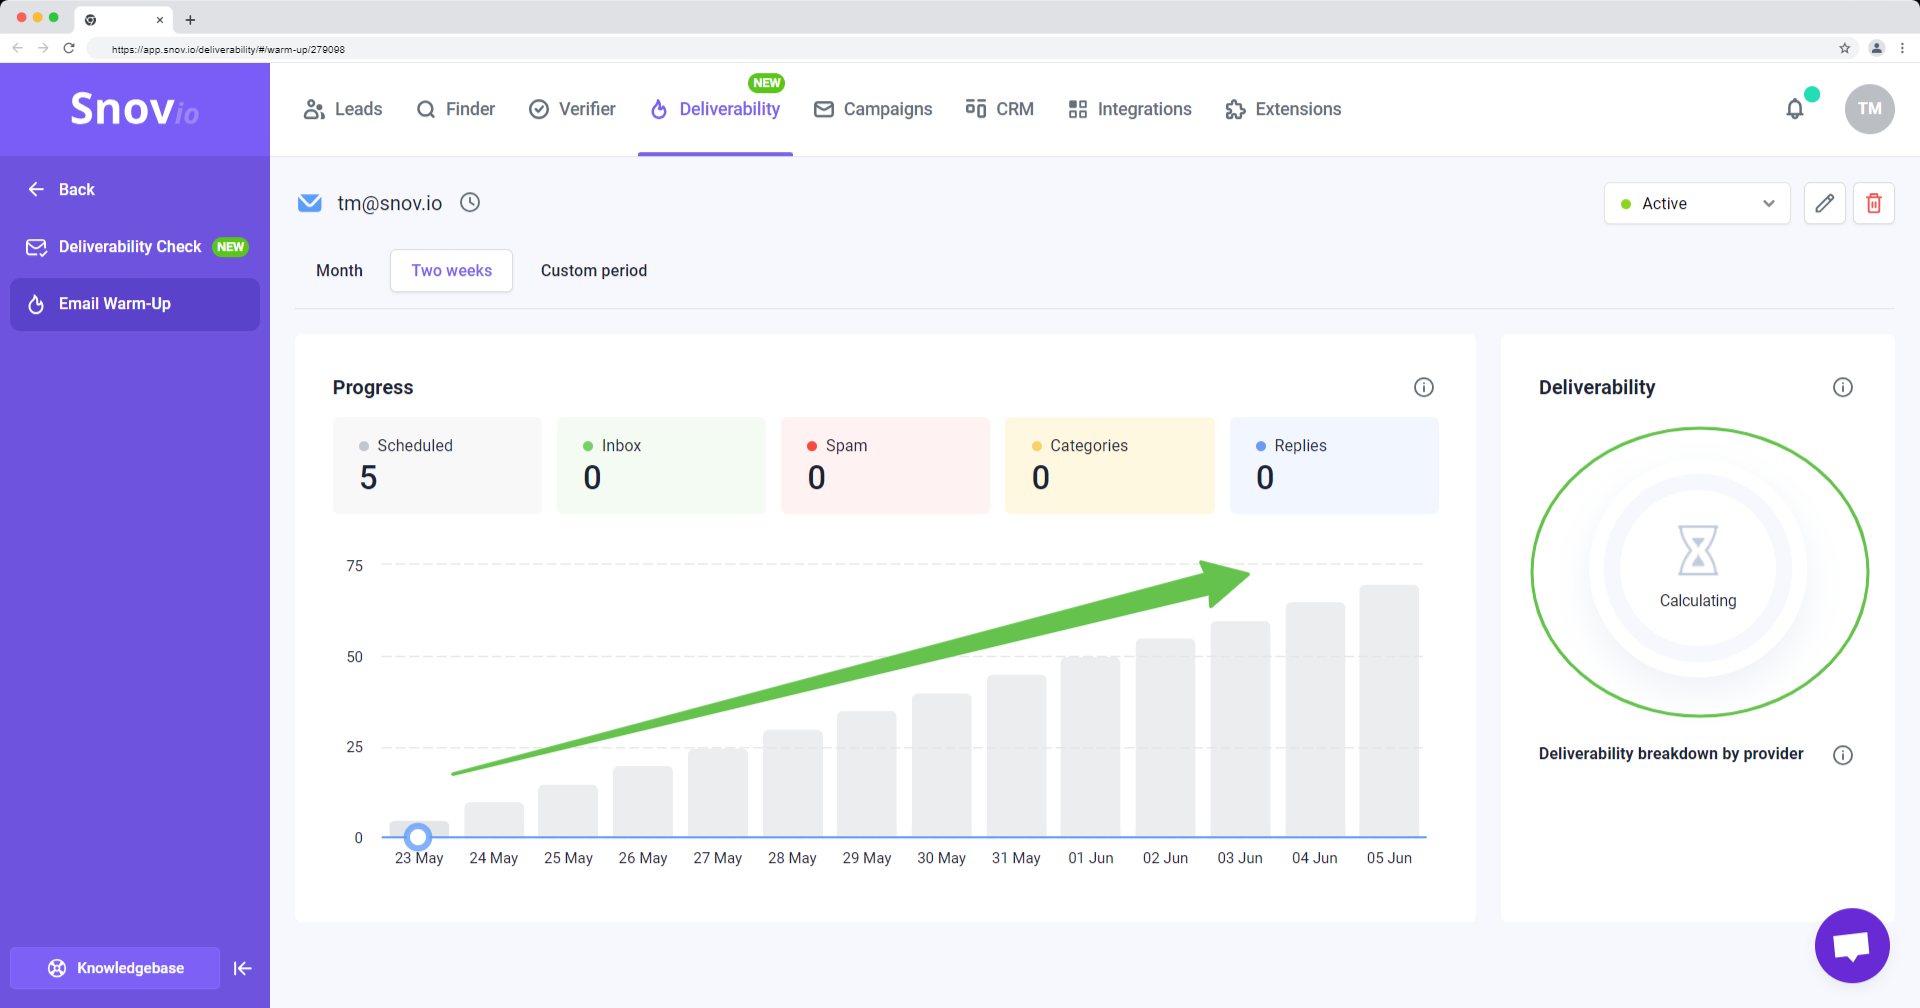
Preparing new accounts
Warm-up helps build a reliable sender reputation for new accounts and prepare them to handle larger campaigns safely. You can set a daily goal for a warm-up based on your expected email volume. It’s recommended to warm up new accounts for at least 4 weeks.
Recovering deliverability of old accounts
If you’ll use existing accounts with a compromised reputation, our warm-up feature helps restore their credibility and prevent future issues. Snov.io can improve deliverability of such accounts after just 2 weeks.
Upkeeping the deliverability during campaigns
It's no mystery that even a perfect campaign can sometimes end up in spam, which negatively affects the account's reputation. Email warm-up can compensate for unexpected deliverability issues and keep your sender reputation high.
Note about simultaneous Warm-up and Campaigns:
We don’t recommend launching campaigns during the initial warm-up period of new accounts. Starting large campaigns too early can reduce the effectiveness of the warm-up. After 4 weeks, you can start sending campaigns while warming up your account at the same time.
Emails sent during the warm-up do not count to the email account’s daily limit in Snov.io, but are included in the total allowed by the ESP. Plan the volume of both your ongoing warm-up emails and active campaigns to avoid exceeding provider limits.
Learn more: How to use email warm-up: tips and advice.
2.3 Perform Deliverability checks
A built-in Deliverability package includes a few useful tests. These tests help check the factors that matter most for the deliverability of your campaigns.
Domain health check
Verifies DNS records of the sender domain, which are crucial for email authentication and sender security.
Email placement test
Tests how effectively your emails pass spam filters and reach inboxes across various email clients.
If your emails are landing in spam, Snov.io will help you identify the reasons why (which will be listed in the test results). This is especially useful when testing the real email template.
Email content test
It includes a spam words check, which scans the email for over 500 common spam trigger words. It also checks that all URLs in the email work properly and ensures attachments are within the recommended file size.
SpamAssassin test
This test checks your email for compliance with spam filters and gives it a score.
Blacklist check
This test checks the sender’s domain and IP addresses to ensure they are not blacklisted. If any blacklists are found, we will show them in the test results so you can request removal.
2.4 Control bounce rate to protect sender reputation
Running and monitoring campaigns for multiple clients takes a lot of attention. To help you handle the responsibility, we’ve added a high bounce rate protection feature.
Campaigns that exceed a 15% bounce rate threshold will be automatically paused, and you will be notified. This gives you more control over campaign performance and prevents damage to the sender domain's reputation.
Part III: How to upload and find leads
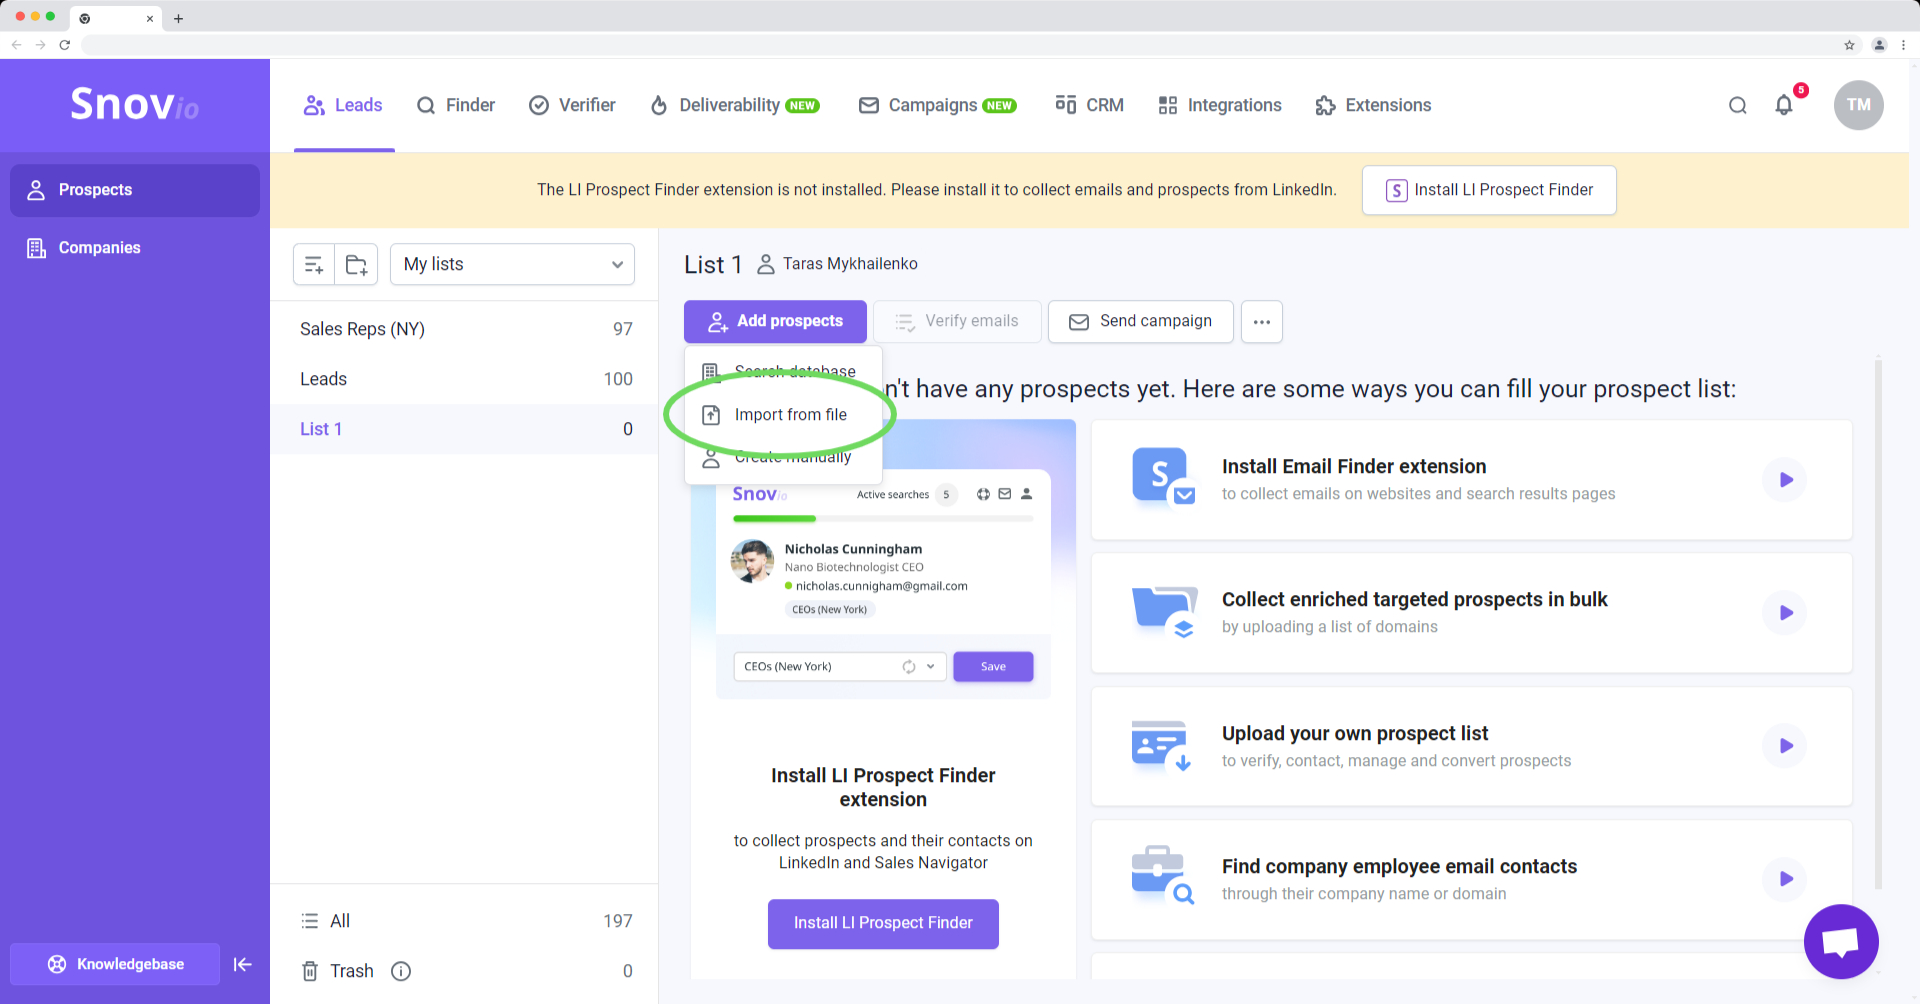
The Leads page in your account is the workspace where you will be storing and managing lead lists. Here you can also import prospects, verify emails and clean lists, filter and export leads.
We offer unlimited data storage in every client (team) account – you can upload and create as many lists as required.
3.1 Upload unlimited lead lists
You can upload leads collected from other sources or provided by your clients. The Import option supports .csv or .xls files with up to 100,000 rows of data per file.
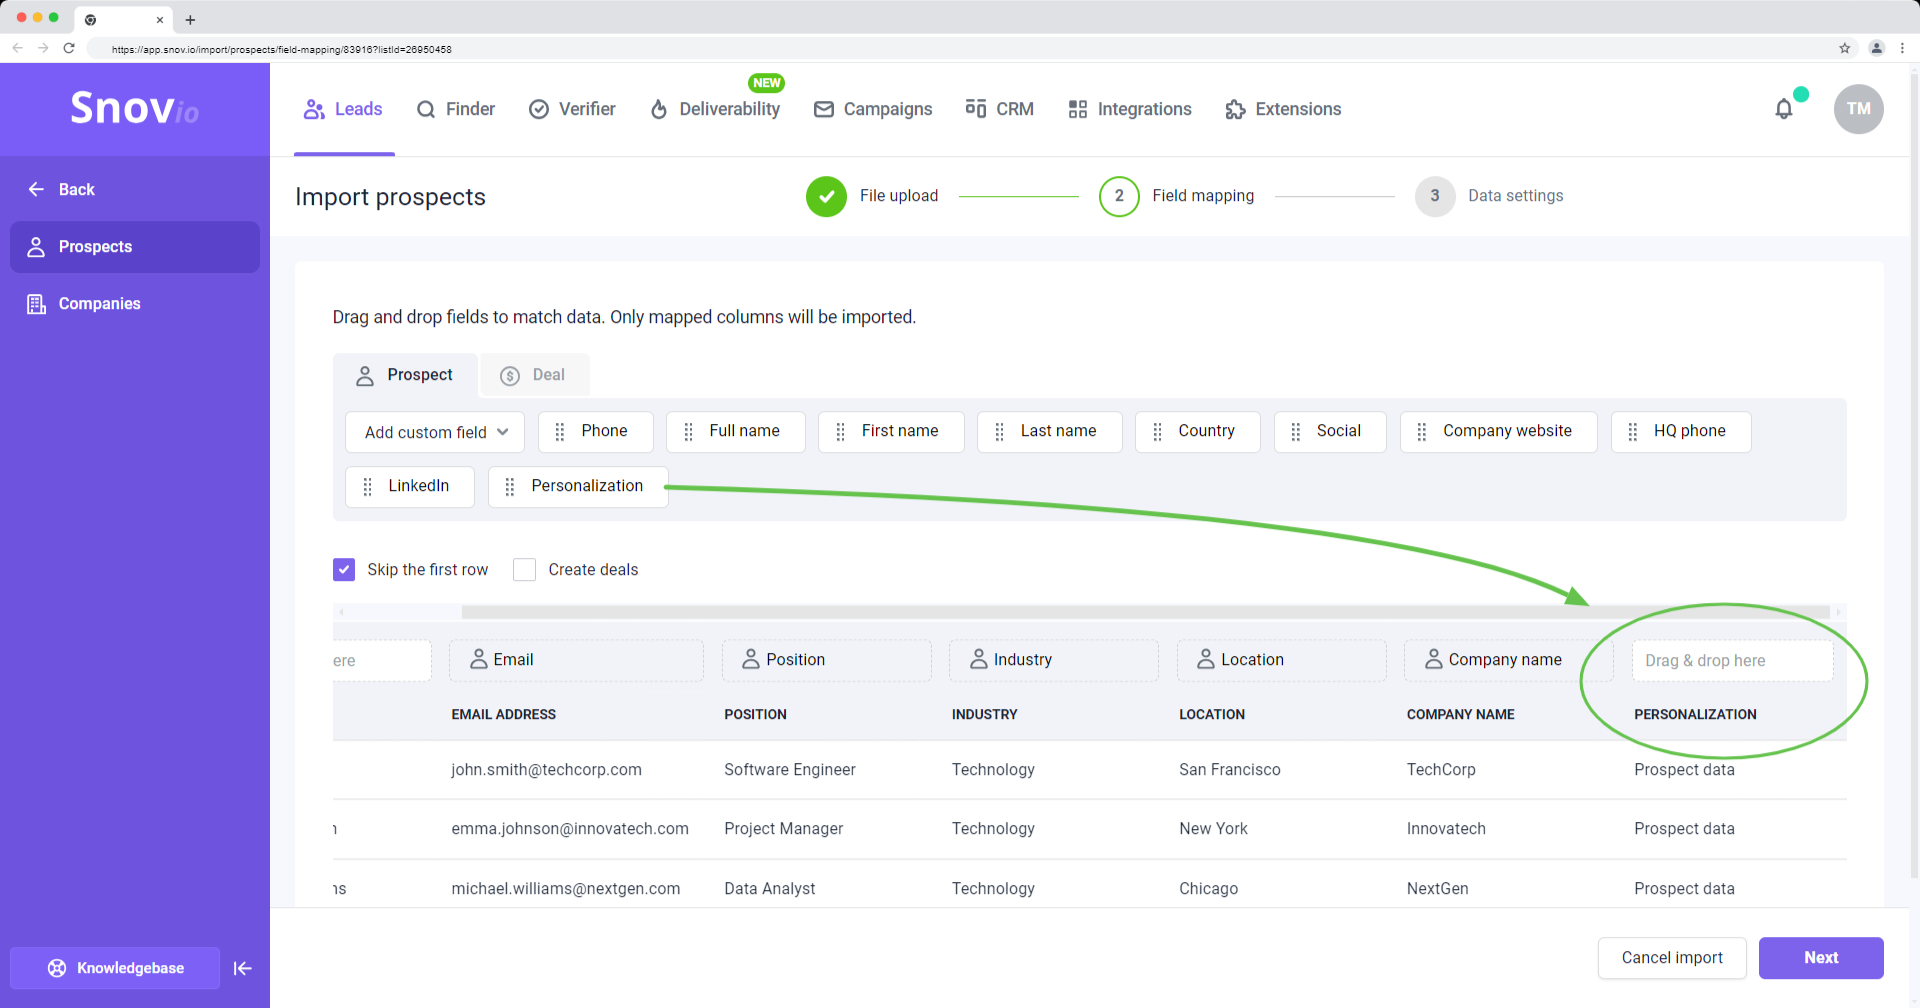
In Snov.io campaigns, you can use your lead data to personalize emails in bulk automatically. This is done by uploading lead details into custom data fields and inserting the corresponding variables into the email content.
To add personalization data to your leads, open the import file and add a new column for personalized details.
Create custom data fields and upload lead details by mapping fields from the import file to the prospect fields in your Snov.io account.
You can create up to 30 custom prospect fields. For each custom field, we will generate variables (placeholders) that can be directly inserted into email content for bulk personalization.
3.2 Find pre-verified leads
Snov.io offers various lead generation options, giving you flexibility in how you collect your leads. You’ll find every option available on the Finder Tools page.
We automatically verify email contacts and enrich them with additional prospect data, so they are ready for use in personalized campaigns right away.

| Finder tool | Use case | A resource to get started |
| Database Search | Find verified leads based on ICP characteristics in our built-in database. | You can apply filters and find leads that match your client’s ICP.
Lead/company filters include: Location, Job Title, Skills, Company Industry, Size, Niche (Specialty), Revenue. |
| LI Prospect Finder extension | Find leads from LinkedIn and Sales Navigator. | The extension for Chrome saves leads in bulk from various LinkedIn pages and search results (+ Sales Navigator support). |
| Domain Search (Single/Bulk) | Find email contacts from company domains. | Save email contacts of leads working at a specific company or upload a list of domains for a bulk search. |
| Email Search (Single/Bulk) | Find lead’s email contact from their name and company domain. | Go to Email Search → |
| Social URL Search | Find email contacts from a list of links to LinkedIn profiles. | Go to Social Search → |

3.3 Create, find and verify leads through automations
We've integrated with tools like Zapier and Make to make it possible to automate your lead generation tasks in Snov.io.
Key automation scenarios include:
- Creating prospects in Snov.io using data from other resources or platforms (with default data fields).
- Searching for email addresses using the lead's name and domain, then collecting the email addresses.
- Adding email addresses for verification and collecting the verification results.

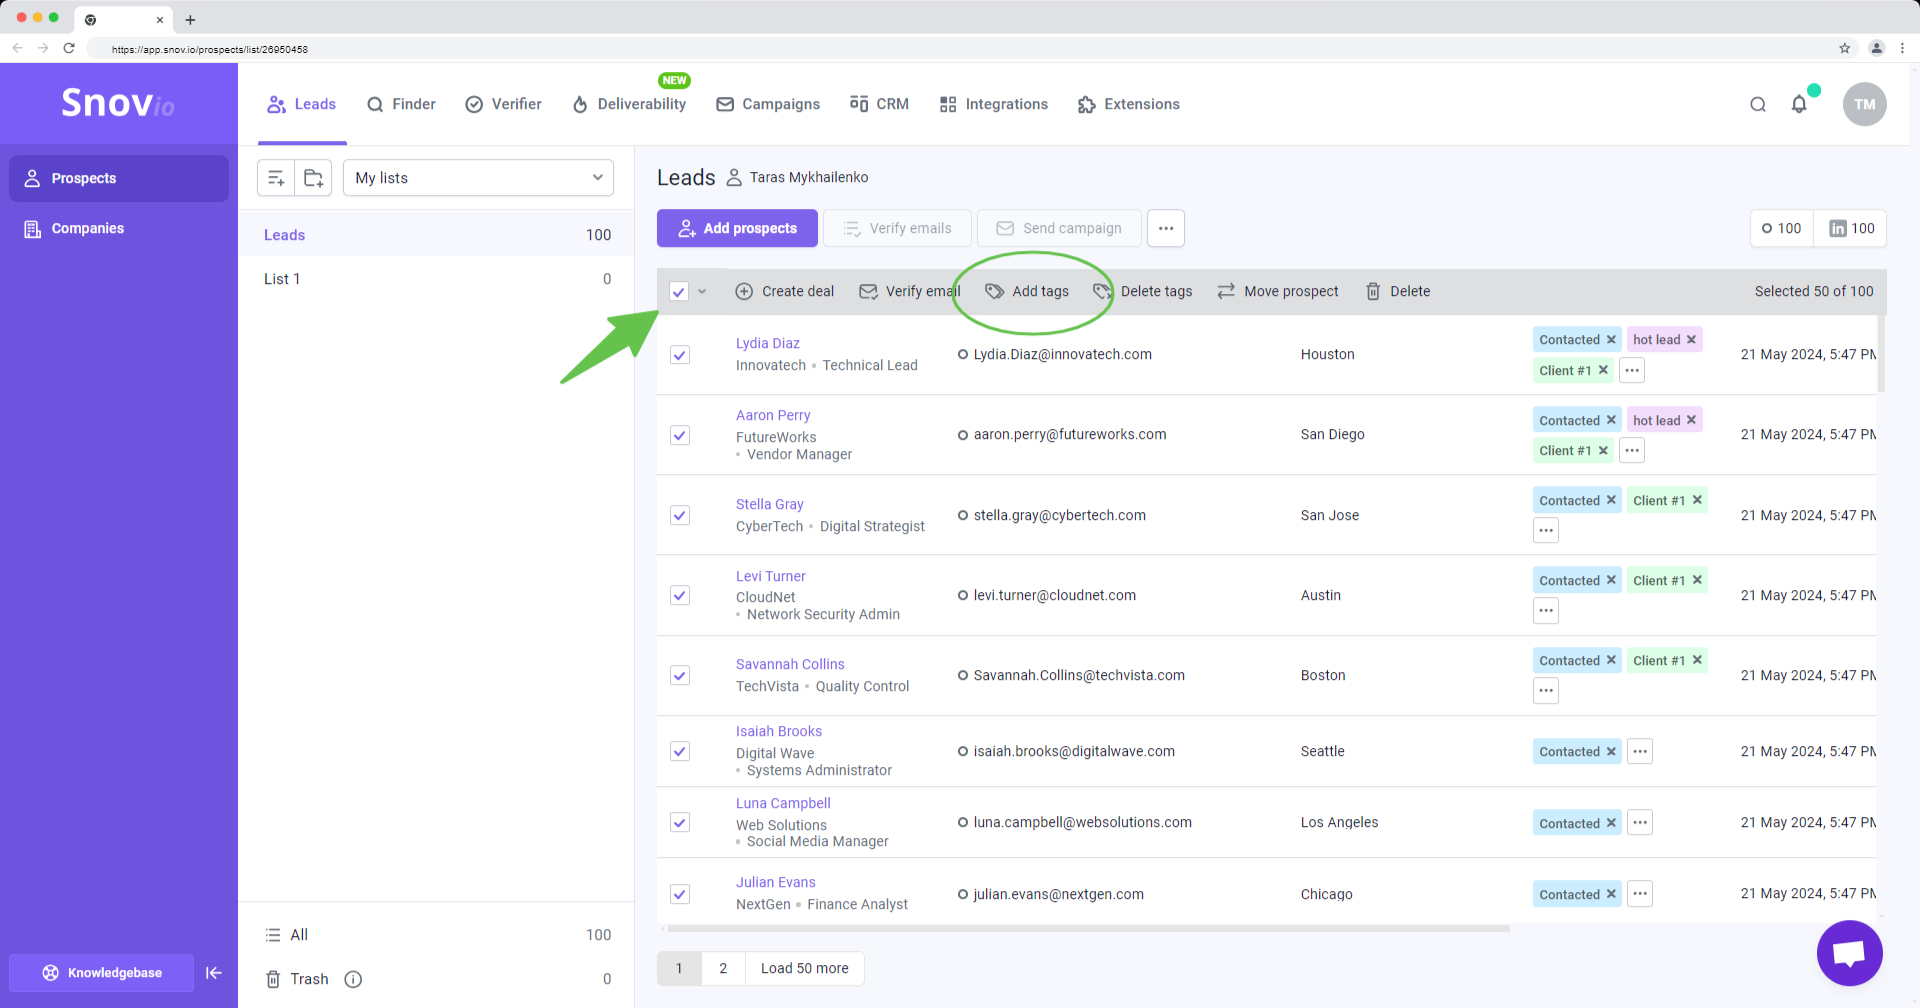
3.4 Add tags to filter and organize leads
You can add custom tags or labels to leads, making it easy to filter, move between lists, or export them. As leads move through campaigns, they get tagged automatically based on their status (e.g., replied, campaign completed, unsubscribed, etc).
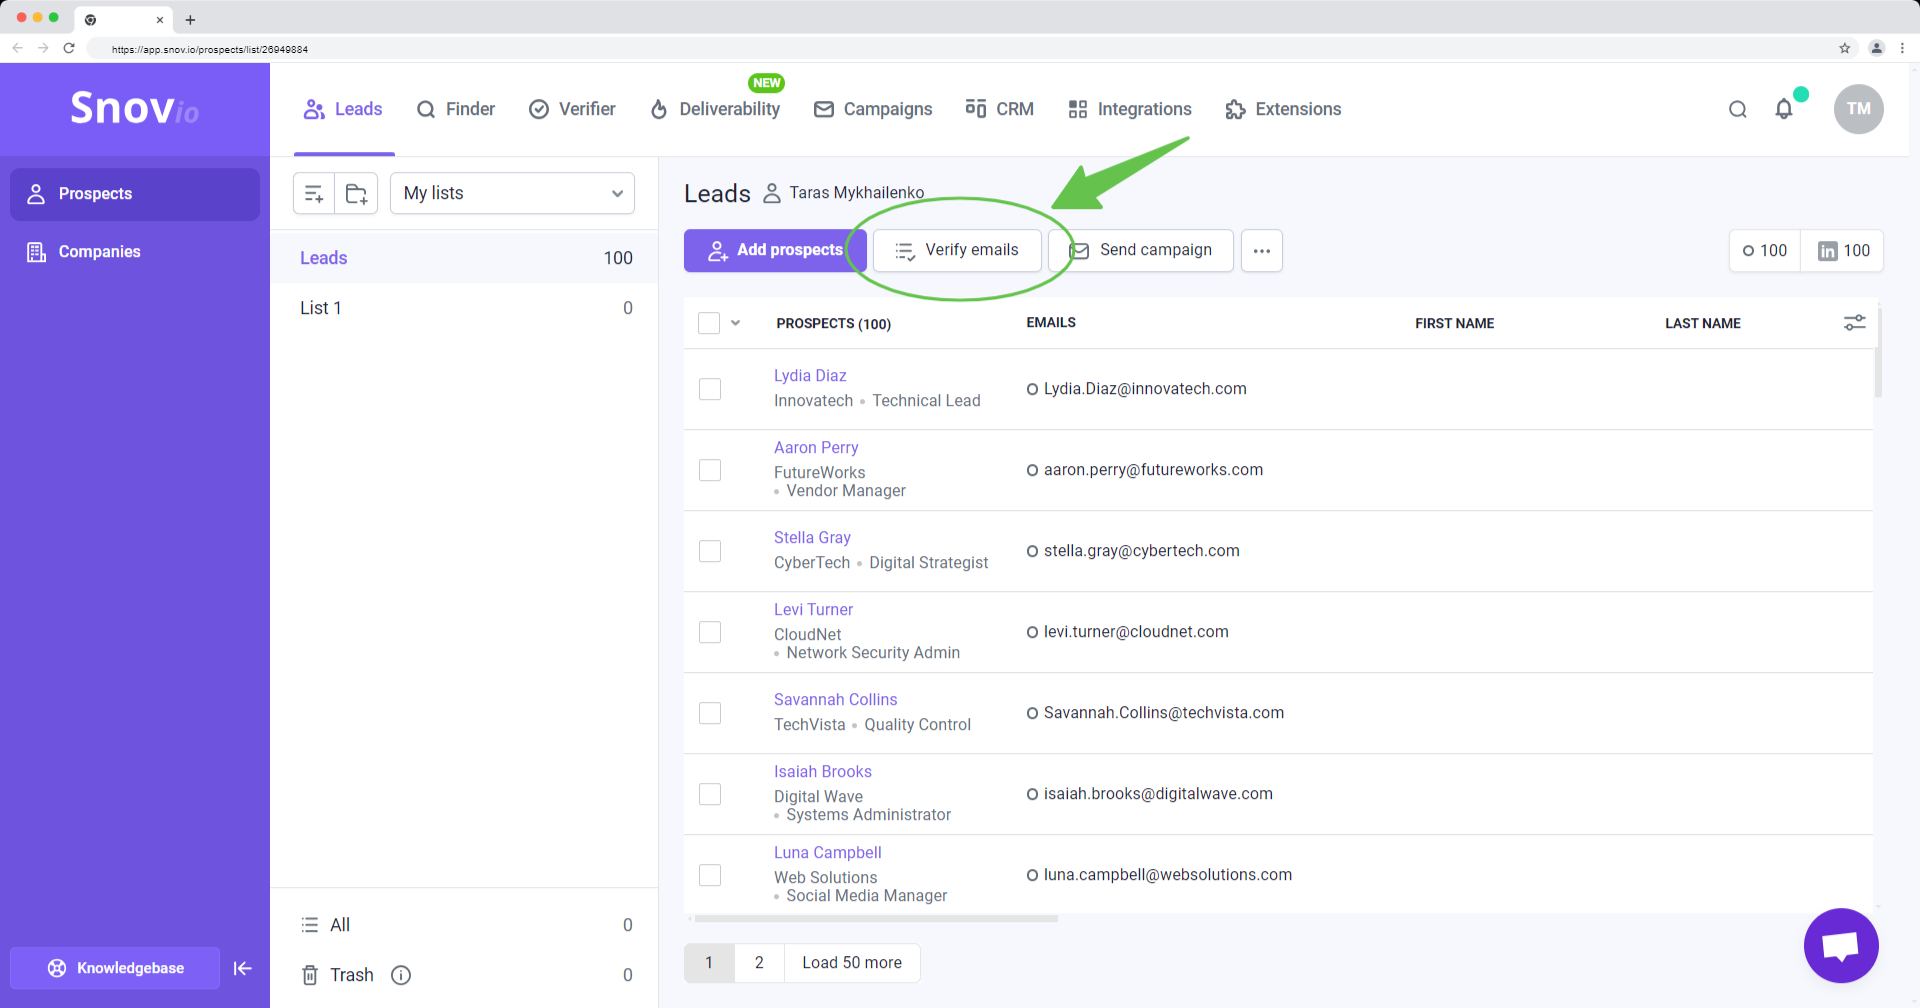
3.5 Verify email lists to reduce bounce rate
When you need to ensure the leads you upload have valid email contacts, use the built-in list verification. After verification, you can sort leads by their status in the top right corner.
Snov.io's verification is fast, accurate (uses 7-step validation), and can process sizable lists.
3.6 Import leads from CRMs
We offer native integrations with two of the most widely used CRMs in the industry—Pipedrive and HubSpot. You can connect your account with either of them to transfer your existing lead database to Snov.io.
Learn how to set up Pipedrive integration
Learn how to set up Hubspot integration
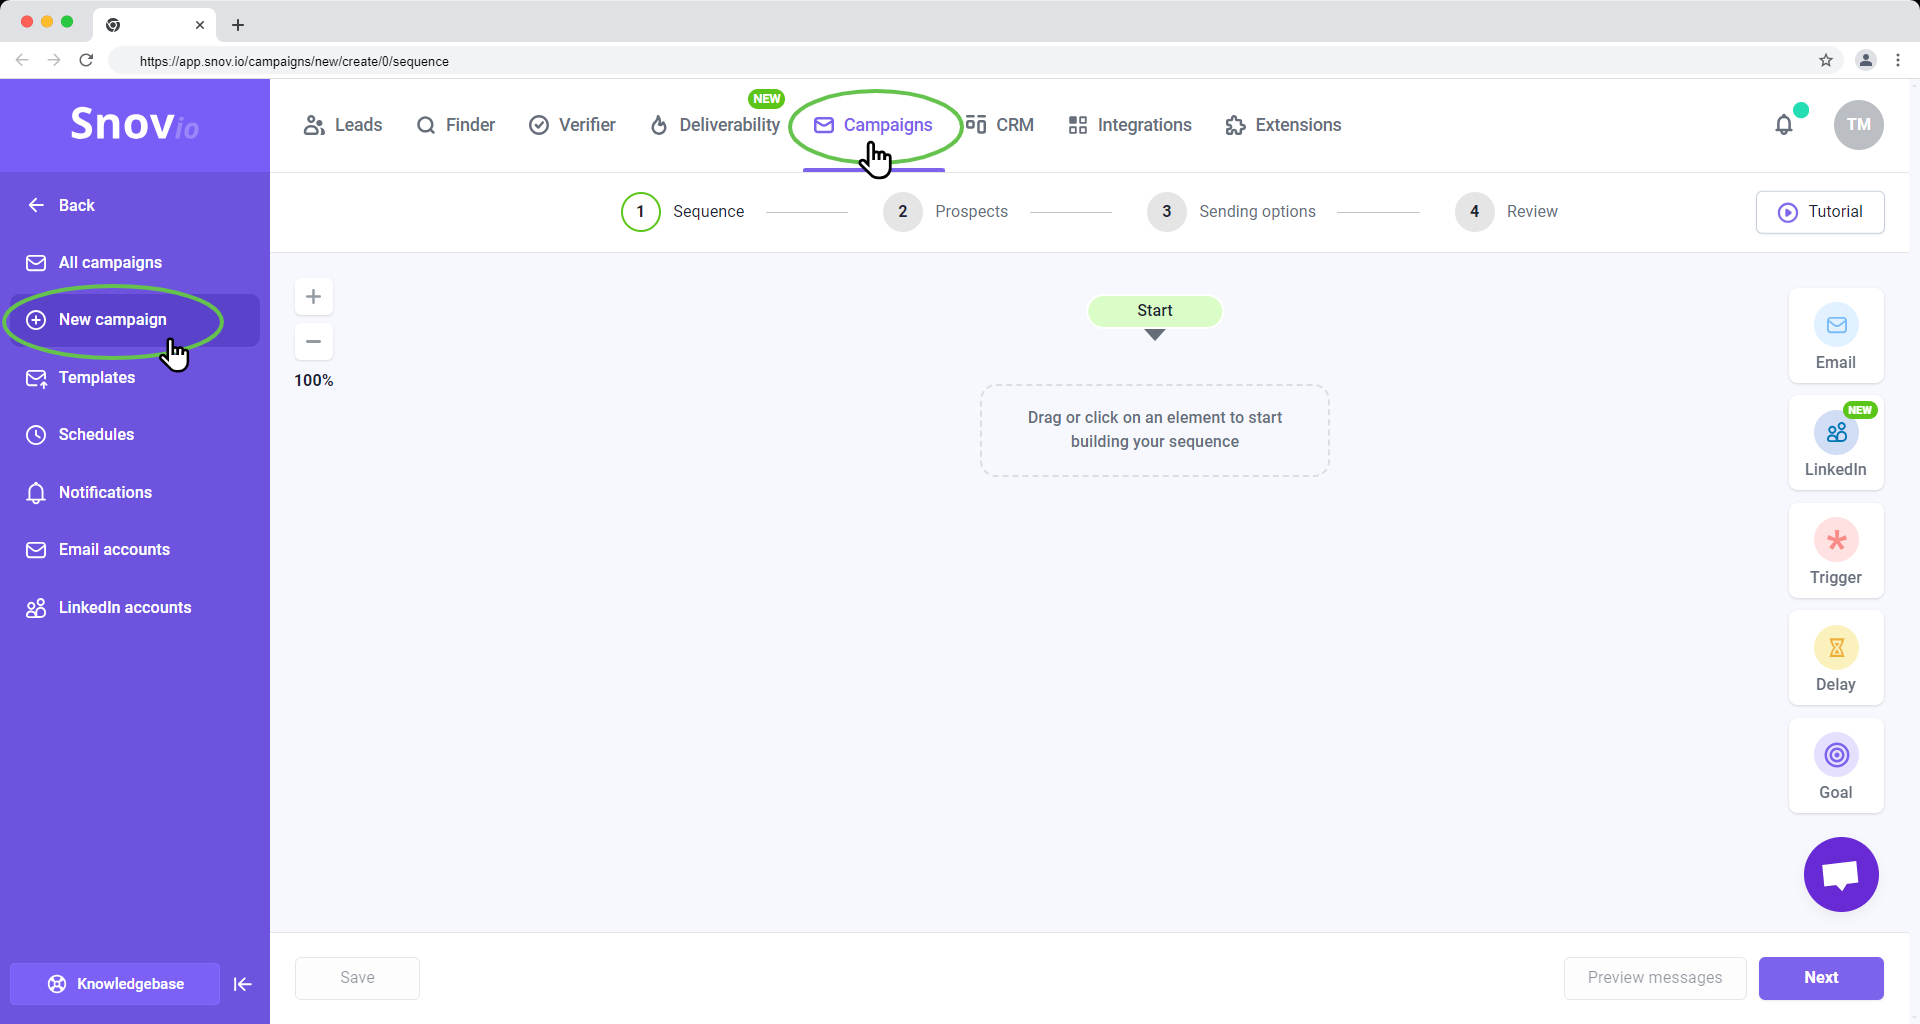
Part IV: How to create personalized automations that drive replies
Snov.io Campaigns is our tool for personalized outreach automation. You can create and execute campaigns using a single channel (email) or a multichannel approach that combines email and LinkedIn actions, ensuring broader reach and higher response rates.
Create, launch and manage unlimited campaigns for each client in their team member account.
4.1 Launch campaigns for every purpose
Our automation can execute or campaign type.
One-time campaign
A campaign which completes itself automatically after the sequence for all recipients is finished.
Long-term campaigns
For strategies that require multiple follow-ups over an extended period, you can add an unlimited number of follow-ups to your sequence.
You can also schedule your campaigns to start and end at specific times, so you can plan them ahead for a certain date.
Perpetual or forever-active campaign
You can start a sequence and keep adding new leads to the recipient list – they will be included in the campaign from the first step. You can also extend the sequence itself by adding more follow-ups or alternative flows.
4.2 Create multichannel sequences: email + LinkedIn
In Snov.io, you can launch outreach on email and LinkedIn channels. This adds flexibility to your lead generation as you can incorporate two channels in your sequence or use them separately based on your strategy for specific campaigns.
To automate lead engagement on LinkedIn, you can add profile visits, post likes, connection requests, and LinkedIn messages to the sequence.
Read how to set up multichannel campaigns in Snov.io.
How to use Snov.io's LinkedIn Automation.

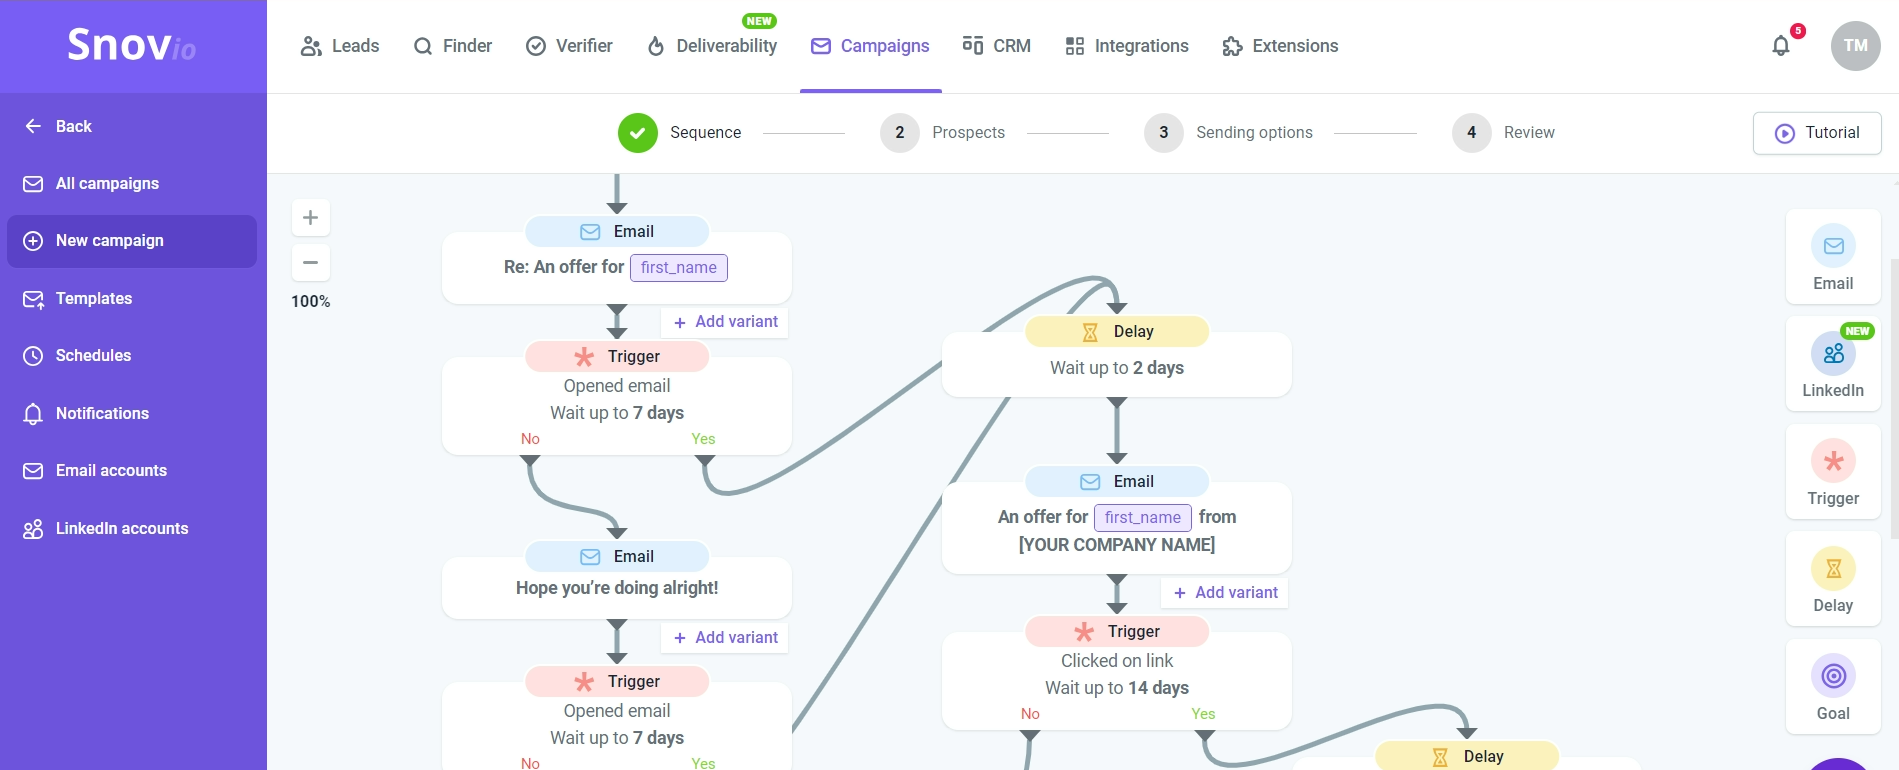
4.3 Add conditions and alternative flows
In the sequence editor, you can create a flow to accommodate virtually any campaign scenario.
Build sequences with unlimited steps and multiple flows using the sequence editor.
They can include delays between steps, conditional triggers, and goals to close the sequence and segment leads based on their engagement throughout the sequence.
Using triggers, you can move the most engaged recipients to a different flow within the same sequence based on conditions. These conditions (actions) could include opening an email, clicking a link, accepting your LinkedIn connection request, or booking a meeting on Calendly.
Triggers allow you to send leads down a different email flow with content that is better personalized to their actions in the previous step of the sequence.
4.4 Add variability and dynamic personalization
We know that for a campaign to succeed, deliverability and personalization are key. That’s why we’ve added a few features to our email editor to help you get more replies and improve deliverability.
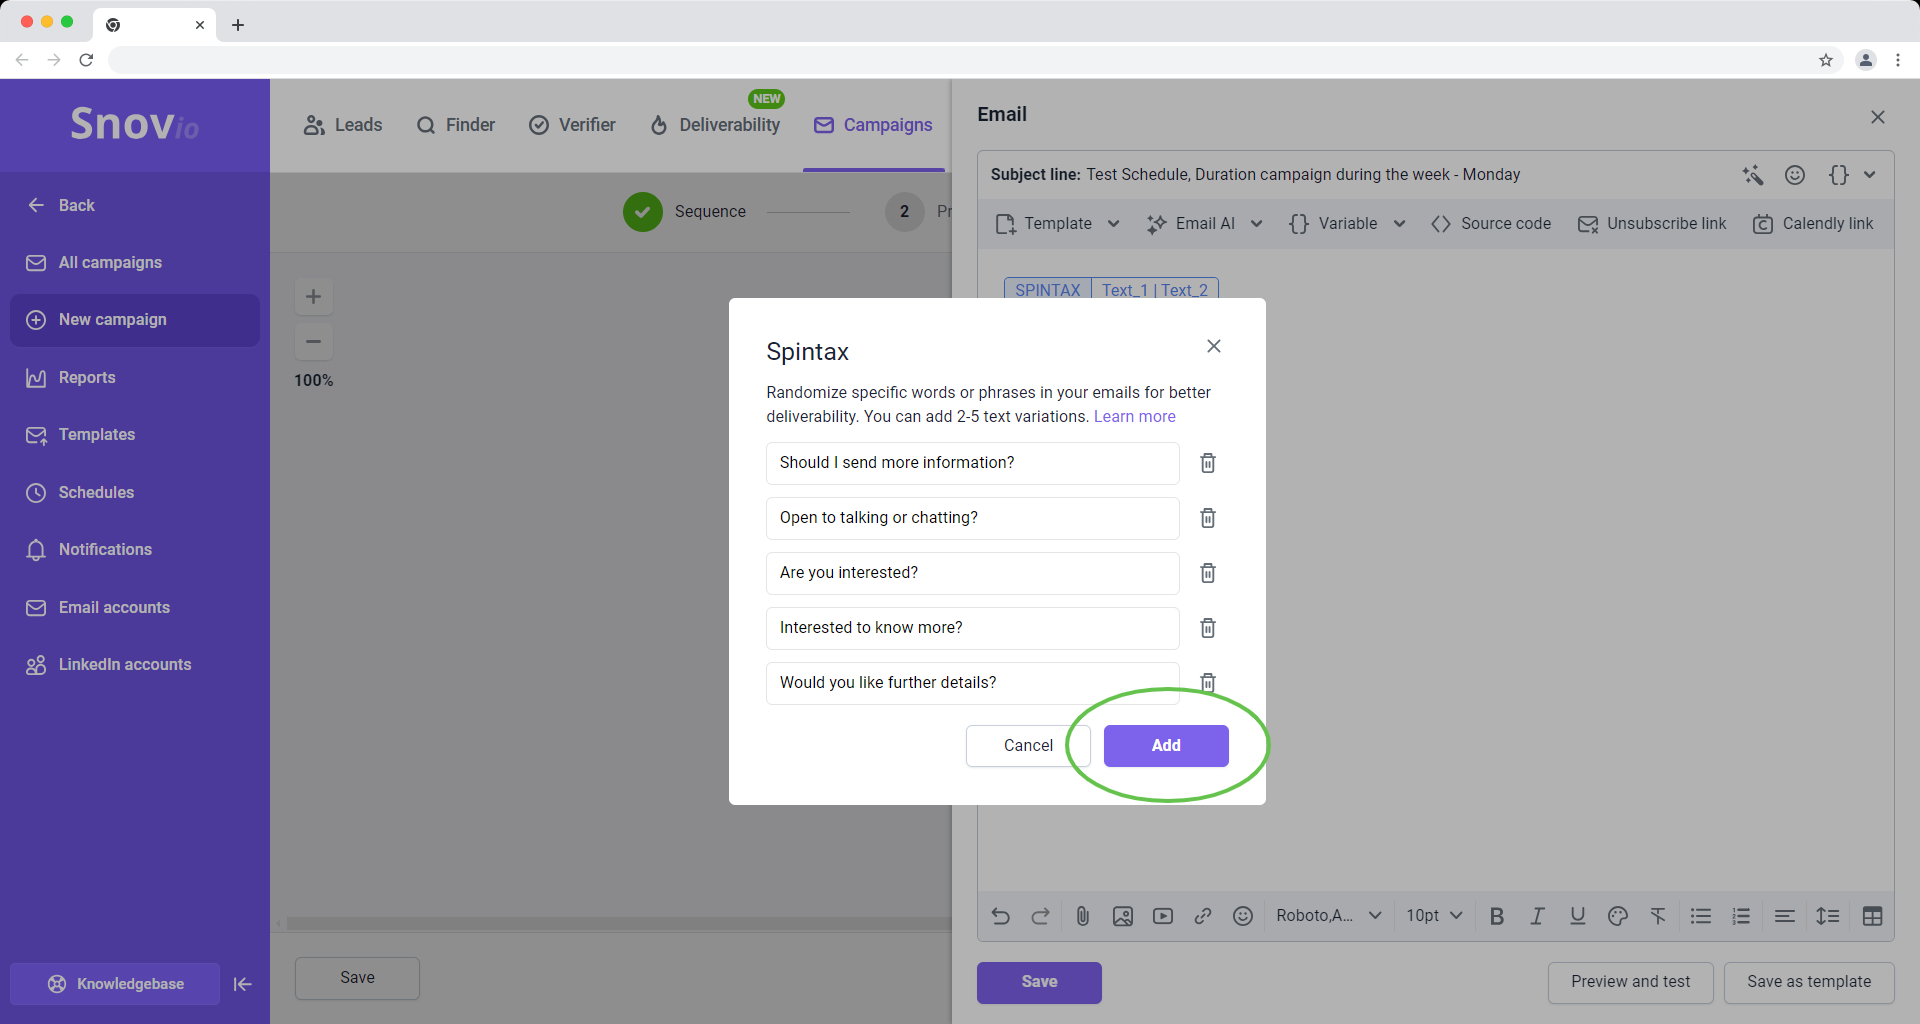
Spintax
The main benefit of using spintax is avoiding spam filters. It helps send unique emails in bulk: you add multiple alternative words or phrases, and it randomly selects one of them for each recipient.
Using spintax, you'll automatically send multiple variations of your email copy and reduce the chance that providers will flag you as a bulk sender.
Learn more about using Spintax for better deliverability.
Personalization variables
In Snov.io campaigns, you can use your lead data to personalize emails in bulk automatically. This is done by inserting variables that correspond to prospect data fields.
These variables will be replaced with lead details or custom text specific to each recipient once the email is sent.
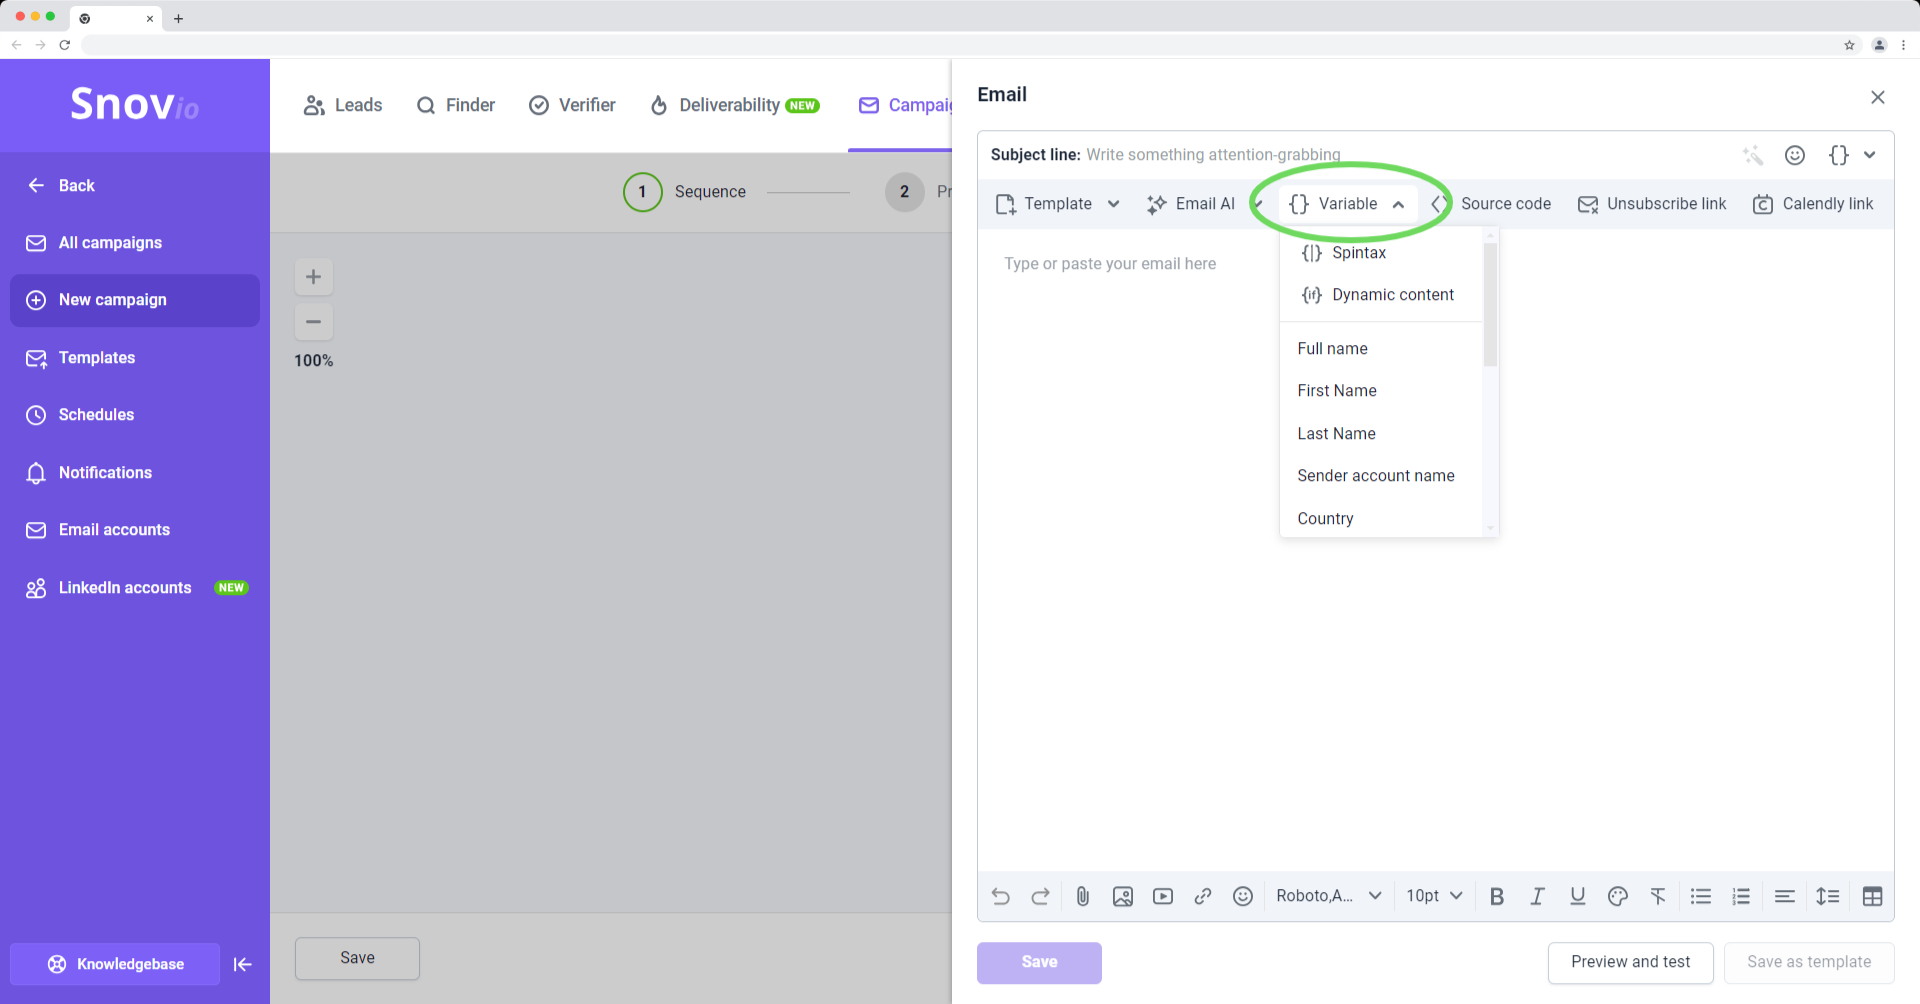
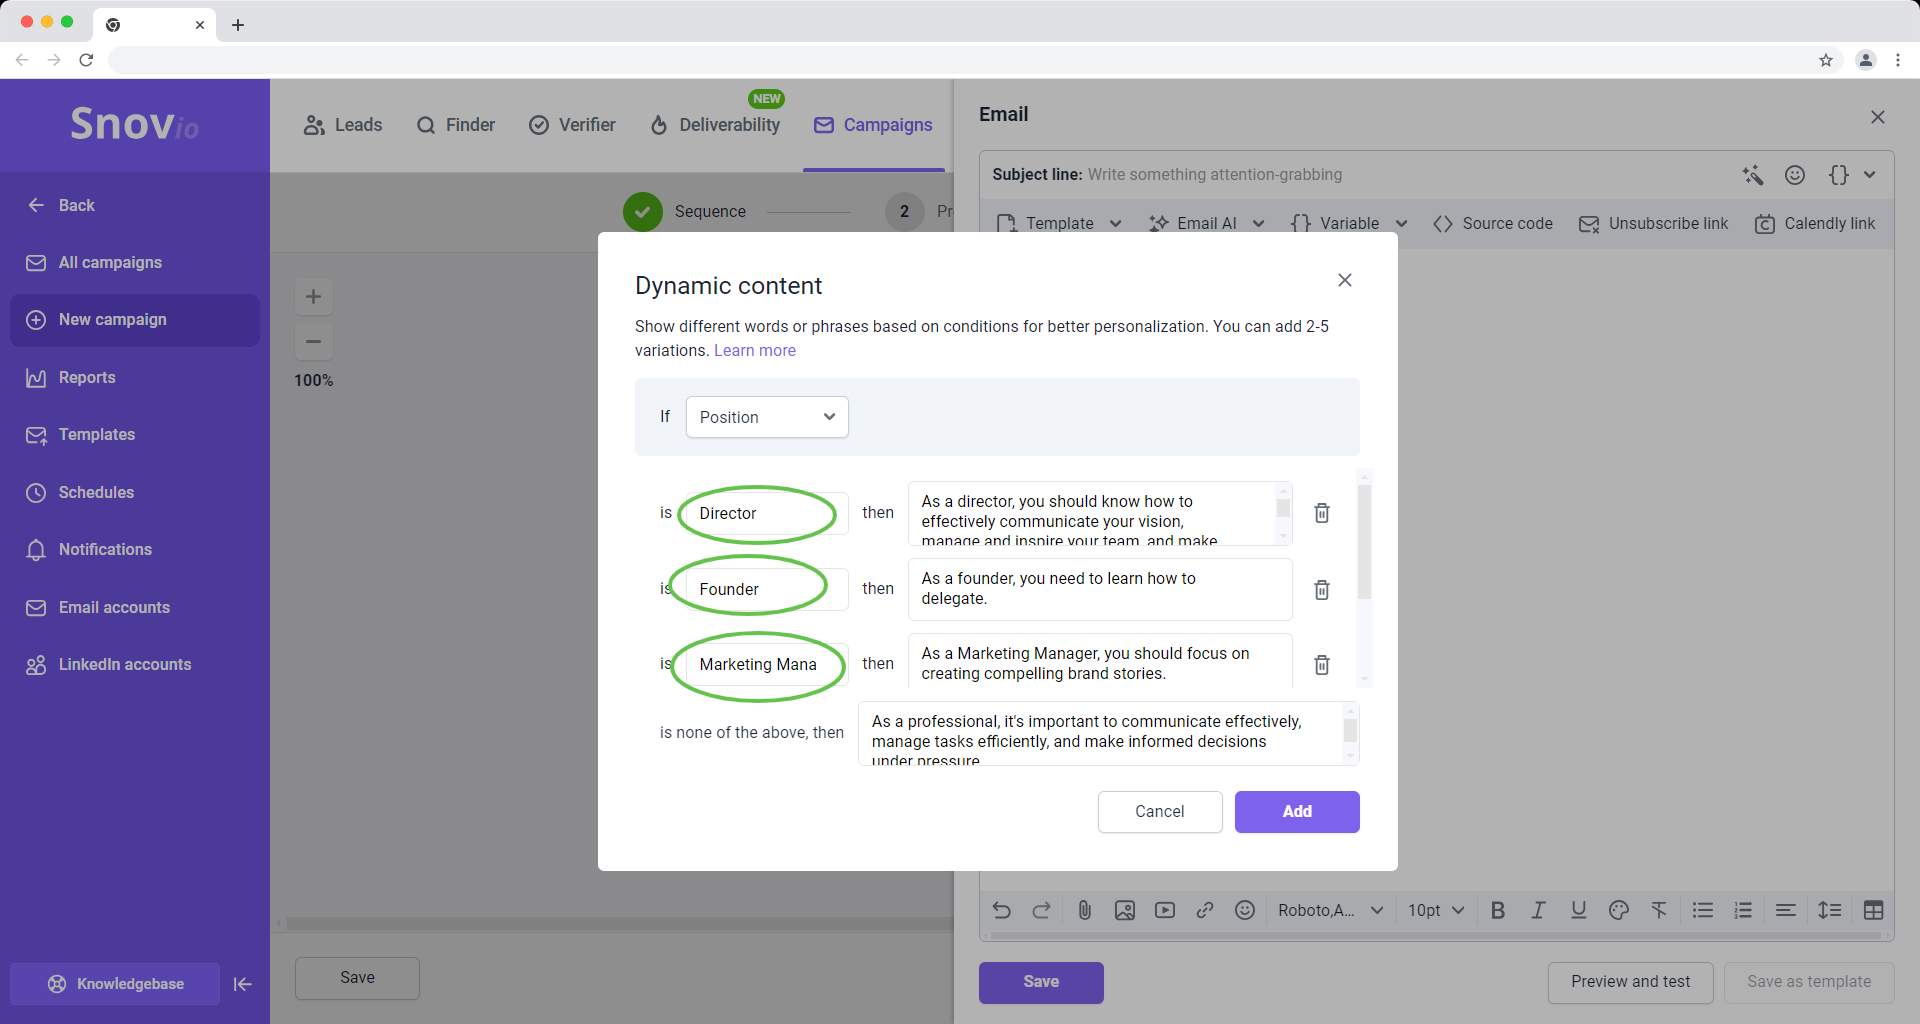
Dynamic content
Dynamic variables automatically change the email content based on conditions you choose. The condition could be the recipient's position or other information from their profile.
For every condition you choose for dynamic content, you can add a specific, personalized piece of text.
Learn how to personalize in bulk with dynamic content.
4.5 Manage email volume and prioritize/schedule sending
With every campaign, you can configure the settings to have more control over how and when they are sent.
You can safely increase daily volumes with extra senders and distribute sending resources efficiently. Plus, you can decide which campaigns or leads (new or existing) get priority for using your account's daily limits.
| Campaign aspect | Feature that helps you tackle it |
| Sending higher volumes without exceeding provider’s quotas | Mailbox rotation:
When the capacity of one sender isn't enough to contact all recipients, add extra senders to increase the total sending limit. |
| Sending prioritization | High-priority vs. low-priority campaigns:
When using the same senders in multiple campaigns, allocate daily sending resources to the most important/urgent campaigns. New leads vs. follow-ups priority: Prioritize sending to match your strategy - either contact more new leads faster or complete the sequence for existing leads first. |
| Managing daily limits | Daily campaign limit:
Set the maximum allowed volume for specific campaigns New recipients daily limit: Set the maximum limit to email new leads within specific campaigns. |
| Sending campaigns at the right time | Campaign schedule:
Schedule email delivery based on the time zone of the recipients on your list. To ensure the sending time is personalized across the entire list, all leads should be from the same location or time zone. |
Part V: How to assign interest levels to prospects
Snov.io can automatically analyze the tone of your prospects' replies to emails or LinkedIn messages and assign the interest level. This allows you to see which prospects on your list are interested and which are not, without having to review their replies manually.
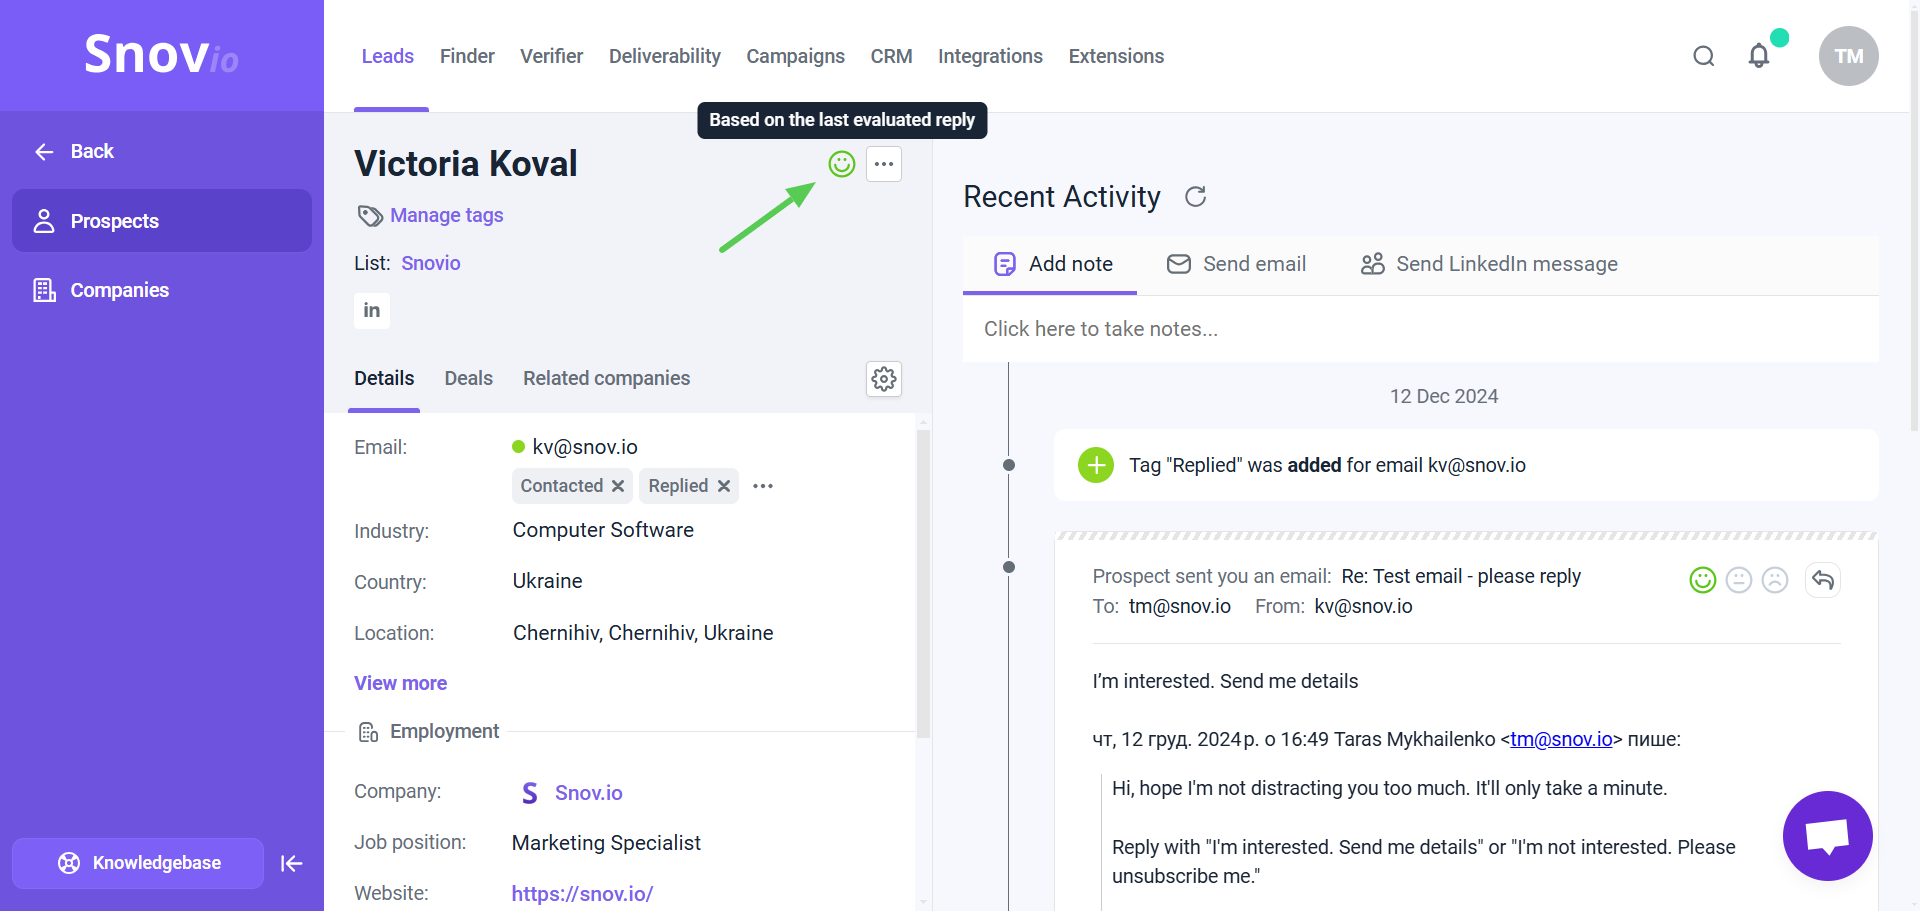
You can check a prospect's interest level in various places within your Snov.io workflow. It's shown as an emoji in the prospect's profile, the campaign recipients list, or the CRM deals. If the emoji is "inactive" (gray), it means there hasn’t been a reply yet.
This helps you prioritize leads with higher potential and allocate resources accordingly, saving you time on communication with less interested leads. You'll be aware of prospects' current mood after every reply because it updates after each new reply.
When reviewing your list, click on any prospect to open their profile. If the prospect hasn’t replied yet, the interest level emoji will appear grayed out.
The prospect's mood shown in their profile is based on the sentiment of their last reply to any email you’ve sent. This could be a campaign email, an email sent directly from their profile, or from a deal in the CRM.
After you upgrade, the AI will analyze all replies from the last 30 days across all your campaigns and assign an interest level to each prospect who replied.
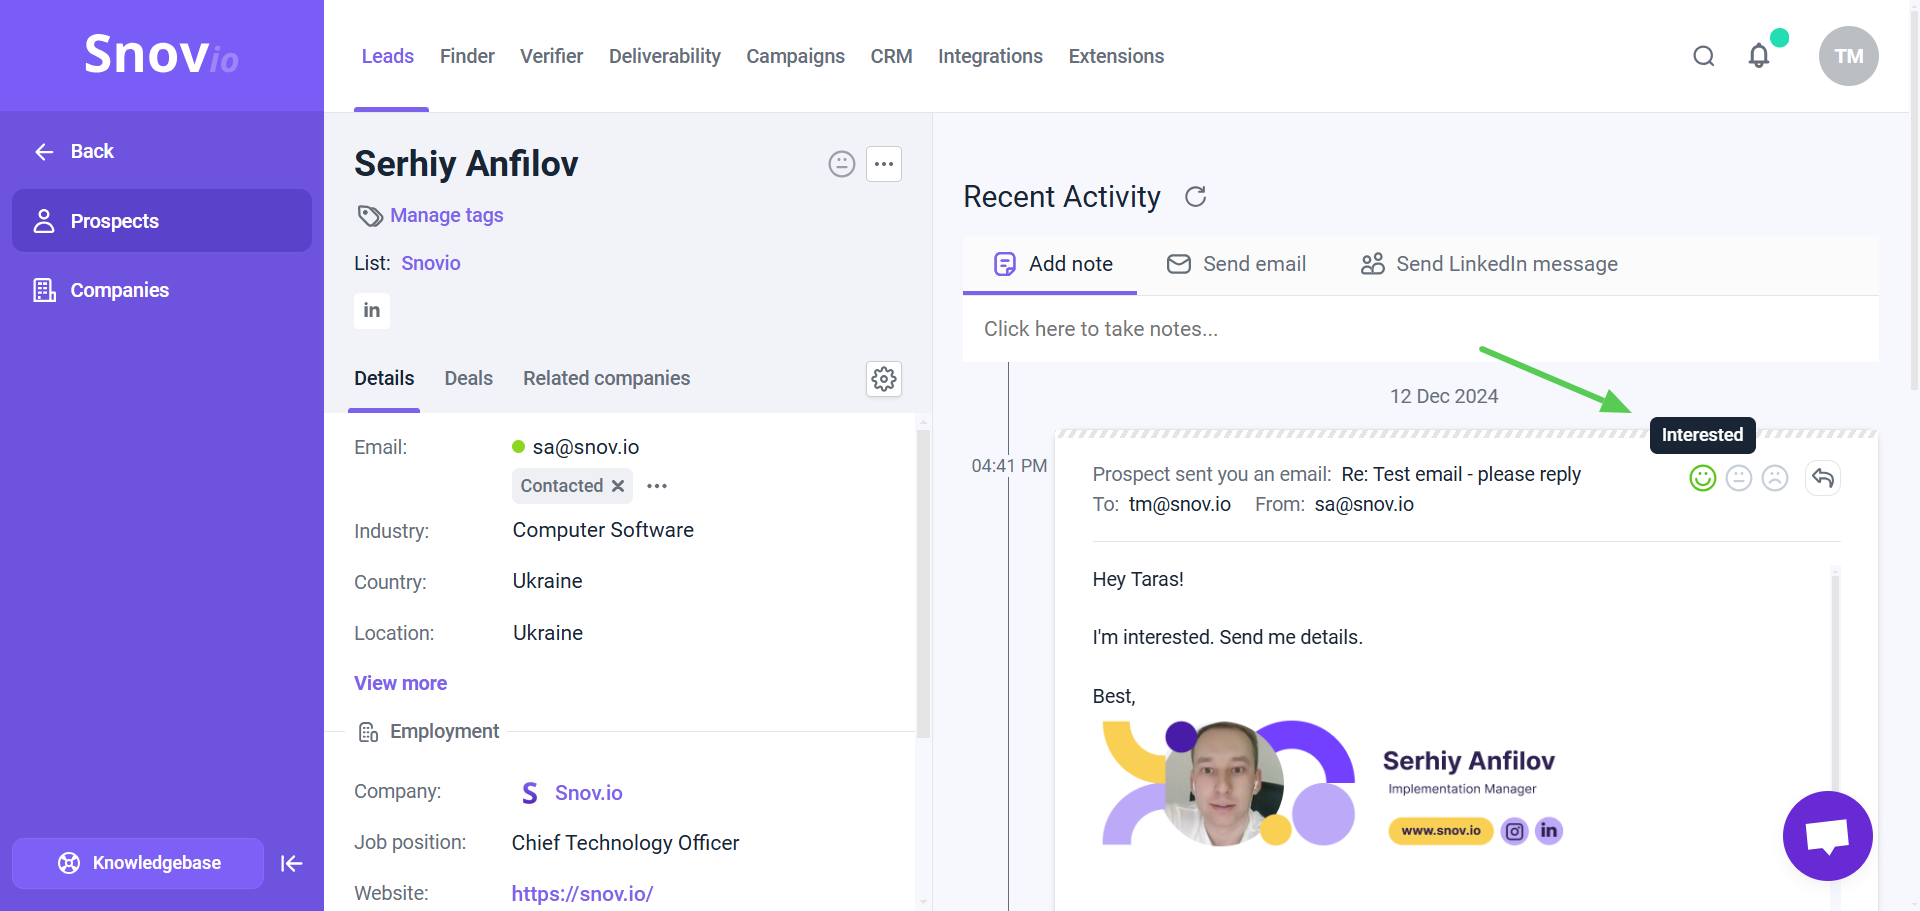
Manual interest level assignment is available on all plans. You can assign interest levels to recipients in campaigns or prospects in the prospect lists manually.
To do this, click on the prospect's name in the list to open their profile, find their reply in the Recent Activity, and select the emoji that matches the sentiment of the reply.
Part VI: How to monitor statistics and review reports
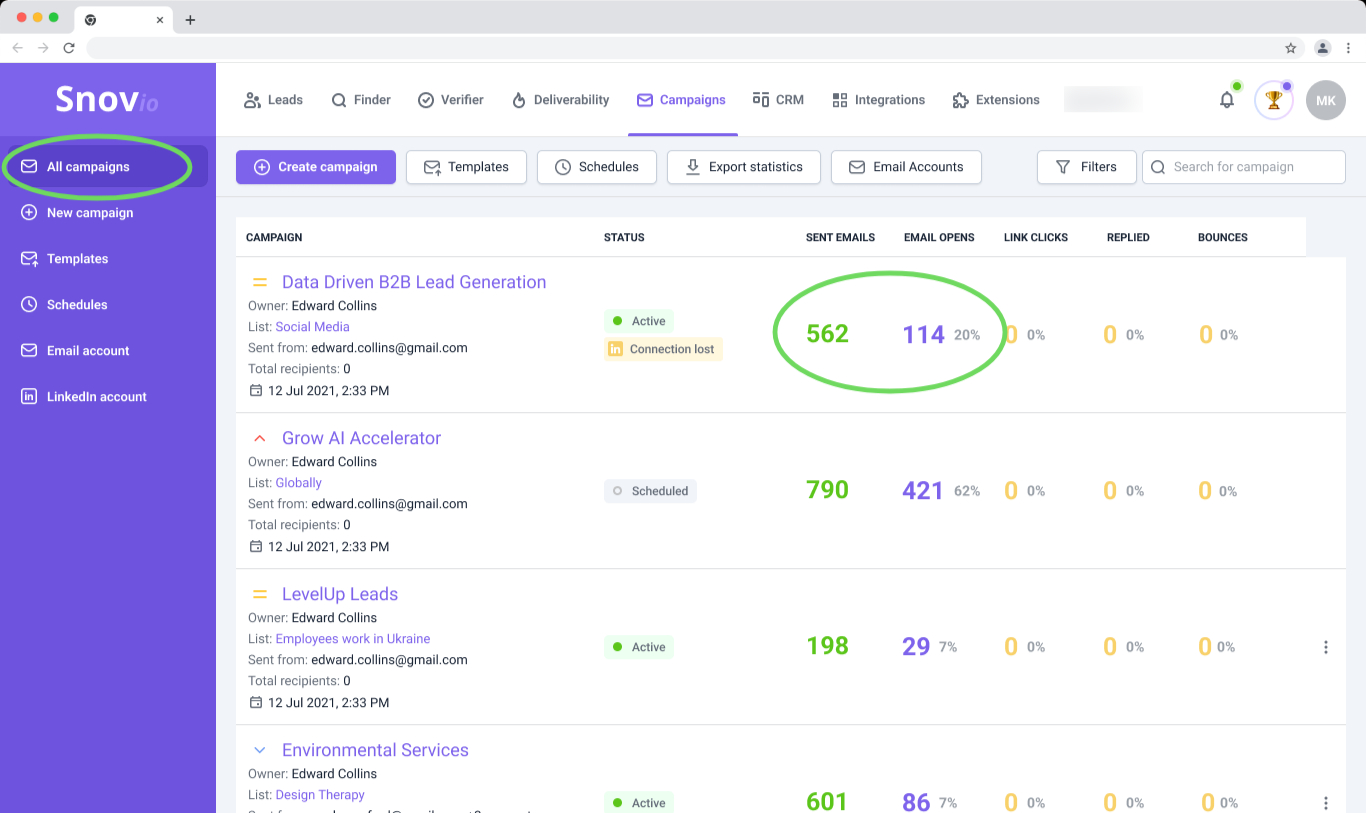
On the Campaigns page, you'll find a summary of all campaigns running for each client in their account. This summary includes key metrics and general campaign details for quick review.
There's an option to select which metrics to display in the campaign preview and hide irrelevant stats. To edit the displayed data columns, use the menu on the right.
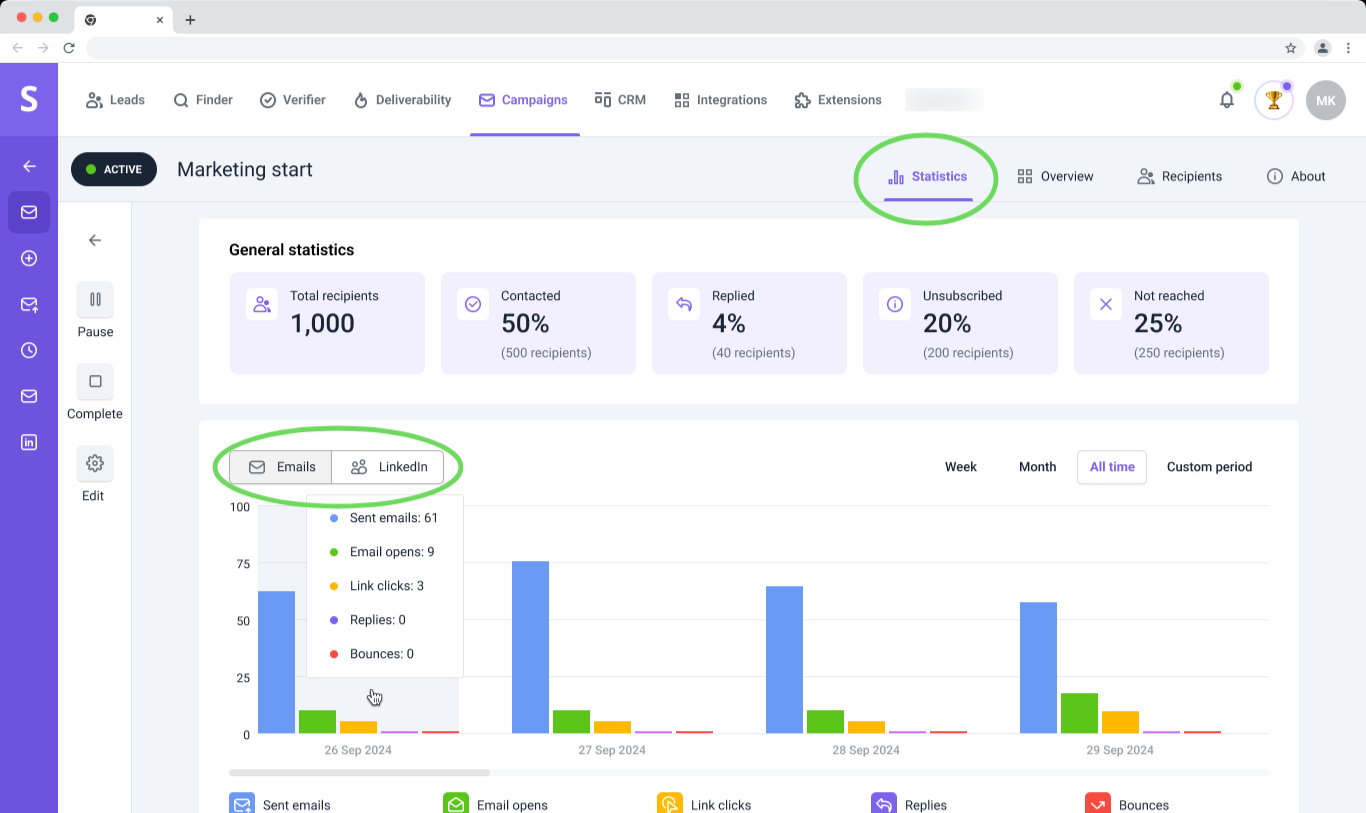
5.1 Review statistics of specific campaigns
To delve deeper into the numbers, each campaign has its own Statistics dashboard, which you can access by clicking on the campaign from the list.
On the campaign's Statistics tab, you can track all the important KPIs per channel (email and LinkedIn) and analyze metrics for completed activities.
You can pick a timeframe to check campaign stats: last week, last month, all time, or a custom date range.
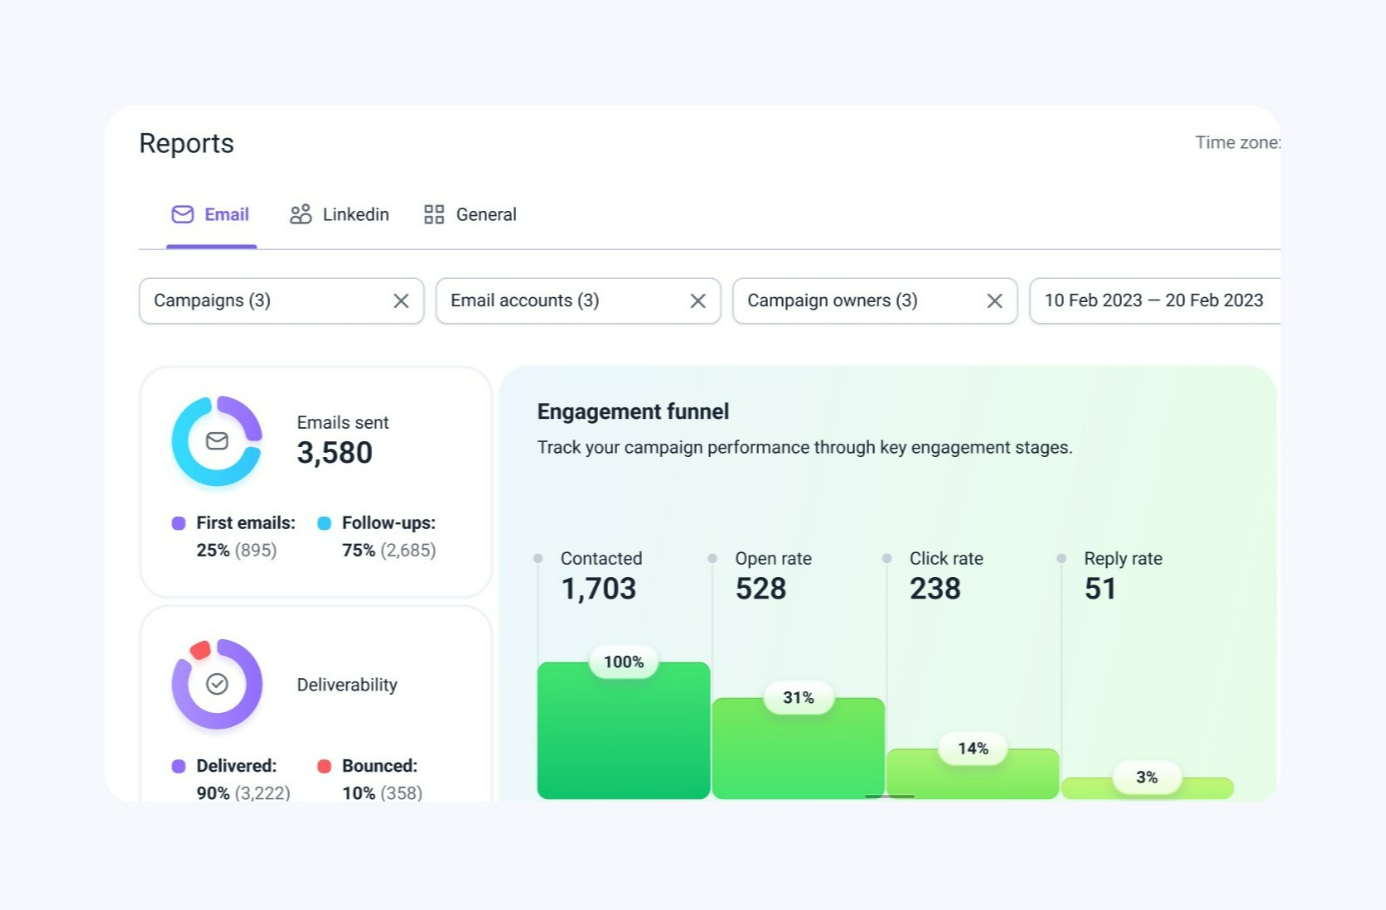
5.2 Review and export campaign reports
While you manage accounts and run campaigns, Snov.io collects statistical data and converts it into tangible analytics. In your account, you'll have a dedicated analytics dashboard for reviewing and exporting performance reports for accounts and campaigns.
To access the reports dashboard, go to Campaigns in the top menu. Choose Reports in the submenu on the left.
Reports are available separately for email and LinkedIn channels, or in the General tab for multichannel campaigns.
The reports dashboard will help you with these tasks:
- Monitor outreach progress through main KPIs
- Reviewing statistics for client accounts and campaigns under your management
- Identifying trends and patterns in account performance
- Exporting metric-based recipient data to share with your team or clients
Read more about the Reports dashboard.
Part VII: How to integrate with other apps and create automations
Snov.io offers several ways to integrate with other software and create automations. See full integrations list.
6.1 Create automations through REST API
Snov.io’s main features are available through API endpoints, letting you automate various processes and tasks. You can use the API to manage recipients and access campaign data.
Here are a few examples of what you can automate:
- Change the status of a recipient in a specific campaign.
- Get statistics for sent emails.
- Get metrics for campaign replies.
- Add contacts to the Do-not-email list.
See full list of API endpoints in the documentation.
6.2 Connect native integrations
Snov.io offers native direct integrations with the most widely used lead management software.
Pipedrive CRM
If you work with leads in Pipedrive, our native integration allows automatic syncing of prospect data. You can transfer Snov.io prospects to Pipedrive for deal management or move Pipedrive contacts to Snov.io for email campaigns.
This integration offers the option to configure automations (up to 24 scenarios) within the integration itself. You can automate routine tasks that consume your time and let the integration handle them.
For example, an activity in Snov.io (like campaign prospect replies) can automatically trigger an action in Pipedrive (such as deal creation).
Learn how to connect Pipedrive integration and set up automations.
HubSpot CRM
If you use HubSpot for lead management, we offer a native integration with this CRM as well. You can set up real-time data syncing or transfer existing lead lists between both platforms.
Learn how to set up Hubspot integration.
Calendly
You can integrate Snov.io with Calendly to add meeting links to your campaign emails.
This integration allows you to follow up with leads based on whether they have booked a meeting.
How to set up an integration with Calendly.
6.3 Create automations with third-party apps via Zapier and Make
Snov.io is one of the apps featured on the Zapier and Make platforms.
We’ve developed several triggers and actions for custom no-code automations with dozens of other services. These automations work through webhooks, where an event in one app triggers an action in Snov.io, or vice versa.
| Snov.io trigger (what starts the automation) | Snov.io action (what follows the event in another app) |
| Campaign email opened | Add email for verification |
| Campaign email sent | Create/Update prospect |
| Campaign link clicked | Search for email |
| Campaign prospect replied | Update recipient’s status |
| New prospect added | |
| Prospect completed campaign |
Support and implementation
Need help with account setup or any features as you start working with Snov.io? Get all the guidance and advice you need from a dedicated Success Manager and priority support from our Customer Care team.
If you have any questions about Snov.io functionality that are not covered in this article, please feel free to contact us at help@snov.io or through our live support chat.
We’ll be there for you every step of the way to show you how to use Snov.io based on your specific use case.

Sorry about that 😢
How can we improve it?