It’s not enough just to craft and send a highly personalized email – you want it to land in your prospect’s inbox, don’t you?
High sender reputation and email deliverability are the key pillars for the success of your email campaigns. However, maintaining these at consistently high levels can be challenging. Unless you conduct an email deliverability audit. This procedure lets you ascertain if your emails go directly into your prospect’s inbox or get sidelined to the promotions folder, or worse, spam.
Many companies tend to avoid conducting email deliverability audits on their own, often because the process can be somewhat tedious. But what if I told you that you don’t have to spend extra money and can handle it all by yourself?
I’ve navigated through this challenge and wish to share some practical tips.
Follow on!
Outline:
What is an email deliverability audit?
An email deliverability audit is a complex process in which you assess how effectively your emails land in the recipients’ inboxes.
Such an audit helps you determine any obstacles that might be preventing your emails from being delivered to your prospects’ primary inboxes. In other words, if your email deliverability audit results are unsatisfactory, you’ll gain insight into why your emails might have low open rates, get bounced, or land in spam.
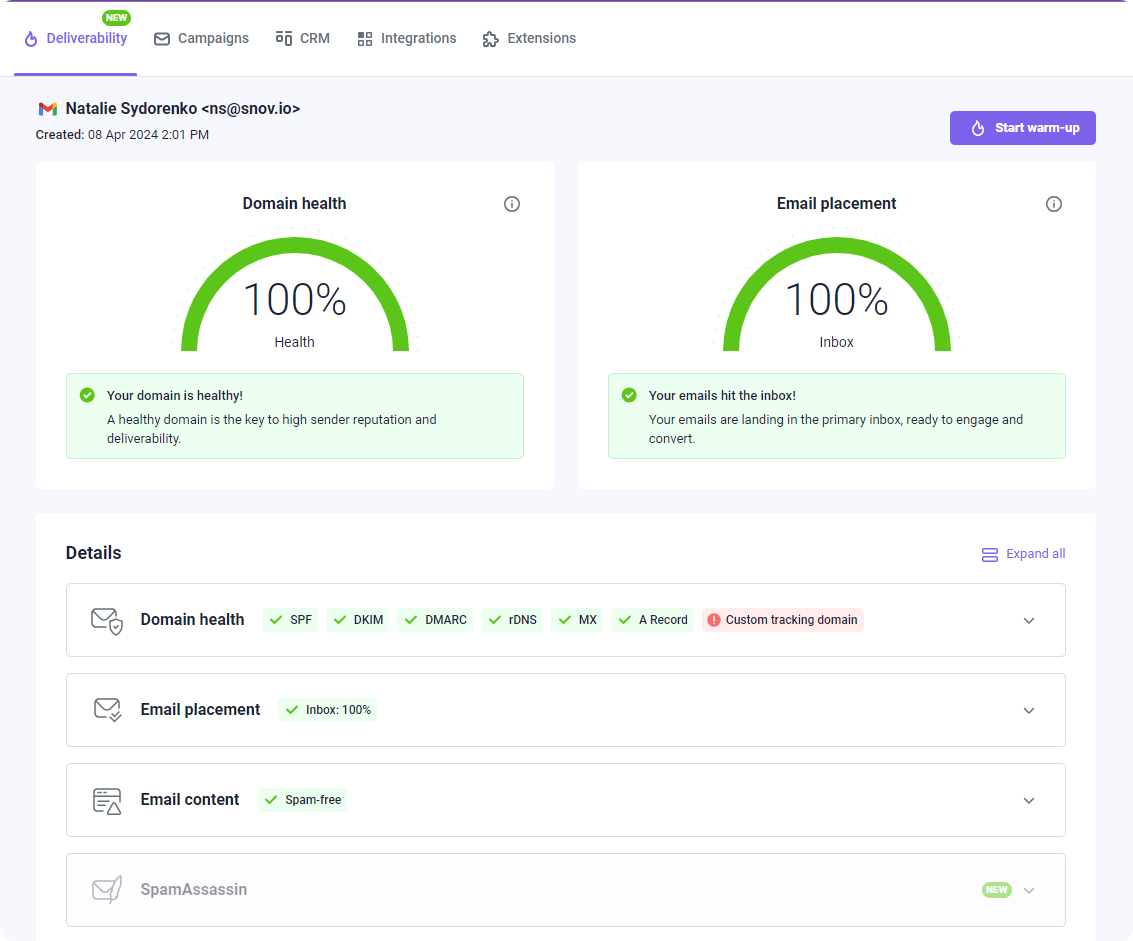
Snov.io Email Deliverability Check
Why is email auditing important?
Imagine pouring your skills into an impeccable email campaign – segmenting your email list, preparing a personalized email copy, perfecting the visuals, and scheduling follow-ups. Ready? Launch!
But then… something goes wrong. Only 5-10% of your target audience saw your email – the majority missed out. That’s devastating!
What should be done?
Consider this analogy: If you were a football coach and you team had just been defeated, what measures would you take to guarantee a win in the next match?
I guess, you’d likely review the recorded game minute by minute, pinpoint mistakes, and delve deep into player statistics to to make necessary improvements, right?
That’s the essence of an email deliverability audit for your outreach campaigns.
Without a retrospective glance at your email perfomance, checking all settings, analyzing open rates, and determining the reasons your messages get bounced or land in spam, all the effort you invest in crafting an impressive pitch might go to waste.
→ To learn everything you need about email deliverability, check out our Ultimate Guide to Email Deliverability
How to do an audit of your email deliverability
An ideal email deliverability audit should comprise four main components:
- Security. This relates to email setup and authentication.
- Reputation. You should assess how you send your emails, considering factors like bounce rates and spam complaints.
- Deliverability. This involves determining where your emails end up: in the primary inbox, promotions tab, or spam folder.
- Content quality. This component boils down to evaluating how your emails perform, whether they’re opened, clicked through, or disregarded.
Ready to go through it all with me?
I’ll show you how you can cope with email deliverability audit easily by splitting the process into seven manageable steps (which I like to call the “7-check approach” to enhance your sender reputation).
Check 1. Monitor your inbox placement rate
Start your email deliverability audit by checking your current inbox placement (or email deliverability) rate. This metric will shed light on how well you perform as an email sender and point out areas for improvement.
The email deliverability rate reveals how successfully your emails reach the intended recipients’ inboxes without being shuffled into spam folders or bouncing back.
With the Snov.io Email Placement Test, you can easily check where your emails land before launching campaigns to guarantee maximum engagement and avoid spam.
Check 2. Configure your technical setup
At this step, audit your email service provider and send a test email to see if it lands in the inbox, goes to promotions, or ends up in the spam folder.
Here’s how I’ve easily done it with Snov.io.
Within Snov.io cold email software, there’s an option to send a test email after its creation:

Once you receive the test email, click “Show original”:

In doing so, I received an audit report confirming that my email met the authentication standards: SPF, DKIM, and DMARC:

Now, let’s demystify these abbreviations:
- SPF (Sender Policy Framework) is akin to an event guest list. This protocol contains a list of IP addresses authorized to send emails on your domain’s behalf. Just as unlisted guests might be turned away at an event, an IP address not included in the SPF record won’t be authorized. If an IP is listed, the email passes SPF authentication.
- DKIM (Domain Keys Identified Mail) is like a digital signature. When you send an email, your server signs it with a unique code. When the recipient gets the email, they use this code to check if its content has been changed during delivery. If the code matches, the email is genuine; if not, it might have been altered. It’s like in the old times when letters were stamped with a seal to ensure it wasn’t broken when the letter arrived.
- DMARC (Domain-based Message Authentication, Reporting, & Conformance) is your email domain’s security guard. It collaborates with SPF and DKIM, guiding email recipients on what to do if they get an email that claims to be from your domain. DMARC’s instructions could be interpreted as, “If the email lacks my SPF or DKIM seal, don’t trust it.” This helps prevent email spoofing and phishing.
|
Important: Prioritize setting up SPF, DKIM, and DMARC before you even start sending your email campaigns. Their correct configuration is pivotal in averting bounces and spam, improving your email deliverability. Learn how to set them correctly from this post. |
Alternatively, you can check your email authentication with Snov.io Deliverability Check. It will analyze your email infrastructure as well as inbox placement rate, providing useful insights on how to improve it:
You can always rely on this tool for regular email deliverability monitoring.
Check 3. Review your sender reputation
Your sender reputation is like your karma in life – it’s shaped by your past actions. During your email deliverability audit, you should check this reputation as well. Specifically, consider both your IP and domain reputations.
IP reputation
Every server has a unique identifier known as an IP address. Sending emails from a specific server links you to its unique IP, enabling ISPs to monitor your IP reputation.
You might be operating on either a dedicated or a shared IP address:
- A dedicated IP address is exclusive to you and not shared. Here, your email reputation hinges solely on your actions, which is generally advantageous. However, note that warming up a dedicated IP can take several months.
- A shared IP address means that multiple email senders use the same IP on a server. Email deliverability, in this case, becomes a collective responsibility.
→ Read our post on how to effectively warm up your email account
You can find the information on your IP address while checking your SPF (Step 1.)

Domain reputation
Domain reputation is the reputation of your domain, i.e., the organization you are sending emails from. Even if you change your IP address or your mailbox provider, the domain reputation will follow your brand.
According to Rostyslav Krasnikov, Sales and Marketing Specialist at Waverley Software, domain reputation brings together a bunch of factors, such as:
- When your domain was born.
- How safe and secure your domain is.
- How do people react to emails from your domain (do they open your emails or ignore them?)?
- How often you hit “Send,” and more.
Major email providers like Gmail, Outlook, and AOL assess your domain’s reputation, assigning it a rating in their databases. A low rating suggests you’re a spammer, and your emails won’t be delivered.
Sales and Marketing Specialist at Waverley Software
Why should you set up a custom tracking domain?
A custom tracking domain is your own unique domain or subdomain you use to track email opens and clicks.
If using an email automation tool without a custom tracking domain, Google might identify a mismatch between your emails and the tool’s default domain.
What’s more, email automation tools commonly lump their users under the same domain. So, if there’s a spammer in this mix, their fraudulent behavior might compromise your deliverability, as your actions will also be associated with spam.
By setting up a custom tracking domain, you shield yourself from reputation issues caused by spammers and improve deliverability.
Tools for checking sender reputation
You can check both your IP and domain reputations with the help of different tools. For a Gmail perspective, try Google Postmaster. All you have to do is enter your sending domain and verify your ownership.
Once your domain is added, Google Postmaster will present insights on domain and IP reputations, along with metrics like SPF/DKIM/DMARC failures, spam feedback, encryption success, and more.


Turn to Microsoft SNDS for Outlook and Hotmail. And for Yahoo and Verizon, rely on Verizon Media Postmaster.
Sales and Marketing Specialist at Waverley Software
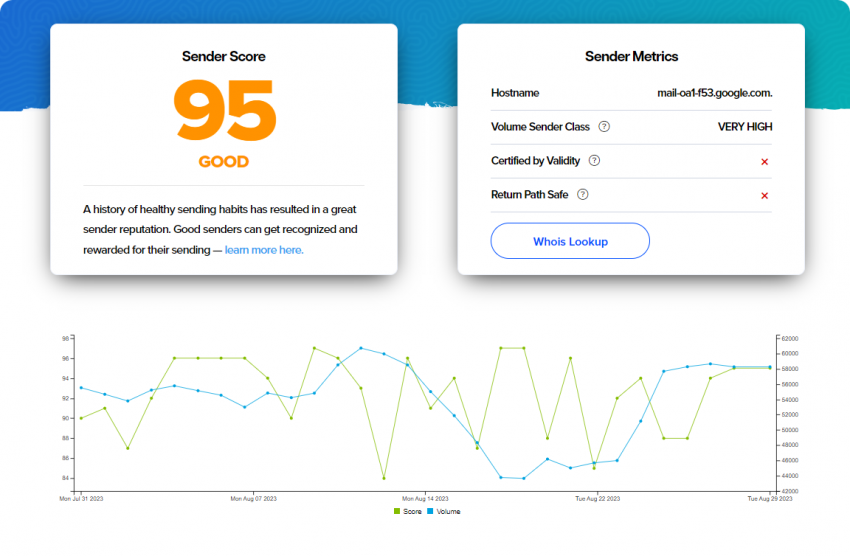
Apart from this, you can rely on the sender score metric to track your sender reputation.
What is a sender score?
A sender score is a number between 0 and 100 that shows the quality of your sender reputation. In other words, it’s the reflection of your sender reputation but in numbers. A sender score is commonly calculated on a rolling 30-day average.
The higher your sender score, the higher your chances to reach your subscribers.

You can check your sender reputation with tools like Sender Score. As you see, I’ve checked my reputation using this tool, and the result delighted me! 🙂
Check 4. Avoid blacklisting and spam
Blacklists are lists of IP addresses and domain names linked to spam activity. Finding yourself on a blacklist is not a joke. It can severely damage your sender reputation, and getting yourself removed can be a challenge.
Below are some of the most widely referenced blacklists that ISPs use to determine whether your IP address or domain name has ties to spam:
It’s crucial to regularly check that you haven’t been added to such lists, and if you find yourself on one, you should thoroughly analyze the reasons and rectify the situation.
A handy tool for this purpose is Mxtoolbox:
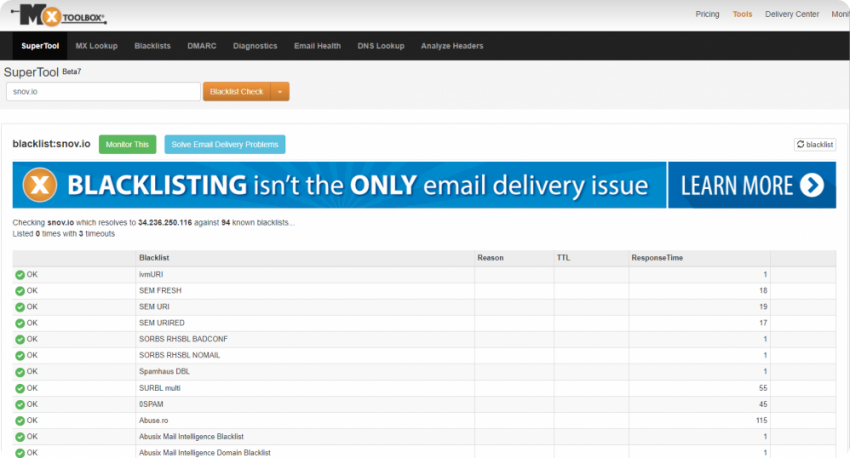
In addition, with MailTester (which I mentioned in Step 1), you can verify if you’re flagged as a spammer. This tool will show you how a famous spam filter, SpamAssassin, evaluates your emails:

It will also show any blacklists on which you’ve been included:

From my own check, I received a favorable score from SpamAssassin, though I was listed on one blacklist.
|
Note: If you use email marketing tools to send cold emails, there’s a chance you could end up on blacklists, even if you’re not genuinely spamming. This can happen because, with some email marketing tools, you send emails via a shared IP—which could also be utilized by spammers. It’s best to use email marketing tools for marketing drip campaigns. For sales outreach, it’s highly recommended to use cold email tools. |
How to avoid blacklists and spam?
Navigating the world of email deliverability can be tricky, and avoiding the pitfalls of blacklists and spam labels is paramount. Here are some strategies to ensure your emails are welcomed by recipients and not relegated to the dreaded spam folder:
- Target the right audience. Avoid purchasing email lists. Focus solely on those email users who align with your ideal customer profile. If your product or service resonates with someone, encourage them to subscribe.
- Segment your email list for more precise targeting, ensuring your content is pertinent to your subscribers.
- Make sure users can easily unsubscribe from your emails. This can be achieved by placing an unsubscribe link in every message or giving recipients an option to unsubscribe by replying directly to your email.
- Create a separate domain and account for different types of campaigns – outbound, marketing, newsletters, and transactional emails. This strategy aids in better responsibility management and maintaining sender reputation.
- Avoid spam-trigger words. Steer clear of phrases and words that are red flags for spam. Such triggers can brand you as a suspicious sender.

How To Avoid Spam Filters: 26 Tips And Tricks
February 11 2026

550+ Spam Trigger Words To Avoid In 2026
December 23 2025
How to respond if you are blacklisted?
Here’s how to proceed with removal from Spamhaus, a blacklist with significant influence given its direct effect on email delivery to numerous domains.
- First, head to the removal center and input your domain or IP address. If you’re the rightful owner, a block notification should’ve been sent to you. This notice will specify the underlying issue, which you must promptly address. For instance, maybe you unknowingly engaged in bulk emailing to an unverified list.
- You should then reach out to Spamhaus, detailing the incident and the measures you’ve implemented to prevent recurrence.
- Upon receiving your message, Spamhaus will respond within a day. You’ll either be informed that your address has been delisted or be given additional steps to complete the removal process.
→ Read our post to learn more about email best practices you can use to get off any blacklist.
Check 5. Craft high-quality email content
Apart from checking for blacklists, you should also asses your email content to ensure it’s suitable for your campaign. Proper content evaluation can help you sidestep the spam folder and improve email deliverability. Tools like GlockApps or Mail-Tester, which I mentioned earlier, can assist in auditing the quality of your email copy and offer suggestions for improvement.
For example, after testing my email copy with Mail-Tester, I received the following feedback:

As you can see, my email didn’t include an unsubscribe link—an oversight that the email deliverability tool promptly flagged.
Check 6. Monitor bounce rates
Monitoring your email bounce rate is a critical component of an email deliverability audit. An email bounce signifies that the recipient’s email provider didn’t accept your message.

The average email bounce rate across all industries is 1.06%, with an acceptable benchmark being 2%. If your email bounce rate exceeds this, it’s a clear signal to focus on refining this metric.
There are two types of bounces: soft and hard bounces.
- Soft bounces are usually due to temporary delivery issues like the recipient’s mailbox being full, a sudden increase in email sending volume, or short-term server connectivity problems.

- Hard bounces, on the other hand, occur due to permanent delivery issues. These can range from sending to non-existent email addresses to spam issues related to your IP or domain.

If email service providers notice a significant number of hard bounces from your end, they might categorize your emails as spam. Not a surprise since mass sending to unverified addresses is a common tactic among spammers.
How to prevent a high bounce rate
To effectively reduce your email bounce rate and foster better communication with your audience, there are several best practices you can adopt. These strategies not only improve deliverability but also enhance the overall health and reputation of your email campaigns:
- Verify email addresses. Regularly ensure the authenticity of the addresses you collect. The best way is to rely on an email verification service (like Snov.io Email Verifier) that can automatically validate your list in bulk.
- Adopt double opt-in. When people sign up, they’ll get a confirmation email. They’ll only join your list after they click the confirmation link, helping you avoid fake addresses.
- Warm up your email account. Before initiating email campaigns, gradually ramp up your sending volume. This prevents servers from being suspicious of your email account. You can put email warm-up on autopilot using tools like Snov.io Email Warm-up.
- Review your email links. Make sure your links are correctly formatted. Use anchored links (e.g., Snov.io) instead of full link addresses (e.g., https://snov.io/)
- Use different accounts for large volumes. Stick to a 100 emails/day/account limit. If your recipient list numbers in the thousands, spread your campaigns across multiple sender accounts.
- Match your sender provider with the recipient’s provider. Emails sent from Gmail to Gmail or from Outlook to Outlook have a better chance of landing in the inbox. Use Snov.io for automatic provider matching.
Check 7. Check user engagement with your emails
Email providers often associate low email open and click-through rates with unwanted emails. If a large portion of your subscribers isn’t consistently engaging with your emails, then, over time, more of your emails might end up in the spam folder.
Thus, a regular audit of how users react to your emails is a must. This practice will not only allow you to take control of your email metrics but also inspire you to craft more enticing email messages. The result? Improved sender reputation and overall inbox placement.
Of course, if you’re sending bulk email campaigns, you most probably won’t be able to handle email performance tracking manually. But don’t get discouraged. There are numerous automation tools that can do email tracking on your behalf.
For example, Snov.io Email Tracker shows whether the recipient has opened your email right within Gmail, marked by a specific label:

Apart from tracking opens and clicks, you should regularly check your unsubscribe rate to understand how you can better this metric.

If your rate is higher than 0.23%, it’s time to pause or halt your campaign and brainstorm ways to improve the user experience with your emails.
What should you do to improve the user’s experience with your emails?
If you find out that your users’ engagement with your emails leaves much to be desired, consider the following tips to improve it:
- Segment your email list and send relevant emails
- Balance frequency and timing
- Improve your subject lines
- Personalize your approach
- Never stop A/B testing
- Optimize your email campaign for all devices
→ Read this post for more tips on how to make users more engaged with your email campaigns.
Wrapping up
And that’s a wrap! I’ve walked you through an email deliverability audit with this easy 7-step approach, highlighting the tools you can use at each stage absolutely free of charge. Here’s a quick summary of the 7 checks:
- Check 1. Inbox placement rate
- Check 2. Technical setup (SPF, DKIM, and DMARC standards)
- Check 3. Sender reputation
- Check 4. Blacklisting and spam
- Check 5. Email content
- Check 6. Bounces
- Check 7. User engagement with your emails (opens, clicks-though, unsubscribes)
While the process might initially appear intricate due to its technical aspects, with Snov.io Email Deliverability Check, you’ll test all the above aspects of your inbox placement automatically. Moreover, Snov.io equips you to properly warm up your email account, ensuring secure email outreach and a high sender reputation.

